Quest® On Demand Migration cloud application lets you create migration projects to perform the following:
Accounts and User Data Migration
Account migration
- Analyze the structure of your Microsoft Azure Active Directory and get reports on the problems that might adversely affect the migration.
- Migrate users, groups, and the related information between tenants.
- Migrate hybrid accounts synchronized with on-premises AD
- Provide robust project management interface and in-depth progress reporting.
- Provide coexistence services for transition period before migration process will be completed:
- Address Rewrite Service to change the message header as if the target mailbox is already used by sender.
Mail migration
- Migrate Microsoft 365 mailboxes and share free/busy information between tenants.
Content Migration
OneDrive for Business
- Analyze OneDrive for Business on your source tenant
- Transfer OneDrive for Business data and settings.
Public Folders
- Analyze Public Folders on your source tenant and get hierarchy information, content information and email addresses for mail-enabled public folders
- Migrate Public Folders and the related information between tenants
- Provide robust Public Folders migration management interface and in-depth progress reporting.
Microsoft SharePoint
- Analyze SharePoint on your source tenant
- Map existing SharePoint sites (previously site collections) in the source and target tenants for further processing
- Migrate SharePoint sites (previously site collections) to the target tenant
- Provide robust SharePoint migration management interface and in-depth progress reporting.
Microsoft Teams
- Analyze Microsoft Teams on your source tenant
- Create Microsoft 365 Groups with Teams functionality on the target tenant
- Provision Microsoft Teams on the target tenant
- Migrate Microsoft teams including content to the target tenant
- Provide robust Microsoft Teams migration management interface and in-depth progress reporting.
Power BI
- Analyze Power BI content on your source tenant
- Assign Connection Profiles
- Match Gateways
- Migrate Connections
- Migrate Workspaces
- Provide robust Power BI migration management interface and in-depth progress reporting.
On Demand Migration is a part of Quest On Demand – a single SaaS console for managing your cloud environment in Microsoft Azure. For more information, see Quest On Demand documentation.
To get access to On Demand Migration, you must sign up for the Quest On Demand service.
- Go to the web page quest-on-demand.
- On the Welcome to Quest On Demand page, click Sign in with Microsoft. See Signing in to On Demand for more information.
|

|
NOTE: Signing in using your Microsoft MFA-enabled account
If your organization requires multi-factor authentication and you receive an authorization error, your conditional access policy may not be configured correctly. You can take one of two actions:
- Contact your IT administrator to deactivate MFA during migrations.
- Contact "Azure Identity" support for help with configuring conditional access policies.
|
- Accept the Software Transaction Agreement before using this product.
- As part of the login process with Microsoft Entra ID, you must consent to the set of minimal permissions required by the Quest On Demand application.
- Create an organization. See Creating an organization for detailed steps.
Use of this software is governed by the Software Transaction Agreement found at www.quest.com/legal/sta.aspx and the SaaS Addendum at www.quest.com/legal/saas-addendum.aspx. This software does not require an activation or license key to operate.
Trial subscriptions are available. Visit Quest® On Demand Migration page for more information and pricing: https://www.quest.com/products/on-demand-migration/
In this topic:
To start a trial subscription
|
|
NOTE: You can use the product free during the 30-day trial period with a limited number of users that can be migrated. |
- Open https://www.quest.com/products/on-demand-migration/.
- Scroll down to the module you want to try and click Try Online.
- To proceed you should read and accept license agreement.
- Select Sign In for your Free Trial option to use your existing Quest account, or Create a Trial account option to create a new account.
- You will receive an email containing step by step instructions on starting your trial period for the product.
The following table shows the trial license limits:
|
Accounts |
5 Accounts |
none |
|
Email |
5 Mailboxes |
5 GB content per mailbox |
|
OneDrive |
5 Accounts |
256 files or 256 MB per OneDrive account |
|
SharePoint |
5 SP sites |
5 GB content per SharePoint site. ODMSP will not discover sites with more than 5 GB. |
|
Teams / M365 Groups |
5 Teams or Groups |
5 GB content per Teams or M365 Groups |
|
1x1 Chats |
5 Accounts |
The most recent 2 conversations and messages up to 30 days per conversation |
| Power BI |
5 Accounts |
none |
To purchase a commercial subscription
- Open https://www.quest.com/products/on-demand-migration/.
- Click Request Pricing and fill in the necessary details.
- Click Contact Sales to request pricing and get help with your business needs.
The product licensing is based on the number of unique source accounts processed by the migration tasks. The licenses are only consumed once the migration task is started.
The following object types do not consume any license,
- Group mailboxes
- AD Groups
- Contacts
- Exchange resource mailboxes
- public folder mailboxes
- room mailboxes or equipment mailboxes
- shared mailboxes
- Guest accounts
- Computer accounts
|
|
NOTE: The license is permanently assigned to the source account may only be used for one migration project, and you can use this account in any number of tasks (migration, re-matching, etc.) from one environment to another environment.
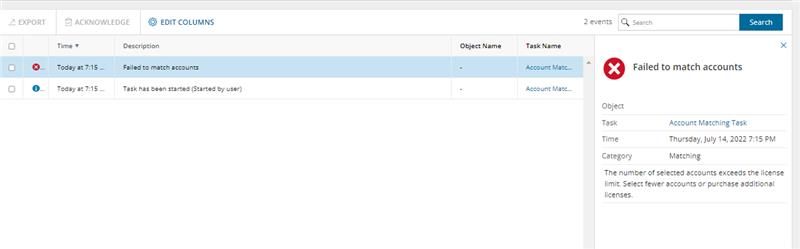
The matching task will result in the error message shown in the image below, in case the number of users in the task exceeds the number of available licenses.
For commercial licenses, there are no content migration data limits for OneDrive, SharePoint, mailbox and public folders. |
To view the license report
License consumption data is available as you work through your migration project.
|
|
NOTE: License data before October 18th 2022 displays only the Licensed user email and the corresponding Consumed On column value indicates the date when the data was uploaded. |
- Log in to Quest On Demand and choose an organization if you have set up multiple organizations.
- From the navigation pane, click Migration to open the migration dashboard. You must create at least one project to view the dashboard.
- Click View License Report to open the License Report workspace.
- Click List View to open the list of consumed licenses. The columns in the table are as described below:
- Consumed On - date and time the license was consumed.
- Signed-in user - user name of the person who consumed the license.
- Licensed user email - User Principal Name (UPN) of the signed-in user
- Task name - name of the task that consumed the license.
- Task type - type of task that consumed the license
- Project - name of the project where the license was consumed.
- Click Edit Columns to show or hide columns in the list.
To export licenses consumption data
- Log in to Quest On Demand and choose an organization if you have set up multiple organizations.
- From the navigation pane, click Migration to open the migration dashboard. You must create at least one project to view the dashboard.
- Click View License Report to open the License Report workspace.
- Click List View to open the list of consumed licenses.
- Select the rows that you want to export. Then click Export. A CSV file will be downloaded to your default download folder.
- Open the downloaded CSV file to view the exported information.
To search for licenses consumed
- Log in to Quest On Demand and choose an organization if you have set up multiple organizations.
- From the navigation pane, click Migration to open the migration dashboard. You must create at least one project to view the dashboard.
- Click View License Report to open the License Report workspace.
- You can search for consumed licenses in two ways:
- Use the following predefined filters:
- License Consumption - filters the list based on the following consumption periods: Last 7 days, Last 30 days, All
- Task Type - filters the list based on the selected task type. The following values are available: Account Migration, Mail Migration, OneDrive Migration, Teams, Chats, All
-or-
- Enter the full or partial name of the user in the search field. Click Search. The list of licenses consumed by the user is displayed.
To view the license summary
- Log in to Quest On Demand and choose an organization if you have set up multiple organizations.
- From the navigation pane, click Migration to open the migration dashboard. You must create at least one project to view the dashboard.
- Click View License Report to open the License Report workspace.
- Click Summary to open the summary view of consumed licenses.
- The two report tiles contain the following information:
- Licenses Consumed
- Last 7 days - number of licenses consumed in the previous 7 days.
- Last 30 days - number of licenses consumed in the previous 30 days.
- All - total number of licenses consumed.
- Licenses
- Total ODM licenses - total number of licenses from active migration subscriptions only.
- Used ODM licenses - total licenses used that include active and expired migration subscriptions.
- Total Teams only licenses - total Teams migration licenses from active migration subscriptions only.
- Used Teams only licenses - total Teams licenses used that include active and expired migration subscriptions.
- Reserved by matches - number of licenses reserved but not consumed after accounts in the source tenant are matched with accounts in the target tenant. You can release the reserved licenses when you unmatch the accounts using the Clear matching task.
When you sign up for the On Demand service for the first time, you create an organization and you are granted the On Demand Administrator role. You can add additional organizations and administrators.
For more information about managing your organization see Managing organizations and regions in the On Demand Global Settings User Guide.
Some common actions with Organizations are reproduced here for your reference:
Creating an organization
- Sign in to Quest On Demand.
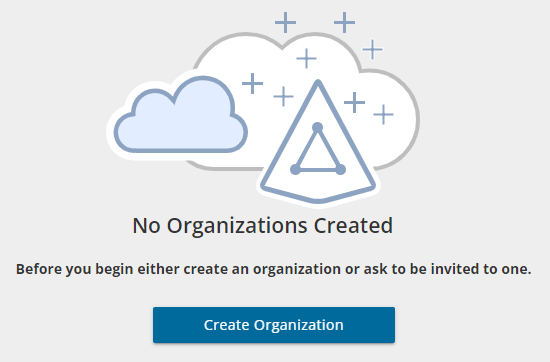
- If you have not yet created an organization, click Create Organization.
If you have created one or more organizations, the Choose an Organization page opens. Click Create New Organization.
If you have already selected an organization, click your email address at the top right-hand corner of the page and the select Create Organization.
- In the Create Organization page, specify the following information:
- Organization Name - name of your organization. For example, Big Box Inc.
- Deployment Region - A Microsoft Azure region or geographic area where data centers are deployed. Not all On Demand modules are available in all regions.
- Click Create Organization.
Switching to another organization
If you have multiple organizations associated with your email address, you can select an organization from the Choose an Organization page when you sign in. If you have already selected an organization but want to work with another organization, you can switch to another organization.
- Click your email address at the top right-hand corner of the page.
- Select Switch Organization. The Choose an Organization page opens.
- Highlight and click the organization to which you want to switch.
Renaming an organization
You can rename the organization to which you are currently signed in. You must be an On Demand Administrator to rename an organization.
- Sign in and select the organization that you want to change.
- Click your email address at the top right-hand corner of the page.
- Click the organization name. The Edit Organization page opens.
- In the Organization Name field, enter the new name.
- Click Update Organization Name. The organization name is updated.
Deleting an organization
|

|
Caution: Deleting an organization cannot be undone. |
- Sign in and select the organization that you want to change.
- Click your email address at the top right-hand corner of the page
- Click the organization name. The Edit Organization page opens.
- Click Delete Organization. A confirmation page opens.
- Select the following check boxes to confirm that you understand the impact of deleting an organization.
- All tenants will be removed
- All user information will be lost
- Click Delete Organization.
