Introduction
Domain Move or Domain Cutover is a powerful feature of On Demand Migration for Active Directory. After a tenant mailbox and group migration, the next step during a domain consolidation or divestiture project is to move any registered Microsoft 365 Domains (i.e. Exchange Online Accepted Domains) from one Microsoft 365 tenant to another.
Manually moving a domain from one Microsoft 365 tenant to another is a tedious, multi-step, intensive procedure that must be carefully planned and executed at the proper time to ensure a seamless user transition. One of the biggest obstacles during this process is that email sent to the domain is not deliverable because it is held until the move is complete. This can cause delays, lost messages and decreased productivity.
The On Demand Migration for Active Directory Domain Move is the solution. This powerful feature guides the migration operator through the entire domain move process and automates many of the steps. It works in conjunction with the Email Relay Service (ERS) to maintain the ability to deliver mail throughout the move. Mail is never held but is delivered on time, ensuring your users never miss any business-critical messages.
This quick-start guide explains how to configure On Demand Migration Active Directory Domain Move service to move a domain between two Microsoft 365 Hybrid tenants.
Differences between Basic and Advanced Email Relay Service
One of the biggest obstacles during this process is that email sent to the domain in transit is not deliverable because it is held until the move is complete. This can cause delays, rejected messages and decreased productivity. On Demand Migration for Active Directory addresses these concerns with the Email Relay Service (ERS). ERS provides the administrator two options on how email should be delivered during a move:
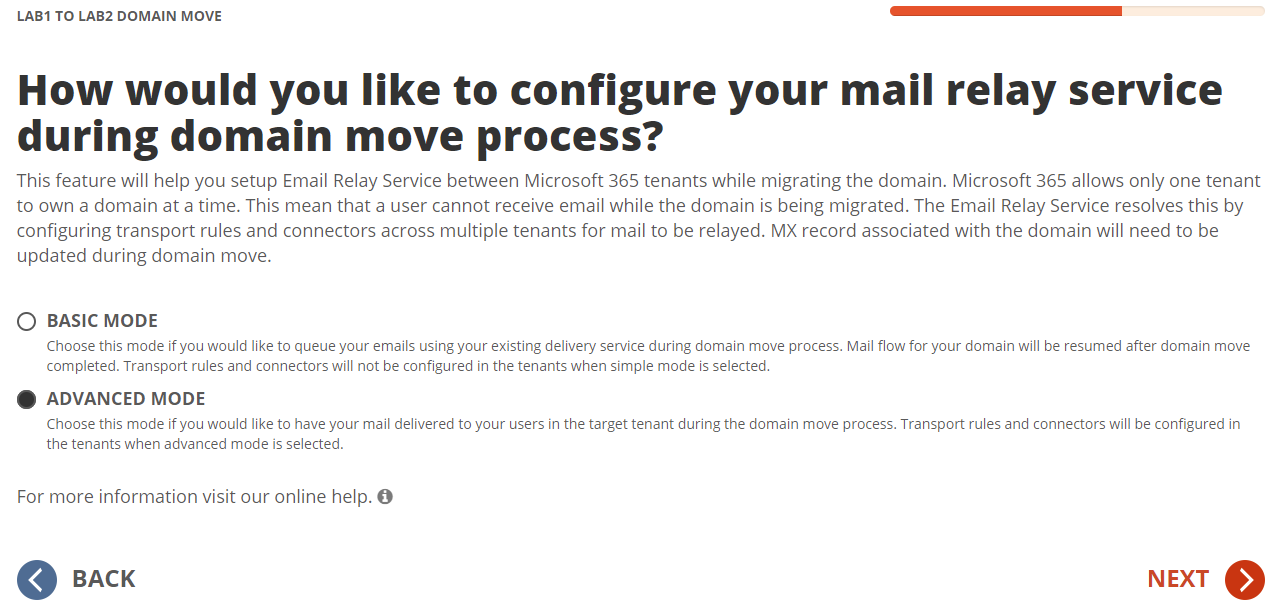
Basic Mode
Choose this mode if you would like to queue your emails using your existing delivery service during the domain move process. Mail flow for your domain will be resumed after the domain move has completed.
Basic Mode is easy to setup and requires no configuration changes to the tenant. Tenant administrators have the option to hold the email message delivery while the domain is being moved or to send the email messages to their own relay service provider for final delivery. In this mode, the directory synchronization component of On Demand Migration for Active Directory will facilitate the move for email addresses and domain names between tenants but it will not be responsible for the mail flow.
Basic Mode is the best choice when:
- Only a handful of objects associated with the tenant and the domain move process will be done within a couple hours.
- Continuous email delivery during domain move is not a requirement, and messages can be queued for delivery after domain move is completed.
- Custom Transport rules and connectors are not allowed in Exchange Online for either source or target tenant.
Advanced Mode
Choose this mode if you would like to have mail delivered to your users in the target tenant during the domain move process. Transport rules and connectors will be configured in the tenants when this mode is selected.
Advanced Mode offers a full coexistence experience for end-users that are affected by the domain move. It relays incoming email messages sent to the source user mailboxes to their matching target user mailboxes. The benefit of choosing Advanced Mode is there is no email disruption while the domain is being moved.
Advanced Mode is the best choice when:
- A large number of objects are associated with the tenant and the domain move process is expected to take hours.
- Continuous email delivery during the domain move is a requirement. Mission critical systems and businesses are impacted when email delivery is suspended.
- Custom Transport rules and connectors are allowed in Exchange Online for either source or target tenant.
Requirements
General
- Client is licensed for On Demand Migration for Active Directory Domain Move
- One Global Administrator Account for each Microsoft 365 tenant
- One Domain Administrator Account for each On-Premise Active Directory attached to the tenant
- One dedicated server to install the Directory Sync agent
- Permissions to download and install Directory Sync agent
Hardware
The local agent must meet the following minimum hardware requirements:
- At least one (1) Windows Server 2012 R2, 2016 or 2019
- Additional Windows servers may be deployed; limit of 5.
- CPU: 4 Cores
- Memory: 4GB Free
- Disk: 40GB Free Disk Space excluding Operating System.
|

|
NOTE Do not install local agents on AD domain controllers in a production environment. |
Software
The local agent must meet the following minimum software requirements:
- Windows Server 2012 R2, 2016 or 2019
- .NET 4.5.2. ( .NET will automatically be installed if needed)
- TLS 1.2 or higher
Domain and Forest Functional Levels
Network
- Directory Sync web interface use TCP port 443 (HTTPS).
- Agent web connections use port 443 to Directory Sync host application.
- DCs use TCP ports 139, 389 (UDP), 445, and 3268.
- SID History functionality uses TCP ports 135, 137-139, 389 (UDP), 445, 1027, 3268, and 49152-65535.
Accounts
- Local Active Directory Account
- Agent installer will prompt for a domain account with permission to read and write on-premises Active Directory.
- An agent intended to sync all domains in a forest must have rights to all domains and objects used in workflows.
- Microsoft Entra ID Application Account
- An account with Global Administrator Role is required to grant permissions and establish connection when adding a Cloud Environment.
- Microsoft Entra ID PowerShell Accounts
- Two (2) PowerShell accounts are automatically created to read and update objects in the cloud. To do this an OAuth token is used from the account used to add the Cloud Environment.
- These PowerShell accounts do not require any Microsoft 365 licenses.
On Demand Migration Project Setup
This topic describes how to set up the On Demand Migration Domain Rewrite Project.
Adding a Microsoft 365 tenant
Follow these steps to add each Microsoft 365 tenant for On Demand Migration. If there is an existing tenant from another project, it can be reused.
- Log in to Quest On Demand.
- Navigate to Tenants. The Office 365 Tenants page opens.
- Click Add Tenant. The Add Tenant page opens.
- Select Add Commerical or GCC Tenant. You are redirected to the Azure sign in page
- Log in with your Global Administrator account for the source tenant.
- Accept the requested Application Permissions
- Click Finish.
- Repeat steps 2 – 8 for the target tenant.
Setting up the Domain Move Project
Follow these steps to setup the Domain Move Project.
- Log in to Quest On Demand.
- Navigate to Migration.
- Select an existing migration project
- Click Domain Move from the Project Dashboard.

- Once the On Demand Migration Active Directory module is loaded, click on the Domain Move icon in the main dash view.
- Click New Project to start the project setup wizard.
- Provide a name and description for the project and click Next.
- Click New to create a new environment or choose any existing environments from the list. Click Next once you have at least two environments selected.
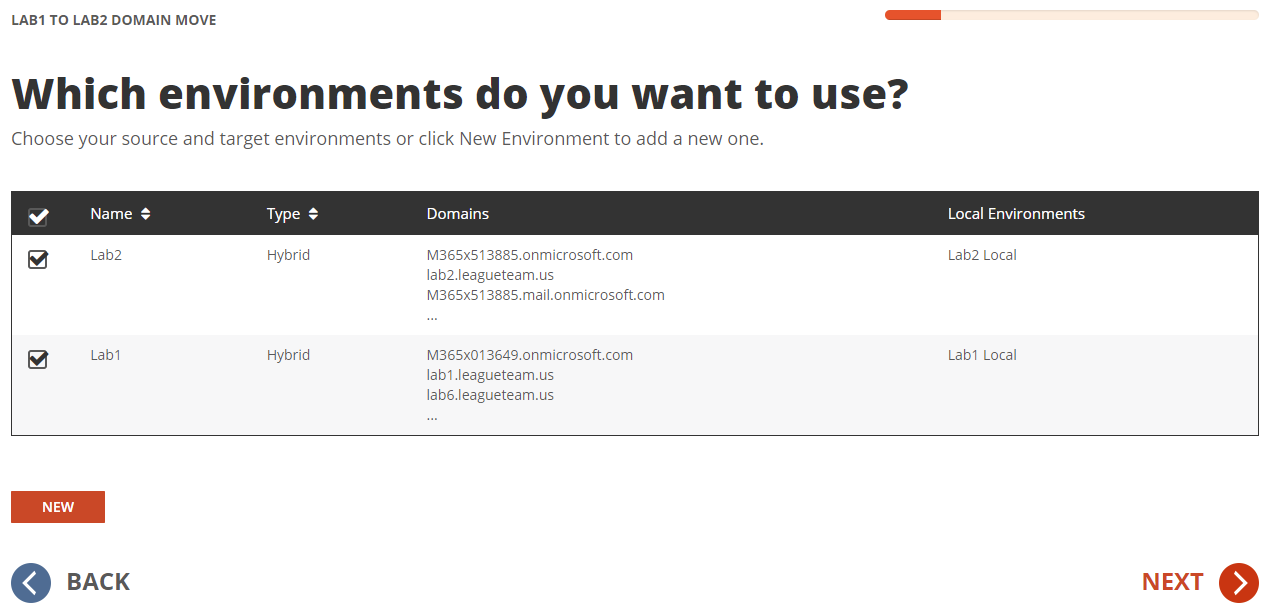
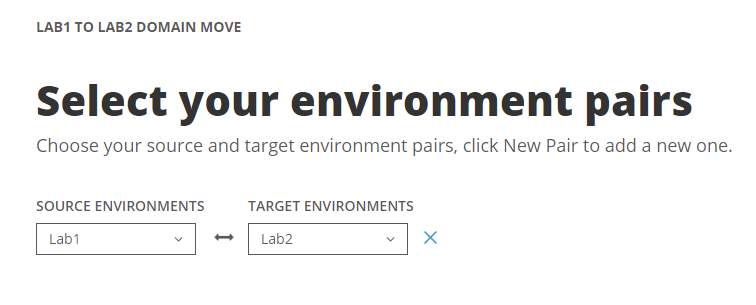
- Choose the source and target environments from the dropdown menu and click Next.
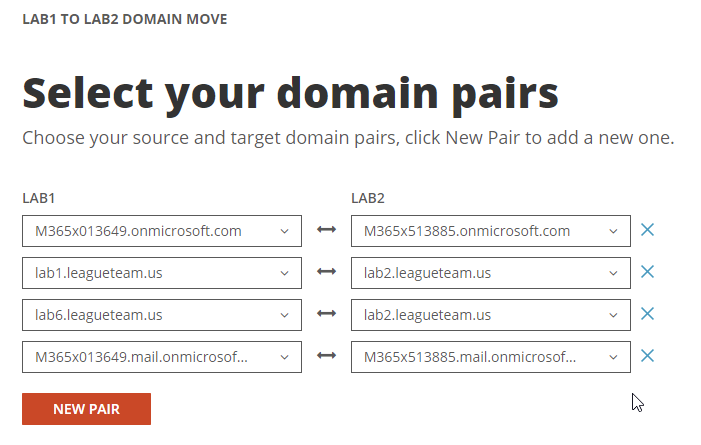
- Configure the domain mapping for your project and click Next.
|
|
NOTE Do not install local agents on AD domain controllers in a production environment. |
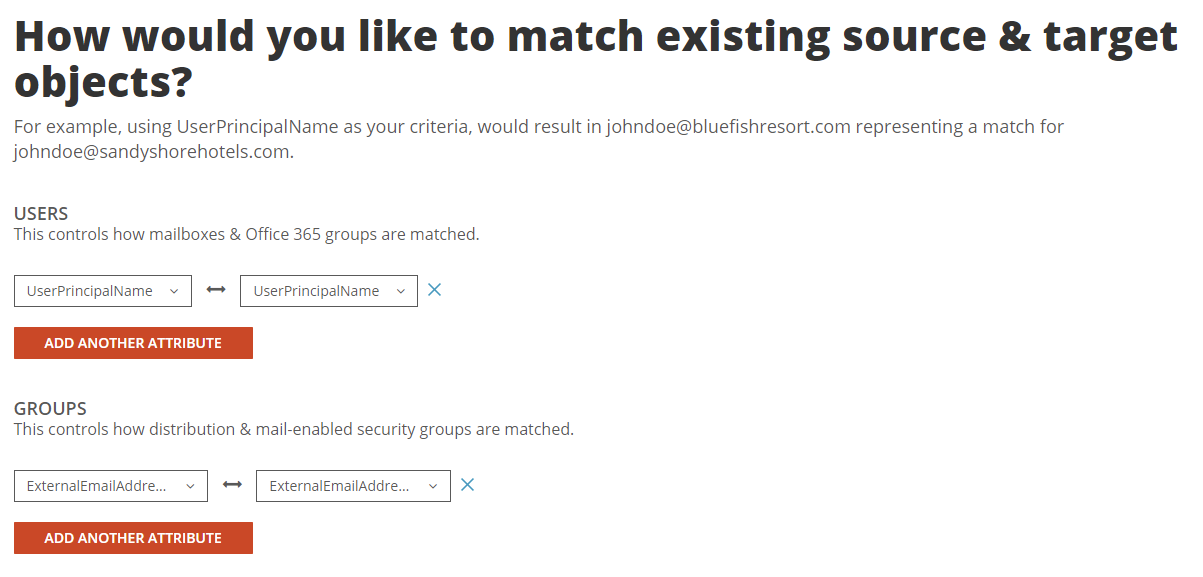
- Configure the attributes to use to match users and groups. Once complete, click Next
|
|
NOTE Multiple attributes can be selected and On Demand Migration will evaluate each one until it finds a matching source and target object. If more than one attribute is selected, the first attribute that matches is used. |
- Copy the Directory Sync agent Registration URL and Registration Key and click Next. This information can be obtained again after the project is configured.
- On Demand Migration for Active Directory offers two email relay service modes. For the purpose of this guide, select Advanced Mode and click Next
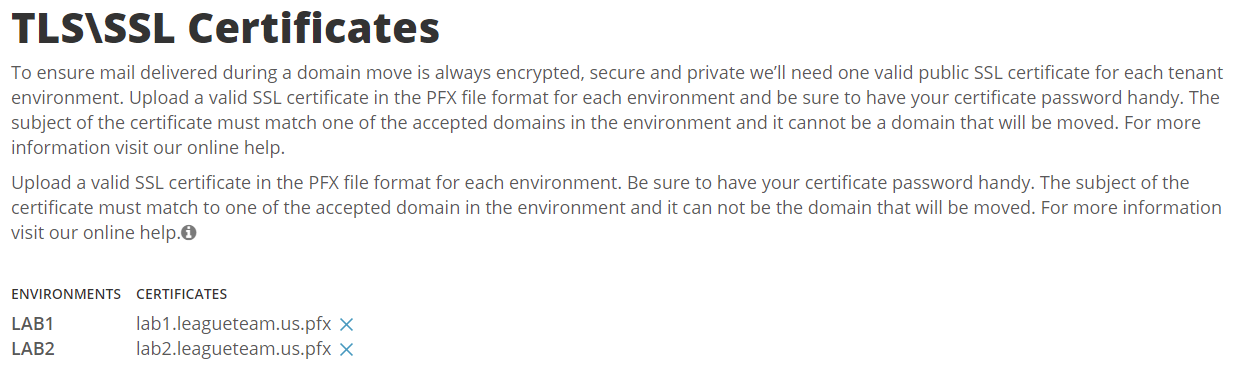
- Upload a SSL Certificate for each environment. On Demand Migration for Active Directory will ensure mail delivered during a domain move is always encrypted, secure and private by using this SSL Certificate. Click Nextonce the certificates are uploaded.
Important Tip: A single subject certificate with both private and public key must be used.
- Review the project configuration settings and click Next
- Enter an email address and click on Start Discovery to finish the project setup
Configuring Directory Sync Agents
This section provides a step-by-step guide on how to deploy and configure the Directory Sync Agents.
- Log in to Quest On Demand.
- Navigate to Migration.
- Select the Domain Move project previously configured.
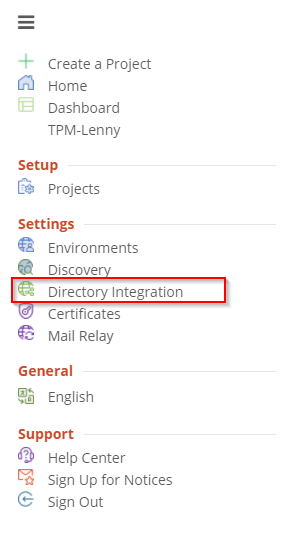
- Open the navigation menu and click Directory Integration.
- Download the Directory Sync Agent.

- Copy the agent file to a dedicated directory sync server for the source tenant and run the installer.
- Click Next when the installer loads.
- Accept the License agreement, Click Next.
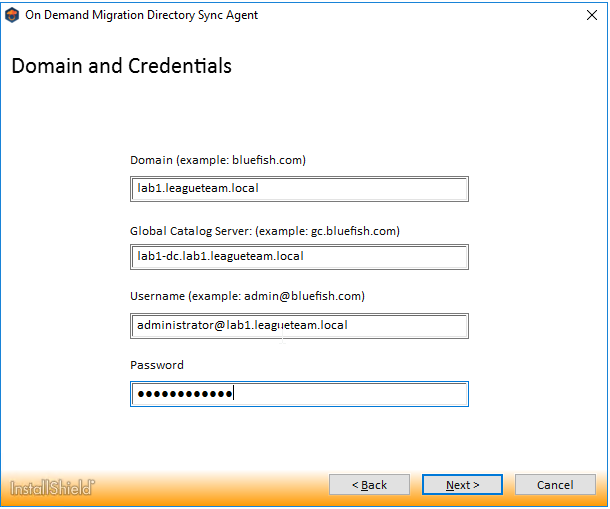
- Enter the domain, GC, and credential for the service account, click Next.
- Enter the Registration URL and Registration Key for the agent associated with the source tenant, click Next.

- Select Run as System Account option, click Next
- Skip the SID History Migration setting and click Next
- Allow the agent to be installed and close the installer.
- Repeat Steps 1-13 for the target tenant Directory Sync agent.
Configuring Directory Integration
This section provides a step-by-step guide on how to deploy and configure the Directory Integration for Domain Move Project.
- Log in to Quest On Demand.
- Navigate to Migration.
- Select the Domain Move project previously configured.
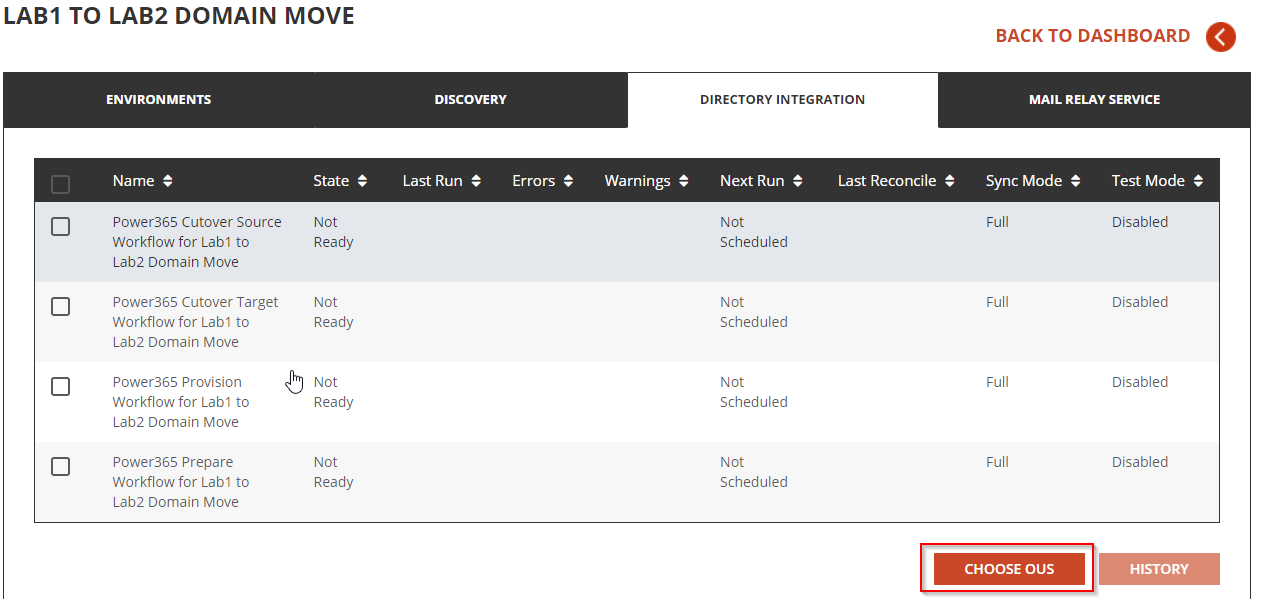
- Open the navigation menu and click Directory Integration.
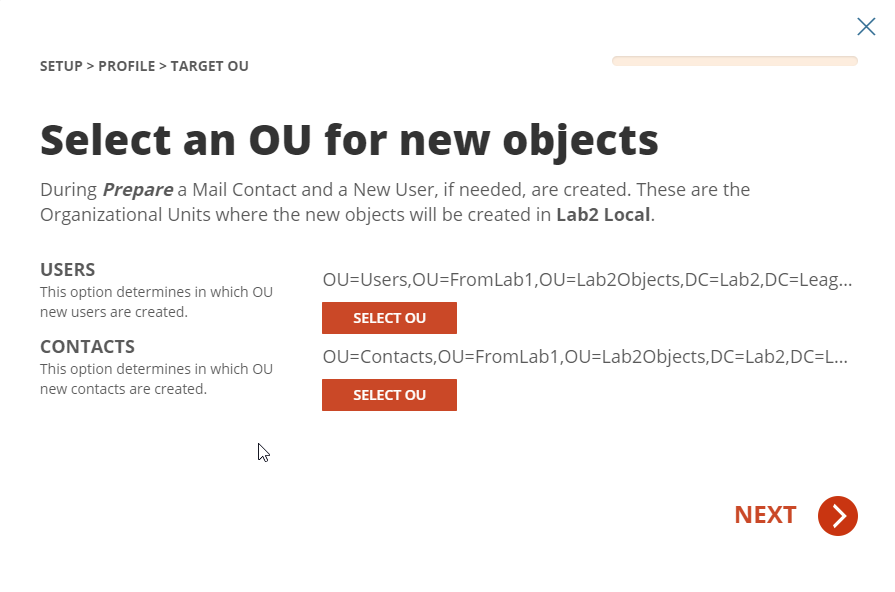
- Click Choose OUs to finish the On-Prem Active Directory integration.
- In the pop-up window, click Select OU and choose an OU for the Users and Contacts in the target Active Directory. Click Next and choose the OU for the source Active Directory. Click Finish to close the pop-up window.
|
|
NOTE Domain Move projects will not create any objects in the source or target Active Directory; it simply requires this OU information to complete the project setup. |
Validating Object Matches
This section provides a step-by-step guide on how to validate object matching.
- Log in to Quest On Demand.
- Navigate to Migration.
- Select the Domain Move project previously configured.
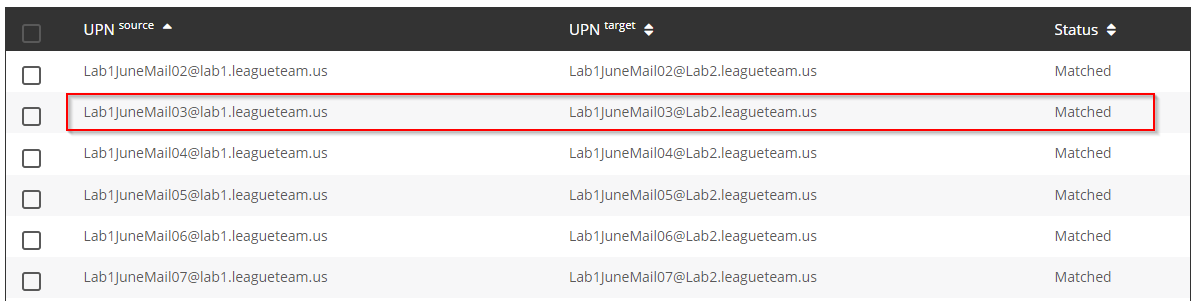
- From the Domain Move Project dashboard, verify the Users, Groups and Domain Matching information:

- Click on the total users link to see all Users, then click Filter and select the Matched checkbox.
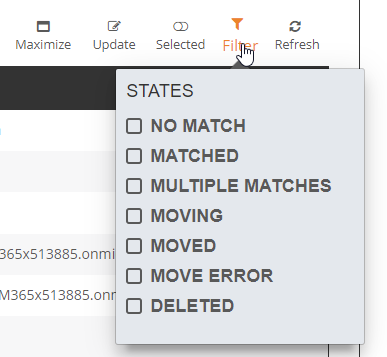
- Validate that the users are correctly matched, as shown below.
- Repeat step 10 - 12 for Groups.
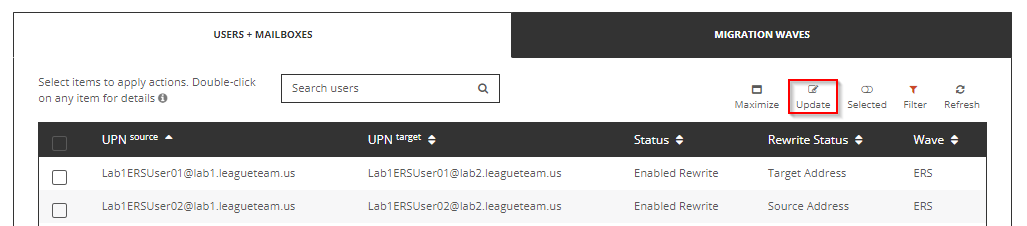
If the Domain Move project is unable to automatically match the users by attributes, you can upload a user list to be used as a mapping file. This process will only update the users found in the file and will not impact any other users in your project.
Uploading a CSV for User Matching
- Click Update to open the CSV upload wizard.
- Click Download Example List.
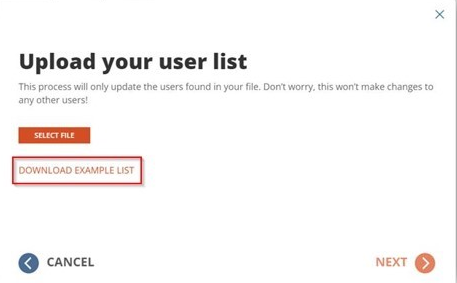
- Use this example file to build your mapping list.
- Populate the Source UPN and Target UPN columns with the desired mappings.
- You can leave the Wave column blank.
- The mapping list can contain a maximum of 1000 lines. You can create multiple mapping files and rerun the wizard to upload additional mappings.
- After building your list, save as a CSV file.
- Click Select File.
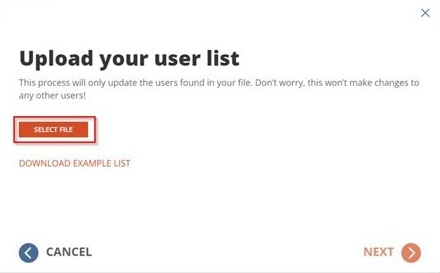
- Locate the CSV file and click Next.
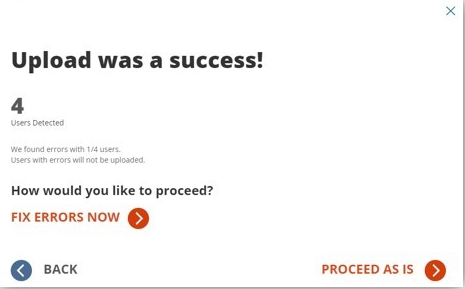
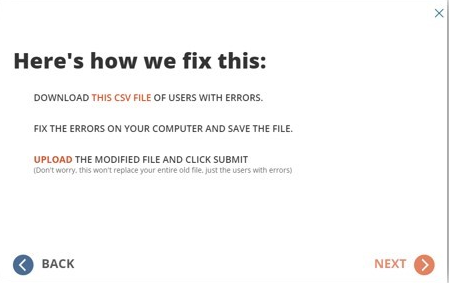
- If there are errors within the file, click Fix Errors Now to review the errors.
- Download the CSV file of users with errors.
- Examine the file and fix any errors found.
- Re-upload the modified file.
- If errors are still found, you can repeat this process as necessary.
- You can also click Proceed As Is to ignore the accounts with errors and map the remaining users
.
- If there are no errors within the file, the upload is complete.
- Validate that the users are correctly matched.
