You can rename and map teams and M365 groups, or rename, map and merge one or more source teams (or M365 group) to a specific team (or M365 group) in the target tenant in two ways:
Renaming and Mapping Teams and Groups automatically
- Log in to Quest On Demand and choose an organization if you have set up multiple organizations.
- From the navigation pane, click Migrate > Projects to open the My Projects list.
- Create a new project or open an existing project.
- Click Teams from the project tiles, or click Open from the Teams tile to open the Teams dashboard.
- Click the Teams tab or the M365 Groups tab and select one or more teams or groups that you want to rename and map.
- Click More and then click Rename and Map. The New Teams & Groups Rename and Map Task wizard starts. Each step is described below:
- Mapping options
- Enter the information as described below:
- Add prefix - specify a prefix for the team or group name. Whitespaces are not supported.
- Add suffix - specify a suffix for the team or group name. Whitespaces are not supported.
- Rename mail nick name - select this option to add a prefix or suffix to the target team or group.
- Click Next.
- Notification
- Send notification email once the task is completed - select this option to send a notification email when a mapping task completes.
- Only in a case of failure - select this option to send the email if the mapping task fails to complete successfully.
- Recipients - enter the email address of the recipients of this email. You can specify multiple recipient email addresses separated by semicolon.
- Click Next.
- Schedule
- Choose from one of three options to schedule the task. The scheduler will be activated only after you complete the task wizard.
- Run now - task runs immediately.
- Run later - task must be started manually.
- Schedule - task will be started at a future date and time entered in the corresponding calendar field.
- Click Next.
- Summary
- Verify the task specifications as described below:
- Name - name of the task. You can specify a custom name. The default name is Rename and Map Task.
- Source tenant - name of the tenant in this project.
- Target tenant - name of the target tenant in this project.
- Scheduled start - date and time when the task will start. Now indicates that the task will start immediately.
- Click Back to revise or review a previous step or click Finish to complete the task wizard and start the task as scheduled.
The task is created. You can track its progress from the Tasks tab, view the summary on the Dashboard or monitor alerts and notifications from the Events tab.
Mapping, Renaming and Merging Manually from a File
To rename Microsoft 365 groups or merge one or more source groups to a specific group in the target tenant, a CSV file is used to indicate the mapping between source and target groups as described below.
To creating a mapping file:
- Prepare a comma-separated values (CSV) file with the source and target group names.
|

|
TIP: Export selected groups to a comma-separated values (CSV) and then edit this file. See Exporting Groups for more details. |
- The header row defines the names of the source and target attribute used for mapping. Subsequent rows list the mapping values of the attributes.
The columns are as follows:
- Source Mailnickname - unique name of the source group. The following column header variations are supported: SourceMailNickname, Source MailNickname, Source MailNickName. The column header is case sensitive.
- Target Mailnickname - unique name of the target group. The following column header variations are supported: TargetMailNickname, Target MailNickname, Target MailNickName. The column header is case sensitive. You can merge multiple source groups to a single target group when you specify the same Target Mailnickname in a mapping file.
- Target Group Name - display name of the target group. The column header is case sensitive.
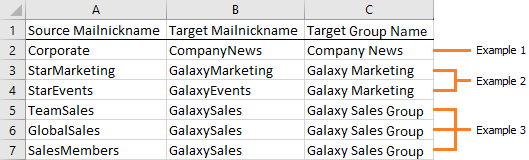
Example 1: Row 2: Simple change of name.
The source group display name and mailnickname are changed.
Example 2: Rows 3 and 4: Different target groups with the same display name.
The Target Mailnicknames are different but the Target Group Names are the same. The Target Mailnickname takes precedence and the groups will be mapped to distinct target groups but the display name of each target group will be the same. It is recommended that you use unique display names to avoid confusion.
Example 3: Rows 5, 6 and 7: Merge multiple source groups with the same target group.
The Target Mailnickname is the same. The source groups will be merged with the same target group with the specified display name.
- Save the CSV file.
|
|
NOTE: File names with non-ASCII characters are not supported. |
To upload a mapping file:
- Log in to Quest On Demand and choose an organization if you have multiple organizations.
- From the navigation pane, click Migrate > Projects to open the My Projects list.
- Create a new project or open an existing project.
- Click Teams from the project tiles, or click Open from the Teams tile to open the Teams dashboard.
- Click the M365 Groups tab.
- Click More > Map from File. The New Mapping from File Task wizard starts. Each step is described below:
- Mapping file
- Click Browse and select the CSV mapping file. The selected file name appears next to the Browse button.
- Click Next.
- Notification
- Send notification email once the task is completed - select this option to send a notification email when a mapping task completes.
- Only in a case of failure - select this option to send the email if the mapping task fails to complete successfully.
- Recipients - enter the email address of the recipients of this email. You can specify multiple recipient email addresses separated by semicolon.
- Click Next.
- Schedule
- Choose from one of three options to schedule the task. The scheduler will be activated only after you complete the task wizard.
- Run now - task runs immediately.
- Run later - task must be started manually.
- Schedule - task will be started at a future date and time entered in the corresponding calendar field.
- Click Next.
- Summary
- Verify the task specifications as described below:
- Name - name of the task. You can specify a custom name.
- Source tenant - name of the tenant in this project.
- Target tenant - name of the target tenant in this project.
- Scheduled start - date and time when the task will start. Now indicates that the task will start immediately.
- Click Back to revise or review a previous step or click Finish to complete the task wizard and start the task as scheduled.
The task is created. You can track its progress from the Tasks tab, view the summary on the Dashboard or monitor alerts and notifications from the Events tab.
On Demand Migration for Teams helps you discover and migrate Chats between one or more matched users from a source tenant to a target tenant.
In this topic:
Prerequisites
User accounts in the source tenant must be matched with user accounts in the target tenant. If new users are added to the source tenant after the Chats discovery task completes, you must match the new users and then rerun another Chats discovery task. For more information about matching user accounts, see Matching Accounts.
Starting a Chats Discovery Task
The Chats discovery task returns all matched user accounts with chats.
|
|
NOTE: Chats discovery can also return the number of chats and the most recent activity within the last 30 days. To activate this capability, you must configure Microsoft 365 for the source tenant, as described below:
- In Microsoft 365 admin center of the source tenant, go to Settings > Org Settings and open the Services tab.
- Select Reports, and clear the check box Display concealed user, group, and site names in all reports. This setting gets applied both to the usage reports in Microsoft 365 admin center and Teams admin center.
- Click Save changes.
|
To discover Chats:
- Sign in to Quest On Demand and choose an organization if you have set up multiple organizations.
- From the navigation pane, click Migrate > Projects to open the My Projects list.
- Create a new project or open an existing project.
- Click the Teams tile, or click Open from the Teams tile to open the Teams dashboard.
- Select the Teams tab and then select the Chats tab.
- From the actions menu, select Discover. The New Chats Discovery Task wizard starts. Each step is described below:
- Description
- Read only. The Chats discovery task will list all user accounts that are matched with a user in the target tenant.
- Click Next.
- Notification
- Send notification email once the task is completed - select this option to send a notification email when a discovery task completes.
- Only in a case of failure - select this option to send the email if the discovery task fails to complete successfully.
- Recipients - enter the email address of the recipients of this email. You can specify multiple recipient email addresses separated by semicolon.
- Click Next.
- Schedule
- Choose from one of three options to schedule the task. The scheduler will be activated only after you complete the task wizard.
- Run now - task runs immediately.
- Run later - task must be started manually.
- Schedule - task will be started at a future date and time entered in the corresponding calendar field.
- Click Next.
- Summary
- Verify the task specifications as described below:
- Name - name of the task. You can specify a custom name. The default name is Discover chats.
- Source tenant - name of the tenant where the statistics will be collected.
- Target tenant - name of the target tenant in this project.
- Scheduled start - date and time when the task will start. For example, Now indicates that the task will start immediately after you complete the wizard.
- Click Back to revise or review a previous step.
- Click Finish to complete the task wizard. The task will start as scheduled.
Reviewing the Chats Discovery Task
- Open the Tasks tab.
- Select the Discover Chats task that you want to review.
- In the task detail pane that opens, the information presented is as described below:
- Type - Type of the task. The type is discover teams.
- Created - Date and time when the task was created.
- Modified - Date and time when the task was last updated.
- State - State of the task.
- Last Operation - The action that was most recently performed in this task.
- Schedule - Date and time when the task started. For example, Now indicates that the task started immediately after the task was created.
- Events (number) - Number indicates the count of events that the task encountered. The values indicate the type of the events and the event count for each type.
Reviewing the Chats Discovery Task Events
- Open the Tasks tab.
- Select the task named Discover Chats that you want to review.
- In the task detail pane that opens, click Events (number). The Events tab opens with a filtered list of events for the selected task.
- Select an event that you want to review. In the task detail pane that opens, the information presented is as described below:
- Object - name of the user account if applicable.
- Task - name of the task.
- Time - date and time when the event occurred.
- Category - type of task.
- Summary - a descriptive statement about the event.
Deleting inactive users
You can delete inactive users from the Chats list view to prevent the migration of the inactive user's personal chats.
To delete inactive users
- Select one or more users in the list view that you want to delete.
- Click More > Delete.
- Click Yes in the Delete Objects popup to confirm the action.
Migrating large numbers of chats requires careful planning. Organize the user accounts into collections to make large chat lists more manageable.
Adding chats to Collections
You can add user accounts with chats to collections in three ways:
To add selected user accounts to a new collection:
- From the project dashboard, click Open in the Teams tile to open the Teams workspace.
- Open the Chats tab and select the user accounts that you want to add to a collection.
- From the actions toolbar, click New Collection. The New Collection dialog opens.
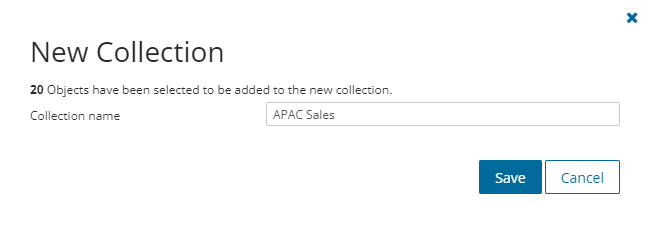
- Enter a collection name in the Collection name field and click Save to add the selected user accounts to the collection.
To add selected user accounts to an existing collection:
- From the project dashboard, click Open in the Teams tile to open the Teams workspace.
- If you need to create a new collection:
- From the top-right corner of the workspace, click Select Collection > + New Collection
- Enter a collection name and click Save to add this collection to the project.
- Open the Chats tab and select the user accounts that you want to add to the collection.
- From the actions toolbar, click Add to Collection. The Add to existing collection dialog opens.
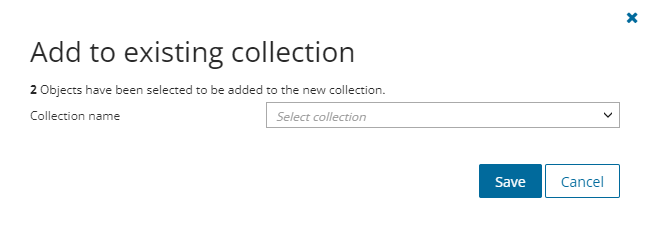
- Select your collection from the Collection name dropdown and click Save to add the selected user accounts to the collection.
To create one or more collections with a CSV file:
This is a two-step process as described below:
Prepare the CSV file
|
|
NOTE: Using a CSV file provides the following additional benefits:
- Multiple collections can be created with the same CSV file.
- Existing collections can be specified in the CSV file to add additional user accounts
- Accounts can be listed in multiple collections
|
Use the format shown below to prepare the CSV file. The minimal set of columns required are shown.
|
|
TIP: You can export the selected user accounts to a CSV file and then add the Collection column and retain the Source UPN column. All other columns in the exported CSV file will be ignored so you can remove those columns if you want. |
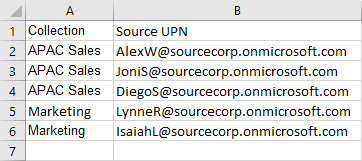
- Collection - Column header for the collection name
- Source UPN - User Principal Name (UPN) of the source account.
Import the CSV file
- Log in to Quest On Demand and choose an organization if you have multiple organizations.
- From the navigation pane, click Migrate > Projects to open the My Projects list.
- Create a new project or open an existing project.
- Click the Teams tile, or click Open from the Teams tile to open the Teams workspace.
- Open the Chats tab.
- From the actions toolbar, click More > Import Collections. The Import Collections from File dialog opens.
- Select Chats from the Specify kind dropdown.
- Click Browse and select the CSV file. The selected CSV file name appears.
- Click Import.
|
|
NOTE: If a collection in the CSV does not exist, a new collection will be created with the name specified in the CSV. |
To verify the addition of the chat to a collection:
- Check the Collections column in the Chats List View that indicates the most recent collection where the group has been added and the number of additional collections that also contain the chat.
- Select a chat from the Chats List View to open the Chat Detail pane. Check the Collections property that lists all the collections where the chat has been added.
In this topic:
Reviewing Chats Migration Readiness
|
|
NOTE: Chat migrations are heavily throttled by Microsoft on source and target tenants. As a result, migration throughput performance is very difficult to predict. Quest recommends migrating the last 15 or 30 days of messages during the last phase of migrations. Use a separate migration task to archive some or all of the remaining messages for users who require the messages for regulatory or business reasons. |
Use the following information in the Chats list view to support your decision.
| Workflow |
Discovered |
On Demand has discovered the chat. |
| OneDrive Status |
Completed |
The OneDrive migration service has migrated the files for this user. This must be completed for On Demand to migrate chats for this user. You can migrate OneDrive file sharing permissions before or after the Chats migration. |
| Mailbox Status |
Migrated |
User mailbox migration is complete and successful. |
In addition to the information that you reviewed, verify the following:
- The temporary Migration Service accounts for source and target tenants that you will use to migrate Teams Chat should be granted the Teams license. You should not change your temporary Migration Service accounts before completing the migration project.
- The temporary Migration Service accounts should be granted the Global Administrator or Teams Administrator role on the tenants for which these account are used.
Considerations
- OneDrive accounts must be provisioned in the target tenant.
- It is a best practice to migrate Chats after all the content like OneDrive, Mailboxes, SharePoint, Teams, etc., is migrated and the user accounts are matched.
- During migration, the migration task will migrate any new messages added to Chats after completing a Discovery task.
- Chats can be migrated multiple times. During remigration, new messages are added to previously migrated live chats in the target, and new chats that were not migrated before are migrated.
- When you select the Archive remaining messages option in the Migration Actions step of the New Chats Migration Task wizard, the chat archive file will be uploaded to an available OneDrive of a chat participant, and shared with other participants. During the process, Microsoft 365 will send a notification email to the owner of the file.
- Due to Microsoft API limitations, the discovery task is automatically run for all users during a remigration to discover new messages and new chats. Which is why we don't recommend remigration for small users sets.
Starting a Chats Migration Task
- Log in to Quest On Demand and choose an organization if you have set up multiple organizations.
- From the navigation pane, click Migrate > Projects to open the My Projects list.
- Create a new project or open an existing project.
- Click Teams from the project tiles, or click Open from the Teams tile to open the Teams workspace.
- Select the Chats tab and select the user accounts whose chats you want to migrate.
- Select Migrate from the action ribbon. The New Chats Migration Task wizard starts. Each step is described below:
- Start
- Task Name - You can specify a custom name. The default name is Migrate chats.
- Use the settings from an existing migration template for this task - select this option if you have already saved a previous migration templates. if this is the first time you are migrating mailboxes, keep this option unchecked.
- Select template - select a template that you previously created, from the dropdown list.
- Go to Summary step - select this option to preserve the settings and go directly to the last step of the wizard. If you do not select this option, but you have selected a template, you can step through the wizard and edit the settings in the template.
- Click Next.
- Migration Options
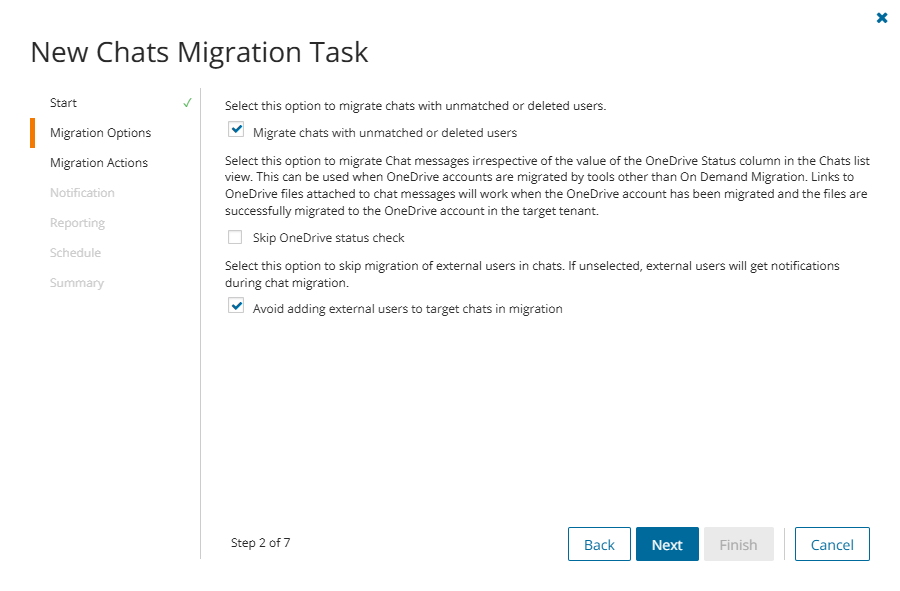
- Select one or more options as described below:
- Migrate chats with unmatched and deleted users - select this option to migrate the chats with users that have not been matched with a user the target tenant, or deleted in the source tenant because they have left the organization. The information about the user from the source tenant is used to migrate the chat.
If this option is not selected, chats that include unmatched or deleted users will not be migrated. For example, if John chats with Dave, and Dave's user account has deactivated because he left the organization, then any chat with user Dave will not be migrated.
- Skip OneDrive status check - select this option to migrate Chat messages irrespective of the value of the OneDrive Status column in the Chats list view. This is helpful because OneDrive accounts could be migrated by tools other than On Demand Migration, and the OneDrive Status column indicates New instead of Completed. Links to OneDrive files attached to chat messages will work when the OneDrive account has been migrated and the files are successfully migrated to the OneDrive account in the target tenant.
- Avoid adding external users to target chats - select this option to avoid adding external users to the chats that are migrated to the target tenant. If this option is not selected, external users will be added to the migrated chat and they will receive unwanted notifications.
- Click Next.
- Migration Actions
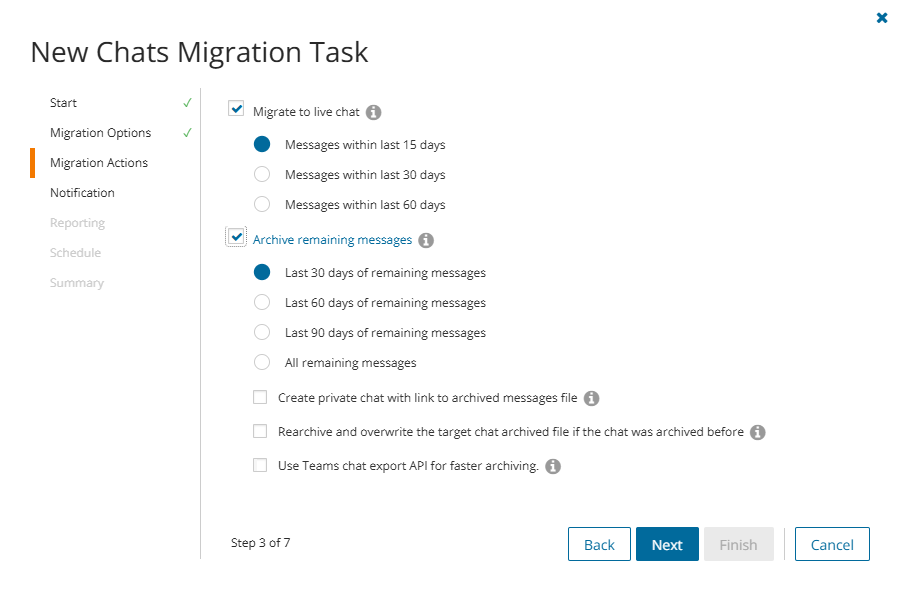
- Select one or more action options as described below:
- Migrate to live chat - select this option to migrate all or a subset of the chat messages from the source tenant to the live chat in the target tenant. You choose a subset or all messages based the date range option as defined below:
- Messages within last 15 days - the most recent chats within the last 15 days discovered after the last migration will be migrated.
- Messages within last 30 days - the most recent chats within the last 30 days discovered after the last migration will be migrated.
- Messages within last 60 days - the most recent chats within the last 60 days discovered after the last migration will be migrated.
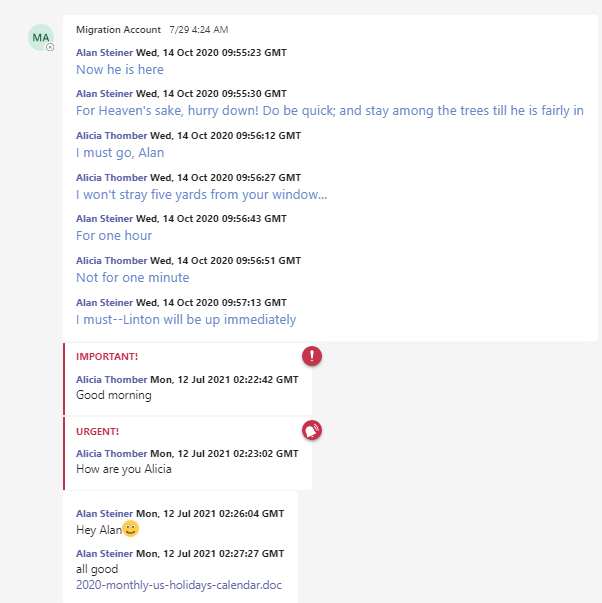
Messages are merged into manageable sets and then migrated. The effect of merging messages is described in the example below:
Consider a set of original messages in the source tenant as shown below:
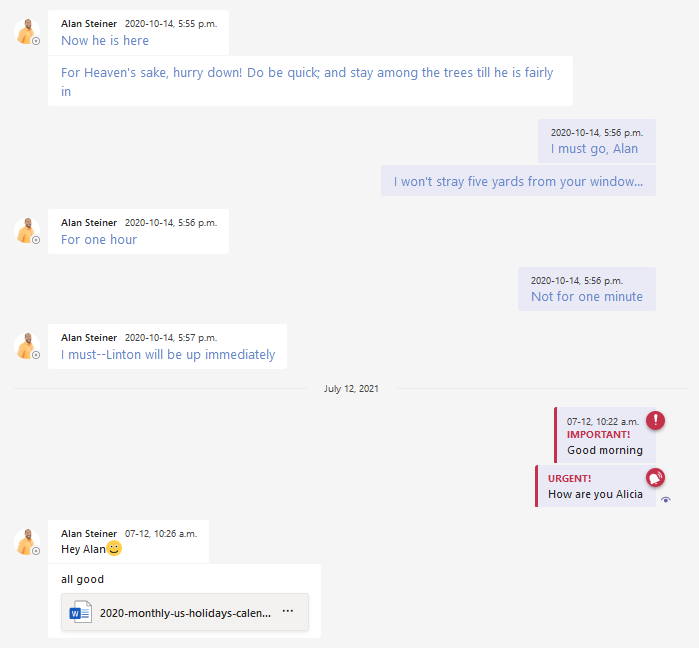
When the message set is merged and migrated, they appear in the target tenant as shown below. The migration service determines the merge set. Messages retain their chronological order and the time stamp is converted to GMT.
- Archive remaining messages - select this option to archive the rest of the chat messages. These messages are archived as an HTML file and are uploaded to an available OneDrive selected from chat participants. Permission to view the HTML file is granted to other chat participants.
|
|
NOTE: Chat migrations are heavily throttled on source and target tenants. Migration throughput performance is very difficult to predict. Quest recommends migrating the last 15 or 30 days of messages during the last phase of migrations. Use a separate migration task to archive some or all of the remaining messages for users who require the messages for regulatory or business reasons. |
You can exercise greater granular control over the remaining messages using the time-range options described below:
- Last 30 days of remaining messages - the most recent 30 days of messages that remain to be migrated will be archived.
- Last 60 days of remaining messages - the most recent 60 days of messages that remain to be migrated will be archived.
- Last 90 days of remaining messages - the most recent 90 days of messages that remain to be migrated will be archived.
- All remaining messages - all messages that remain to be migrated will be archived.
Additional options:
- Create private chat with link to archived messages file - selecting this option creates a private chat message in the target tenant with the members of the original chat. The chat message contains a link to the archived messages (HTML) file that is uploaded to the Microsoft Teams Chat Files folder on an available OneDrive selected from chat participants. Clearing this option creates the archived messages (HTML) file with appropriate permissions without a private chat message.
The archived messages file appears in the OneDrive with the naming convention: <chat name or first 3 member names> + current date + random munber + <-archivedchat.html>
The link is named Conversation History.
- Use Teams chat export API for faster archiving - select this option to improve the overall performance of archiving private chat conversations. Manually stopping this task will take longer as this task cannot be interrupted until the migration of data already being processed is completed.. This option is enabled if:
- Migrate to live chat option is not selected.
- Rearchive and overwrite the target chat archived file if the chat was archived before option is not selected.
- Rearchive and overwrite the target chat archived file if the chat was archived before - select this option to rearchive and overwrite any previously archived chat file in the target tenant. This option will respect the time-range selected in previous options.
Example 1: Assume that you are migrating chats on June 30.
If you select Migrate to live chat and Messages within 15 days, then all chat messages from June 16 to June 30 will be migrated to the live chat in the target tenant.

If you also select Archive remaining messages and Last 30 days of remaining messages, any remaining chats from May 17 to June 15 will be archived as an HTML file in the target tenant. Chats before May 17 will not be migrated.

If you also select Create private chat with link to archived messages file, a chat message with a link named Conversation History is created in the chat that links to the archived HTML file.
Example 2: Assume that you migrated and archived chat messages previously on June 30 and are migrating chats again on July 5.
If you select Migrate to live chat and Messages within 15 days, only new chats discovered after June 30 (July 1 to July 5) will be migrated to the live chat in the target tenant because migration service remembers the previous migration. Chats from June 21 (last 15 days) to June 30 (previous migration date) cannot be remigrated to the live chat.

If you also select Archive remaining messages and All remaining messages no chat messages will be archived because you cannot archive any messages before June 30 even though there could be messages remaining that were not previously archived.

- Click Next.
- Notification
- Send notification email once the task is completed - select this option to send a notification email when a migration task completes.
- Only in a case of failure - select this option to send the email if the migration task fails to complete successfully.
- Recipients - enter the email address of the recipients of this email. You can specify multiple recipient email addresses separated by semicolon.
- Click Next.
- Reporting
- Generate detailed report of migration errors - select this option to generate a migration error report when you run the migration task.
You can download the report from the Reports tab of the SharePoint workspace by clicking the Download link in the Error Log column. If there are no migration errors, a download link is not available. Error reports are retained for 30 days. After 30 days the download link is replaced with the label Expired and you can no longer download the report. For more information about error reports, see Reports.
- Generate AI summary - select this option to generate an AI summary of the task, as well as each object in the task.
|
|
NOTE: If this is the first time you have selected this option, the Quest Policies prompt appears. Read the Quest AI Terms of use and click Accept to proceed. This s a one-time acceptance prompt and your acceptance covers all migration tasks that support the AI migration assistant. |
- Schedule
- Choose from one of three options to schedule the task. The scheduler will be activated only after you complete the task wizard.
- Run now - task runs immediately.
- Run later - task must be started manually.
- Schedule - task will be started at a future date and time entered in the corresponding calendar field.
- Priority - select a priority from the dropdown for the objects scheduled for migration with this task . Values are: Highest, High, Medium, Low and Lowest. The default priority is Medium. If the system is busy, the objects are queued (Migration state = Queued). When the system accepts new migration work, objects are taken from the queue based on the assigned priority and age in the queue.
- Click Next.
- Summary
- Save task settings as a migration template - select this option to save the settings in this wizard as a reusable migration template.
- Migration Template Name - specify a name for the template. If you have changed the settings of a preselected template, specify the same template name to apply the changes to the template when you complete the wizard. All saved templates are displayed in the Templates tab.
- Verify the task specifications as described below:
- Name - name of the task. You can specify a custom name. The default name is Migrate chats.
- Source tenant - name of the source tenant for the chats.
- Target tenant - name of the target tenant where the chats will be migrated.
- Scheduled start - date and time when the task will start. For example, Now indicates that the task will start immediately after you complete the wizard.
- Click Finish to complete the task wizard. The task will start as scheduled.
The migration task is created. You can track its progress from the Tasks tab, view the summary on the Dashboard or monitor alerts and notifications from the Events tab.
Reviewing the Migration Results
Once the migration task is complete, use the information on the Chats tab to verify the success of the migration. The column in the chats migration list view are as follows:
- User Name - name of the user from the source tenant.
- Migration State - status of the task in the migration process. Values are as listed below:
- Discovered
- Migrating
- Partially migrated
- Partially migrated with issues
- Migrated
- Migrated with issues
- Migration failed
- Workflow - the most recent operation performed on the group. Valid values are
- migrated - when all discovered chats have migrated.
- partially migrated - when some chats failed to migrate. The number of migrated chats is fewer than the total number of chats.
- Migrated Chats - number of chats migrated for the user. This may be fewer than the total number of chats. If a participant is not matched or OneDrive not migrated then migration of the chat is intentionally skipped and the event documented on the Events tab.
- Archived Chats - indicates whether or not chats have been archived. When chats are migrated and archived, the value changes to Yes for the selected user. Since chats can be archived only once, if you attempt to re-archive migrated chats, a warning message appears in the migration task events.
- Source UPN - UserPrincipalName (UPN) of the source account.
- Target UPN - UserPrincipalName (UPN) of the target account.
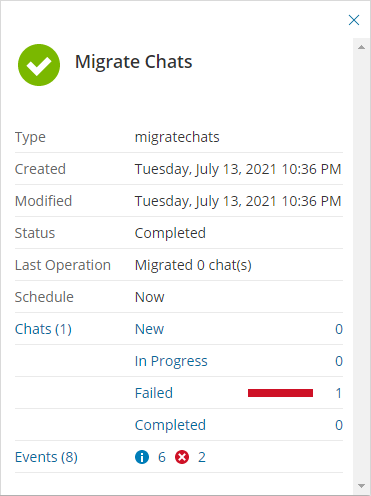
Reviewing the Migrate Chats Task
- Open the Tasks tab.
- Select the Chats migration task that you want to review.
- In the task detail pane that opens, the information presented is as described below:
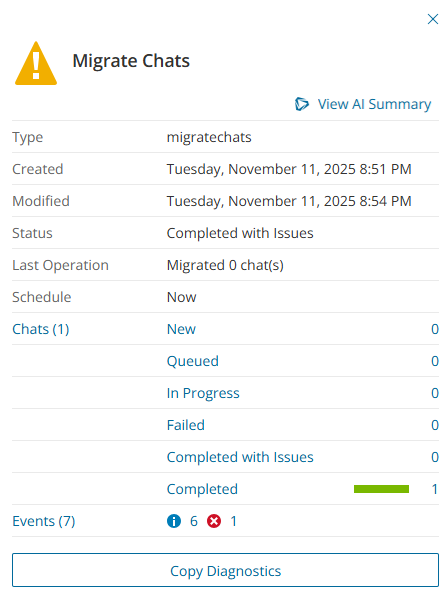
- Type - Type of the task. The type is migratechats.
- Created - Date and time when the task was created.
- Modified - Date and time when the task was last updated.
- Status - current status of the task.
- Last Operation - The action that was most recently performed in this task.
- Schedule - Date and time when the task started. Now indicates that the task started immediately after the task was created.
- Chats (number) - The number of Chat objects that were selected for migration and the number of objects passing through the various states. You can click Chats to open a filtered list of Chatt objects included in this task.
- Events (number) - Number indicates the count of events that the task encountered. The icon values indicate the type of the events and the event count for each type.
-
- View AI Summary - This link is available if you opted for the AI feature in the organization you created (see Organizations and Regions), and the task is a migration task that supports the AI migration assistant and you selected the Generate AI summary option in the Reporting step of the migration wizard. Click this link after the task has completed, to view the AI-generated migration summary.
|
|
NOTE: The View AI Summary link may take a while to appear depending on the volume of tasks and objects being migrated. If this is the first time you have selected this option, the Quest Policies prompt appears. Read the Quest AI Terms of use and click Accept to proceed. This s a one-time acceptance prompt and your acceptance covers all migration tasks that support the AI migration assistant. |
- Copy Diagnostics - click this link to copy relevant task properties that you can paste in a text file and use it to troubleshoot the task if necessary.
Reviewing the Migrate Chats Task Events
- Open the Tasks tab.
- Select the Chats migration task for which you want to review the events.
- In the task detail pane that opens, click Events (number). The Events tab opens with a filtered list of events for the selected task.
- Select an event that you want to review. In the event detail pane that opens, the information presented is as described below:
- Object - name of the Chat object if applicable.
- Task - name of the task.
- Time - date and time when the event occurred.
- Summary - a descriptive statement about the event if an exception occurs.
Recreating Conversation History Links
When there are changes to the target domain due to a domain move, changes to user UPNs, aliases etc., the link to the archived file in private chats that are migrated to the target tenant will not work. To recreate the link in the migrated chat, use the New Recreate Conversation History Link Task wizard as described below:
|
|
NOTE: The task can only recreate links for chats which were archived with the Create private chat with link to archived messages file option in the New Chats Migration Task wizard. |
- Select the Chats tab.
- Select More > Recreate Conversation History Link from the Actions menu. The Recreate Conversation History Link Task wizard starts. Each step is described below:
- Description
- Click Next.
- Notification
- Send notification email once the task is completed - select this option to send a notification email when a migration task completes.
- Only in a case of failure - select this option to send the email if the migration task fails to complete successfully.
- Recipients - enter the email address of the recipients of this email. You can specify multiple recipient email addresses separated by semicolon.
- Click Next.
- Schedule
- Choose from one of three options to schedule the task. The scheduler will be activated only after you complete the task wizard.
- Run now - task runs immediately.
- Run later - task must be started manually.
- Schedule - task will be started at a future date and time entered in the corresponding calendar field.
- Priority - select a priority from the dropdown for the objects scheduled for migration with this task . Values are: Highest, High, Medium, Low and Lowest. The default priority is Medium. If the system is busy, the objects are queued (Migration state = Queued). When the system accepts new migration work, objects are taken from the queue based on the assigned priority and age in the queue.
- Click Next.
- Summary
- Verify the task specifications as described below:
- Name - name of the task. You can specify a custom name. The default name is Recreate Conversation History Link.
- Source tenant - name of the source tenant.
- Target tenant - name of the target tenant.
- Scheduled start - date and time when the task will start. For example, Now indicates that the task will start immediately after you complete the wizard.
- Click Finish to complete the task wizard. The task will start as scheduled.
Troubleshooting
Chats may not be successfully migrated due to a variety of reasons. Two example are described below.
Example 1: Members of a chat have not been matched or migrated to the target tenant.
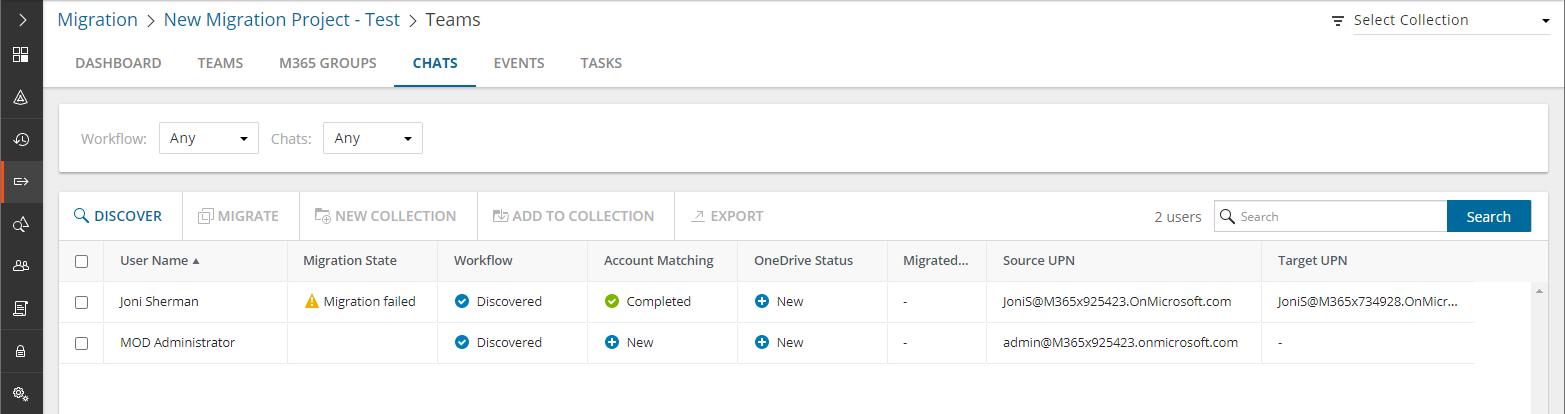
This is a common case where one or more members are not available in the target tenant. In such a case, the chat will not be migrated. In this example, the chat migration for Joni Sherman indicates a failure. The Status column indicates Migration failed. Joni has been chatting with the Administrator. However the Administrator account has not been matched or migrated to the target tenant.
When you inspect the migration task details, it will indicate a failure. You can click the event icons to get more information about the failure.
Resolution: When accounts are missing from the target tenant, you must map or migrate the account and rerun the chat migration task.
Example 2: An error in a chat message prevents all subsequent chat messages from being migrated.
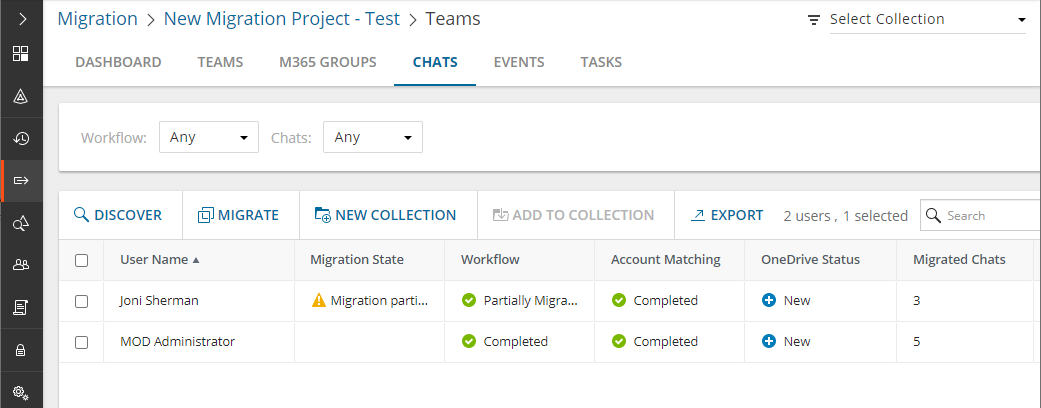
In this example, chats for Joni Sherman indicate a migration problem. The Status column indicates Migration partially failed. There are 36 chat messages but only 3 messages could be migrated. The migration task completes successfully but no more messages are migrated. The service account that is used to migrate the chat remains as a member of the chat in the target tenant.
When you inspect the migration task, you will notice that the task has completed successfully, but there are error events in the task detail.
The Events list will indicate the error event, but more importantly you will notice that no more messages are migrated after the error event.
Resolution: Inspect the chat messages of the user and resolve the issue. Then rerun the migration task for the same user. If you are unable to address the issues with chat messages, contact Quest Technical Support.
