Collecting Statistics
The Collect Team Statistics Task for Teams conducts an assessment of all teams in the source tenant and matching teams in the target tenant. It provides information like member count, content size (in GB), planner count and planner task count for the teams in the source tenant, and optionally in target tenant if the team is already provisioned.
Each Collect Team Statistics Task generates events. Events are milestones that a task achieves as it runs. For example, when a Collect Team Statistics Task starts, an event is logged and it appears in the events list. When the number of teams that are selected for assessment is large, the Collect Team Statistics Task divides the total number of teams into manageable sets. Each set is called a batch. When a batch of accounts is assessed, another event occurs.
In this topic:
Starting a Collect Team Statistics Task
- Log in to Quest On Demand and choose an organization if you have multiple organizations.
- From the navigation pane, click Migrate > Projects to open the My Projects list.
- Create a new project or open an existing project.
- Click the Teams tile, or click Open from the Teams tile to open the Teams workspace.
- Select the Teams tab and then select List View if not already selected.
- Select the teams in the list from where you want to collect statistics. You can use search, filtering or collections to quickly navigate through the list of mailboxes. You can select the check box in the table header to select all the accounts.
- Click Collect Statisticsfrom the Actions ribbon. The New Collect Statistics Task wizard starts. Each step is described below:
- Collect Statistics Options
- Choose from the following options
- Include collection of statistics from target tenant - select this option to include the same teams from the target tenant and generate the Comparison Report. Statistics will be collected for the target tenant teams only if a provision task was previously run for the teams.
- Collection levels:
- Basic (Fast) - collect statistics about member count and content size (in GB) for the teams selected in the source and target tenant if provisioned.
- Advanced (Slow) - collect statistics about member count and content size (in GB), planner count and planner task count for the teams selected in the source and target tenant if provisioned. The task requires more time to run.
- Click Next
- Notification
- Send notification email once the task is completed - select this option to send a notification email when a discovery task completes.
- Only in a case of failure - Select this option to send the email if the discovery task fails to complete successfully.
- Recipients - enter the email address of the recipients of this email. You can specify multiple recipient email addresses separated by semicolon.
- Click Next.
- Step 3:Schedule
- Choose from one of three options to schedule the task. The scheduler will be activated only after you complete the task wizard.
- Run now - task runs immediately.
- Run later - task must be started manually.
- Schedule - task will be started at a future date and time entered in the corresponding calendar field.
- Click Next.
- Summary
- Verify the task specifications as described below:
- Name - name of the task. You can specify a custom name. Default name is Collect Team Statistics Task.
- Source tenant - name of the tenant where the statistics will be collected.
- Target tenant - name of the target tenant in this project.
- Scheduled start - date and time when the task will start. Now indicates that the task will start immediately.
- Click Back to revise or review a previous step or click Finish to complete the task wizard and start the task as scheduled.
- Review the statistics collected
- Open the Teams workspace.
- Select the Teams tab and then select List View if not already selected.
- Review the statistics collected for each team. The statistics displayed depends on the option selected in the New Collect Team Statistics Task wizard.
Reviewing the Collect Team Statistics Task
- Open the Tasks tab.
- Select the Collect Statistics task for teams that you want to review.
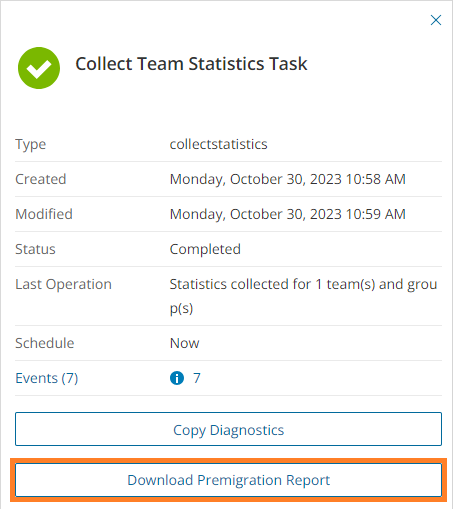
- In the task detail pane that opens, the information presented is as described below:
- Type - Type of the task. The type is collectstatistics.
- Created - Date and time when the task was created.
- Modified - Date and time when the task was last updated.
- Status - State of the task.
- Last Operation - The action that was most recently performed in this task.
- Schedule - Date and time when the task started. Now indicates that the task started immediately after the task was created.
- Events (number) - The number of events that the task encountered.
- From the task detail pane, click Download Premigration Report. Download and save the ZIP file to a suitable folder, and extract the report.
|

|
NOTE: Premigration reports are also available from the following tasks:
- Discover All
- Discover From File
- Provision
|
Reviewing the events for the Collect Team Statistics Task
- Open the Tasks tab.
- Select a Collect Statistics task for teams that you want to review.
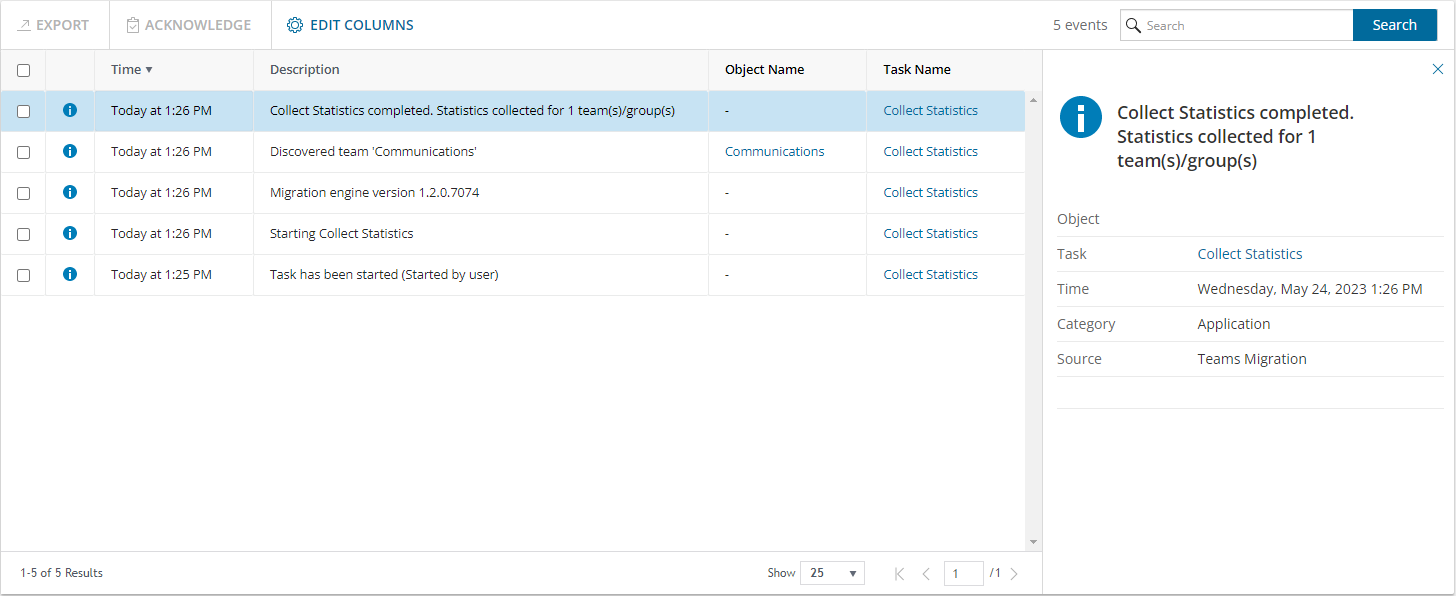
- In the task detail pane that opens, click Events (number). The Events tab opens with a filtered list of events for the selected task.
- Select an event that you want to review. In the task detail pane that opens, the information presented is as described below:
- Object - name of the team if applicable.
- Task - name of the task.
- Time - date and time when the event occurred.
- Category - type of task. the value is Application.
- Source - the workspace from where the event was generated. The value is Teams Migration.
Premigration Assessment for Teams
On Demand Migration analyzes your environment and tracks potential problems, misconfiguration, and risks that might adversely affect the migration. Use Assessment view to see the summary reports on the discovered data and use the automatic filters to quickly select certain items.
The following reports are available for Teams:
- Workflow - (deprecated) Teams sorted by completed workflow
- Discovered
- Processed
- Migrated
- Teams- Teams sorted by processing status
- Idle
- In progress
- Needs your attention
- Teams By Size
- Teams By Last Activity Time
- Teams By Channel Count
- Teams By Member Count
Once you handle the issues, if any, go to List View screen. You are ready to start the migration.
Migrating Teams
When you migrate teams, files stored in the corresponding SharePoint document libraries and OneNote items stored in asset libraries can be migrated. The SharePoint sites associated with teams may contain additional objects that cannot be migrated with the On Demand Migration for Teams service.
Considerations
- Channels are dedicated sections within a team to keep conversations organized. Channel membership can be Standard, Private or Shared.
- When teams are migrated, the account that is assigned the Migration Service role is added to the team. If dynamic membership is enabled, the rules are modified to include this account. This temporary role is required for migrating teams by the On Demand Migration for Teams service.
- Teams in the target tenant may take up to 24 hours to be fully provisioned by Microsoft after they are created during a Teams provisioning task. We recommend that you migrate only those teams which are provisioned at least 24 hours before they are migrated.
- When teams are migrated, the SharePoint Contents list is updated, and the Migration state of the objects is changed to Migrated. You can review the list and use the On Demand Migration for SharePoint service to migrate additional SharePoint objects.
- When a team with same name already exists in the target tenant and the merge option is selected for migration, contents of the note in the target tenant is overwritten with the contents from the source.
In this topic:
Configuring the project
- Log in to Quest On Demand and choose an organization if you have set up multiple organizations.
- From the navigation pane, click Migrate > Projects to open the My Projects list.
- Create a new project or open an existing project.
- Click Teams from the project tiles, or click Open from the Teams tile to open the Teams dashboard.
- Click Configure Project from the dashboard menu. The Edit Project wizard starts. Each step is described below:
- Project Settings
- Set Migration Defaults
Default Target User - Specify a user principal name (UPN) to use as the team owner when the existing owner has no match in the target tenant.
- Teams Migration Option
Skip private channels during provisioning and migration - select this option to prevent the provisioning of and migration of private channels. However, if private channels are already provisioned, this setting will be ignored and private channel content will be migrated.
- Click Finish.
Starting a Migrate Teams Task
- Log in to Quest On Demand and choose an organization if you have multiple organizations.
- From the navigation pane, click Migrate > Projects to open the My Projects list.
- Create a new project or open an existing project.
- Click Teams from the project tiles, or click Open from the Teams tile to open the Teams dashboard.
- Select one or more teams from the Teams List View.
|
|
TIP: It is recommended to select no more than 100 teams for the task to streamline the process. You can create several tasks that will be executed concurrently. Use search and filtering to quickly navigate through the list of teams. |
- Click Migrate. The New Teams Migration Task wizard starts. Each step is described below:
- Start
- Task Name - You can specify a custom name. The default name is Migrate Teams.
- Use the settings from an existing migration template for this task - select this option if you have already saved a previous migration templates. if this is the first time you are migrating mailboxes, keep this option unchecked.
- Select template - select a template that you previously created, from the dropdown list.
- Go to Summary step - select this option to preserve the settings and go directly to the last step of the wizard. If you do not select this option, but you have selected a template, you can step through the wizard and edit the settings in the template.
- Click Next.
- Migration Options

- Choose from the following options:
- Channel Posts(Messages) - select this option to migrate the posts or messages in a channel.
- Archive - select this option to migrate and archive channel messages as an HTML file for each channel. The HTML file is added to the file list of the team's SharePoint site in the target tenant. A new message from the target tenant Administrator is added to each migrated channel with a link to its HTML file. A new tab called Conversation History is created in the target channel and the archived messages are displayed there.
- All messages - migrate and archive all messages across all channels in the team
- Messages older than 15 days - migrate and archive messages across all channels in the team that are older than 15 days.
- Messages older than 30 days- migrate and archive messages across all channels in the team that are older than 30 days.
- Messages older than 60 days - migrate and archive messages across all channels in the team that are older than 60 days.
|
|
NOTE:
Messages that are more recent than the 15, 30 or 60 days option that is selected will be migrated but not archived.
Links to files that are not yet migrated to the target will not work. remigrate Teams using Channel Files to ensure the links work correctly. To learn more, see remigrating messages and files.
If the migration task is successful and the archive HTML file is created in the target tenant, it cannot be modified by subsequent migrations. If you attempt another migration and select the Archive option, the Archive option is ignored. All new and modified channel messages from the selected teams will be migrated and posted to the corresponding team channels in the target tenant. Messages already archived will be skipped unless they were subsequently modified (edited or linked to replies or attachments) in the source tenant.
If the migration task is unsuccessful and the archive file is not created, subsequent migrations with the Archive option selected will attempt to create an archive HTML file in the target tenant. Archive sub-options like All, Messages older than 15 days, Messages older than 30 days or Messages older than 60 days, are re-evaluated for all messages in the channel. The new set of messages selected for archival may not be the same set of messages identified in the previous archive attempt. |
- Migrate Bot Messages - select this option to migrate bot messages.
- SharePoint Content - select this option to migrate SharePoint content linked to teams selected for migration.
- Standard (Channel files only) - select this option to migrate files, OneNote, Word, Excel and PowerPoint tabs added to the channel.
- Standard and Customized (All SharePoint Content) - select this option to migrate OneNote, Word, Excel, PowerPoint and List tabs added to the channel, and site collections which includes any customized content such as descendant websites and lists.
- Include site level term group for site migration - select this option to add site level metadata to the target Global Term Store. The Global Term Store must be migrated before you can use this option, otherwise an error will be logged as an event. For more information, see Migrating the Global Term Store.
|
|
NOTE: For better performance and accountability the Get Total File Size task is automatically scheduled to run 24 hours after the migration task completes.
For each team that is being migrated, the task calculates the total size of files across all channels of the team from the source and the target tenants. These totals are displayed in the Teams List view.
If you manually start the task before 24 hours of the migration task, you may not get accurate results. The task retains its original schedule and runs 24 hours after the migration task completes. |
- Planner - select this option to migrate the Planner buckets, tasks, comments and the corresponding Planner tabs in teams.
- Group Mailbox - select this option to migrate the Microsoft 365 Group mailbox.
- Team Membership - select this option to migrate team members. If this option is not selected, team members will not be migrated. If the team member or owner was not matched or migrated by an account migration task, a warning is reported: Cannot add *** as group ***: User Mapping does not exist. Workaround: Match or migrate the account and then re-run the task with this option selected.
- Click Next.
- File Version Options

- Choose the migration option for file versions associated with teams selected for migration.
- Latest version only - select this option to migrate the most recent version of the file. All other versions will be ignored. This is the default selection.
- More versions - select this option to migrate additional versions of a file based on the options described below. Large version sets take a significantly long time to migrate.
- Number of versions - maximum number of version to migrate. The available choices are: 2, 5, 10, 30, 60, 90 and 365. When you specify the number of versions, additional options can be selected.
- Latest version and preceding versions - version count includes the latest version and the preceding versions in chronological order restricted to the Size Limit of the latest version. For example, if you choose to migrate 5 versions, then the most recent version and 4 preceding versions will be migrated as long as the most recent version does not exceed the selected size limit specified.
- Latest version and daily latest from preceding days - version count includes the latest version and the latest version from each preceding day restricted to the Size Limit of the latest version. For example, if there are many versions of a site and you choose to migrate 5 versions, then the most recent version and the latest version from each of the 4 preceding days will be migrated as long as the most recent version does not exceed the selected size limit specified.
- Size limit - this setting is available if the Latest version and preceding versions or the Latest version and daily latest from preceding days option is selected. By default, the size limit is 80 MB. You can configure the size limitation by selecting from one of the possible values in the dropdown list. If the size of the latest file version exceeds the selected size limit, the latest version will be migrated and previous versions will be ignored. If the size of the latest file version does not exceed the selected size limit, then the file and its versions will be migrated based on your selection between Latest version and preceding versions or Latest version and daily latest from preceding days.
- All Versions - select this option to migrate the latest version of the file, and all previous versions if the latest version does not exceed a specified size limit. This option requires significantly more time to migrate all the versions.
- Size limit - this setting is available if the All Versions option is selected. By default, the size limit is 80 MB. You can configure the size limitation by selecting from one of the possible values in the dropdown list. If the size of the latest file version exceeds the selected size limit, the latest version will be migrated and previous versions will be ignored. If the size of the latest site version does not exceed the selected size limit, then the file and its versions will be migrated.
- Click Next.
- SharePoint Permission Options

- Select how Sharing Links permissions are migrated. Direct permissions are always migrated.
- Migrate permissions - select this option so that unique permissions associated with web, list and list items are migrated. If you clear this option all other options in this step are deactivated and permission migration is prevented. When permissions are not migrated, the permissions for new migrations of web, list and list items, that are not already on the target tenant, will be inherited from its parent. The permissions will not be changed for migrations of content that was already migrated to the target tenant.
- Migrate permissions only for previously migrated webs and lists - select this option to migrate permissions for webs and lists only. Permissions will be merged with any existing permissions on the target tenant. List item permissions are not migrated with this option because list item permissions cannot be migrated separately from the list item. To re-migrate list items and its permissions, re-migrate the whole list without selecting this option. Selected objects must be in a migrated or migrated with issues state for this option work.
- Do not migrate Sharing Links permissions - select this option to ignore Sharing Links permissions.
- Migrate Sharing Links permissions as direct permissions. - select this option to migrate Sharing Links permissions. These permissions will be migrated as direct permissions. The conversion and migration of Sharing Links permissions takes more time to migrate. Migration is slower.
- Click Next.
- SharePoint File Options

- Choose from the following options to determine how changes to list items that were previously migrated should be remigrated:
- Refresh list items - an incremental migration is performed to repair and update the target list with missing or new items.
- Migrate all list items - all list items are remigrated.
- Choose a conflict resolution option.
|
|
NOTE: Conflict resolution rules will not be applied if the Migrate all list items option is selected. All files in the target tenant will be overwritten if all files are migrated. |
- Overwrite target files - all migrated files in the target tenant will be overwritten. Migration is fastest with this option selected. For default Notebooks, target channel Notes will be overwritten if the source and target teams and channels have the same name.
- Skip if target list item is the same version or newer - ignore list items in the target tenant with the same or newer version. If the item does not exist in the target tenant, a copy of the source item will be migrated. For default Notebooks, target channel Notes will be preserved even if the source and target teams and channels have the same name.
- Create a copy if target list item is the same version or newer - preserve the list item in the target tenant with the same or newer version and migrate a copy of the source item. When you choose this option, you must choose from one of the following file suffix options: _Copy, _Source, _Older, _Backup, and _1. For default Notebooks, target channel Notes will be preserved and no copies are created even if the source and target teams and channels have the same name.
- Migrate list and library comments - select this option to include list and library comments in the migration task. A large number of list and library comments increase task processing time.
- Auto re-run list item migrations to retry missing items - select this option to automatically re-run the list item migration during list migrations to retry and repair missing items.
- Migrate Enterprise Keyword column values - select this option to migrate Enterprise Keywords. The Global Term store must be migrated using the SharePoint migration service. In the context of SharePoint or Microsoft 365, enterprise keywords are terms that are part of the Term Store, which is a centralized repository used to manage metadata (or tags) for content within the organization.
- Click Next.
- Sensitivity Labels
Choose how you want to migrate sensitivity labels applied to associated SharePoint content. Sensitivity labels require specific tenant permissions. They must be discovered and matched before you can use the following options. For more details, see the topic Sensitivity Labels.
- Process document sensitivity labels - select this checkbox to enable sensitivity label processing if you have already configured and matched sensitivity labels.
|

|
Caution: Encrypted documents may be inaccessible on the target tenant if sensitivity labels that are applied to documents in the source tenant are not processed. If a document is encrypted in the source, then it is decrypted, labels are processed and the document is reencrypted in the target. |
- Match and apply corresponding labels to documents migrated to the target - select this option to match and apply sensitivity labels during migration. If the label in the source document has a matching label in the target (there is a corresponding target label in the On Demand repository), the source label is replaced by the target label. If the label in the source document has no matching label in the target (there is no corresponding target label in the On Demand repository), the document is not migrated.
- Remove sensitivity labels from documents migrated to the target - select this option to clear the labels from migrated documents. Labels on documents in the source tenant are not changed.
- Click Next.
- Archiving Options

|
|
NOTE: If you archive the source team without using On Demand Migration (e.g., by using Microsoft tools), then you can migrate the source team and archive the target team. If you archive the source team using On Demand Migration then you can migrate the target team but you cannot archive the target team. |
- Archive the source team after migration - select this option to archive the source team after migration. If you select this option you cannot archive the target team.
- Make source SharePoint site read only - this option is available if option (a) is selected. Select this option to set the associated SharePoint site to read only for the team members.
- Archive target team if source team is archived - select this option to archive the target team after migration. Archived teams cannot be updated or remigrated. This option is not available if option (a) is selected.
- Make target SharePoint site read only - this option available if option (b) is selected. Select this option to set the associated SharePoint site to read only for the team members.
- Click Next.
- Notification
- Send notification email once the task is completed - select this option to send a notification email when a migration task completes.
- Only in a case of failure - select this option to send the email if the migration task fails to complete successfully.
- Recipients - enter the email address of the recipients of this email. You can specify multiple recipient email addresses separated by semicolon.
- Click Next.
- Reporting
- Generate detailed report of migration errors - select this option to generate a migration error report when you run the migration task.
You can download the report from the Reports tab of the SharePoint workspace by clicking the Download link in the Error Log column. If there are no migration errors, a download link is not available. Error reports are retained for 30 days. After 30 days the download link is replaced with the label Expired and you can no longer download the report. For more information about error reports, see Reports.
- Generate AI summary - select this option to generate an AI summary of the task, as well as each object in the task.
|
|
NOTE: If this is the first time you have selected this option, the Quest Policies prompt appears. Read the Quest AI Terms of use and click Accept to proceed. This s a one-time acceptance prompt and your acceptance covers all migration tasks that support the AI migration assistant. |
- Schedule
- Choose from one of three options to schedule the task. The scheduler will be activated only after you complete the task wizard.
- Run now - task runs immediately.
- Run later - task must be started manually.
- Schedule - task will be started at a future date and time entered in the corresponding calendar field.
- Priority - select a priority from the dropdown for the objects scheduled for migration with this task . Values are: Highest, High, Medium, Low and Lowest. The default priority is Medium. If the system is busy, the objects are queued (Migration state = Queued). When the system accepts new migration work, objects are taken from the queue based on the assigned priority and age in the queue.
- Click Next.
- Summary
- Save task settings as a migration template - select this option to save the settings in this wizard as a reusable migration template.
- Migration Template Name - specify a name for the template. If you have changed the settings of a preselected template, specify the same template name to apply the changes to the template when you complete the wizard. All saved templates are displayed in the Templates tab.
- Verify the task specifications as described below:
- Name - name of the task. You can specify a custom name. The default name is Migrate Teams.
- Source tenant - name of the tenant in this project.
- Target tenant - name of the target tenant in this project.
- Scheduled start - date and time when the task will start. Now indicates that the task will start immediately.
- Priority - select a priority from the dropdown for the objects scheduled for migration with this task . Values are: Highest, High, Medium, Low and Lowest. The default priority is Medium. If the system is busy, the teams are queued (Migration state = Queued). When the system accepts new migration work, teams are taken from the queue based on the assigned priority and age in the queue.
- Click Back to revise or review a previous step or click Finish to complete the task wizard and start the task as scheduled.
The migration task is created. You can track its progress from the Tasks tab, view the summary on the Dashboard or monitor alerts and notifications from the Events tab.
|
|
Important: The task state in the task list indicates the progress of this task. Completed state means this task processing is completed. If the migration has any errors, the status column in the Teams List View will indicate Migration partially failed. |
Reviewing the Migrate Teams Task
- Open the Tasks tab.
- Select the SharePoint migration task that you want to review.
- In the task detail pane that opens, the information presented is as described below:
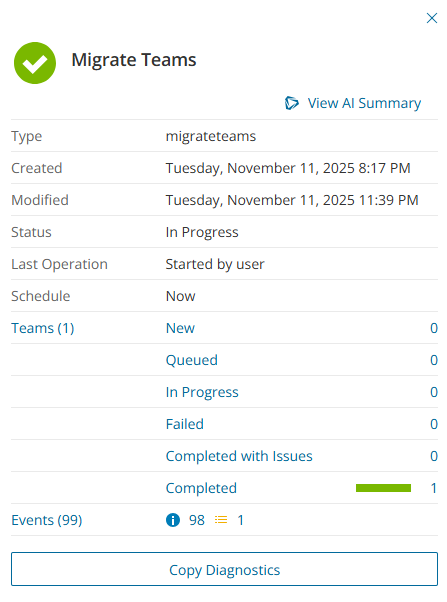
- Type - Type of the task. The type is migrateteams.
- Created - Date and time when the task was created.
- Modified - Date and time when the task was last updated.
- Status - current status of the task.
- Last Operation - The action that was most recently performed in this task.
- Schedule - Date and time when the task started. Now indicates that the task started immediately after the task was created.
- Teams (number) - The number of Teams objects that were selected for migration and the number of objects passing through the various states. You can click Teams to open a filtered list of Teams objects included in this task.
- Events (number) - Number indicates the count of events that the task encountered. The icon values indicate the type of the events and the event count for each type.
-
- View AI Summary - This link is available if you opted for the AI feature in the organization you created (see Organizations and Regions), and the task is a migration task that supports the AI migration assistant and you selected the Generate AI summary option in the Reporting step of the migration wizard. Click this link after the task has completed, to view the AI-generated migration summary.
|
|
NOTE: The View AI Summary link may take a while to appear depending on the volume of tasks and objects being migrated. If this is the first time you have selected this option, the Quest Policies prompt appears. Read the Quest AI Terms of use and click Accept to proceed. This s a one-time acceptance prompt and your acceptance covers all migration tasks that support the AI migration assistant. |
- Copy Diagnostics - click this link to copy relevant task properties that you can paste in a text file and use it to troubleshoot the task if necessary.
Reviewing the Migrate Teams Task Events
- Open the Tasks tab.
- Select the Teams migration task for which you want to review the events.
- In the task detail pane that opens, click Events (number). The Events tab opens with a filtered list of events for the selected task.
- Select an event that you want to review. In the event detail pane that opens, the information presented is as described below:
- Object - name of the Teams object if applicable.
- Task - name of the task.
- Time - date and time when the event occurred.
- Summary - a descriptive statement about the event if an exception occurs.
Remigration
To remigrate messages, planner tasks and files, start a new teams migration task and follow the steps outlined in Migrating Microsoft Teams. Select whether to migrate messages with attachments from the various options.
|
|
NOTE:
- Do not reuse a previous migration task because the task options you need may be different.
- See What We Migrate to review the Teams objects that are supported.
- An incremental query is used automatically to find messages, tasks and files that were added or changed.
- The initial synchronization must have completed successfully for the incremental synchronization to succeed.
- Perform a remigration before you switch from the source to the target tenant.
- Do not delete teams in the target tenant after migration.
- Content that is updated or deleted in the source tenant cannot be synchronized with the target tenant during remigration. Here are some examples
- A migrated message get deleted in the source. During remigration, the corresponding migrated message in the target will not be deleted.
- A migrated message get updated in the source. During remigration, the corresponding migrated message in the target will not be updated.
- A migrated Planner task's status gets updated in the source. During remigration, the corresponding Planner task's status in the target will not be updated.
|
Messages
Messages that were previously migrated successfully will not be remigrated. Messages are remigrated as follows:
- New messages that are added since the last synchronization will be migrated.
- Messages that were partially migrated, for example the attachment was unavailable during a previous migration, will be migrated. Updates to these messages by users in the target tenant will not be overwitten.
Planner Tasks
Planner Tasks in the target tenant that are created or updated will not be impacted. Planner Tasks from the source tenant will be remigrated as follows:
- Previously migrated Planner Tasks that are updated on the source tenant will not be migrated to the target tenant.
- New Planner Tasks will be migrated to the target tenant.
Files
Previously migrated list items and files with the same name and ID will be remigrated from the source tenant as follows:
- Updates on source will be migrated to the target.
- Updates to target will be overwritten by the remigrated source items or files.
When Teams files are remigrated an incremental query retrieves files that have been added or changed in the channels since the last synchronization. Follow the steps outlined in Migrating Microsoft Teams and select Migrate messages and files.