Each On Demand Migration dashboard has a Events tab.
Click the Events tab to see the Events list. The Events list displays all the events related to tasks that are initiated throughout the migration process. It lets you:
- View all events related to a task. Use search or filtering to quickly retrieve events of interest.
- View details related to the event on the right hand pane when you select an event.
- Hide certain alerts from the list by using the Acknowledge option. This might be useful if you don’t want to be distracted by the accidental warning or “expected” error.
- Export selected events into comma-separated values (CSV) file for analytic or archival purposes.
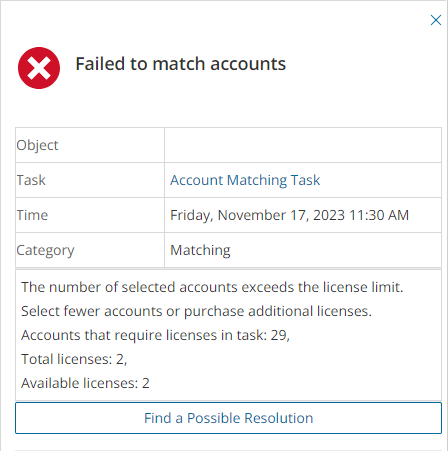
- Look for resolutions to error events. In the event detail pane, click Find a Possible Resolution to look for a solution from among the applicable Knowledge Base (KB) articles in the Quest website. If there is no solution found, the KB article search page is displayed.
Sensitivity labels in Azure are part of a broader information protection strategy to ensure that sensitive data is identified, classified, and appropriately protected, enhancing security and compliance across your organization. Sensitivity labels are a feature within the Microsoft Purview Information Protection solution (formerly part of Azure Information Protection).
The primary goal of sensitivity labels is to ensure that sensitive information is properly protected throughout its lifecycle. This includes:
- Classifying data based on its sensitivity level (e.g., "Confidential", "Highly Confidential").
- Protecting data by applying security settings, such as encryption, rights management, or watermarking.
- Governance of how sensitive data is shared, accessed, and retained.
Sensitivity labels are integrated into various Microsoft 365 apps, such as Outlook, Word, and Teams, and protect sensitive information across Microsoft 365 services (like Word, Excel, PowerPoint, SharePoint, and OneDrive) and other cloud services. They allow seamless classification and protection of emails, documents, and other content directly from within the apps.
For more information about Sensitivity labels, see the Microsoft article Get started with sensitivity labels.
Sensitivity label definitions are not migrated. After you create the labels in the target tenant, you can discover and match the labels between your tenants to prepare On Demand Migration to migrate items with these labels across your tenants.
In this topic:
Prerequisites
The following application consents must be granted:
AIP protected content migration - Read
This application is required for the source tenant to migrate Sensitivity Labels applied to emails, calendar items, Office files and PDFs in Mail, OneDrive, SharePoint and Teams migrations. It cannot be used for the target tenant. The consent granted with this application is the minimal consent required to allow On Demand Migration to read from the Microsoft Information Protection Sync Service and the Azure Rights Management Service.
AIP protected content migration - Write
This application is required for the target tenant to migrate Sensitivity Labels applied to emails, calendar items, Office files and PDFs in Mail, OneDrive, SharePoint and Teams migrations. It cannot be used for the source tenant. The consent granted with this application is the consent required to allow On Demand Migration to read from the Microsoft Information Protection Sync Service and write to the Azure Rights Management Service.
Sensitivity Labels List View
The Sensitivity Labels List View is comprised of the following components:
Notification panel - presents relevant information and shortcuts to migration activities. It appears only when there is a notification.
Filter panel - consists of predefined filters for the Sensitivity List view. The predefined filters are:
- Status - tracks the state of the account from discovery to migration from source to target tenant. See the Status column description below for a description of each status:
List View Actions Menu - contains links to sensitivity label activities and the search box. Each action is explained in greater detail in subsequent topics. See Searching for more information about working with the search box.
List View Columns - displays information about sensitivity labels in the source and target tenant. Some columns may be hidden by default. Use Edit Columns to show or hide columns in the list. The columns are as described below:
- Source Label - Sensitivity Label discovered in the source tenant.
- Target Label - Sensitivity Label in the target tenant.
- Status - tracks the state of the sensitivity label from discovery to migration from source to target tenant. The description of each status is provided in the table below:
| Discovered |
Sensitivity Labels have been discovered in the source tenant. |
| Matching |
Sensitivity Labels are being matched. |
| Matched |
Sensitivity Labels have been successfully matched. |
| Match Failed |
Sensitivity Labels matching task encountered one or more errors and did not complete. |
| Stopped |
Sensitivity Labels matching task was stopped by a user. |
- Source Active - indicates whether or not the label is active in the source tenant.
- Source Description - description for the label in the source tenant defined by the administrator.
- Target Active - indicates whether or not the label is active in the target tenant.
- Target Description - description for the label in the target tenant defined by the administrator.
Discovering Sensitivity Labels
- Log in to Quest On Demand and choose an organization if you have set up multiple organizations.
- From the navigation pane, click Migrate > Projects to open the My Projects list.
- Create a new project or open an existing project.
- From the Sensitivity Labels tile on the project dashboard click Open. Then select the Sensitivity Labels tab.
- Click Discover All in the menu. The New Discover Sensitivity Labels Task wizard starts. Each step is described below:
- Start
- Task Name - You can specify a custom name. The default name is Discover Sensitivity Labels Task.
- Click Next.
- Notification
- Send notification email once the task is completed - select this option to send a notification email when a discovery task completes.
- Only in a case of failure - Select this option to send the email if the discovery task fails to complete successfully.
- Recipients - enter the email address of the recipients of this email. You can specify multiple recipient email addresses separated by semicolon.
- Schedule
- Choose from one of three options to schedule the task. The scheduler will be activated after you complete the task wizard.
- Run now - task runs immediately.
- Run later - task must be started manually.
- Schedule - task will be started at a future date and time entered in the corresponding calendar field.
- Click Next.
- Summary
- Verify the task specifications as described below:
- Name - name of the task. The default name is Discover Sensitivity Labels Task. You can specify a custom name.
- Source tenant - name of the source tenant.
- Scheduled start - date and time when the task will start. Now indicates that the task will start immediately.
- Click Back to revise or review a previous step or click Finish to complete the task wizard and start the task as scheduled.
- When the task completes, the Sensitivity Labels list is updated.
Matching Sensitivity Labels
|

|
NOTE: Content migration will fail if sensitivity labels miss-matched. |
There are two ways you can match sensitivity labels from the source to sensitivity labels in the target tenant:
Matching labels selected from the list
- Log in to Quest On Demand and choose an organization if you have multiple organizations.
- From the navigation pane, click Migrate > Projects to open the My Projects list.
- Create a new project or open an existing project.
- Click the Sensitivity Labels tile, or click Open from the Sensitivity Labels tile to open the Sensitivity Labels workspace.
- Select the Sensitivity Labels tab and click Match > Match Selected. The New Sensitivity Labels Matching Task wizard starts. Each step is described below:
- Start
- Task Name - You can specify a custom name. The default name is Sensitivity Labels Matching Task.
- Matching
- Clear existing matches - select this option to clear previous matches of the selected sensitivity labels. The task clears only the match information stored in the On Demand repository, and does not impact the tenants.
- Match by path attribute - select this option to match labels based on the relative path of the selected sensitivity labels.
- Click Next.
- Notification
- Send notification email once the task is completed - select this option to send a notification email when a discovery task completes.
- Only in a case of failure - Select this option to send the email if the discovery task fails to complete successfully.
- Recipients - enter the email address of the recipients of this email. You can specify multiple recipient email addresses separated by semicolon.
- Schedule
- Choose from one of three options to schedule the task. The scheduler will be activated after you complete the task wizard.
- Run now - task runs immediately.
- Run later - task must be started manually.
- Schedule - task will be started at a future date and time entered in the corresponding calendar field.
- Click Next.
- Summary
- Verify the task specifications as described below:
- Name - name of the task. The default name is Sensitivity Labels Matching Task. You can specify a custom name.
- Source tenant - name of the source tenant.
- Target tenant - name of the target tenant.
- Scheduled start - date and time when the task will start. Now indicates that the task will start immediately.
- Click Back to revise or review a previous step or click Finish to complete the task wizard and start the task as scheduled.
- When the task completes, the Sensitivity Labels list is updated.
Matching labels from a CSV file
The CSV file lets you specify the labels that you want to match and ignore the rest. You can then use this file in the New Sensitivity Labels Matching from File Task wizard to match labels from the source to the target tenant.
The steps are as follows:
Download the relevant CSV template
- Log in to Quest On Demand and choose an organization if you have multiple organizations.
- From the navigation pane, click Migrate > Projects to open the My Projects list.
- Create a new project or open an existing project.
- Click the Sensitivity Labels tile, or click Open from the Sensitivity Labels tile to open the Sensitivity Labels workspace.
- Select the Sensitivity Labels tab and click Match > Match from file. The New Sensitivity Labels Matching from File Task wizard starts. Each step is described below:
- Start
- Task Name - You can specify a custom name. The default name is Sensitivity Labels Matching from File Task.
- Matching File
- Click Download Example File for the template that you want to use: One uses label ids and the other uses path and label names.
- Click Cancel to exit the wizard.
Prepare the CSV file
- Create a CSV file and add the attributes of the sensitivity label that you want to use to match the source with the target tenant labels. You can use any of the two formats shown below:
- Format 1Using sensitivity label ids
- SourceSensitivityLabelId - GUID of the label from the Microsoft Purview portal of the source tenant.
- TargetSensitivityLabelId - GUID of the label from the Microsoft Purview portal of the target tenant.
- Format 2Using label paths and names
- SourceLabelPath - relative path and name of the sensitivity label in the source tenant.
- TargetLabelPath - relative path and name of the sensitivity label in the target tenant.
- Save the CSV file that you created.
Start the Sensitivity Labels Matching from File Task
- Log in to Quest On Demand and choose an organization if you have multiple organizations.
- From the navigation pane, click Migrate > Projects to open the My Projects list.
- Create a new project or open an existing project.
- Click the Sensitivity Labels tile, or click Open from the Sensitivity Labels tile to open the Sensitivity Labels workspace.
- Select the Sensitivity Labels tab and click Match > Match from file. The New Sensitivity Labels Matching from File Task wizard starts. Each step is described below:
- Start
- Task Name - You can specify a custom name. The default name is Sensitivity Labels Matching from File Task.
- Matching File
- Click Browse and select the CSV file with the sensitivity label specifications that you prepared.
- Click Next.
- Notification
- Send notification email once the task is completed - select this option to send a notification email when a discovery task completes.
- Only in a case of failure - Select this option to send the email if the discovery task fails to complete successfully.
- Recipients - enter the email address of the recipients of this email. You can specify multiple recipient email addresses separated by semicolon.
- Schedule
- Choose from one of three options to schedule the task. The scheduler will be activated after you complete the task wizard.
- Run now - task runs immediately.
- Run later - task must be started manually.
- Schedule - task will be started at a future date and time entered in the corresponding calendar field.
- Click Next.
- Summary
- Verify the task specifications as described below:
- Name - name of the task. The default name is Sensitivity Labels Matching from File Task. You can specify a custom name.
- Source tenant - name of the source tenant.
- Target tenant - name of the target tenant.
- Scheduled start - date and time when the task will start. Now indicates that the task will start immediately.
- Click Back to revise or review a previous step or click Finish to complete the task wizard and start the task as scheduled.
- When the task completes, the Sensitivity Labels list is updated.
Exporting Sensitivity Labels
- Select one or more sensitivity labels from the list view that you want to export.
- Click Export the actions menu.
- Open the CSV file by extracting it from the ZIP file that is downloaded to your computer.
Deleting Sensitivity Labels
- Select one or more sensitivity labels from the list view that you want to delete.
- Click Delete in the actions menu.
- Click Yes in the Delete Sensitivity Label popup to confirm the action.
Migrating data with sensitivity labels
Sensitivity Labels are not migrated. On Demand Migration migrates your Microsoft 365 data assets like Mailboxes, OneDrive, and SharePoint files that are tagged with sensitivity labels. OneDrive and SharePoint migration can only migrate the latest file version when the sensitivity label option is selected. Older versions will be migrated without the label applied.
You can control what happens to the labels when the data is migrated through the following migration wizards:
The On Demand Migration service for Accounts migration support for the listed attributes of user account types is indicated in the table below:
| AccountStatus |
✔ |
✔ |
✔ |
|
| Alias |
✖ |
✔ |
✔ |
|
| City |
✔ |
✔ |
✔ |
|
| Country |
✔ |
✔ |
✔ |
|
| Department |
✔ |
✔ |
✔ |
|
| DisplayName |
✔ |
✔ |
✔ |
|
| ExternalEmailAddress |
✔ |
✔ |
✔ |
|
| Fax |
✔ |
✔ |
✔ |
|
| HomePhone |
✔ |
✔ |
✔ |
includes Business Phone and Mobile Phone. |
| LastName |
✔ |
✔ |
✔ |
|
| MailNickname |
✔ |
✔ |
✔ |
|
| Name |
✔ |
✔ |
✔ |
|
| PhysicalDeliveryOfficeName |
✔ |
✔ |
✔ |
|
| PostalCode |
✔ |
✔ |
✔ |
|
| PreferredDataLocation |
✔ |
✔ |
✔ |
|
| RecipientTypeDetails |
✔ |
✔ |
✔ |
|
| StateOrProvince |
✔ |
✔ |
✔ |
|
| StreetAddress |
✔ |
✔ |
✔ |
|
| TelephoneNumber |
✔ |
✔ |
✔ |
|
| UserPrincipalName |
✔ |
✔ |
✔ |
|
| Visibility |
✔ |
✔ |
✔ |
|
| UsageLocation |
✔ |
✔ |
✔ |
|
The On Demand Migration service for Accounts migrates discovered user accounts and the following types of discovered groups:
- Microsoft 365 Groups
- ownership (for accounts that have a pair on the target tenant )
- membership (for accounts that have a pair on the target tenant )
- email address for migrated Microsoft 365 Groups will be created in default target domain. See Microsoft Teams Migration for details on how to migrate Microsoft 365 Groups associated with Teams.
- Security groups
- ownership (for accounts that have a pair on the target tenant )
- membership (for accounts that have a pair on the target tenant )
- Mail-enabled security groups
- ownership (for accounts that have a pair on the target tenant )
- membership (for accounts that have a pair on the target tenant )
- membership approval
- delivery management
- message approval
- MailTip
- group delegation
- visibility in GAL
- Distribution lists
- ownership (for accounts that have a pair on the target tenant )
- membership ( for accounts that have a pair on the target tenant )
- membership approval
- delivery management
- message approval
- MailTip
- group delegation
- SendAs and SendOnBehalf group delegates
- visibility in GAL
Migrating distribution lists with group delegations
On Demand migrates distribution lists with group delegations like SendAs and SendOnBehalf, including scenarios where the distribution list in the target exists or does not exist, or exists and does or does not have group delegations. When the distribution list with group delegations exists in the target then only newly added group delegations are migrated, and group delegations are ignored if anything is deleted at the source. Existing SendAs and SendOnBehalf group delegations on the target, either preexisting before On Demand migration or migrated by On Demand will be left intact and merged with the one migrated from the source.
Delegated accounts are migrated as follows:
| SendAs |
Y |
Y |
Y |
|
| SendOnBehalf |
Y |
Y |
Y |
Y |
|
|
NOTE: Microsoft does not support the following delegated account types so they do not apply to the migration.
- For SendAS: AAD User, External/Guest User, Distribution List, Security Group
- For SendOnBehalf: AAD User, External / Guest User, Security Group
|
|
|
NOTE: The temporary Migration Service account of the target tenant will be added as an owner to all target mail-enabled security groups, distribution groups and Microsoft 365 Groups. |
