Find Objects
To quickly find any object on any Workspace
- Use the Quick Search function (CTRL + F). It helps you find any object swiftly by showing you instant results as you type.
For more information see Quick Search.
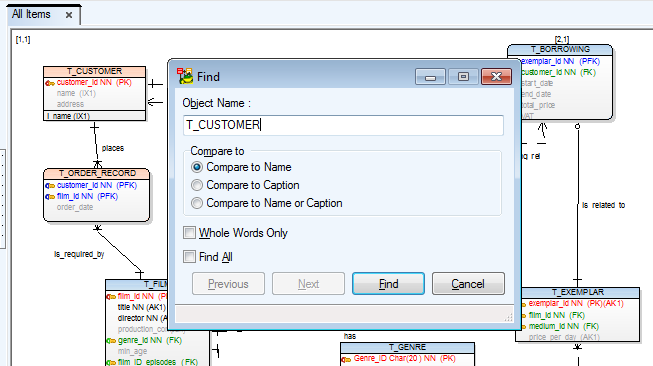
To find a specific object on specific Workspace in your large model
- Activate the Workspace in Application Window.
- From Edit Menu, select Find (SHIFT + CTRL + F shortcut).
- Write the name of the searched object to the Object Name box and click OK to find and highlight the object on the Workspace.
Right-click an object in Model Explorer | Find on Workspace. The object will be focused and highlighted.
Object Viewer displays a complete lists of all objects in your model. You can find and highlight any selected object (and also its shortcuts) by right-clicking it and selecting Find on Actual Workspace or Find all Shotcuts on Actual Workspace.
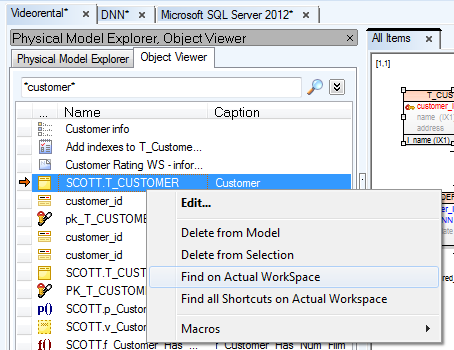
Object Viewer
External Objects
External objects are objects dynamically linked from another model. This feature can help you to divide a large model into several smaller elements.
External objects are read-only, and therefore it is not possible to insert any objects that would have effect on dependencies such as relations. However, it is possible to add entities, procedures, domains and others.
External objects are synchronized with their source objects only when prompted. Both models need to be available during the synchronization process.
Add External Objects to a Model
- Right-click the root of a model in Model Explorer or Application View and select External Sources to import external objects
- Both models must be opened in Toad Data Modeler in order to use external sources
- Select the source model to import from and check objects you want to use in your destination model
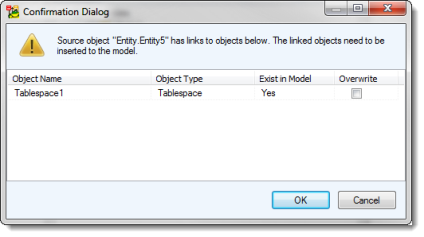
- If an object with the same name as the imported object already exists in the model you will be asked about overwriting it:
- Click Yes to overwrite the original object with the external object
- Click No to insert the external object and keep the name
- If asked about inserting linked objects:
- Click OK to insert external objects and the objects that are linked to it
- Click Cancel to cancel import. The external object will not be inserted into the model
- For linked objects that are named identically to already existing objects:
- Check Overwrite to replace the original target object with the imported linked objects
- Leave Overwrite unchecked to keep the names of both objects
|

|
NOTE: Exist in Model field has four states:
- No - There is no object with the same name as the imported object
- Yes - There is a non-external object with the same name as the imported object
- Mapped External - There is a external object with the same name as the imported object, which comes from the same source as the currently imported object
- External - There is a external object with the same name as the imported object, which comes from a different source than the currently imported object
|
Manage External Objects
- Right-click a model and select External Objects | Update All to easily update all external objects
- Select Window | External Dependencies Explorer to manage imported and exported objects
- Imported Objects shows a list of objects from an external source and Exported Objects shows a list of objects inserted into other models
- Click Update to update the imported objects if they had been modified in the source model
- External objects are marked by an icon (
 ) in Designer and in Model Explorer
External Dependencies Explorer Actions
| Button |
Description |
| Refresh |
Refreshes the list of external objects |
| Check Item |
Performs a validity check against the external source model |
| Check All |
Performs a validity check for all external objects against the external source models |
| Delete Object |
Deletes the object in the target model |
| Create Reference in Source Model |
Creates a dependency reference in the source model in order to indicate that the object has been linked from other models |
| Delete Reference |
Deletes the reference to the target model from this model |
| View Object/Item |
Displays properties of the object |
| Open Model |
Opens the model that contains the external object |
| Update from External Source |
Updates the model with changes from the external source |
| Propagate to External Source |
Updates the source model with changes from this model
|
|
NOTE: There is one exception when the external source is not read-only. Create an object in the source model and synchronize it with your target model. Then create a relation to the object in the target model and an attributed is created in consequence. This attribute will be propagated to the source model when synchronized. | |
Shortcuts of Objects
There are three types of models in Toad Data Modeler:
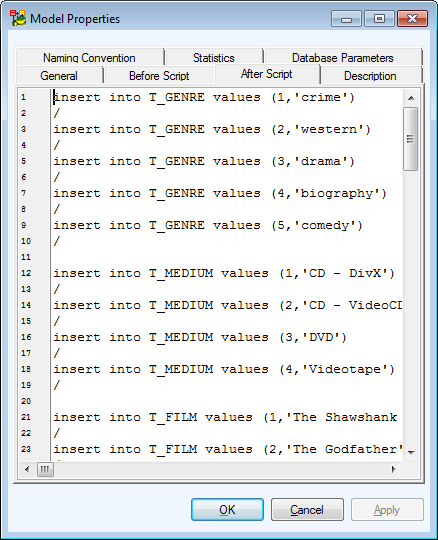
Model Properties
Select Model | Properties.
| General |
General information on the model (project, model, author, company, version etc.) |
| Before Script |
Whatever you write on the Before Script tab, it will be generated before the generated SQL code. |
| After Script |
Whatever you write on the After Script tab, it will be generated after the generated SQL code. |
| Description |
Notes on the model |
| Naming Convention |
Here you can select a naming convention for the model. |
| Database Parameters |
The value in the Length Semantics box shows which default length semantics (BYTE or CHAR) was set in the database for reverse engineering of Oracle database.
|
|
Note: This tab is available only in Oracle models. | |
| Naming Convention |
Here you can link or unlink a naming convention to/from your model.
Manage Naming Conventions - Opens the Naming Convention dialog (available also from the Tools menu)
Edit Naming Convention - Opens the Naming Convention Properties dialog. |
Model Statistics
To display details on your model, its Workspaces, objects etc.
Select Model | Statistic....
To change some of the General Information (e.g. model name, author or company)
Select Model | Properties....
|
|
TIP: You can also change it via the shortcut of Stamp on the Workspace - just double-click the Stamp. |
About Shortcuts
In Toad Data Modeler, you can create multiple graphical representatives of an object - Shortcuts.
- A shortcut is a graphical representative of an object in the Workspace (WS). It is not a copy of an object.
- A shortcut has the same name as its object + a number indicator.
- A shortcut has the same data properties as its object. You can edit any shortcut and all changes will be applied to its object. Also, changes made to an object will be reflected on its shortcuts.
- An object can have none or many shortcuts. Their number is not limited.
- You can set individual graphical format for each single shortcut of the same object.
You can create shortcuts of these objects:
- Entity
- Relationship
- Inheritance
- View (Materialized View)
- Note
- Stamp
- Category (caption of Category)
- Image
Shortcuts help you to organize your large models. Let's say you have a model, where an entity is related to a large number of other entities. You can break the model down into multiple workspaces and create a shortcut of the entity for each workspace. The structure of model is not affected, but you get to see the important things more clearly.
For further distinction of model objects using colors, see Categories.
|
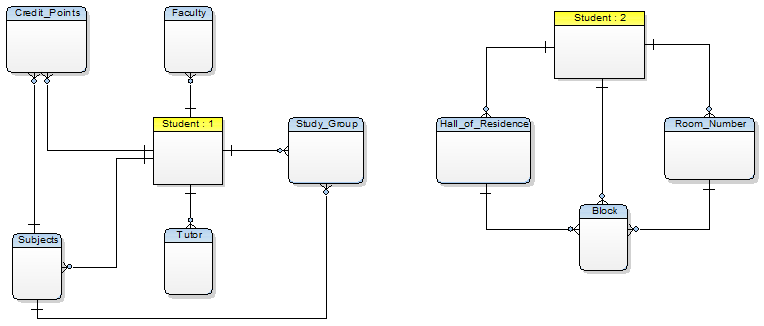
Scenario
You have a Student entity, which is related to many other entities across the entire model. You want to divide the model into two blocks and you also want the Student entity to be contained in both of these blocks.
Solution: A shortcut of the Student entity has been created and used in another part of the model. This way, the model has been logically divided into two blocks and became much clearer and better arranged.
|
