
Toad Data Modeler offers these basic ways how to work in it and control all its features and functions:
Toad Data Modeler offers these basic ways how to work in it and control all its features and functions:
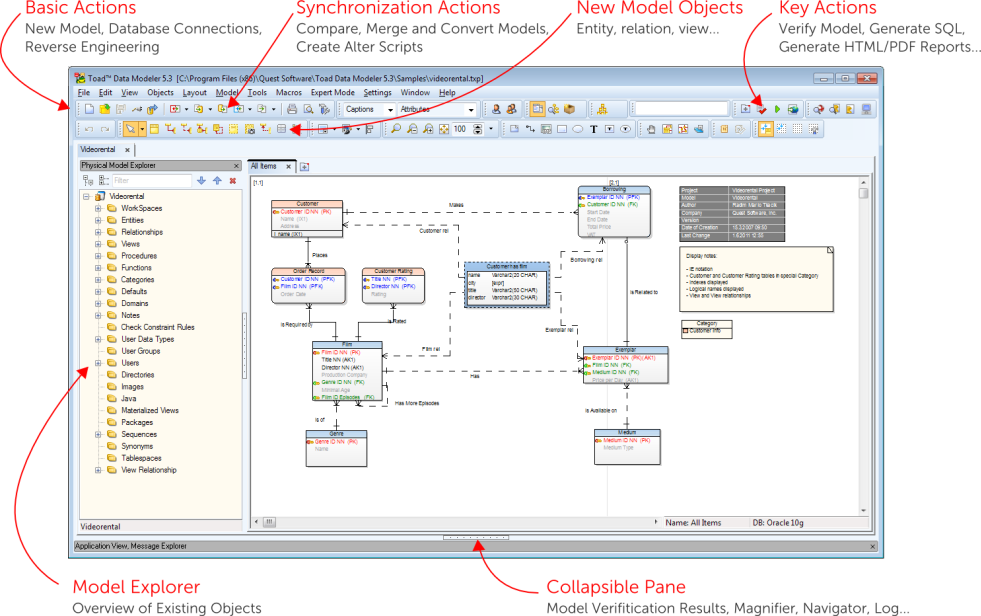
Layout of Toad Data Modeler can be both simple and complex. Various panes can be docked on the left side, the right side or at the bottom of the application and some of the areas can be collapsed using tiny buttons in the middle of window splitters. The default layout for basic operations and tasks can be similar to this:

All currently opened projects, models and their workspaces are listed in the Application View (AV). There, you can:
Application View is by default docked on the bottom left side, next to the Message Explorer. You can close it at any time and open it later.
To open the Application View
Click 

|
|
TIP:
|
Right-click a Model to see the following options:
| Option | Description | ||
|---|---|---|---|
|
Activate Model |
Highlights the selected model and enables menu and toolbar options for the model. | ||
|
Adds a new workspace (WS) to the selected model. You can define the workspace name, description and objects in the automatically opened Workspace Properties dialog.
| |||
|
Model Properties |
Opens the Model Properties dialog. | ||
|
Save |
Saves the model. | ||
|
Save as |
Allows you to save the selected model in another file format or to another location. | ||
|
Object Viewer |
Displays a complete list of model objects, e.g. attributes, triggers, check constraints, views, etc. | ||
| Add to Project |
Adds the model to a chosen Project. | ||
|
Rename |
Renames the model. | ||
|
Close Model |
Closes the selected model. If any changes have been made in the model, a confirmation dialog is displayed. | ||
|
Create Indexes to All Foreign Keys |
Creates Indexes for all foreign keys that don't already have one.
| ||
| Infer Indexes of Foreign Keys |
Binds suitable Indexes of foreign keys to an entity relationship.
| ||
|
In Expert Mode, additional options are available: | |||
|
Add to Version Manager |
Allows you to add the model to Version Manager. | ||
|
Test Model |
Runs internal test of model consistency. | ||
|
Repair Model |
Tries to fix errors found during Test Model. Fixes roughly 60 % of problems.
| ||
Right-click the Workspaces node to see the following options:
| Option | Description |
|---|---|
|
Add Workspace |
Creates a new workspace (WS) in the model. |
|
Open All Designers |
Opens Designers for all existing Workspaces in the model. |
Right-click a specific Workspace to see the following options:
| Option | Description |
|---|---|
|
Activate Designer |
Activates already opened Designer of the selected WS, or opens Designer for this WS in the Application Window. |
|
Open Designer |
Opens another Designer for the selected WS. |
|
Opens the Workspace Properties dialog where you can define the name of the WS and description. | |
| Model Properties | Opens the Model Properties dialog. |
|
Workspace Format |
Opens the Workspace Format dialog. |
| Copy Workspace Layout to | Copies this layout to another Workspace |
|
Add All Model Objects to Workspace |
Adds shortcuts of Model objects to the selected workspace. |
|
Fill Relationships to Workspace |
Adds shortcuts of relationships to the selected WS. Note that this function only adds shortcuts of existing relationships between objects in case they are not present on the selected workspace. |
|
Optimal Style for All Lines |
Seeks an optimal relationship line arrangement and adjusts them accordingly. |
|
Straighten All Lines |
Straightens all relationship lines wherever it is possible. |
| Copy Workspace | Creates a copy of the selected WS. |
| Rename | Renames the Workspace name. |
|
Delete Workspace |
Deletes the selected WS from model. |
Application Window (AW) represents a work area where you design your models, work with scripts etc.
Toad Data Modeler allows you to work with several models of the same or different databases simultaneously. The opened models, their workspaces and even Script Editor or Scripting Window are organized using the system of tabs.

The system of tabs used by the Application Window can be divided into two levels:
Closing a top level tab will close all of its sub level tabs (e.g. closing a model tab will close all its designer tabs)
