Create Entities
In Toad Data Modeler, there are several ways how to create entities - on the Workspace, via Model Explorer and in the Entities dialog (Model | Model Items | Entities). Create entities directly on the Workspace.
|
Scenario
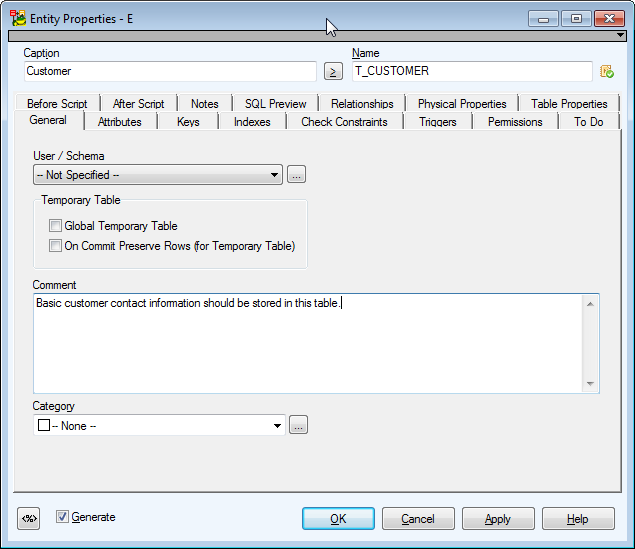
Create entity Customer on the Workspace in your Videorental model. |
- Click
 on the toolbar (also CTRL+E) and then click anywhere on the Workspace.
- Double-click the entity to edit it.
- Define the entity caption and name
|
Caption |
Logical entity name - Customer. |
| Name |
Physical entity name - T_CUSTOMER. |
- Define other properties on tab General and other tabs (e.g. Notes, Comments etc.). To save the changes simultaneously and leave the form open, click Apply.
Create Attributes
You can create attributes in:
- Entity right-click menu on Workspace
- Entity Properties dialog
- Attribute Properties dialog
- Model Explorer
To create an attribute on the Workspace
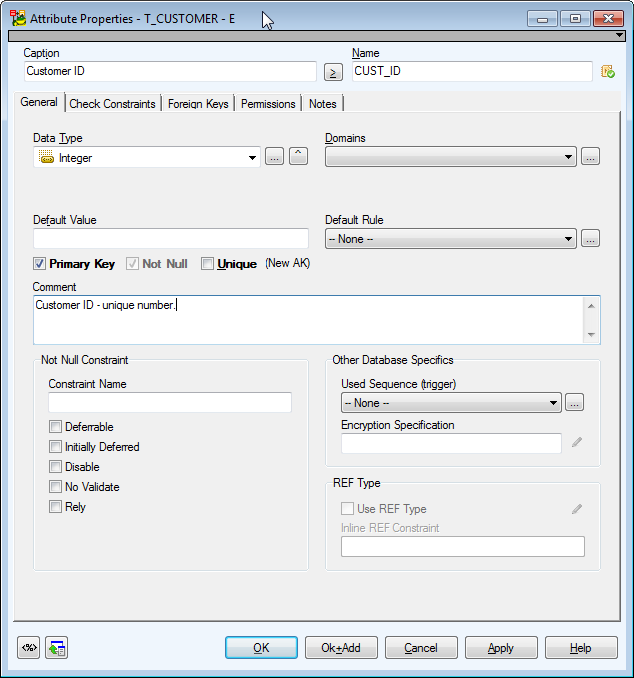
Right-click an entity on the Workspace and select Add | Attribute. The Attribute Properties dialog opens.
|

|
Note: Select the Primary Key (Unique) checkbox to set the attribute as PK or unique attribute. |
To create an attribute in the Entity Properties form
- Double-click an entity on Workspace.
- In the Entity Properties form, switch to the Attributes tab and click Add.

Entity Properties attribute columns
|
Key |
Graphical representation of keys of a particular attribute |
|
Caption |
Logical attribute name |
| Name |
Physical attribute name |
|
Data Type |
Data Type of an attribute
|
|
TIP: You can set a default data type for newly created attributes. See Settings Menu | Options | Physical Model | *database platform and version* | Default Data Type combo-box. (The selected data type will be also applied to Dictionary Types and Domains.) | |
|
p1 |
Parameter 1. Only some of the available data types have this parameter. Defines properties of the selected data type, e.g. length in case of the Char data type. |
|
p2 |
Parameter 2. Only some of the available data types have two parameters. E.g. the Decimal data type has two parameters, which define precision and scale. |
|
Not Null |
When checked, the attribute cannot be empty. |
|
Comments |
Comments or descriptions related to the attribute |
|
Status |
Shows status of attributes in grid. Status of Items in Grids |
Buttons:
 - opens the Application Variables form
Smaller Add button- adds new attributes quickly, just enter attribute name and then click Add.
Bigger Add button - adds an attribute
Edit - opens Attribute Properties of the selected entity
Delete - deletes the selected attribute
 - moves the selected attribute up or down in the list
To create another attribute in the Attribute Properties form
Click OK+Add.
To create an attribute in Model Explorer
Unfold the Entities folder | Unfold the specific entity folder | Right-click the Attributes folder | Add Attribute.
Create Primary Key
An entity can have a primary key and many alternate keys. The keys are stored in the Keys tab in the Entity Properties form.
To create a key
- Right-click an entity on the Workspace and select Add | Key. The Key Properties dialog opens.
To create a PK (unique) attribute
- Right-click an entity on the Workspace and select Add | Attribute. The Attribute Properties dialog opens.
- On tab General, select the Primary Key (Unique) checkbox.
To assign an attribute to key
- In the Entity Properties dialog, Attributes tab, double-click the empty space in the Key column next to the selected attribute.
or
- In the Key Properties dialog | Attributes tab.
|
|
Note:
- Primary keys are graphically marked by red key by default.
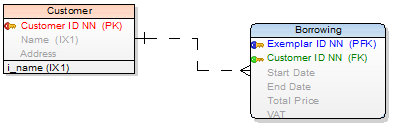
- A primary key can be added to more attributes.
- It is possible to delete primary keys. It is not possible to delete alternate keys of unique attributes.
|
NotNull Property for PK and AK Attributes
Toad Data Modeler allows you to check/uncheck the NotNull property for PK and AK attributes.This is possible only if the Allow Null Attributes in Keys checkbox is selected (unchecked by default).
To select this checkbox
Select Settings | Options | Physical Model and select the checkbox.
If this checkbox is not selected, Toad Data Modeler doesn’t allow you to uncheck the NotNull checkbox in key attributes.
The availability of this option differs by database:
| DB2 z/OS v. 9, 10, 11 |
n/a |
n/a |
| DB2 v. 8, 9.x, 10.x |
n/a |
n/a |
| Greenplum |
n/a |
available |
| Ingres 9.3, 10 |
n/a |
n/a |
| Microsoft Access |
available |
available |
| Microsoft Azure SQL Database |
n/a |
available |
| SQL Server 2000 |
n/a |
n/a |
| SQL Server 2005 |
n/a |
available |
| SQL Server 2008 |
n/a |
available |
| SQL Server 2012 |
n/a |
available |
| SQL Server 2014 |
n/a |
available |
| MySQL 5.x |
n/a |
available |
| Oracle |
available |
available |
| PostgreSQL |
n/a |
available |
| SQLite 3.7 |
available |
available |
| Sybase ASE, Sybase IQ |
n/a |
n/a |
| Sybase SQL Anywhere |
n/a |
n/a |
| Teradata |
n/a |
n/a |
If the Allow Null Attributes in Keys checkbox is selected:
- When you assign an attribute to a key (PK, AK), the Not Null checkbox of the attribute will be checked. (But you are able to uncheck it)
- During propagation of the key via the identifying relationship, the Not Null property in child attribute is inherited from the parent attribute. The only exception is when a database doesn't support Null value in primary key, which would be created via the propagation.
- During Model Conversion, different settings of the Not Null property and its support in different databases are taken into consideration.
- For databases that support Null value in child attribute, the Mandatory Parent checkbox is selected in the Relationship Properties dialog and should behave coherently to Null value in child attribute as well as it behaves for non-identifying relationships.
- For databases that support Null value in child attribute, the settings of the Synchronize NotNull with Mandatory Parent option work the same way for PFK as for FK.
See Synchronization of NotNull and Mandatory Parent for more information.
Create Relationship
- Select a relationship type - click the appropriate relationship icon on the toolbar:
 Identifying relationship (also CTRL+R)
 Non-identifying relationship
 M:N relationship
- Move your mouse cursor over the work area. (The cursor changes its appearance.)
- Click the first entity (parent) and then the target entity (child).
|
|
TIP: Hide relationship names:
- Right-click the Workspace and select Workspace Format.
- In the Workspace Format dialog | General tab, select Hide Line Captions checkbox.
|
To create self-relationship for non-identifying relationship
- Click the Non-identifying relationship icon on the toolbar .
- Move your mouse cursor over the work area.
- Double-click the selected entity on the Workspace.
|
|
TIP: Before you create a self-relationship, select Settings | Options | Physical Model | Self Relation Attribute Name/Caption and define a name for propagated attributes there (e.g. via prefix, suffix, application variable.) |
To add multiple relationships
- Press SHIFT and click the Relationship icon. See the blue frame in the icon now.

- Create as many relationships in you model as you need.
- Right-click the work area (or click the Relationship icon again) to turn this function off.
