Chat now with support
Chat with Support

Toad Data Modeler 7.3 - User Guide

Introduction User Interface Models and Model Objects
Physical Data Model
Entity Relationship Diagram Objects Basic Database Design Advanced Database Design
Universal Data Model Logical Data Model Working with Model Objects
Features and Tools
Application Variables Export/Import DDL Script Generation Graphics Model Actions Print Create New Project Reports Reverse Engineering Scripting and Customization About Templates Tips and Tricks Toad for Oracle Integration Toad Intelligence Central (TIC) Integration Tools Version Control
Options and Configuration Databases
Amazon Redshift 1.0 IBM DB2 LUW 9.5 IBM DB2 LUW 9.7 IBM DB2 LUW 10.1 IBM DB2 LUW 10.5 IBM DB2 LUW 11.1 IBM DB2 z/OS 10 IBM DB2 z/OS 11 Greenplum 4.1 Greenplum 4.2 Ingres 9.3 Ingres 10.0 EDB Postgres Advanced Server 10 Microsoft Access 2007/2010 Microsoft Azure SQL Database V12 Microsoft SQL Server 2005 Microsoft SQL Server 2008 Microsoft SQL Server 2012 Microsoft SQL Server 2014 Microsoft SQL Server 2016 Microsoft SQL Server 2017 Microsoft SQL Server 2019 MySQL 5.0 MySQL 5.1 MySQL 5.5 MySQL 5.6 MySQL 5.7 MySQL 8.0 Oracle 10g Oracle 11g Release 1 Oracle 11g Release 2 Oracle 12c Release 1 Oracle 12c Release 2 Oracle 18c Oracle 19c PostgreSQL 9.0 PostgreSQL 9.1 PostgreSQL 9.2 PostgreSQL 9.3 PostgreSQL 9.4 PostgreSQL 9.5 PostgreSQL 10 PostgreSQL 11 PostgreSQL 12 SQLite 3.7 Sybase ASE 15.5 Sybase ASE 15.7 SAP ASE 16.0 Sybase IQ 15.2 Sybase SQL Anywhere 11 SAP SQL Anywhere 17 Teradata 13 Vertica Database 8.0
Copyright Legal Notices

Arrange Relationship Lines

Relationship lines consist of:

  • Lines
  • Anchor points - End points directly connected to entity boxes. You can move them.
  • Handle points - Other points that can be added to relationship lines via CTRL key. Handle points allow you to select a part of relationship line to move or delete.

Move Lines, Anchor Points and Handle Points

To move Line or Handle point

  1. Select a relationship line.
  2. Place mouse cursor over a part of the line or over a Handle point.
  3. Drag and drop to change the position of the line/handle point.

To move single anchor point and break a line

  1. Select a relationship line.
  2. Place mouse cursor over an anchor point.
  3. Use drag and drop technique to change position of the break point.

Column to Column Alignment

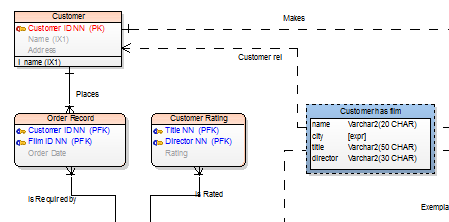
Lines can be rearranged manually to clearly express a link between columns in entities.

Add Handle Points

To break a horizontal line using one Handle point:

  1. Select a relationship line.
  2. Press CTRL and click the line in any place. A red cross icon appears. Release CTRL key.
  3. Move your mouse cursor left or right of the cross icon and move the highlighted part of the line up or down.
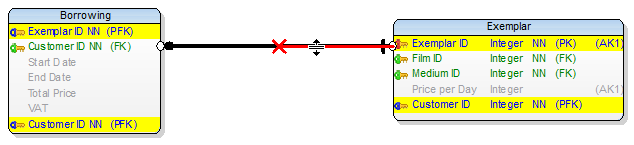

Result:

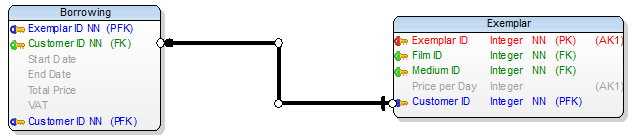
To break horizontal line using two handle points:

  1. Select a relationship line.
  2. Press CTRL and click the line. A red cross icon appears.
  3. Click the line somewhere else. A second red cross appears.
  4. Move the highlighted part between the two crosses up or down.

Result:

Add Horizontal or Vertical Lines Only

To create horizontally or vertically straight lines

(Assuming it is possible to link two entities using only horizontal/vertical line)

  1. Click the identifying or non-identifying relationship icon on Model Objects Toolbar.
  2. Click parent entity and hold SHIFT key. As long as you hold it, you can only create vertically/horizontally straight line.
  3. Move your mouse cursor over the desired position (child entity)
  4. Click the target entity and release SHIFT key.

TIP: Relationship lines between entities are created automatically once you click the parent and the child entity. The line created may not be ideal and you may have to edit it so it looks as you wish. But you can also create your own custom relationship line from scratch:

  1. Click the identifying or non-identifying relationship icon on Model Objects Toolbar.
  2. Click the parent entity and hold SHIFT key. As long as you hold it, you can only create vertically/horizontally straight line.
  3. Lead the line to the child entity. Click on Workspace to create a break point. By using break points, you can create any path you want.
  4. Finally, click the target entity and release SHIFT key.

Unhide Line

To display relationship line hidden behind objects on Workspace

Select the relationship and click button on Layout Toolbar or right-click the line | Line Style | Unhide Line.

Move, Hide, Find Relationship Names

To move relationship name

Right-click the selected relationship in particular place and select Move Caption Here or Move Caption to Parent or Move Caption to Child.

To hide relationship names on the Workspace

Click Hide Captions button on Layout Toolbar.

Note: You can also right-click the Workspace | Workspace Format | General tab | Hide Line Captions.

To find a relationship line by its caption on Workspace

Click the relationship caption. The appropriate relationship line will be highlighted on the Workspace.

To find a relationship caption by its line on Workspace

Click the relationship line, its caption will be highlighted in a frame.

Format Relationship Lines

To change format of all relationship lines on Workspace

Right-click the WS and select Workspace Format.

To change format of selected relationship(s)

Right-click the relationship and select Format.

Categories

Categories allow you to colorfully distinguish parts of your model. Categories can be assigned to entities, views and relationships.

Scenario

You would like to graphically distinguish all entities related to Ordering process. Or maybe you want to mark all entities containing personal data of your employees.

Solution: You can simply create a category, select its color and assign it to the appropriate entities. All the entities will share the category color.

To add a category to your model

  • Select Model Menu | Categories and click Add in the Category List  dialog.

or

  • Right-click the Categories folder in Model Explorer and select Add Category.,

or

  • In Entity/View/Relationship Properties dialog, click the ... button in the Category section.

To assign category to objects

  • Open Category Properties (via Model Menu or Model Explorer) | Switch to Objects tab and move objects to right section.

or

  • In Entity/View/Relationship Properties, choose the desired category in the Category section on General tab.

TIP:

  • If your model contains multiple categories, you can display captions of categories on Workspace. See Caption of Categories for more information.
  • To use category colors in Model Explorer, right-click in Model Explorer | Settings | enable Use Colors of Category to Draw. Object names will be now match their category color.

Change Notation

To change notation in your model

  • Go to View Menu | Notation | choose IE or IDEF1X.

IDF1X

IE

Data Warehouse Types

In physical model, you can define a Data Warehouse Type for your entities and graphically distinguish Fact and Dimension entities.

Example:

By default, the Data Warehouse options are not available and have to be activated in Settings menu.

To display Data Warehouse Type options

Select Settings Menu | Options | Physical Model | Entity tab | Form Settings | check Display Data Warehouse Type and Size.

Data Warehouse Type and Size options then become available in Entity Properties.

Related Documents

The document was helpful.

Select Rating

I easily found the information I needed.

Select Rating