Alternate Keys
You can create a relationship between a Parent and Child entities using:
- Key (Primary or Alternate Key) of parent entity
- Unique Index of parent entity
Alternate keys are used when you want to link two entities using two attributes. These two attributes make one unique item.
|
Scenario
You would like to create a composite alternate key which contains Title and Director attributes in the Film entity.
Solution
- Edit the Film entity.
- In the Entity Properties form click the Keys tab. Here, primary keys and alternate keys are stored, and you can manage them easily using the Add, Edit and Delete buttons. Now click Add to create a new key and confirm by clicking Apply.
- Edit the new key.
- Define its properties on tab General and then switch to the Attributes tab.
- From the window Available, select attributes Title and Director and click the Add arrow button to move them to the Selected window.
- Set properties in other tabs as you wish (e.g. Notes) and confirm.
Scenario: After creating the alternate key, you would like to use it for linking entities.
To select the alternate key for relationship
- Double-click the relationship.
- From the Parent Key box, select the alternate composite key title-director.

|
Indexes
To create an index
- Right-click an entity on Workspace and choose Add | Index. The Index Properties dialog opens.
or
- In the Entity Properties form, select the Indexes tab and click Add.
To edit indexes
- In the Entity Properties dialog | Indexes tab, double-click the index or Edit.
|

|
Above the Object Navigator Dropdown Menu, you can see name of entity that the index belongs to. Click the button on top right-hand corner to open the parent form (Entity Properties form). |
|
Object Navigator Dropdown Menu |
All indexes of selected entity are listed here. The box allows you to edit indexes quickly and comfortably from one place.
Use buttons to change order of indexes. Use Ctrl + Up to move index upwards or Ctrl + Down to move it downwards. |
|
General Tab |
Description |
|
Caption |
Logical attribute name. |
| Name |
Physical attribute name. |
|
Schema |
Schema selection. |
|
Unique |
Select this option to set the index as unique. Via unique indexes, you can link entities together. See Select Parent Key for Relationship for more information on available linking methods. |
|
Bitmap Index |
Database dependent item (Oracle). Select this checkbox to define the index as bitmap index. |
|
Generate |
Select it to generate the index in final SQL (DDL) script. (It is selected by default.) |
|

|
Note: Other options on the General tab vary according to the database platform you're using. Options specific to your database can be found in the "Databases" chapter. | |
|
Items Tab |
Option |
|
Available |
A list of all attributes of the entity. |
|
Selected |
Attribute(s) that have been assigned to the index. |
|
Notes Tab |
Tab for notes on the index. |
| Index Properties Tab |
Description |
|
Tablespace |
Select a tablespace or click the button on the right to define a new tablespace. |
|
Indextype |
Index type definition |
|
ODCI Parameters |
ODCI parameters definition |
To display indexes on the Workspace
Right-click the WS, select Workspace Format | Entity tab and select the Display Indexes checkbox.
See how indexes are displayed:

|
|
Note:Even when the indexes are not displayed, you can see which attribute belongs to which index (e.g. attribute Name is assigned to indexes i_name and i_name_address - (IX1,IX2) |
To delete an index
In the Entity Properties dialog select the Indexes tab, choose the index and click Delete.
Check Constraints
Check constraints can be created in the Check Constraints tab in Entity Properties form (for multiple column check constraints) or in the Attribute Properties dialog (for single column check constraint).
To add a check constraint
In Entity Properties form, select the Check Constraints tab and click Add.
To edit a check constraint
In Entity Properties form | Check Constraints tab, double-click the selected check constraint or press Edit .
|
General Tab |
Description |
|
Caption |
Logical check constraint name |
| Name |
Physical check constraint name |
|
Check Constraint Rule |
Select rule or click the button on the right to define a new rule. |
|
Generate |
Select it to generate the check constraint in final SQL (DDL) script (selected by default). |
|
SQL Tab |
Write SQL script for the check constraint here.
See About Templates for more information. |
|
Notes Tab |
Space for your notes on the check constraint. |
|
|
Note:
- To copy a check constraint, press CTRL and drag the constraint over the Check Constraints folder of a target entity in Model Explorer.
- To move a check constraint, drag it over the Check Constraints folder of a target entity in Model Explorer.
- To delete a check constraint, select it and click Delete in the Check Constraints tab of the Entity Properties form.
|
Triggers
To add a trigger
In Entity Properties form, select the Triggers tab and click Add.
To edit a trigger
In Entity Properties form, Triggers tab, double-click the selected trigger or press Edit.
Example: Trigger Properties dialog (Oracle 10g db)
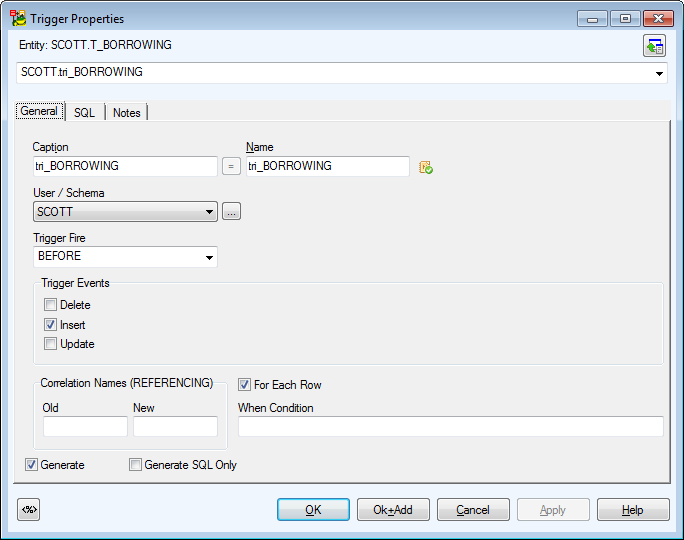
|
|
Above the Object Navigator Box, you can see name of entity the trigger belongs to. If you click the button in top right-hand corner, the parent form will open (Entity Propertiesin this case). |
|
General Tab |
Description |
|
Caption |
Logical trigger name |
| Name |
Physical trigger name |
|
Schema |
Schema selection box |
|
Trigger Fire |
Before, After (database dependent) - select a trigger fire. |
|
Trigger Events |
Delete, Insert, Update - select a trigger event. |
|
Generate |
Select to generate the trigger in final SQL (DDL) script (selected by default.) |
|
Generate SQL Only |
Select to generate the SQL code written in tab SQL only. |
|
SQL Tab |
Write SQL script for the trigger here.
About Templates |
|
Notes Tab |
Space for your notes on the trigger. |
Example: Trigger Properties dialog | SQL tab (Oracle 10g db)

|
|
Note:
- To copy a trigger, press CTRL and drag the trigger over the Triggers folder of a target entity in Model Explorer.
- To move a trigger, drag it over the Triggers tab (folder) of a target entity in Model Explorer.
- To delete a trigger, select it and click Delete on the Triggers tab in the Entity Properties form.
|
