Model Actions
Features and Tools > Model Actions > Model Actions
Basic Information
Model Actions can be opened by clicking Window | Model Actions or Model | Manage Model Actions.
This tool contains following Model features:
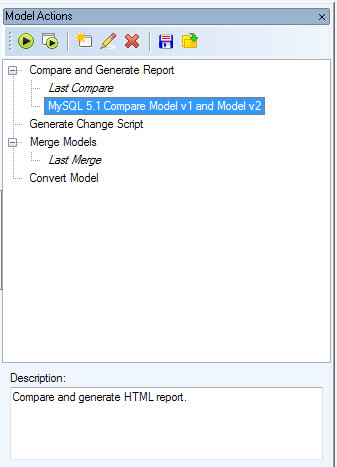
- Compare and Generate Report
- Generate Change Script
- Merge Models
- Convert Model
- Generate SQL
- Report
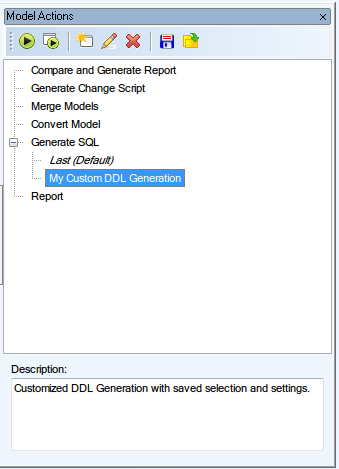
Using Model Actions helps you work more effectively. You can:
- Find the most used Model features all in one place
- Save Action Definitions for future use, even to a file
- Load Action Definitions to reduce time spent configuring Actions, even from a file
- Reduce the number of dialogs using Run Promptly button
|

|
Note: Action Definition is a custom configuration of an Action (e.g. Convert Model). Instead of configuring Action every time from scratch, you are now able to save its Definition for later use (e.g. Convert Model from DB2 10.5 to DB2 10.1). In the future you can simply execute the Action Definition without worrying about its settings.
If you clicked through Action dialogs and forgot to save the Action Definition in progress, worry not. Every executed Action creates an Action Definition called Last *Action*. It contains the settings of the last Action you ran.
Also please note that all saved Action Definitions are part of the model. You can transfer Action Definitions from one Model to another by saving them to a file in original Model and loading them from the file in target Model. |
Model Actions Options
| Run Action Definition Promptly |
Allows you to execute Action Definition with minimum of dialogs shown. |
| Run Action Definition |
Executes the selected Action/Action Definition. You can save the configuration as a new Action Definition in progress. |
| New Action Definition |
Executes the selected Action/Action Definition. An extra dialog displays asking you to enter name and comment for new Action Definition. |
| Edit Action Definition |
Allows you to go through the dialogs of an Action Definition and edit any options. |
| Delete Action Definition |
Removes Action Definition from list. |
| Save Action Definition to file |
Allows you to save selected Action Definition to a .txad file. |
| Load Action Definition from file |
Allows you to load an Action Definition from .txad file. |
Saving Action Definition
Action Definition can be saved by clicking the Save Action button which is located in the Review dialog (the last dialog every Action has).
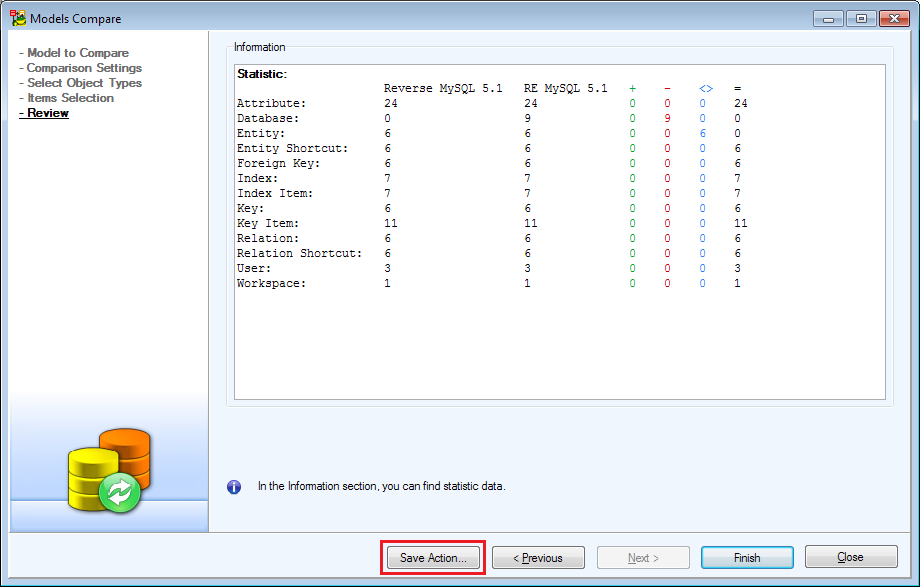
Fill in the new Action Definition name and an optional description. Click Save.

The newly saved Action Definition will now show up in the list.
Generate Change Script
Change Script
Features and Tools > Model Actions > Generate Change Script > Change Script
Change Script is useful for transferring changes done to your database or another model into the model you are currently working with. You can generate change script from a modified model or from a connection to a database or to a DDL script file. For executing the resulting script you will need another application such as Toad for Oracle. See Toad for Oracle® as Default Editor for more information.
For the list of databases for which Change Script Generation is supported in Toad Data Modeler see Supported Databases. For those supported you can either generate Simple Change Script or complete change script using a Generate Change Script wizard:
To generate change script
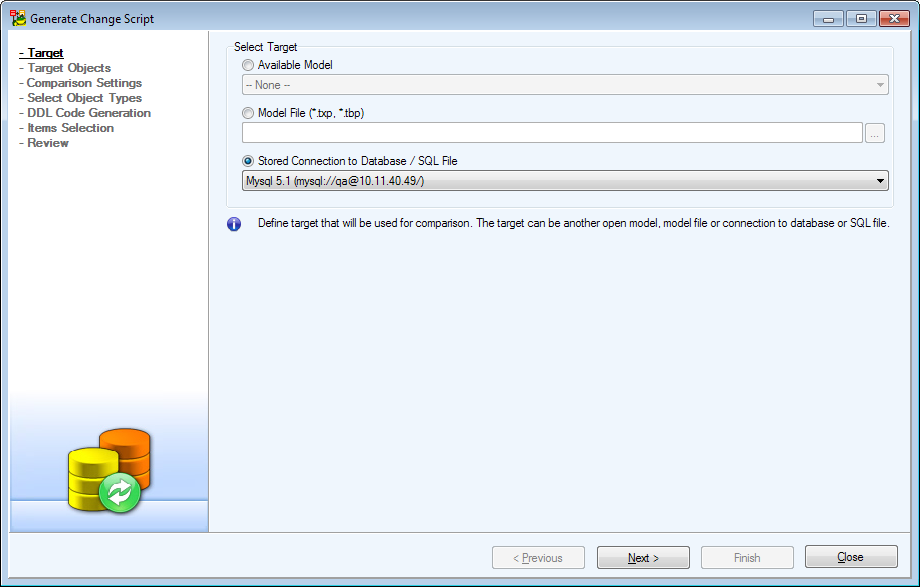
- Click Run Generate Change Script button or select Model | Generate Change Script or click Model Actions | Generate Change Script.

- Select your target:
- Available Model - Select any open model of the same type
- Model File - Select and browse for any saved model file of the same type
- Stored connection to Database/SQL file - Select any saved connection. See Connections for more information
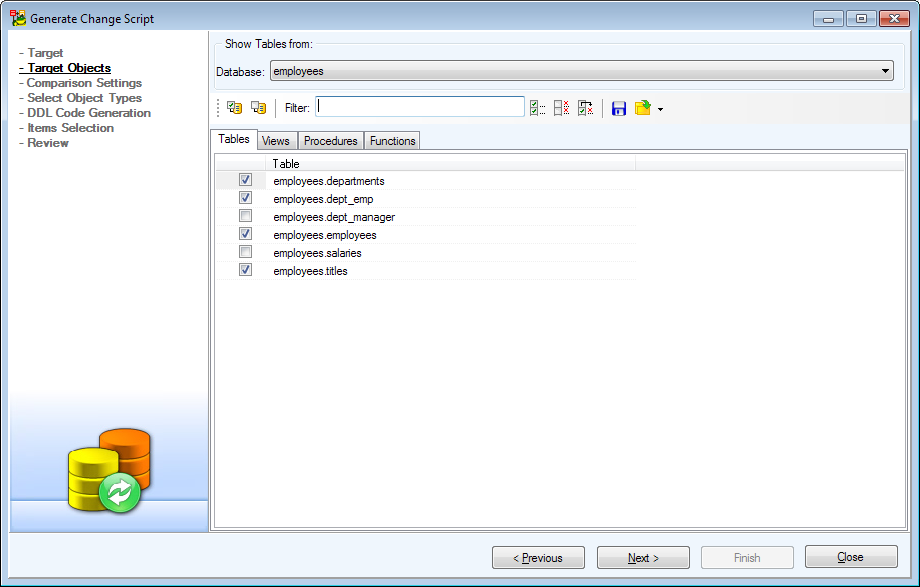
- If you select a connection to a database or to a DDL file as the target you need to select the target objects you would like to include in your change script. The following buttons and the filter can be used to easily select objects:
| Schema |
Select a specific schema you want to include in the target model, all tables or all selected tables. |
| Select All on All Tabs |
Selects all objects on all tabs. |
| Deselect All on All Tabs |
Deselects all objects on all tabs. |
| Filter |
Type to filter objects.
|
|
TIP: Use wildcards - example: "*user" or "?ser".
* - replaces unlimited number of characters
? - replaces any single character | |
| Select All |
Selects all object on the current tab. |
| Deselect All |
Deselects all object on the current tab. |
| Invert Selection |
Inverts selection on the current tab. |
| Select Parent Tables |
Selects all parent tables of the currently selected tables. |
| Select Child Tables |
Selects all child tables of the currently selected tables. |
| Select Parent and Child Tables |
Selects all child and all parent tables of the currently selected tables. |
| Export Selection |
Export selection as a *.wsxr file. |
| Import Selection |
Imports a selection from *.wsxr file. |
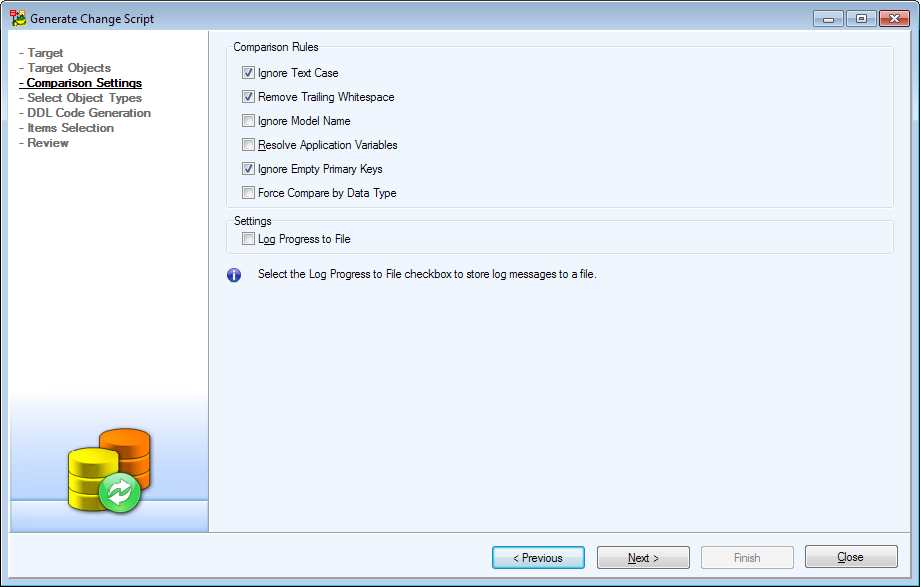
- Adjust your comparison rules and settings:
| Ignore Text Case |
Toad Data Modeler will ignore all differences in text case when pairing model objects.
E.g. “Entity1”, “eNTITY1”, “ENTITY1” are treated as identical. |
| Remove Trailing Whitespace |
Trailing whitespace, i.e. any whitespace characters at the end of a line including blank lines at the end of bodies of definitions, will be ignored during comparison.
E.g. If checked, the following pieces of script will be treated as identical:
"Insert Into "Test" Values("aaa");"
"Insert Into "Test" Values("aaa");
"
"Insert Into "Test" Values("aaa"); " |
| Ignore Model Name |
Ignores the name of the model. Set the name in Model Properties | Model. |
| Resolve Application Variables |
Resolves application variables during comparison. If left unchecked variables will be compared as variables.
|
|
NOTE: In names, application variables are supported in the following objects: Relations, Keys, Check Constraints, and Indexes. For more information on application variables see Application Variables. |
E.g. Your name is John Doe Your user name is “jdoe”. An index is called “Index1_<%Author%>”. If you check Resolve Application Variables the index will be treated as “Index1_jdoe”. If unchecked it will be treated as “Index1_<%Author%>”. |
| Ignore Empty Primary Keys |
Primary keys with no attributes will be ignored during comparison. |
| Pair Primary Keys Regardless of Names |
Primary keys will be mapped with no regard to their names. |
| Force Comparison by Data Type |
Objects and properties will be compared also according to their data types.
E.g. Source and target attributes in domains are named identically but they have different data types. If checked, they will be marked as different. If unchecked, they will be considered identical because their names and the names of the domains are identical. |
| Log Progress to File |
Progress and errors will be logged to a file. |
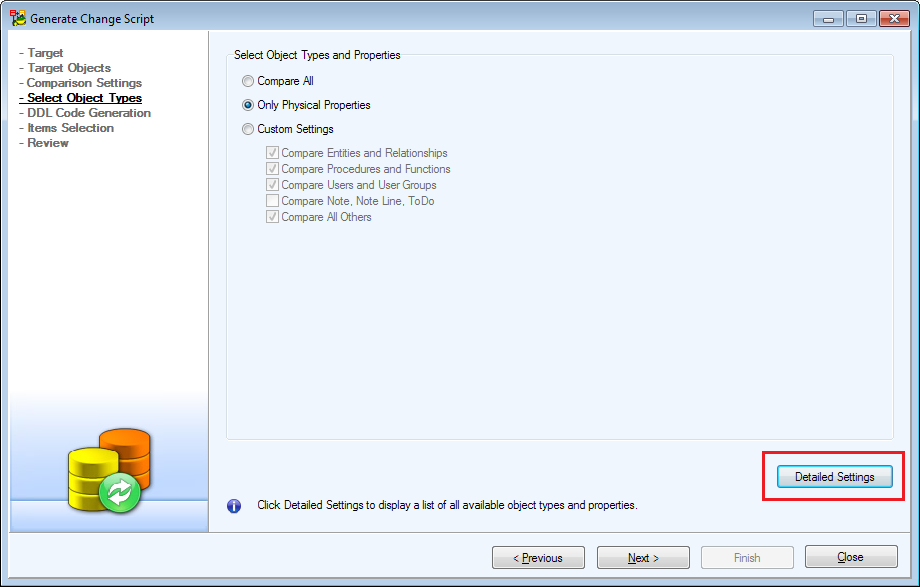
- By default Simple Settings are displayed. Select which object types and properties from several preset options will be compared between the models. Switch to Detailed Settings to display finer settings in order to select specific object types and properties.
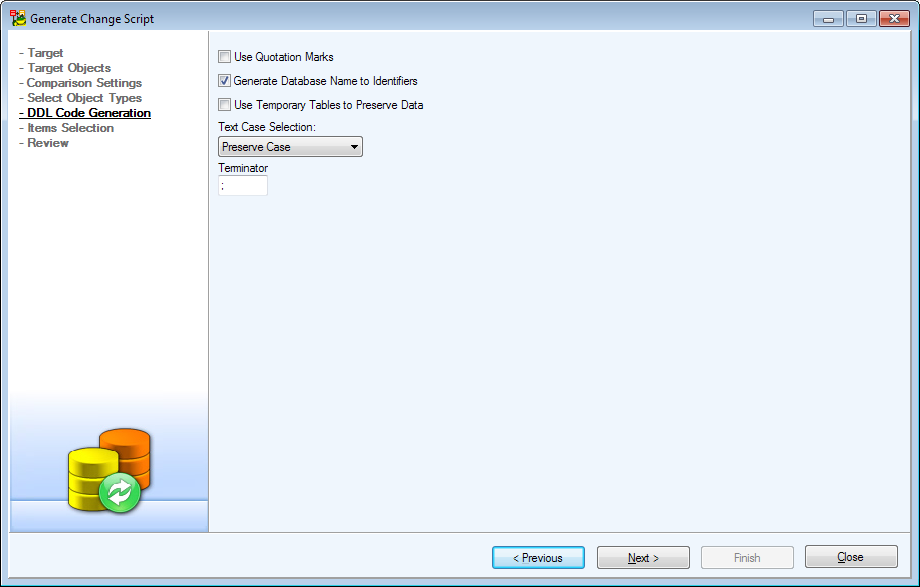
- Adjust settings for DDL Code Generation. The following options for DDL Code Generation are common for more database types. The wording of the options is dependent on the database type selected.
| Use Quotation Marks |
Names of objects and properties will be generated in quotation marks (or as delimited identifers etc.). |
| Generate Database Name to Identifies |
Names of objects and properties will be generated together with the name of the related database, user or schema or similar. |
| Text Case Selection |
Select the case in which the change script will be generated:
- Preserve Case
- Lower Case
- Upper Case
|
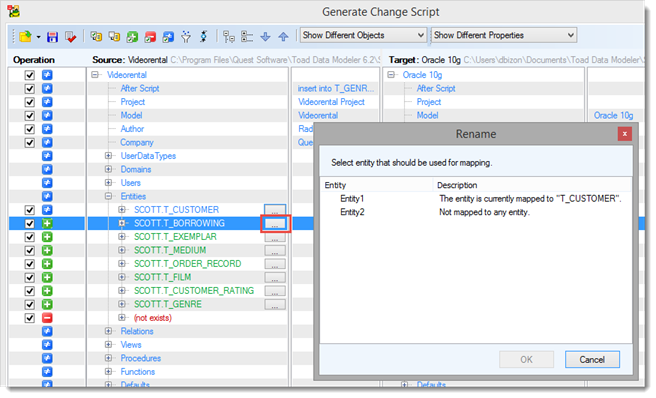
- Map entities and attributes in the last step. Click the Rename button (
 ) to map an entity or attribute to a target entity or attribute. The Description column in Rename dialog displays the current state of the object. Objects can be unmapped.
Compare Tree displays all differences between the two given models. The generated change script modifies the target model on the right so it matches the source model on the left. Check the changes you would like to execute.
Compare Tree Overview
| Import Selection |
 |
Import selection from a saved file. |
| Export Selection |
 |
Save selection to a file. |
| Verify |
 |
Runs the verification process.
The verification might return a warning  . Details are available in Verification Log. . Details are available in Verification Log. |
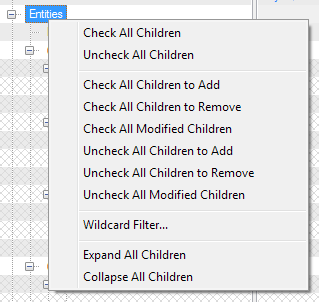
| Check All |
 |
Checks all items. |
| Uncheck All |
 |
Unchecks all items. |
| Check All to Add |
 |
Checks all items that exist in the Source model, but not in the Target model (CREATE). |
| Check All to Remove |
 |
Checks all items that do not exist in the Source model, but exist in the Target model (DROP). |
| Check All to Modify |
 |
Checks all items that exist in both models and are different (ALTER). |
| Wildcard Filter |
 |
Opens the Wildcard Dialog where you can define settings for bulk selection/deselection of the Action box of the items listed on page Select Items. |
| Refresh Necessitated Items |
 |
Some objects are related together (e.g. entity and domain, entity and relationship). In case you uncheck an object or property in Select Object Types step and a related object or property is selected, the unchecked object or property will be automatically selected too.
E.g. You uncheck a domain in Select Object Types but you keep an attribute of the domain type checked for conversion. In the next screen the domain will be selected for conversion (and highlighted in gray). This is because of its relationship with the attribute, which cannot exist without the domain.
If you uncheck the attribute, the domain will still be checked for conversion. This is where you use this button. It inspects all checked objects and removes the domain highlighted in gray since the attribute is no longer checked. That means the domain is no longer necessary, since it has no relationships with currently checked objects and you unchecked it in Select Object Types step. |
| Display options for objects |
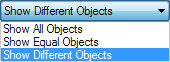 |
Compare Tree will show only:
- Show All Objects
- Show Equal Objects
- Show Different Objects
|
| Display options for properties |
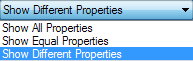 |
Compare Tree will show only:
- Show All Properties
- Show Equal Properties
- Show Different Properties
|
|
Source |
- |
The updated or modified model. |
| Target |
- |
The model for which you want to generate change script. |
| Operation |
- |
Check this checkbox to generate change script for the difference.
Uncheck this checkbox to not generate change script for the difference.
Default selection: Default selection of the Action checkboxes depend on your settings on page Settings in the Options for Default Selection of Items area. If you select all the options in this area, the Action checkboxes will be selected for all changes (CREATE, DROP and ALTER) by default. |
Compare Tree Icons

Difference between original model and Target model.

This object exists in original model but does not exist in Target model.

This object is missing in original model but exists in Target model.
Right-click menu
Right-click any item to display the following menu:
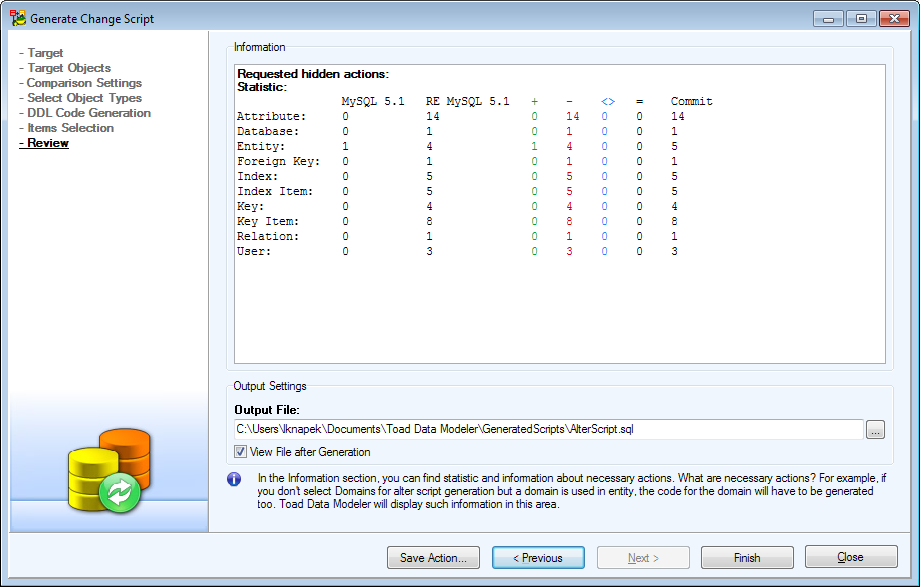
- Review your comparison. You can set your own path for change script output file here. Click Save Action to save the comparison as Model Action for repeated use. See Model Actions for more information.
Click Finish to generate the script.
Change Script Generation - Temporary Tables
You can decide whether or not to use Temporary Tables during Change Script generation. The settings are available in Settings | Options | Physical Model | *Specific Database*| Change Script Settings.
- Use Temporary Tables to Preserve Data – If you uncheck this checkbox, a sequence of commands DROP TABLE / CREATE TABLE will be generated instead of temporary tables. (The exception are the changes in data types where ALTER TABLE command is generated.)
- Use Temporary Tables to Preserve Data on Data Type Change – This option is only available with Use Temporary Tables to Preserve Data option checked. Unchecking this option results in generating ALTER commands where there are changes in data types instead of using Temporary Tables.
|
|
Note: For Microsoft Azure SQL Database, Microsoft SQL Server, and PostgreSQL, if you uncheck the Use Temporary Tables to Preserve Data checkbox, temporary UDT/DictType will not be generated either. (They are created together with Temporary Tables.) |
Simple Change Script
Features and Tools > Model Actions > Generate Change Script > Simple Change Script
Simple Change Script is generated for one entity. You might find it useful when you want to transfer minor changes in your model to your database.
To generate Simple Change Script
- Right-click the entity you want to generate change script for and select Change Script | Run
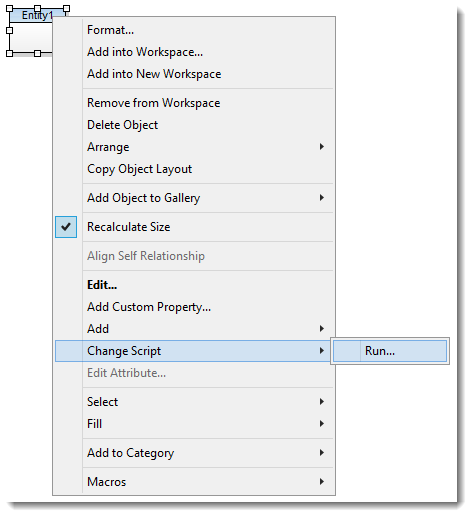
- Follow the steps in Change Script to create simple change script

 items) to generate the CREATE statement.
 items) to generate the DROP statement.
 items) to generate the ALTER statement.