
Migrating large numbers of Power Apps objects requires careful planing. Organize the Power Apps objects into collections to make large lists more manageable. Collections can be created for Environments, Apps, Solutions, Flows and Connections. The process described below is common to all Power Apps objects.
In this topic:
Adding Power Apps Objects to Collections
You can add Power Apps objects to collections in several ways:
- Select one or more Power Apps objects and add to a new collection
- Select one or more Power Apps object and add to an existing collection
- Use a CSV file to add Power Apps objects to one or more collection
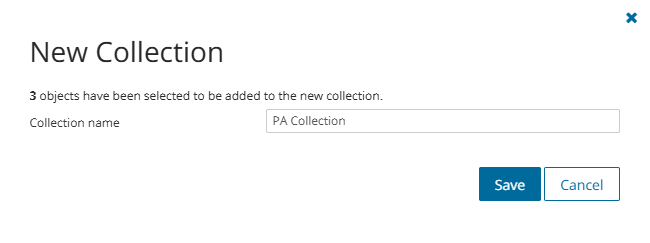
To add selected Power Apps objects to a new collection:
- From the project dashboard, click Open in the Power Apps tile to open the Power Apps migration workspace.
- Click a Power Apps object tab and select the Power Apps objects you want to add to the collection.
- From the Actions toolbar, click Collections > Create New Collection. The New Collection dialog opens.
- Enter a collection name in the Collection name field and click Save to add the selected Power Apps objects to the collection.
To add selected Power Apps objects to an existing collection:
- From the project dashboard, click Open in the Power Apps tile to open the Power Apps migration workspace.
- Click a Power Apps object tab and select the Power Apps objects you want to add to an existing collection.
- From the actions toolbar, click Collections > Add To Collection. The Add to existing collection dialog opens.
- Select a collection from the Collection name dropdown and click Save to add the selected Power Apps objects to the collection.

To add Power Apps objects to one or more collections with a CSV file:
Using a CSV file provides the following additional benefits:
- Multiple collections can be created with the same CSV file.
- Existing collections can be specified in the CSV file to add additional objects.
- Power Apps objects can be listed in multiple collections.
This is a two-step process as described below to add Power Apps objects to an existing collection from a Power Apps object tab:
Step 1: Prepare the CSV file
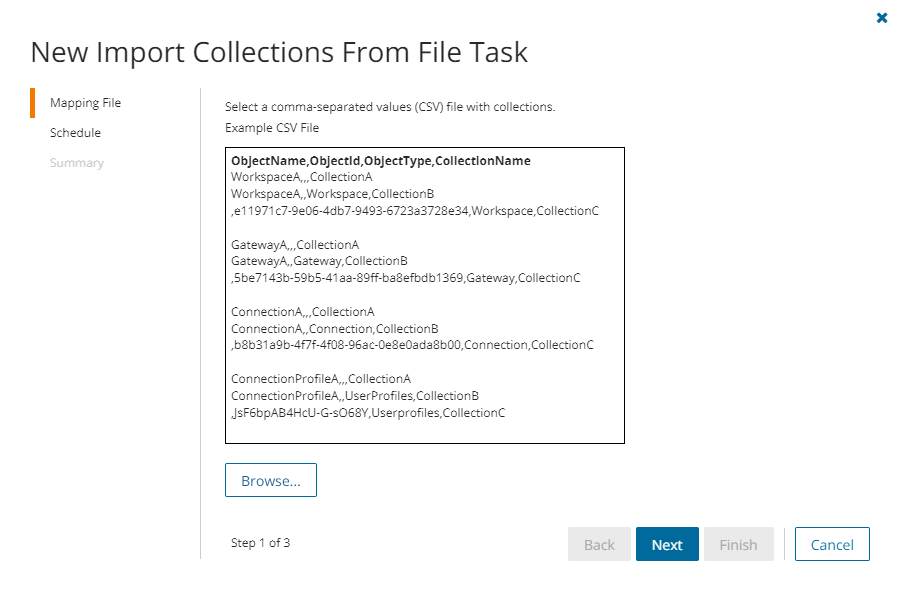
- From the actions toolbar, click Collections > Import Collections. The New Import Collections from File Task wizard starts.
- From the Mapping File step, click Download Example File. A ZIP file is downloaded.
- Extract the CSV file and use it to prepare your import file in one of three formats described below:
NOTE: CSV file names with non-ASCII characters are not supported. Power Apps objects in the CSV that have not been discovered cannot be added to a collection.
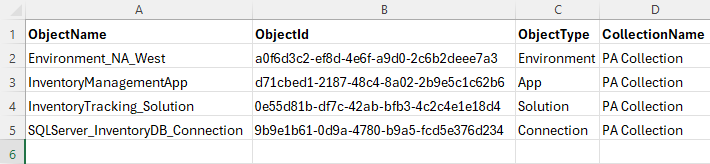
Use the format shown below to prepare the CSV file. The minimal set of columns are described below.
- ObjectName - specify the name of the Power Apps object. If you provide this value, specifying the ObjectId is optional.
NOTE: If there are rows with the same ObjectName, only the last row will be added to the collection.
- ObjectId - provide the GUID (Globally Unique Identifier) of the Power Apps object. If you include this value, then ObjectName is optional.
NOTE: Use the Premigration report to get the Object Ids.
- ObjectType - enter the type of the Power Apps object. The options are Environment, App, Solution, Flow and Connection. This field is required.
- CollectionName - provide the name of the collection. This field is required. If a collection name specified in the CSV file does not exist, a new collection will be created with the specified name .
- ObjectName - specify the name of the Power Apps object. If you provide this value, specifying the ObjectId is optional.

Step 2: Import the CSV file
- Open a Power Apps object tab.
- From the actions toolbar, click Collections > Import Collections. The New Import Collections From File Task wizard starts.
- Mapping File
- Click Browse and select the CSV file. The selected CSV file name appears.
- Schedule
- Choose from one of three options to schedule the task. The scheduler will be activated after you complete the task wizard.
- Run now - task runs immediately.
- Run later - task must be started manually.
- Schedule - task will be started at a future date and time entered in the corresponding calendar field.
- Click Next.
- Choose from one of three options to schedule the task. The scheduler will be activated after you complete the task wizard.
- Summary
- Verify the task specifications as described below:
- Name - name of the task. The default name is Import Collections From File. You can specify a custom name.
- Scheduled start - date and time when the task will start. Now indicates that the task will start immediately.
- Click Back to revise or review a previous step or click Finish to complete the task wizard and start the task as scheduled.
- Click Finish.
- Verify the task specifications as described below:
To verify the addition of a Power Apps object to a collection:
- Check the Collections column in the Workspaces List View, Gateways List View, Connections List View or the Connection Profiles List View that indicates the most recent collection where the corresponding Power Apps object has been added and the number of additional collections that also contain the Power Apps object.
- Select a Power Apps object from its list view to open the Power Apps object Detail pane. Check the Collections property that lists all the collections where the Power Apps object has been added.
Working with the Collections Dashboard
The Collections Dashboard shows the collection-specific summary, allows you to see Power Apps objects added to it, create tasks for them, and monitor the progress of tasks.
To view the collection dashboard for an existing collection:
- From the project dashboard, click Open in the Power Apps tile to open the Power Apps migration workspace.
- From the top-right corner of the workspace, click Select Collection and then select the collection to view. The collection Dashboard is displayed.
- Open the Power Apps tab. You will see the list of Power Apps objects that belong to the collection.
To remove items from a collection:
- From the actions toolbar, click Collections > Remove from Collection.
- In the confirmation dialog click Remove to remove the selected Power Apps objects from the collection.
To rename the collection:
- Click Collections > Rename Collection in the Actions toolbar of the collections dashboard.
To delete the collection:
- Click Collections > Delete Collection in the Actions toolbar of the collections dashboard.
To see the tasks for collection-specific Power Apps objects:
- Open the Tasks tab.
To see the events related to the collection:
- Open the Events tab.
To return to the Power Apps migration workspace:
- Click the collection dropdown at the top-right corner of the page, and select Show All.