Before you start, verify that you have discovered all the Microsoft 365 groups without teams. Make sure that all accounts that are members of these groups, have been discovered and matched with accounts in the target tenant. Group members are not added to groups in this step. Use the migration task to migrate group membership.
Considerations
A Group Map task will be automatically created in the Accounts and User Data migration workspace of the project. The purpose of this task is to match the M365 group accounts so that the On Demand Migration for SharePoint service can use the mapping for membership migration.
Starting the provisioning task
- Log in to Quest On Demand and choose an organization if you have multiple organizations.
- From the navigation pane, click Migrate > Projects to open the My Projects list.
- Create a new project or open an existing project.
- Click the Teams tile, or click Open from the Teams tile to open the Teams dashboard.
- Click theM365 Groups tab.
- Select one or more groups from the Groups List View.
- Click Provision. The New Groups Provisioning Task wizard starts. Each step is described below:
- Provision Options
These options control the actions of the provisioning task if the selected groups already exist in the target tenant. Groups that are not in the target tenant will be automatically provisioned.
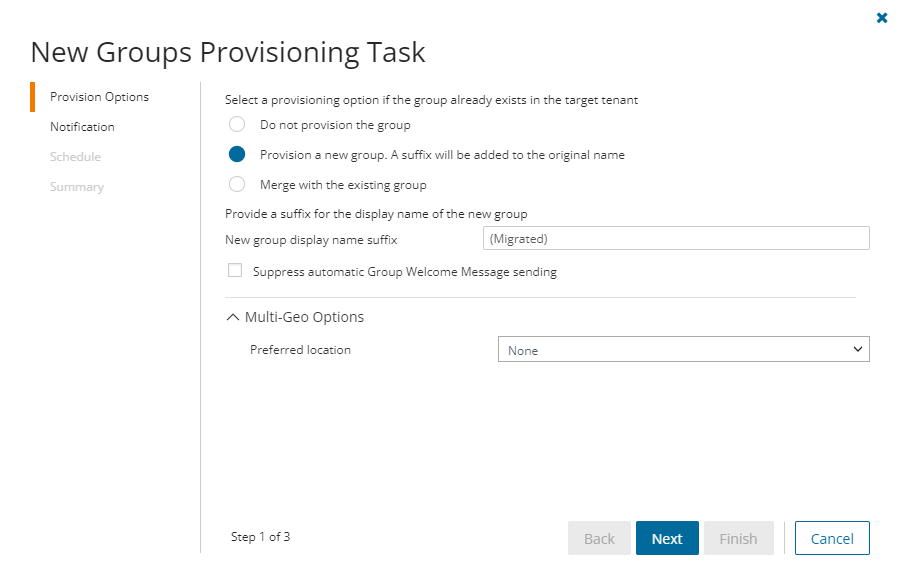
Select and configure the options as described below:
- Do not provision the group - The group will be skipped if it exists in the target tenant.
- Provision a new group. A suffix will be added to the original name - A new group will be provisioned with the specified suffix appended to the group name
- New group display name suffix - Specify a suffix to append to the group name. The default suffix is (migrated).
- Merge with the existing group - Select this option to set up a mapping between a source and target group with the same name. When members are migrated with the migration task, the accounts that are members of the source group will be added to the same group in the target tenant.
- Suppress automatic Group Welcome Message sending - Select the check box to prevent group members from receiving a welcome message.
- Multi-geo options: Preferred location - Leave the preferred data location as Nonewhich is the default if the target is a multi-geo tenant and you have already configured a default geo location for the target tenant. All groups will be migrated to the same region. To set up the default geo location, see Configuring the Migration Project. If you change the default settings, please allow at least 5 minutes for the new settings to take effect. Alternatively, select the geo location configured for the target tenant.
-
|

|
TIP: To migrate groups to different regions, the best practice is to create a collection of groups for each region. Example collection names could be "Migrate to EUR", "Migrate to JPN" or "Migrate to NAM". Then use the collection as a filter to create the provision task.
For more information about multi-geo tenants, see Microsoft 365 Multi-Geo. |
- Notification
- Send notification email once the task is completed - select this option to send a notification email when a provisioning task completes.
- Only in a case of failure - select this option to send the email if the provisioning task fails to complete successfully.
- Recipients - enter the email address of the recipients of this email. You can specify multiple recipient email addresses separated by semicolon.
- Click Next.
- Schedule
- Choose from one of three options to schedule the task. The scheduler will be activated only after you complete the task wizard.
- Run now - task runs immediately.
- Run later - task must be started manually.
- Schedule - task will be started at a future date and time entered in the corresponding calendar field.
- Click Next.
- Summary
- Verify the task specifications as described below:
- Name - Name of the task. The default name is Provision Groups. You can specify a custom name.
- Source tenant - Name of the source tenant in this project.
- Target tenant - Name of the target tenant in this project.
- Scheduled start - Date and time when the task will start. Now indicates that the task will start immediately.
- Click Back to revise or review a previous step or click Finish to complete the task wizard and start the task as scheduled.
The provisioning task is created. You can track its progress from the Tasks tab, view the summary on the Dashboard or monitor alerts and notifications from the Events tab.
To manage large lists of M365 groups in a project, you can remove one or more M365 groups from the groups list view that you don't need for migration. The M365 groups that are removed will remain in the source tenant and you must re-discover the groups in the project when you need them for migration.
When 365 groups are removed, all associated items, mappings and migration information will also be removed from the project. When these M365 groups are rediscovered, they will be treated as new M365 groups in the project and the process of provisioning and migration of the M365 groups and related items must be repeated.
If these groups are listed in other projects, they will be displayed in those projects.
- Log in to Quest On Demand and choose an organization if you have multiple organizations.
- From the navigation pane, click Migrate > Projects to open the My Projects list.
- Create a new project or open an existing project.
- Click the Teams tile, or click Open from the Teams tile to open the Teams dashboard.
- Select the Teams tab and select List View if not already selected.
- Select the groups you want to clear.
|
|
TIP: Use filters, search or collections to quickly navigate through the list of groups. |
- Click More and then click Delete.
- The Remove Objects confirmation dialog opens.
- Click Remove to remove the selected groups from the list.
The Collect Group Statistics Task for M365 Groups conducts an assessment of all groups in the source tenant and matching groups in the target tenant. It provides information like member count, planner count and planner task count for the groups selected in the source tenant, and optionally in target tenant if the group is already provisioned.
Each Collect Group Statistics Task generates events. Events are milestones that a task achieves as it runs. For example, when a M365 Groups Collect Group Statistics Task starts, an event is logged and it appears in the events list. When the number of groups that are selected for assessment is large, the M365 Groups Collect Group Statistics Task divides the total number of groups into manageable sets. Each set is called a batch. When a batch of groups is assessed, another event occurs.
In this topic:
Starting a Collect Group Statistics Task
- Log in to Quest On Demand and choose an organization if you have multiple organizations.
- From the navigation pane, click Migrate > Projects to open the My Projects list.
- Create a new project or open an existing project.
- Click the Teams tile, or click Open from the Teams tile to open the Teams migration workspace.
- Select the M365 Groups tab. Then select any group in the list to activate the menu options.
- Click Collect Statisticsfrom the Actions menu. The New Collect Group Statistics Task wizard starts. Each step is described below:
- Collect Statistics Options
- Choose from the following options
- Include collection of statistics from target tenant - select this option to include the same groups from the target tenant and generate the Comparison Report. Statistics will only be collected for the target tenant groups if a provision task has been executed for the group previously.
- Collection levels:
- Basic (Fast) - collect statistics about member count and content size (in GB) for the groups selected in the source and target tenant if provisioned.
- Advanced (Slow) - collect statistics about member count and content size (in GB), planner count and planner task count for the groups selected in the source and target tenant if provisioned. The task requires more time to run.
|
|
NOTE: When a Collect Group Statistics task is started with this option selected, the temporary Migration Service for the source tenant will be added to all groups. The additional information collected by the tasks are used in the migration process for teams and groups, and helps improve the performance of the migration task. |
- Click Next
- Notification
- Send notification email once the task is completed - select this option to send a notification email when a discovery task completes.
- Only in a case of failure - Select this option to send the email if the discovery task fails to complete successfully.
- Recipients - enter the email address of the recipients of this email. You can specify multiple recipient email addresses separated by semicolon.
- Click Next.
- Schedule
- Choose from one of three options to schedule the task. The scheduler will be activated only after you complete the task wizard.
- Run now - task runs immediately.
- Run later - task must be started manually.
- Schedule - task will be started at a future date and time entered in the corresponding calendar field.
- Click Next.
- Summary
- Verify the task specifications as described below:
- Name - name of the task. You can specify a custom name. Default name is Collect Group Statistics Task.
- Source tenant - name of the tenant where the statistics will be collected.
- Target tenant - name of the target tenant in this project.
- Scheduled start - date and time when the task will start. Now indicates that the task will start immediately.
- Click Back to revise or review a previous step or click Finish to complete the task wizard and start the task as scheduled.
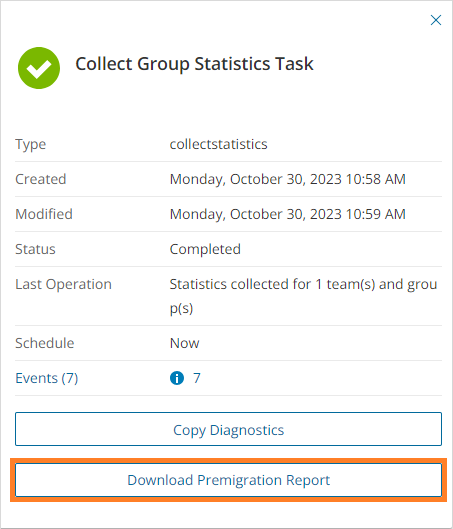
Reviewing the Collect Groups Statistics Task
- Open the Tasks tab.
- Select the Collect Group Statistics task for groups that you want to review.
- In the task details pane that opens, the information presented is as described below:
- Type - Type of the task. The type is collectstatistics.
- Created - Date and time when the task was created.
- Modified - Date and time when the task was last updated.
- Status - State of the task.
- Last Operation - The action that was most recently performed in this task.
- Schedule - Date and time when the task started. Now indicates that the task started immediately after the task was created.
- Events (number) - The number of events that the task encountered.
Reviewing the statistics collected
- Open the Tasks tab.
- Select the Collect Group Statistics Task that you want to review.
- From the task details pane, click Download Premigration Report.
- Download and save the ZIP file to a suitable folder, and extract the report.
|
|
NOTE: Premigration reports are also available from the following tasks:
- Discover All
- Discover From File
|
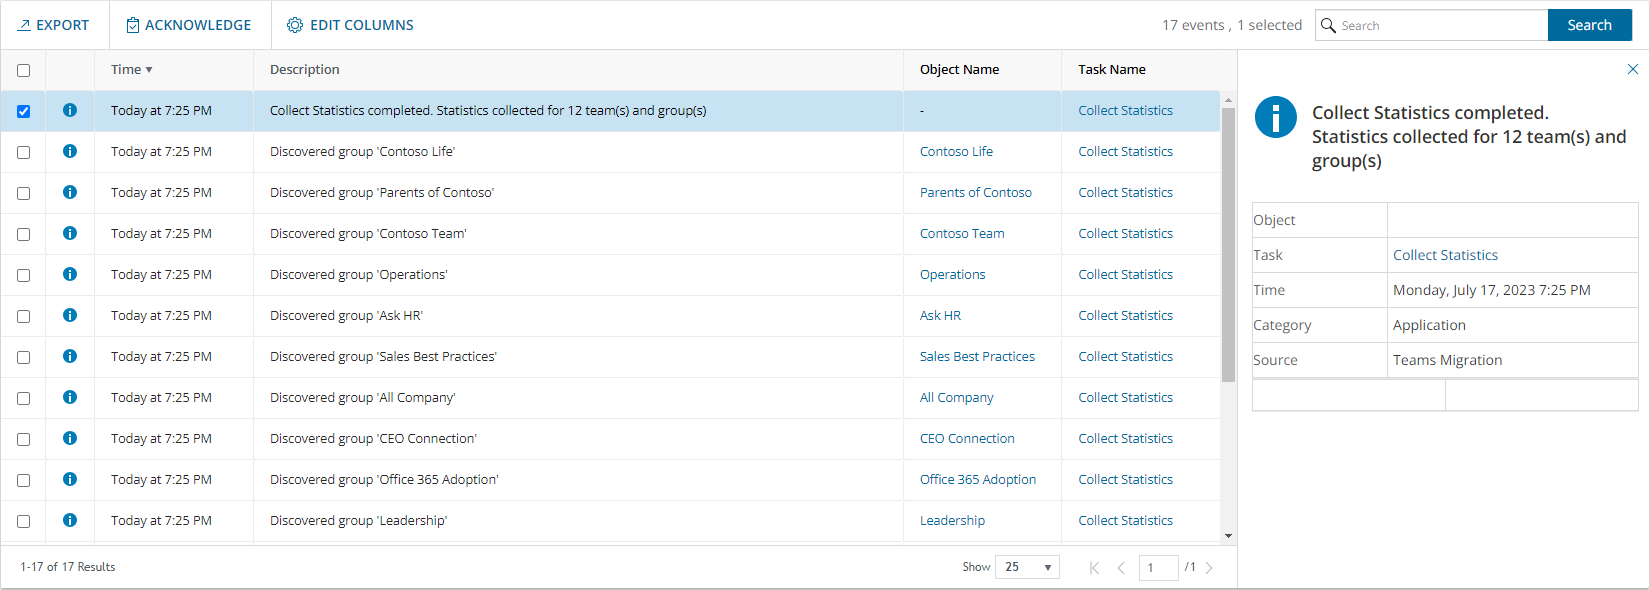
Reviewing the events for the Collect Group Statistics Task
- Open the Tasks tab.
- Select a Collect Group Statistics Task for groups that you want to review.
- In the task details pane that opens, click Events (number). The Events tab opens with a filtered list of events for the selected task.
- Select an event that you want to review. In the task details pane that opens, the information presented is as described below:
- Object - name of the group if applicable.
- Task - name of the task.
- Time - date and time when the event occurred.
- Category - type of task. the value is Application.
- Source - the migration workspace from where the event was generated. The value is Teams Migration.
Before you start, verify that you have provisioned all the Microsoft 365 groups without teams. See Provisioning Groups for more information. Migration will be skipped for all groups that are not yet provisioned.
In this topic:
Considerations
- When groups are migrated, the account that is assigned the Migration Service role is added to the group. If dynamic membership is enabled, the rules are modified to include this account. This temporary role is required for migrating groups by the On Demand Migration service.
- The migration service performs a full comparison during a remigration between the source and target, ensuring that messages are not moved or deleted, and folders are not moved, renamed, or deleted in the target.
Starting a Microsoft 365 Groups Migration Task
- Log in to Quest On Demand and choose an organization if you have multiple organizations.
- From the navigation pane, click Migrate > Projects to open the My Projects list.
- Create a new project or open an existing project.
- Click Teams from the project tiles. Click Open from the Teams tile to open the Teams dashboard.
- Click theM365 Groups tab.
- Select one or more groups from the Groups List View that are provisioned (State = Provisioned)
- Click Migrate. The New Groups Migration Task wizard starts. Each step is described below:
- Start
- Task Name - You can specify a custom name. The default name is Migrate Groups.
- Use the settings from an existing migration template for this task - select this option if you have already saved a previous migration templates. if this is the first time you are migrating mailboxes, keep this option unchecked.
- Select template - select a template that you previously created, from the dropdown list.
- Go to Summary step - select this option to preserve the settings and go directly to the last step of the wizard. If you do not select this option, but you have selected a template, you can step through the wizard and edit the settings in the template.
- Click Next.
- Migration Options
- Group mailbox - Select this option to migrate Group Mailbox.
- SharePoint Content - Select this option to migrate associated SharePoint sites including files, One Note, OneDrive Shared Library and other supported tools.
- Include site level term group for site migration - select this option to add site level metadata to the target Global Term Store. The Global Term Store must be migrated before you can use this option, otherwise an error will be logged as an event. For more information, see Migrating the Global Term Store.
- Planner - Select this option to migrate the group Planner.
- Group Membership - Select this option to migrate group members. If this option is not selected, group members will not be migrated.
- File Version Options
- Choose the migration option for file versions associated with groups selected for migration.
- Latest version only - This is the default selection. The most recent version of the file will be migrated. All other versions will be ignored.
- More versions - Additional versions of a file will be migrated based on the options described below. Large version sets take a significantly long time to migrate.
- Number of versions - The maximum number of version to migrate. The available choices are: 2, 5, 10, 30, 60, 90 and 365. When you specify the number of versions, additional options can be selected.
- Latest version and preceding versions - The version count includes the latest version and the preceding versions in chronological order restricted to the Size Limit of the latest version. For example, if you choose to migrate 5 versions, then the most recent version and 4 preceding versions will be migrated as long as the most recent version does not exceed the selected size limit specified.
- Latest version and daily latest from preceding days - The version count includes the latest version and the latest version from each preceding day restricted to the Size Limit of the latest version. For example, if there are many versions of a site and you choose to migrate 5 versions, then the most recent version and the latest version from each of the 4 preceding days will be migrated as long as the most recent version does not exceed the selected size limit specified.
- Size limit - This setting is available if the Latest version and preceding versions or the Latest version and daily latest from preceding days option is selected. By default, the size limit is 80 MB. You can configure the size limitation by selecting from one of the possible values in the dropdown list. If the size of the latest file version exceeds the selected size limit, the latest version will be migrated and previous versions will be ignored. If the size of the latest file version does not exceed the selected size limit, then the file and its versions will be migrated based on your selection between Latest version and preceding versions or Latest version and daily latest from preceding days.
- All Versions - The latest version of the file will be migrated, and all previous versions of the file will be migrated if the latest version does not exceed a specified size limit. This option requires significantly more time to migrate all the versions.
- Size limit - This setting is available if the All Versions option is selected. By default, the size limit is 80 MB. You can configure the size limitation by selecting from one of the possible values in the dropdown list. If the size of the latest file version exceeds the selected size limit, the latest version will be migrated and previous versions will be ignored. If the size of the latest site version does not exceed the selected size limit, then the file and its versions will be migrated.
- Click Next.
- SharePoint Permission Options
- Select how Sharing Links permissions are migrated. Direct permissions are always migrated.
- Migrate permissions - select this option so that unique permissions associated with web, list and list items are migrated. If you clear this option all other options in this step are deactivated and permission migration is prevented. When permissions are not migrated, the permissions for new migrations of web, list and list items, that are not already on the target tenant, will be inherited from its parent. The permissions will not be changed for migrations of content that was already migrated to the target tenant.
- Migrate permissions only for previously migrated webs and lists - select this option to migrate permissions for webs and lists only. Permissions will be merged with any existing permissions on the target tenant. List item permissions are not migrated with this option because list item permissions cannot be migrated separately from the list item. To re-migrate list items and its permissions, re-migrate the whole list without selecting this option. Selected objects must be in a migrated or migrated with issues state for this option work.
- Do not migrate Sharing Links permissions - select this option to ignore Sharing Links permissions.
- Migrate Sharing Links permissions as direct permissions. Migration is slower - select this option to migrate Sharing Links permissions. These permissions will be migrated as direct permissions. The conversion and migration of Sharing Links permissions takes more time to migrate.
- Click Next.
- SharePoint File Options
- Choose from the following options to determine how changes to list items that were previously migrated should be remigrated:
- Refresh list items - an incremental migration is performed to repair and update the target list with missing or new items.
- Migrate all list items - all list items are remigrated.
- Choose a conflict resolution option.
|
|
NOTE: Conflict resolution rules will not be applied if the Migrate all list items option is selected. All files in the target tenant will be overwritten if all files are migrated. |
- Overwrite target files - all migrated files in the target tenant will be overwritten. Migration is fastest with this option selected.
- Skip if target list item is the same version or newer - ignore list items in the target tenant with the same or newer version. If the item does not exist in the target tenant, a copy of the source item will be migrated.
- Create a copy if target list item is the same version or newer - preserve the list item in the target tenant with the same or newer version and migrate a copy of the source item. When you choose this option, you must choose from one of the following file suffix options: _Copy, _Source, _Older, _Backup, and _1.
- Migrate list and library comments - select this option to include list and library comments in the migration task. A large number of list and library comments increase task processing time.
- Auto re-run list item migrations to retry missing items - select this option to automatically re-run the list item migration during list migrations to retry and repair missing items.
- Click Next.
- Sensitivity Labels
Choose how you want to migrate sensitivity labels applied to associated SharePoint content. Sensitivity labels require specific tenant permissions. They must be discovered and matched before you can use the following options. For more details, see the topic Sensitivity Labels.
- Process document sensitivity labels - select this checkbox to enable sensitivity label processing if you have already configured and matched sensitivity labels.
|

|
Caution: Encrypted documents may be inaccessible on the target tenant if sensitivity labels that are applied to documents in the source tenant are not processed. If a document is encrypted in the source, then it is decrypted, labels are processed and the document is reencrypted in the target. |
- Match and apply corresponding labels to documents migrated to the target - select this option to match and apply sensitivity labels during migration. If the label in the source document has a matching label in the target (there is a corresponding target label in the On Demand repository), the source label is replaced by the target label. If the label in the source document has no matching label in the target (there is no corresponding target label in the On Demand repository), the document is not migrated.
- Remove sensitivity labels from documents migrated to the target - select this option to clear the labels from migrated documents. Labels on documents in the source tenant are not changed.
- Click Next.
- Notification
- Send notification email once the task is completed - select this option to send a notification email when a migration task completes.
- Only in a case of failure - select this option to send the email if the migration task fails to complete successfully.
- Recipients - enter the email address of the recipients of this email. You can specify multiple recipient email addresses separated by semicolon.
- Click Next.
- Reporting
- Generate detailed report of migration errors - select this option to generate a migration error report when you run the migration task.
You can download the report from the Reports tab of the SharePoint workspace by clicking the Download link in the Error Log column. If there are no migration errors, a download link is not available. Error reports are retained for 30 days. After 30 days the download link is replaced with the label Expired and you can no longer download the report. For more information about error reports, see Reports.
- Generate AI summary - select this option to generate an AI summary of the task, as well as each object in the task.
|
|
NOTE: If this is the first time you have selected this option, the Quest Policies prompt appears. Read the Quest AI Terms of use and click Accept to proceed. This s a one-time acceptance prompt and your acceptance covers all migration tasks that support the AI migration assistant. |
- Schedule
- Choose from one of three options to schedule the task. The scheduler will be activated only after you complete the task wizard.
- Run now - task runs immediately.
- Run later - task must be started manually.
- Schedule - task will be started at a future date and time entered in the corresponding calendar field.
- Click Next.
- Summary
- Save task settings as a migration template - select this option to save the settings in this wizard as a reusable migration template.
- Migration Template Name - specify a name for the template. If you have changed the settings of a preselected template, specify the same template name to apply the changes to the template when you complete the wizard. All saved templates are displayed in the Templates tab.
- Verify the task specifications as described below:
- Name - Name of the task. The default name is Migrate Groups. You can specify a custom name.
- Source tenant - Name of the source tenant in this project.
- Target tenant - Name of the target tenant in this project.
- Scheduled start - Date and time when the task will start. Now indicates that the task will start immediately.
- Click Back to revise or review a previous step or click Finish to complete the task wizard and start the task as scheduled.
The migration task is created. You can track its progress from the Tasks tab, view the summary on the Dashboard or monitor alerts and notifications from the Events tab.
|
|
NOTE: If a group from the source tenant is merged with a group in the target tenant during the provision process, any new mail items, SharePoint files and Planner items that are generated in the source tenant will appear in the target group. |
Reviewing the Migrate Groups Task
- Open the Tasks tab.
- Select the M365 Groups migration task that you want to review.
- In the task details pane that opens, the information presented is as described below:

- Type - Type of the task. The type is migrategroups.
- Created - Date and time when the task was created.
- Modified - Date and time when the task was last updated.
- Status - current status of the task.
- Last Operation - The action that was most recently performed in this task.
- Schedule - Date and time when the task started. Now indicates that the task started immediately after the task was created.
- Groups (number) - The number of M365 Group objects that were selected for migration and the number of objects passing through the various states. You can click Groups to open a filtered list of M365 Group objects included in this task.
- Events (number) - Number indicates the count of events that the task encountered. The icon values indicate the type of the events and the event count for each type.
-
- View AI Summary - This link is available if you opted for the AI feature in the organization you created (see Organizations and Regions), and the task is a migration task that supports the AI migration assistant and you selected the Generate AI summary option in the Reporting step of the migration wizard. Click this link after the task has completed, to view the AI-generated migration summary.
|
|
NOTE: The View AI Summary link may take a while to appear depending on the volume of tasks and objects being migrated. If this is the first time you have selected this option, the Quest Policies prompt appears. Read the Quest AI Terms of use and click Accept to proceed. This s a one-time acceptance prompt and your acceptance covers all migration tasks that support the AI migration assistant. |
- Copy Diagnostics - click this link to copy relevant task properties that you can paste in a text file and use it to troubleshoot the task if necessary.
Reviewing the Migrate Groups Task Events
- Open the Tasks tab.
- Select the Chats migration task for which you want to review the events.
- In the task details pane that opens, click Events (number). The Events tab opens with a filtered list of events for the selected task.
- Select an event that you want to review. In the event details pane that opens, the information presented is as described below:
- Object - name of the Chat object if applicable.
- Task - name of the task.
- Time - date and time when the event occurred.
- Summary - a descriptive statement about the event if an exception occurs.
