In Toad Data Modeler there are several methods how to move attributes. You can select from the following options.
A. Drag&Drop techniques on the Workspace
Use: This way, you can move one or more attributes to another entity at one jump.
Example:
- Display attributes in your model.
- Select an entity of which attribute/attributes you want to move.
- Press CTRL and hold the key down. Click the attributes that you want to move.
- Release CTRL.
- Drag the selected attributes to a target entity.
B. In Entity Properties Form | Attributes tab: Drag&Drop techniques
Use:
- In the Entity Properties form, you can move attributes within an entity and between entities. (To change order of attributes within an entity, use the green arrows.)
- From the Entity Properties form to a Workspace, and vice versa
- Between the Entity Properties form and Model Explorer
- Multiple selection is possible - use SHIFT or CTRL keys
Example:
- Open the Customer Properties form of the Customer entity and the Employee Properties form of the Employee entity.
- Click the Attributes tabs in both forms.
- Select attributes in the Customer Properties form and drag them to the Employee Properties form | Attributes tab.
C. In Model Explorer
Use: You can move attributes:
- Between entities in Model Explorer itself
- From Model Explorer to an entity on the Workspace directly
- Between Model Explorer and the Entity Properties form | Attributes tab
- Between two Model Explorers of two different models
- Multiple selection is possible - use SHIFT or CTRL keys
Tip: Use CTRL to select attributes of various entities in Model Explorer, and move them at one jump to another entity (of the same model or even a different model).
Example: Moving an attribute in Model Explorer.
- Unfold the Entities folder in Model Explorer tree.
- Select attributes (SHIFT or CTRL) and drag them to the Attributes or 'EntityName' folder of another entity.
You can change the attribute name e. g. in the following cases:
- When you create a self-relationship.
- Whenever you want to change a Foreign Key attribute name.
|
Scenario:
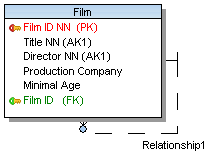
You have just added a self-relationship to the Film entity. |
- A copy of your identifying key attribute has been created in the entity - Film ID. Now you have two Film ID attributes in the Film entity.
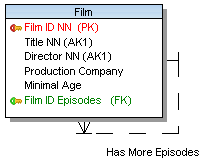
- Edit the newly created Film ID attribute, define a new Name . The link to parent attribute is displayed on top right-hand corner of the form.
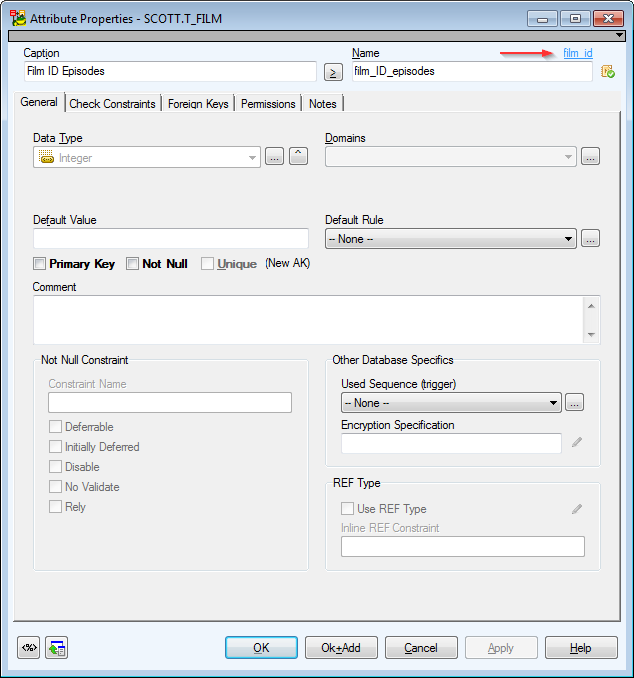
- Confirm OK and see the change on the Workspace.
Toad Data Modeler allows you to design Entity Relationship Diagrams of specific database platforms, convert physical model from one database platform to another, create an ER Diagram directly from your database (Reverse Engineering feature), update physical models, generate DDL/SQL scripts and Change Scripts, create Dictionary Types, Views, Triggers, Functions, generate detailed documentation to your model (in HTML, RTF, PDF, XSLT formats) and much more.
This chapter describes features and functions related to Physical Data Modeling. Look around each section to get the information you need.
|

|
Note: See the sample physical model Videorental (Oracle 10g db) that is included in the installation package of Toad Data Modeler. Default location is: C:\Program Files (x86)\Quest Software\Toad Data Modeler7.2\Samples. |
Benefits of Physical Data Model
- Detailed definition of database structure, including database specific items, for example:
- Stored procedures
- Functions
- Triggers
- Views
- Materialized views
- Sequences (auto increments) etc.
- Possibility to synchronize local model with existing database.
- Possibility to specify logical names for objects (captions for tables, attributes and other objects).
- Detailed database specific information can be exported to HTML/RTF/PDF or XML/XHTML/CSV reports.
- Automatic generation of SQL code for selected objects (SQL code generation is not available in Logical and Universal Model)
- Automatic migration of PK attributes to child entities (Attributes don't migrate to child entities in Logical Model)
