Edit Attributes
- In the Entity Properties dialog | Attributes tab, double-click the selected attribute.
or
- Find the attribute in Model Explorer | EntityName folder | Attributes | Double-click the selected attribute.
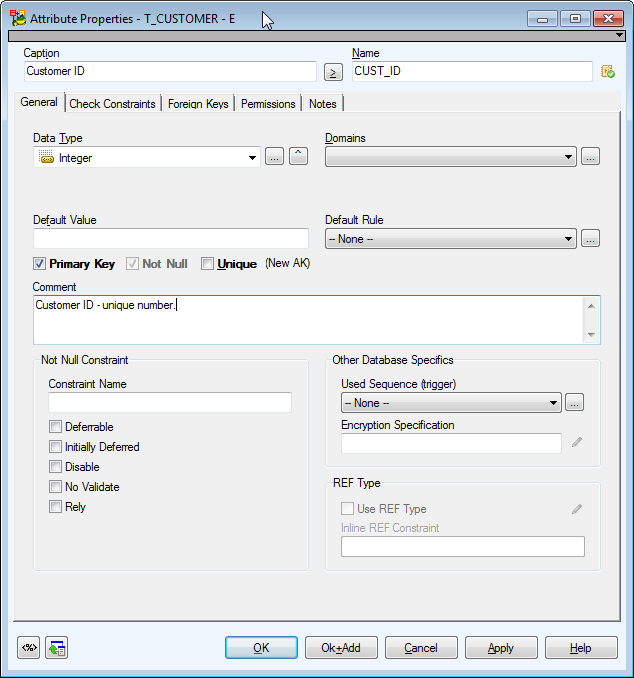
Example: The Attribute Properties dialog (Oracle 10g db):
|
Object Navigator Dropdown Menu |
Object Navigator Dropdown Menu can be expanded or collapsed by clicking the right black arrow in top right corner.
All attributes in your entity are listed here. This allows you to edit them quickly and comfortably from one place.
Tip: After you finish editing an entity, click Apply to confirm changes and select another entity from the Object Navigator box. |
|
General Tab |
General properties of attribute |
|
Caption |
Logical column name |
| Name |
Physical attribute name
See About Naming Conventions for more information. |
| Primary Key |
Select this checkbox to set the attribute to be a part of primary key. |
| Not Null |
Select this checkbox to set the attribute Not Null.
See NotNull Property for PK and AK Attributes for more information. |
| Unique |
Select this checkbox to set the attribute as unique.
See Unique Attributes for more information. |
|
Data Type |
Data Type selection box
|

|
TIP:
- Before you create new attributes, set a default data type, including parameters, for particular database. See the Settings menu | Options | Physical Model | particular database version | Default Data Type combo-box. (The selected data type will be applied also for Dictionary Types and Domains.)
- Set maximal length for display of data types in the physical ERD. Select Settings | Options | Graphics | Maximal Number of Characters for Displayed Data Type.
| |
|
Domains |
Domains selection box
|
|
Note: It's not possible to assign an attribute a data type and a domain at the same time. If you select a domain, data type will be set automatically from the domain. | |
|
Default |
Default value definition |
|
Default Rule |
Default rule selection |
|
|
Note: Other options on the General tab vary according to a database type. Options specific for your database can be found in the Databases chapter. | |
|
Check Constraints Tab |
On this tab, you can add, edit and delete check constraints. |
|
Foreign Keys Tab |
Details of a foreign key attribute are listed here. |
|
Entity |
Name of parent entity |
|
Relationship |
Name of relationship connecting the parent entity and child entity |
|
Attribute |
Name of attribute |
|
Permissions Tab |
On this tab, you can assign a User or User Group permissions for the selected attribute. |
|
Notes Tab |
A tab for notes on the attribute. The text will display in a pop-up box when you point your mouse cursor at the attribute name in ER diagram (the Attributes item has to be selected in Display Level). |
|
Not Null Constraint Tab |
Options related to Not Null Constraint definition. |
|

|
Click this button to open the parent form (Entity Properties form).
|
|
Note: Above the Object Navigator Dropdown Menu, you can see name of the entity that the attribute belongs to. The Properties dialog of this entity will open. | |
Display Attributes in Model
To display attributes in your ER diagram
From the Display Level box on the toolbar, select Attributes.
To define a display level for particular Workspace
Right-click the work area | Workspace Format... | Entities tab | Display Level | select Attributes.
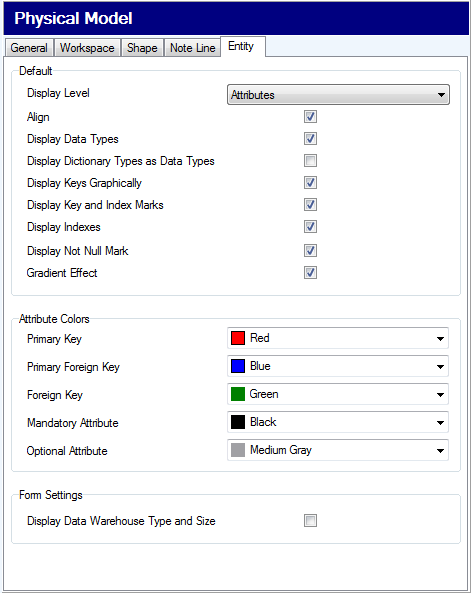
To set the default Display Level properties for all models that you will create
Select Settings | Options | Physical Model | Entity tab | Display Level.
To define different colors for attributes on your Workspace
Select Settings | Options | Model section | Physical Model | Entity tab | Attribute Colors area.
Order Attributes
In the Entity Properties form | Attributes tab, you can order attributes:
- Manually via the green arrows at the bottom of the form
- Automatically (e.g. by Name, Caption, Data type etc.)
Manual Order
The order you will set via the green arrows will be applied in particular entity box in the Designer (all workspaces).
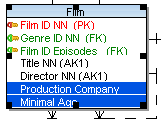
Example: Attributes in the Film Entity Properties form have been ordered manually using the green arrows and finally confirmed Apply. Now see the Film entity in Designer and compare its order of attributes with the order set in the Film Entity Properties form. The order is identical.
Automatic Order
Click the appropriate column name - e.g. click the Name column to sort attributes alphabetically.
This function offers you just a different view on the attributes in the Entity Properties form. It does not influence order of attributes in entity box in the Designer.
If you sort attributes this way, you cannot manually change order of attributes via the green arrows. If you click a green arrow, this message will display:
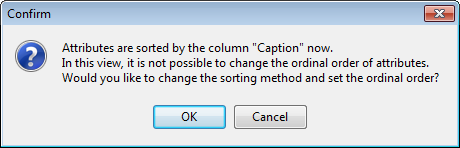
Click OK to activate the green arrows and order the attributes manually.
|
|
Note:
- No green arrow is enabled when there is no attribute or when there are attributes but none is selected.
- If any sorting function is turned on (e.g. sorting by name), green arrows are both active, so you can click any of them to turn off the sorting and set the ordinal order.
|
Copy Attributes
In Toad Data Modeler there are several methods and places where to copy attributes. You can select from the following options.
A. CTRL + Drag&Drop techniques on the Workspace
Use: This way, you can copy attributes within an entity and between entities on one WS. You can copy one or more attributes at one jump.
Example:
- See Display Attributes in Model for more information.
- Select an entity of which attributes you want to copy.
- Press CTRL and hold the key down. Click the attributes that you want to copy.
- Release CTRL key.
- Now click the selected objects, hold the mouse button down. Press CTRL again and hold the key down.
- Drag the selected attributes to a target entity. (If you want to copy the attributes within the entity, drag it a little in the entity box itself.)
- Release your mouse button and CTRL.
B. In the Entity Properties form | Attributes tab: CTRL + Drag&Drop techniques
Use:
- In the Entity Properties form, you can copy attributes within an entity and between entities of the same model or a different model.
- From the Entity Properties form and Workspace, and vice versa
- Between the Entity Properties form and Model Explorer
- Multiple selection is possible here - use SHIFT or CTRL keys
Example:
- Open the Customer Properties form of the Customer entity and the Employee Properties form of the Employee entity.
- Click the Attributes tabs in both forms.
- Press CTRL and hold the key down.
- Click the Name attribute in the Customer Properties form and drag it to the Employee Properties form | Attributes tab.
- Release your mouse button and CTRL.
C. In Model Explorer
Use: You can make copies of attributes:
- In Model Explorer itself
- From Model Explorer to a Workspace and vice versa
- Between Model Explorer and the Entity Properties form | Attributes tab
- Between two Model Explorers of two different models (see the following examples)
- Multiple selection is possible here - use SHIFT or CTRL keys
Example: Making a copy of attributes from Model Explorer to a WS.
- Unfold the Entities folder | 'EntityName' | Attributes tab in Model Explorer tree.
- Make selection of attributes.
- Press CTRL, hold it down.
- Click any selected attribute and drag the attribute to the appropriate entity box on the Workspace.
- Release the mouse button and CTRL.
|
|
Note:
- An attribute is copied with all its properties.
- It's possible to copy objects between models of a different database. However, some specific object properties cannot be copied - properties that are in the source model but do not exist in target model. E.g. Copy of entity from Microsoft SQL 2005 to MySQL 5.1. - Entity A has Partition Schema, Entity B has Fulltext Catalog. In these cases, the entities will not be copied to MySQL model.
|
