Scorecards
Role Applicable to: Client Administrator, User, Contributor, Reviewer
Scorecards can help you manage and evaluate metrics that can be applied to objects. With many objects, creating an automated score is the best way to calculate value.
Scorecards automatically appear as attributes within an object. Scorecards may be assigned to different object types.
Scorecards can be defined by a client administrator on the platform. Metrics (attributes) contain the values that are used in determining the score of an object.
For example, a scorecard might use a person’s age, credit rating, and employment status, to calculate the person’s score.
When a Scorecard is filled in for an object, it generates the scorecard Score.
|
|
When defining a set of scorecards on the platform, an administrator may want to consider using Scorecards that have a consistent maximum value (e.g., 100) to allow comparison between objects across the portfolio. |
Name and Description
A name and description should be entered for each metric. This is important as it lays out the context for the metric within the scorecard.
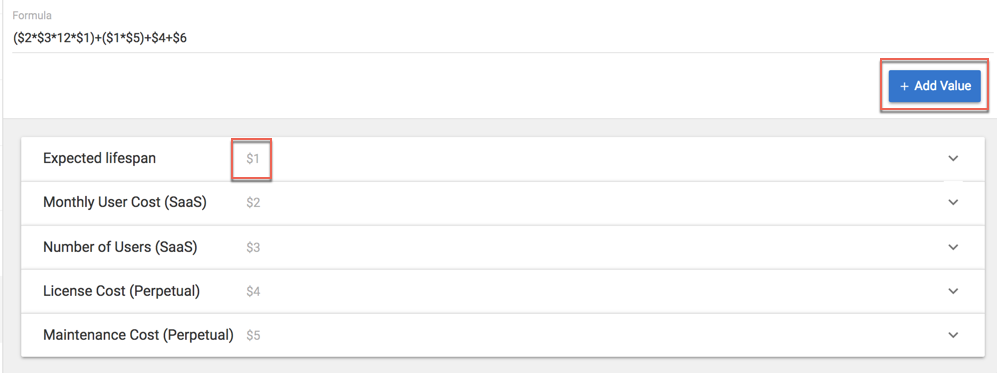
Each metric is allocated an identifier such as $1 or $2. New metrics can be added using the +Add Value option
The Formula to generate the score uses the identifiers as variables and works in the following way using arithmetic operators: $1 + $2
Valid arithmetic operators are:
|
Example |
Name |
Result |
|
-$1 |
Negation |
Negative $1 |
|
$1 + $2 |
Addition |
Sum of $1 and $2 |
|
$1 - $2 |
Subtraction |
Difference of $1 and $2 |
|
$1 * $2 |
Multiplication |
Product of $1 and $2 |
|
$1 / $2 |
Division |
$1 divided by $2 |
Open Metrics
Metrics can be simple and consist of purely a metric name. The user will simply enter a value for the metric used in the scorecard equation, or an attribute value could be used. This will be an Open value
Restricted Metrics
Each metric could be made restricted, to specify a continuous range of numeric values, or set increments.
For example, setting a value for a minimum of 1, and a maximum of 10, with an increment of 2 and a starting value of 2, will creaste 4 other range values.
The 4 ranges would be (4), (6), (8) and (10).
This would offer the user the options below for this metric, as part of the overall scorecard
Formula
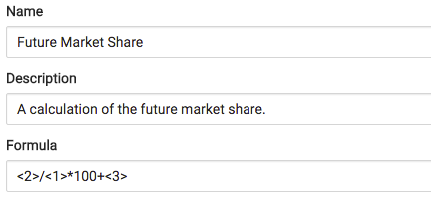
A formula can be a mix of identifiers and constants, separated by operators;
|
|
Parentheses () may be used to change the order that operators are processed. The standard algebraic order of operations applies;(Parentheses, Multiplication and Division, Addition and Subtraction). |
Metrics made up of other attributes
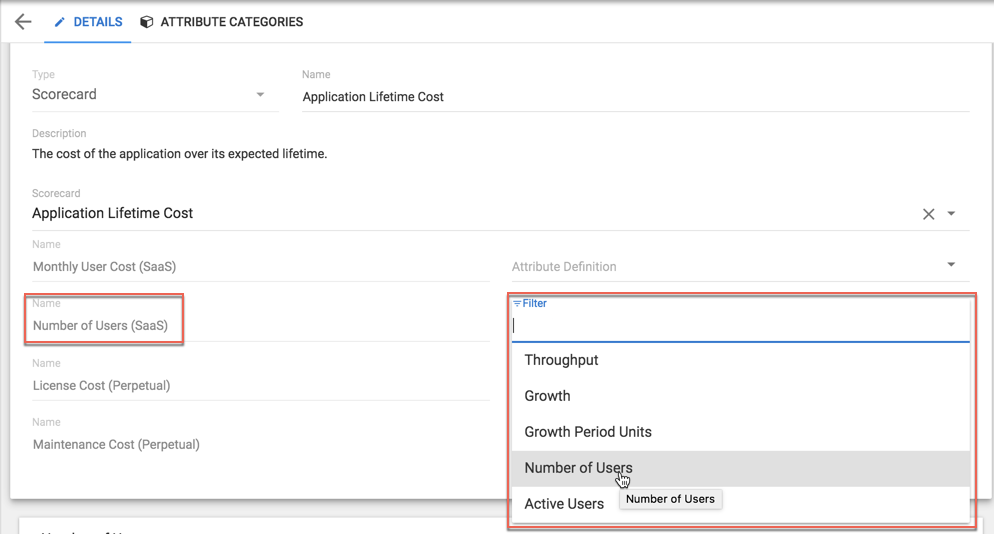
Metrics can be made up of other attributes. It may be useful to reference the value of another attribute in the calculation of a scorecard value.
The referenced attribute can be selected when adding a scorecard attribute to an Object type.
To do this, click on the arrow to the right of the name of the field (in the Attribute Definition field). A drop down list of attributes that can be selected will be presented.
Examples of scorecards
Scorecards for Innovation Management
Scorecard – Innovation Score
Attractiveness – High = 10, Medium = 5, Low = 1
Time to Market – 1 Month = 10, 2-6 Months = 8, 6-12 Months = 6, 1-2 Years = 4, 2-3 Years = 2, 3 Years+ = 1
Anticipated Risk – High = -5, Medium = -3 Low = -1
Development Effort – High = -10, Medium = -5, Low = -1
Increase in Brand Value
Innovation Score = Attractiveness + Time to Market + Anticipated Risk + Development Effort + Increase in Brand Value
Scorecard – Requirements Score
Resources Required - High = 10, Medium = 5, Low = 1
Resource Experience rating
Business Alignment - High = 10, Medium = 5, Low = 1
IT Alignment - High = 10, Medium = 5, Low = 1
Project costs – High = -10, Medium = -5, Low = -1
Requirements Score = (Resources Required / Resource Experience Rating) + Business Alignment + IT Alignment + Project Costs
Scorecard - Marketing Score
Brand Impact
Word of Mouth Potential
Fits customer demographic
Case studiable (weighting x 2)
Marketing Score = Brand Impact + Word of Mouth Potential + Fits customer demographic + (2 x Case studiable).
Customizable metamodel
Role Applicable to: Client Administrator, User
Each client area is created with the default system metamodel.
Often organizations require the ability to configure the underlying metamodel within the platform. The entire metamodel may be customized. Types of objects can be added (Object Types), along with attributes and new relationship types.
Additional metrics can be added via the Scorecard capability.
A metamodel is consistent for an entire client area. All workspaces conform to the core metamodel of a client area.
Object Types
Object types can be customized, by adding new types or deleting existing types.
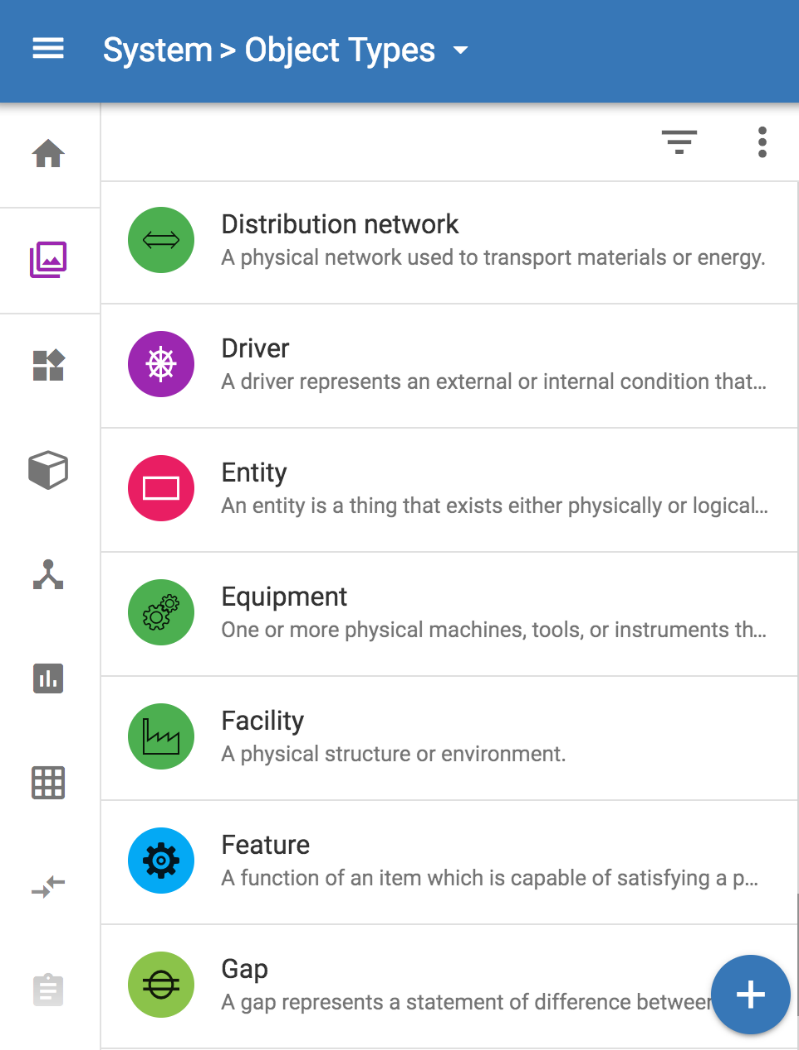
To view a list of existing object types; access the User menu > System > Object Types
Object types can be created by Client Administrators, by clicking on the + button in the bottom right of the list.
An object type will require a Name and an Icon, before it can be saved. The Name must be between 2 and 50 characters in length. An Icon can be chosen from 100's of available images. It is good practice to also provide a short description, describing the purpose of the object type and select a colour.
Object types can be deleted by Client Administrators, by clicking on DELETE in the bottom left of the DETAILS edit screen.
Attributes
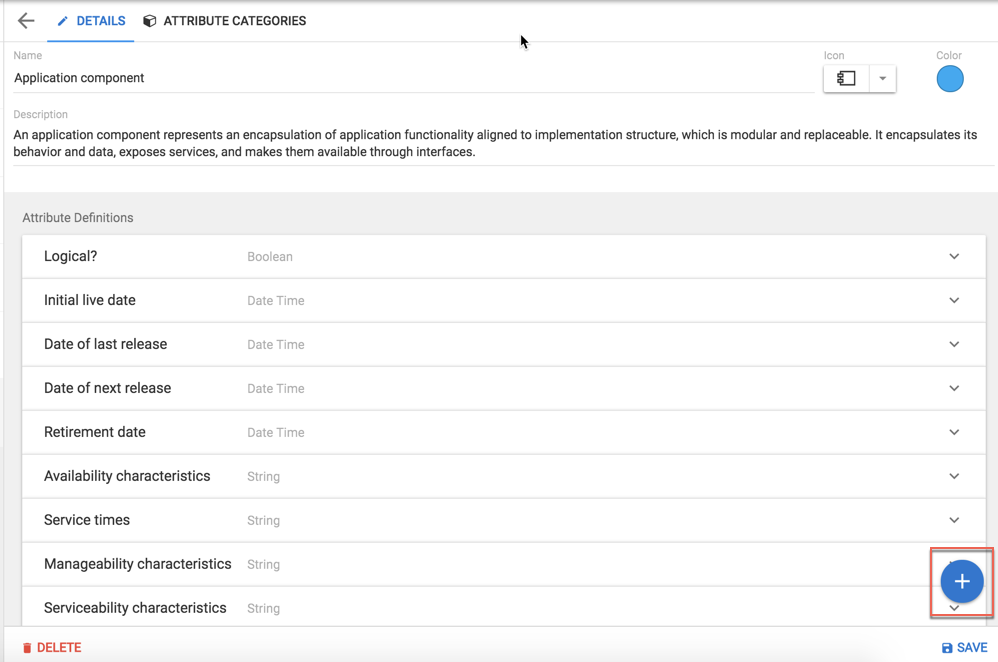
Attributes are used for storing information in objects. All objects will have a Name and a Description, but it is expected that more specific detail will be required.
Attributes can be created by Client Administrators, by clicking the blue circle with the white plus sign, found in the bottom right-hand corner of the screen
Clicking this button will create a new entry at the bottom of the existing attribute list.
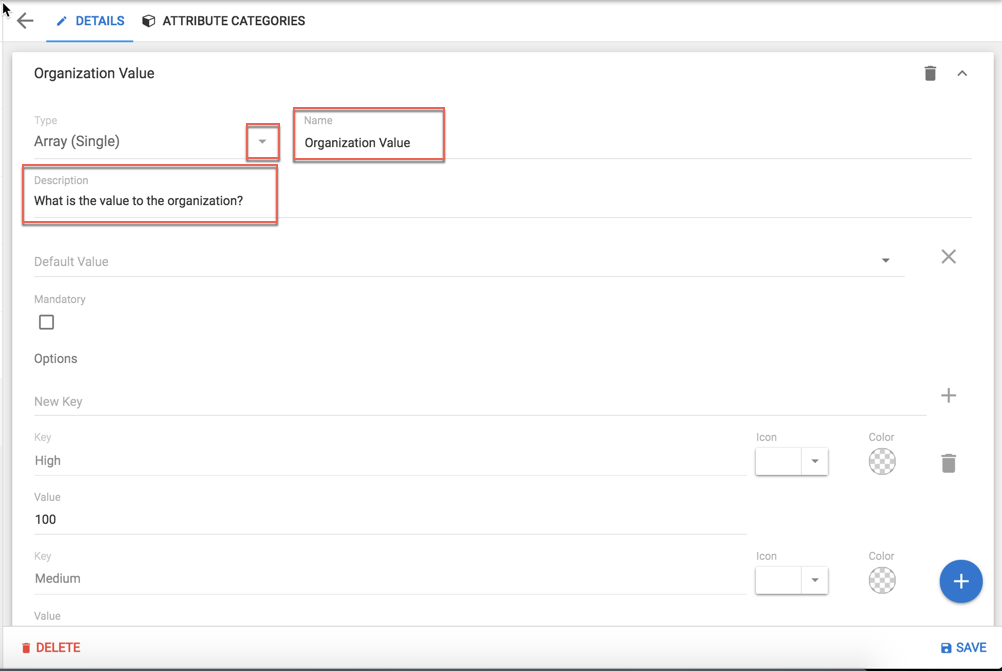
Each attribute will require its Attribute Type to be identified, by selecting from the drop down list of available types. A Name will also be required, and a short description is recommended.
In the example above, the Array attribute type has been selected. It requires a series of Key:Value pairs to be devised, but other attribute types will have different settings. A default value can then be chosen, that each instance of the attribute is initally populated with.
|
|
Once the Attribute Type has been selected it cannot be changed. The attribute Name can be modified. |
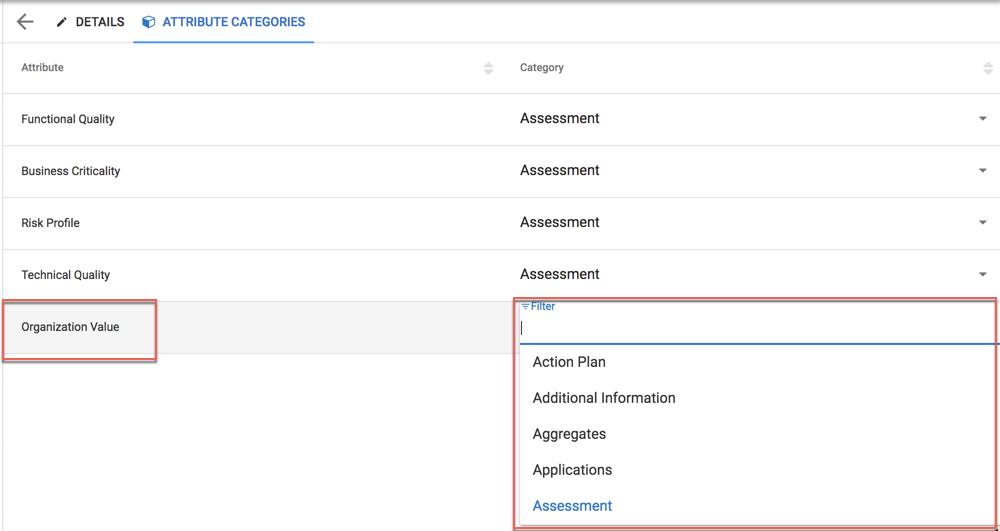
Each Attribute should have a Category assigned to it, particularly if many attributes are to be created.
Select the ATTRIBUTE CATEGORIES tab from with the object type
Find the attribute within the list, select the drop down next to the entry and choose the attribute category that you would like it to appear in.
Within an object instance, the attribute can either be searched for, by name, or the attribute category can be selected from a list of existing categories. This will filter the attribute list to the categories chosen and make it easier to find an attribute in a long list.
Users can also select the coloured circle and drag the category to where they would like to see it within the object, changing the order of how things are displayed.
Attribute Categories can be edited by Client Administrators, by accessing the User menu > System > Attribute Categories.
|
|
Any existing Attribute Groups will be converted to Attribute Categories and will be found in the list. |
Attribute Types
|
Attribute Type |
Description |
Applies to |
Example |
|
Array (Single and Multiple) |
Supports a list of 'key-value pairs'. |
A need to store values associated with descriptive labels. Colours and icons can be set for these values, so they can be represented in table and other visualizations. |
Impact: High: 50, Medium: 30, Low: 10 |
|
Boolean |
Supports a "true" or "false" value. |
Used when a simple on/off 'switch' is required. |
Strategic?: true |
|
Date Time |
Displays a date (and time). |
Used when a 'point-in-time' is to be specified. |
Installation Date: 01/01/2020 15:15 PM |
|
Date Time Range |
Supports a 'start date' and an 'end date'. |
Used to describe a 'region-of-time', or range of dates. |
In Production: 01/01/2017 09:00 AM, 01/01/2020 17:30 PM |
|
Date Time Rollup |
Aggregates dates from related objects. |
An automatic update of a Date or Date-Range value, calculating the first (Min), or last (Max) date value from related objects. |
Duration: 01/01/2016 12:00 AM, 01/01/2020 17:30 PM |
|
Fraction |
Allows for 'non-integer' numbers |
Values that require a fractional part, or non-whole number. |
Production Cost of Item: 4.82 |
|
Integer |
Supports 'whole' numbers |
Values that require whole numbers. |
Resource Required: 4 |
|
List (Single and Multiple) |
A number of values. |
Providing a list of values, from which the user can choose. Colours and icons can be set for these values, so they can be represented in table and other visualizations. |
IT Alignment: High, Medium, Low |
|
Numeric Rollup |
Aggregates numeric values from related objects. |
An automatic update of an Integer or Fraction value, calculating the total (Sum), lowest (Min), or highest (Max) numeric value from related objects. |
Overall Resource Requirements: 37 |
|
Relationship-List |
Provides for a selection of related objects. |
The need to identify a subset of related objects, from a larger group of related objects. |
Primary Service: Claim Registration |
|
Scorecard |
Calculates a numeric value based on input from numeric values and/or the object's numeric attributes. |
A need to dynamically calculate a number that could be used to possibly indicate a priority, or level of importance, by employing a simple formula that uses other values from within the object. |
Marketing Score: 77 |
|
String |
A number of characters. |
Descriptive content. |
Business Impact: Impacts the majority of our customer facing processes. |
|
URL |
A web browser reference to a web page. |
Support a 'navigateable' link to web content, which could be another object, a resource or webpage. |
Webpage: https://www.erwin.com |
Attributes can be set to Mandatory if a user wishes them to have to be filled in.
Relationship Types
Relationship Types are used to link object types together. As standard, we use the relationship types provided by ArchiMate from the Open Group.
However, you may use and define your own relationship types.
To view a list of existing Relationship Types; access the User menu > System > Relationship Types
Relationship Types can be created by Client Administrators, by clicking on the + button in the bottom right of the list.
They need to be populated with Source / Target Object Types and Source Name / Target Name relationships
The relationship type currently needs to be created for each object type pairing.
Visio Import
Visio Import
Role Applicable to: Client Administrator, Professional
Import Visio 2013 diagrams into the SPP platform
Step 1 - Create a new diagram
Within the SPP, create a new instance of the diagram type you would like to import the Visio diagram as (this can be an out of the box or a custom diagram type)
Save the diagram.
Step 2 - Import the Visio file
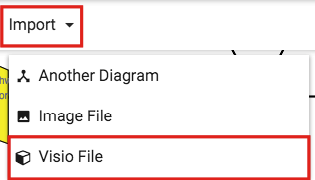
From within the diagram, select the Import menu and select the Visio File option.
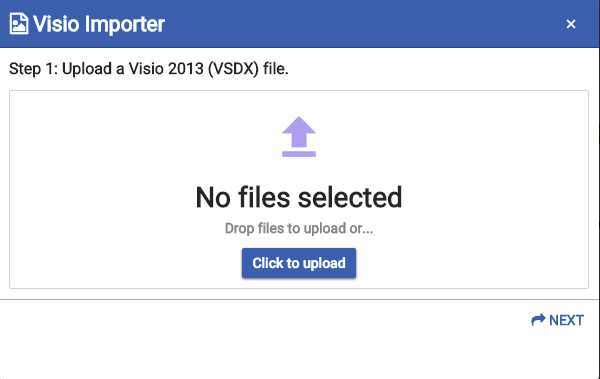
When asked, select 'Click to upload' to upload a VSDX file (containing your diagram) from your machine, for mapping
When the file is loaded, select the Next option
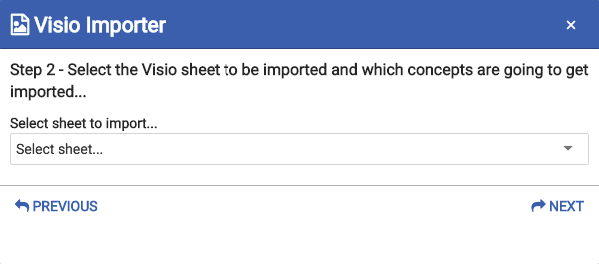
Select the sheet you would like to use from the VSDX file, using the drop down arrow
Once the sheet has been chosen, the shapes idenitifed from the sheet will be presented for mapping
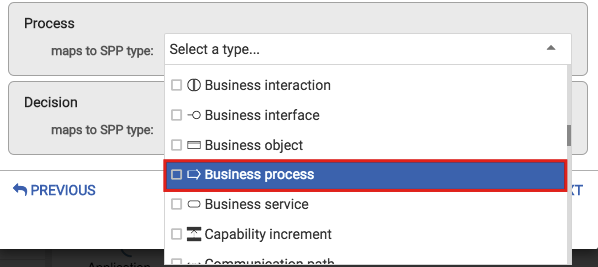
Select the object type you would like to map to each identified shape, using the drop downs for each shape presented (the object type offered are the ones allowed on the diagram type you chose)
Once all of the shapes have been mapped, select the Next option
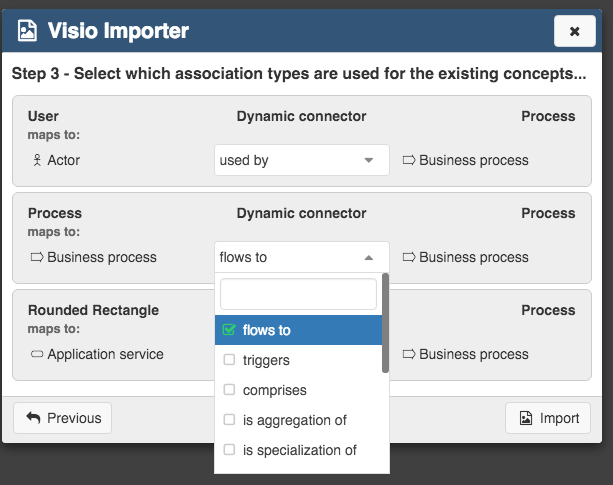
Map all of the associations types that are used by existing concepts on the diagram
Once the associations have been mapped, select the next option
The diagram is now imported into your SPP diagram.
Settings
Settings


