How do I prevent Guest Users from being sent an Invitation during creation?
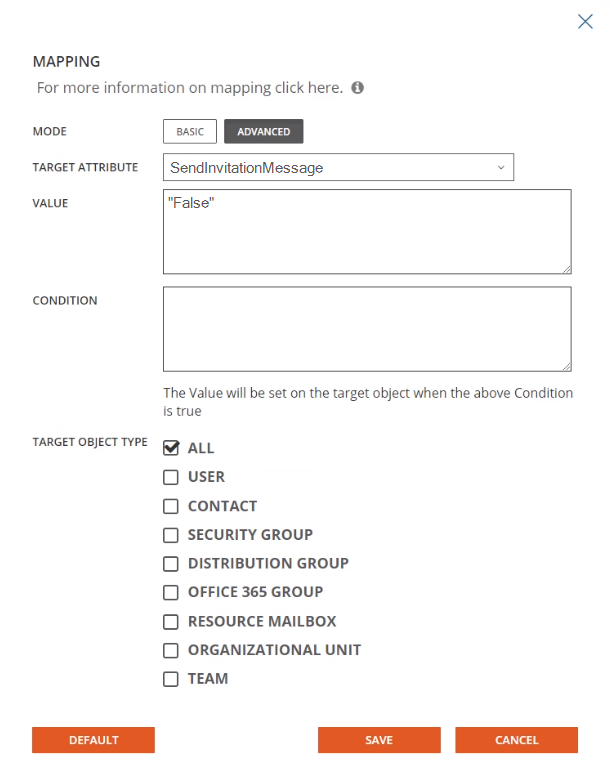
To prevent an invitation being sent when a Guest user is created, modify the default mappings for the property named SendInvitationMessage to be False before creating your Guest users.
Follow these steps to complete this task:
- From the landing page or the application menu, choose Directory Synchronization.
- Open the left navigation menu

- Select Templates under Setup

- Locate the template to be modified
- Select the template then click Settings
- Navigate to the Mapping tab
- Search for the attribute SendInvitationMessage
- Double click the resulting record to open for editing

- Click Advanced.
- Modify the default value of “True” to be “False”

- Click Save
- Once saved you may navigate out of Templates to your next destination
How do I create local users, so they are ready to be synchronized up to Microsoft Entra ID as a Guest?
Once you have decided on the local on-premises attribute to be used for this purpose, then it is simply a matter of setting that attribute mapping to set a value of “Guest” for the appropriate set of users.
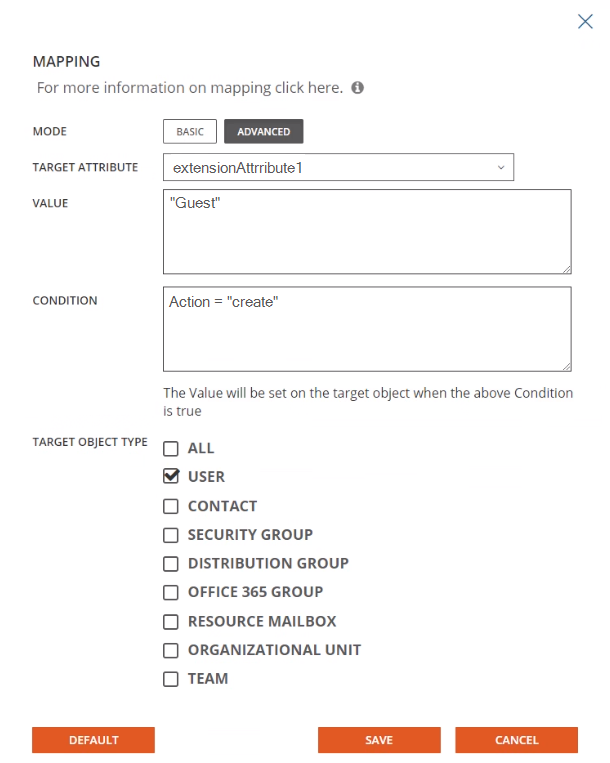
The following provides a simple example template mapping using ExtensionAttribute1 as the designated local attribute to be set as “Guest” for Microsoft Entra Connect to sync them up to Microsoft Entra ID as B2B accounts.
- From the landing page or the application menu, choose Directory Synchronization
- Open the left navigation menu

-
Select Templates under Setup

- Locate the template to be modified
- Select the template then click Settings
- Navigate to the Mapping tab
- Search for the attribute ExtensionAttribute1
- Double click the resulting record to open for editing
- Once open, click Advanced
- Modify the value to be “Guest”
- Set the Condition to Action = “create” if you want to only apply this rule to new users

- Select User as the Target Object Type
- Click Save
- Once saved you may navigate out of Templates to your next destination
When you run your workflow to create your local users with the above mappings and Microsoft Entra Connect is configured to sync as B2B users. This is only one example, there are different methods that be used to provide the same result depending on your environment needs.
Please note: If you choose this approach, you must ensure that the designated attribute is populated with the correct value (Guest or Member) for all existing user objects in on-premises Active Directory that are synchronized to Microsoft Entra ID before enabling synchronization of the “UserType” attribute.
For details on How to enable synchronization of UserType for Microsoft Entra Connect then please read this Microsoft document.
How do I ensure my Guest Users are visible in the Global Address Lists (GAL)?
By default, guests aren't visible in the Exchange Global Address List.
If you have already created your Guest Users manually or otherwise, you may run a few PowerShell commands to set the appropriate property. Here’s how to Add guests to the global address list.
If you are using Directory Sync to create and update your Guest Users, then use the steps listed below to make sure your guests are visible in the global address list.
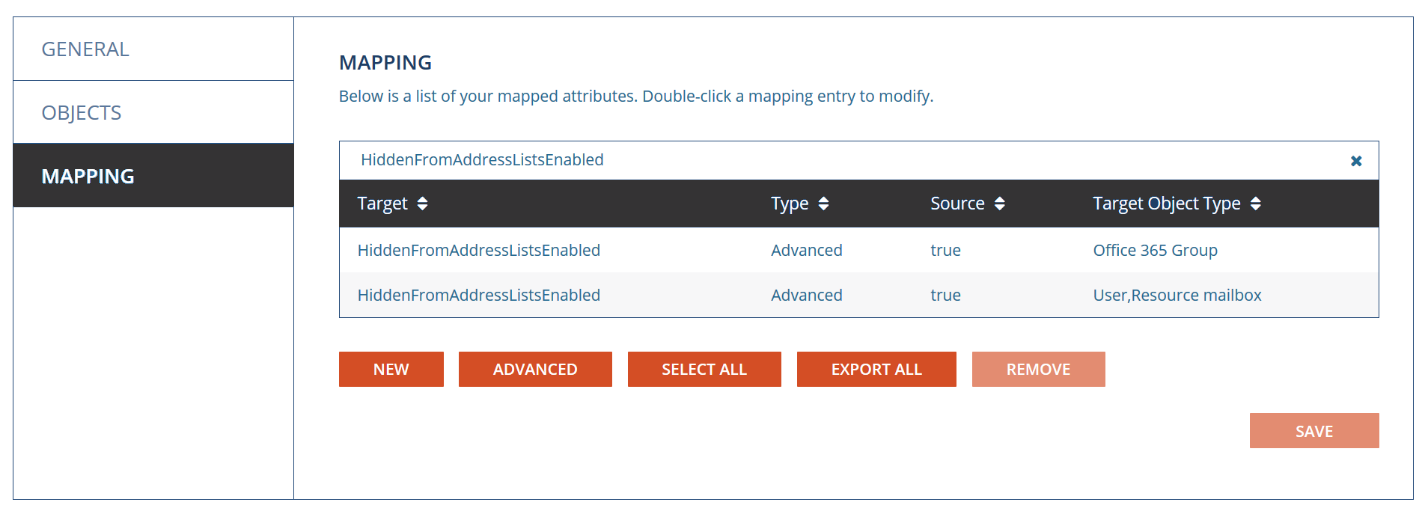
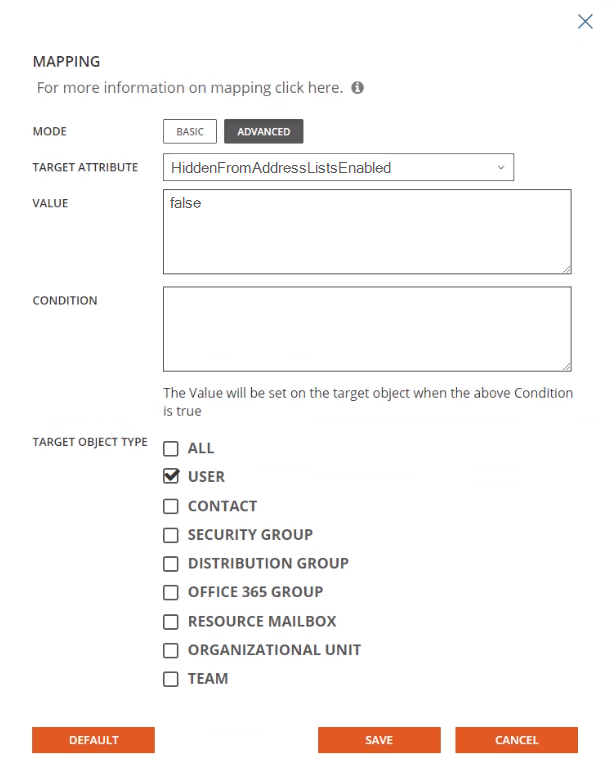
To ensure the Guest user is visible in the GAL, modify the default mappings for the property named HiddenFromAddressListsEnabled to be False before creating or synchronizing your Guest users.
The default mapping for HiddenFromAddressListsEnabled is to synchronize the source user object visibility property to the same in the target. If this is not the desired behavior, then follow these steps to guarantee the user will be visible.
Follow these steps to complete the task:
- From the landing page or the application menu, choose Directory Synchronization
- Open the left navigation menu

-
Select Templates under Setup

- Locate the template to be modified
- Select the template then click Settings
- Navigate to the Mapping tab

- Search for the attribute HiddenFromAddressListsEnabled
- Locate the mapping where the Target Object Type is User
- Double click the resulting record to open for editing
- Once open, click Advanced
- Modify the value to be false.

- Optionally you may set a condition action ("create", "update", or "delete") whereby the object is only acted upon when the condition is satisfied
- Click Save
- Once saved you may navigate out of Templates to your next destination
Additional Information
Guest Users in Directory Sync
A typical migration project using Active Directory can be broken up into six (6) phases.
- Phase 1: Install Directory Sync agents and create the Workflow
- Phase 2: Identify Devices and their related Users and Groups to migrate (Concurrent with Phase 3)
- Phase 3: Install Active Directory agents and Register Devices (Concurrent with Phase 2)
- Phase 4: ReACL Devices
- Phase 5: Cutover Devices
- Phase 6: Cleanup. The Cleanup process typically occurs several months after the completion of the project.
This user guide walks you through the steps required to complete each phase, which can also be used to migrate devices from AD environments to Entra environments. The Active Directory Entra-Join Quick Start Guide walks you through the process of configuring and performing migrations for AD to Entra migrations.
Best practices for each phase of the migration project are presented below:
Phase 1: Install Directory Sync agents and create the Workflow
- Directory Sync is used to synchronize objects and must be configured before using Active Directory.
- Only those Devices which are in scope of the synchronization Workflow and the filters on its Environments will be available in Active Directory.
- At a minimum the Read From and Match To steps of the synchronization Workflow must be present for Devices.
Phase 2: Identify Devices and their related Users and Groups to migrate (Concurrent with Phase 3)
- Before migrating Devices do some analysis and planning to see what Users and Groups may need to be migrated, what groups need to be consolidated, how duplicates will be handled, etc.
- More than one Workflow can be used to control the target destinations of Users and Groups.
- Identifying Devices, Users, and groups to migrate can be accomplished concurrently with installing Active Directory agents and Registering Devices in Phase 3.
Phase 3: Install Active Directory agents and Register Devices (Concurrent with Phase 2)
- The Active Directory agent should be installed on the Devices to be migrated or pushed out via third party tool.
- Sufficient time should be allowed to address any issues with Device registration with the server. Correcting registration issues can take more time than expected. A typical large company with a large number of Devices may need a couple of weeks of off and on work to resolve registration issues with all Devices.
- Resolving Device registration issues can be accomplished concurrently with identifying Users and groups to migrate in Phase 2.
Phase 4: ReACL Devices
- Run a ReACL (file level re-permissioning) job on as many Devices as possible early in the process.
- ReACL is a non-destructive process that can be repeated as often as necessary up until Cutover in Phase 5.
- Troubleshoot any Devices with ReACL jobs which did not complete successfully.
- Run a ReACL job again close to the actual Cutover date. This will allow you to complete most of the ReACL process early and provide time to resolve any issues with things such as anti-virus software and Group Policies.
Phase 5: Cutover Devices
- Using some test Devices, Users, and Groups, verify a successful Device Cutover.
- Create any custom Actions that may be required to run as part of the Cutover.
- Typically, a final ReACL job should be run the weekend before the scheduled Cutover to ensure any new Users and other changes are processed.
- Optionally, use the Auto-Pilot Cleanup option to prepare the AutoPilot-provisioned device for migation. This must be done before the cutover if the source Entra ID Joined device is Autopilot-provisioned and the Entra ID Join Profile has the Auto-Pilot Cleanup option selected.
- A workstation reboot is required after the target account is enabled, the source account is disabled, and the Cutover is complete. This is usually completed in the evening when fewer end-users are impacted. Any impacted end-users should be alerted that this reboot is necessary.
- Disabling SID Filter Quarantining on External Trusts
- To disable SID filter quarantining for the trusting domain, type a command using the following syntax at a command-prompt:
- Netdom trust TrustingDomainName /domain: TrustedDomainName /quarantine:No /usero: domainadministratorAcct /passwordo: domainadminpwd
- To re-enable SID filtering, set the /quarantine: command-line option to Yes.
- Allowing SID History to Traverse Forest Trusts
- The default SID filtering applied to forest trusts prevents user resource access requests from traversing the trusts with the credentials of the original domain. If you want to enable users to use the credentials that were migrated from their original domain, you can allow SID history to traverse forest trusts by using the Netdom command.
- To allow SID history credentials to traverse a trust relationship between two forests, type a command using the following syntax at a command-prompt:
- Netdom trust TrustingDomainName /domain: TrustedDomainName /enablesidhistory:Yes /usero: domainadministratorAcct /passwordo: domainadminpwd
- To re-enable the default SID filtering setting across forest trusts, set the /enablesidhistory: command-line option to No.
- For more information about configuring SID filtering refer to the Microsoft article available at https://technet.microsoft.com/en-us/library/cc755321(v=ws.10).aspx.
Phase 6: Cleanup
- The Cleanup phase typically takes place about two months after all Device Cutovers are complete. During the Cleanup phase, all permissions should be removed from the source domain and then the Active Directory agent should be removed from the Devices.
- Before executing the Cleanup job to complete the Cleanup process it is recommended that you disable SID filtering/quarantine to verify that there are no issues with application access.
- Optionally, use the Set Intune Primary User action after the Device Cutover is completed.


