Guest Users in Directory Sync
What is a Guest User?
A guest user is an Microsoft Entra ID Business-to-Business account which is utilized to provide seamless collaboration between the Microsoft Cloud organizations.
For more context and details check out Microsoft’s document on the topic, What is guest user access in Microsoft Entra ID B2B?
Can I create, update and delete Guest user objects with Directory Sync?
Yes, Directory Sync provides create, update and delete capabilities to keep your multiple identities, objects and properties in sync for short-term and long-term integration needs.
There are two (2) new additional options to create users in a target cloud directory, highlighted below. The image shows the Template wizard where you may manage how users are created.

Figure 1: Example Template Wizard - Create New Users – Guest Options
What does the Guest User option do?
The Guest User option (see figure 1) will create a user object with the type of Guest within the destination directory configured in the workflow. This user’s password will be set and managed within the target directory management controls. This user’s UPN, Display Name and email address will be constructed based on the template mapping controls configured within the workflow.
What does the Guest Invite option do?
The Guest Invite option (see figure 1) will create a user object with the type of Guest within the destination directory configured in the workflow and immediately send an invitation to the source email user account. This user’s UPN will be constructed automatically by Microsoft to meet their requirements for B2B functionality. This user’s password will not be set and will continue to be managed from the source directory management tools and administrators. All other attributes set during creation will be determined by the template mapping controls configured within the workflow.
Can I send an invitation later if I didn’t send one during creation?
Yes, Microsoft provides numerous methods for managing invitations. For more details, see the Microsoft Entra ID B2B documentation.
Can I match to an existing Guest user and update it?
Yes, Directory Sync can match and update existing Guest user types in Active Directory and Microsoft Entra ID.
What is the recommend matching attribute for Guest Users?
To match a source user object to a target Guest user object can sometimes be challenging because depending on the type of target Guest user object, there may not be a readily available attribute or property that can be used for an exact match to ensure an accurate match.
How to identify unique attributes for Matching to Guest Users
Before synchronization, you must first decide how to derive the matching attribute pairs between the source user object and target guest object. In other words, what parameters in your environment are unique to your external collaborators? Determine a parameter that distinguishes these external collaborators from members of your own organization.
A common approach to resolve this is to:
- Designate an unused attribute (for example, extensionAttribute1) to use as the source attribute that will match to a unique identifier attribute, such as email, in the target.
- Next construct the value for that attribute from other source properties, to create a unique identifier that will be found in the target. For example, use the email address of the source user to construct the extensionAttribute1 value as Source Local Part @ Target Domain.
Can I create a local user, so it is ready to be synchronized up to Microsoft Entra ID as a Guest?
Yes, Directory Sync supports the creation of local user objects for this purpose. Simply configure the template mappings to set the attribute value of the predetermined attributed which will be used by Microsoft Entra Connect to set the UserType = Guest in the cloud object. If you are using a different method within Microsoft Entra Connect, adjust your mapping rules to fit your needs.
You can use Microsoft Entra Connect to sync the accounts to the cloud as Microsoft Entra B2B users (that is, users with UserType = Guest). This enables your users to access cloud resources using the same credentials as their local accounts, without giving them more access than they require.
For more information about How to grant local users access to cloud apps read this Microsoft article on the topic.
For details on How to enable synchronization of UserType for Microsoft Entra Connect then please read this Microsoft document.
Additional Information
How To Use Guest Users in Directory Sync
What is guest user access in Microsoft Entra ID B2B?
Microsoft Entra ID B2B best practices
Microsoft Entra ID B2B documentation
Properties of an Microsoft Entra ID B2B collaboration user
Quickstart: Add guest users to your directory in the Azure portal
Add guests to the global address list
Product Licensing
The product licensing is based on the number of unique source accounts processed by a Directory Sync Workflow. The licenses are consumed when the Directory Sync Workflow creates or updates the target objects.
The following object types do not consume any license:
- Distribution Group
- Security Group
- Mail Enabled Security Group
- Teams
- M365 Group mailboxes
- Contacts
- Computer accounts
- Guest
Licensing for bi-directional, one to many and many to one scenario.
Since product licensing is based on unique source accounts, there will only be one license consumed per account in a bi-directional sync or in a one-to-many scenario. Additional licenses are consumed in a many-to-one scenario.
Refer to the below examples for details.
One to One Environment Pair with bi-directional sync
- User1@Contoso.com matched to User1@fabrikam.com
- User1@fabrikam.com matched to User1@Contoso.com
Only consumes one license because it is a bi-directional sync for source account User1@Contoso.com
One to Many Environment Pair
- User1@Contoso.com matched to User1@fabrikam.com
- User1@Contoso.com matched to User1@foo.dom
Only consumes one license, because even though the target users are from two different environments, the syncs are for the same source account User1@Contoso.com
Many to One Environment Pair
- User1@fabrikam.com matched to User1@Contoso.com
- User1@foo.dom matched to User1@Contoso.com
Consumes two licenses because User1@fabrikam.com and User1@foo.dom are two unique source accounts.
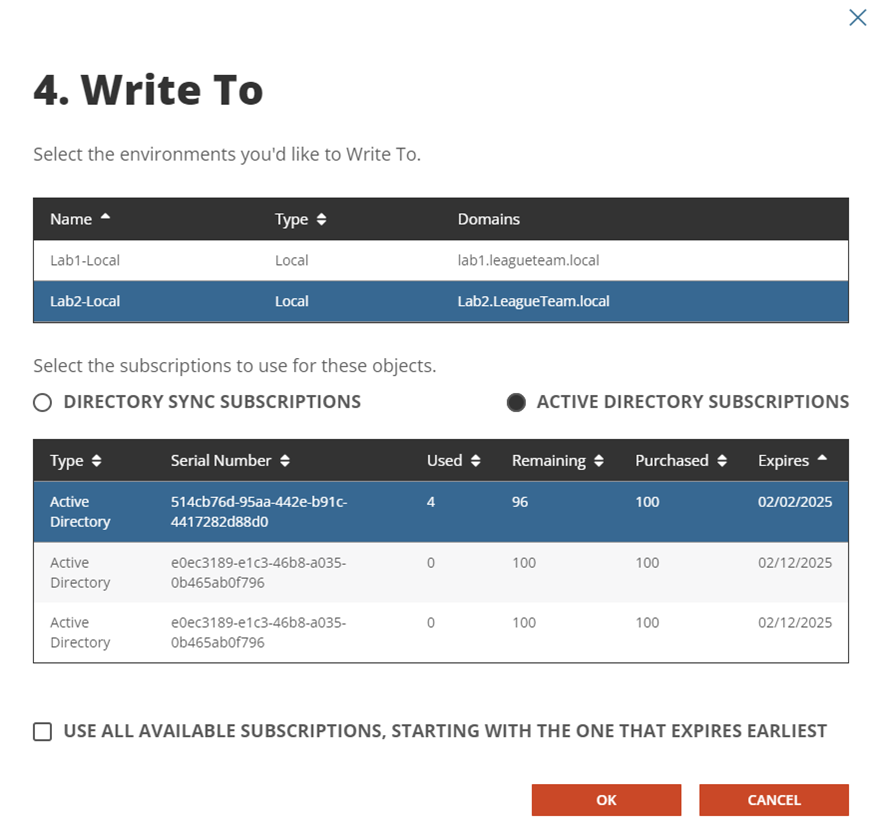
Licensing related to the Write To workflow task
Including at least one Write To environment is required. After data has been matched, mapped, and filtered, you must determine your target and where to place the new objects and/or sync objects that were matched.
The Write To workflow task is also where you need to configure the license consumption. From The Write To task screen, select the license subscription to use. You may select one or more licenses from the same subscription. The license that expires earliest will be consumed.
Settings
Environments
What is an Environment?
If a workflow is a series of action steps, an environment is the receiver of those actions. On the Select Environments screen you will choose two or more environments that the workflow will take actions against. You need at least two so that you have at least one source and one target, but you can choose several in a more complex migration scenario. For example, you may choose to read from two different environments as sources, to be written to a single target environment.
Where do I manage Environments?
To manage environments, simply open the left navigation menu and click Environments, located under Settings, see Figure 1.

Figure 1: Directory Sync Setup and Settings Menu
How are Local Environments added?
To add a local environment:
- On the Environments page, Click the New button. The Select your Environment type page appears.
- Select Local and click Next.
- Enter a name for your environment and click Next.
- Enter a name for your agent and click Next.
- Enter values in the following fields:
- Target Domain Controller IP Address – The IP address of the target Domain Controller.
- Target Domain Controller Ping Interval - The number of seconds the script will sleep between pings to the defined target domain controller. The default value is 300 seconds.
- Timeout Before Job Failure – The number of minutes to wait after Credential Cache job is downloaded by the agent before marking the job a failure due to timeout. The default value is 180 minutes.
- Timeout for User Credential Prompt – The number of minutes to prompt the user with a dialog box to enter their target domain credentials for caching. The default value is 5 minutes
- Click Save Profile. The Credential Cache Profile is added to the list.
How do you export a list of Users, Groups, Contacts, and Devices in an environment?
Select an environment in the Environments table and then click Details. On the Details page, click the Export button to download a CSV file of the Users, Groups, Contacts, and Devices.
How do you unmatch Users, Groups, Contacts, and Devices so they will not be synchronized?
Select an environment in the Environments table and then click Details. On the Details page, select an object in the table and click the Unmatch button. The Match Status for the object will change to "Unmatched" and the object will not be synchronized.
The Unmatch action is not supported for objects belonging to the Tenant-to-Tenant project and registered devices.
How do you view logs for local environments?
Select a local environment in the Environments table and then click Password Logs or Discovery Logs to export a CSV with password or discovery information.
How do you discover local environments?
Select a local environment in the Environments table and then click Discover to begin the discovery process for the environment.
How do you filter out users and groups in cloud environments you do not want to synchronize?
Select a cloud environment in the Environments table and then click Settings. Then select the Object Filter tab to view the filter options. Uncheck the object types you want to exclude. Options to exclude unlicensed and disabled accounts are also available. Click Attribute Filters to build filters that allow you to be more specific as to which object(s) to sync. Select the Filter Groups tab to enable Group filters.
How do you set the object filter to synchronize Microsoft Entra ID Joined devices in cloud environments?
If you subscribe to the Microsoft Entra ID Joined Device add on feature, you can enable the Microsoft Entra ID Joined device object filter option in Settings. To enable the Microsoft Entra ID Joined device option, select a cloud environment in the Environments table and then click Settings. Then select the Object Filter tab to view the filter options. Check the Microsoft Entra ID Joined devices option. Click Attribute Filters to build filters that allow you to be more specific as to which device(s) to sync.
The below table displays filterable properties and the object types that can be filtered by them. ✓= The property can be used to filter this object type.
| AcceptMessagesOnlyFrom |
|
✓ |
✓ |
✓ |
|
| AcceptMessagesOnlyFromDLMembers |
|
✓ |
✓ |
✓ |
|
| AcceptMessagesOnlyFromSendersOrMembers |
|
✓ |
✓ |
✓ |
|
| AccessType |
|
|
|
✓ |
|
| AccountDisabled |
✓ |
|
|
|
|
| AddressListMembership |
|
✓ |
✓ |
✓ |
|
| AdministrativeUnits |
✓ |
✓ |
✓ |
✓ |
|
| Alias |
|
✓ |
✓ |
✓ |
|
| AllowAddGuests |
|
|
|
✓ |
|
| AllowUMCallsFromNonUsers |
✓ |
|
|
|
|
| AlwaysSubscribeMembersToCalendarEvents |
|
|
|
✓ |
|
| ArbitrationMailbox |
|
✓ |
✓ |
|
|
| ArchiveRelease |
✓ |
|
|
|
|
| AssistantName |
✓ |
|
|
|
|
| AuditLogAgeLimit |
|
|
|
✓ |
|
| AuthenticationPolicy |
✓ |
|
|
|
|
| AutoSubscribeNewMembers |
|
|
|
✓ |
|
| BypassModerationFromSendersOrMembers |
|
✓ |
✓ |
✓ |
|
| BypassNestedModerationEnabled |
|
|
✓ |
|
|
| CalendarMemberReadOnly |
|
|
|
✓ |
|
| CalendarUrl |
|
|
|
✓ |
|
| CertificateSubject |
✓ |
|
|
|
|
| City |
✓ |
|
|
|
|
| Classification |
|
|
|
✓ |
|
| Company |
✓ |
|
|
|
|
| ConnectorsEnabled |
|
|
|
✓ |
|
| ConsumerNetID |
✓ |
|
|
|
|
| CountryOrRegion |
✓ |
|
|
|
|
| CustomAttribute1 |
|
✓ |
✓ |
✓ |
✓ |
| CustomAttribute10 |
|
✓ |
✓ |
✓ |
✓ |
| CustomAttribute11 |
|
✓ |
✓ |
✓ |
✓ |
| CustomAttribute12 |
|
✓ |
✓ |
✓ |
✓ |
| CustomAttribute13 |
|
✓ |
✓ |
✓ |
✓ |
| CustomAttribute14 |
|
✓ |
✓ |
✓ |
✓ |
| CustomAttribute15 |
|
✓ |
✓ |
✓ |
✓ |
| CustomAttribute2 |
|
✓ |
✓ |
✓ |
✓ |
| CustomAttribute3 |
|
✓ |
✓ |
✓ |
✓ |
| CustomAttribute4 |
|
✓ |
✓ |
✓ |
✓ |
| CustomAttribute5 |
|
✓ |
✓ |
✓ |
✓ |
| CustomAttribute6 |
|
✓ |
✓ |
✓ |
✓ |
| CustomAttribute7 |
|
✓ |
✓ |
✓ |
✓ |
| CustomAttribute8 |
|
✓ |
✓ |
✓ |
✓ |
| CustomAttribute9 |
|
✓ |
✓ |
✓ |
✓ |
| Database |
|
|
|
✓ |
|
| DataEncryptionPolicy |
|
|
|
✓ |
|
| Department |
✓ |
|
|
|
|
| DirectReports |
✓ |
|
|
|
|
| DisplayName |
✓ |
✓ |
✓ |
✓ |
✓ |
| DistinguishedName |
✓ |
✓ |
✓ |
✓ |
|
| EmailAddressPolicyEnabled |
|
✓ |
✓ |
✓ |
|
| ExchangeGuid |
|
|
|
✓ |
|
| ExchangeVersion |
✓ |
✓ |
✓ |
✓ |
|
| ExpansionServer |
|
|
✓ |
✓ |
|
| ExtensionCustomAttribute1 |
|
✓ |
✓ |
✓ |
|
| ExtensionCustomAttribute2 |
|
✓ |
✓ |
✓ |
|
| ExtensionCustomAttribute3 |
|
✓ |
✓ |
✓ |
|
| ExtensionCustomAttribute4 |
|
✓ |
✓ |
✓ |
|
| ExtensionCustomAttribute5 |
|
✓ |
✓ |
✓ |
|
| Extensions |
|
✓ |
|
|
|
| ExternalDirectoryObjectId |
✓ |
✓ |
✓ |
✓ |
|
| ExternalEmailAddress |
|
✓ |
|
|
|
| Fax |
✓ |
|
|
|
|
| FileNotificationsSettings |
|
|
|
✓ |
|
| FirstName |
✓ |
|
|
|
|
| GeoCoordinates |
✓ |
|
|
|
|
| GrantSendOnBehalfTo |
|
✓ |
✓ |
✓ |
|
| GroupExternalMemberCount |
|
|
|
✓ |
|
| GroupMemberCount |
|
|
|
✓ |
|
| GroupPersonification |
|
|
|
✓ |
|
| GroupSKU |
|
|
|
✓ |
|
| GroupType |
|
|
✓ |
✓ |
|
| Guid |
✓ |
✓ |
✓ |
✓ |
|
| HasPicture |
|
✓ |
|
|
|
| HasSpokenName |
|
✓ |
|
|
|
| HiddenFromAddressListsEnabled |
|
✓ |
✓ |
✓ |
|
| HiddenFromExchangeClientsEnabled |
|
|
|
✓ |
|
| HiddenGroupMembershipEnabled |
|
|
✓ |
✓ |
|
| HomePhone |
✓ |
|
|
|
|
| Id |
✓ |
✓ |
✓ |
✓ |
|
| Identity |
✓ |
✓ |
✓ |
✓ |
|
| InboxUrl |
|
|
|
✓ |
|
| Initials |
✓ |
|
|
|
|
| InPlaceHolds |
|
|
|
✓ |
|
| InPlaceHoldsRaw |
✓ |
|
|
✓ |
|
| IsExternalResourcesPublished |
|
|
|
✓ |
|
| IsLinked |
✓ |
|
|
|
|
| IsMailboxConfigured |
|
|
|
✓ |
|
| IsMembershipDynamic |
|
|
|
✓ |
|
| IsSecurityPrincipal |
✓ |
|
|
|
|
| IsSoftDeletedByDisable |
✓ |
|
|
|
|
| IsSoftDeletedByRemove |
✓ |
|
|
|
|
| IsValid |
✓ |
✓ |
✓ |
✓ |
|
| Language |
|
|
|
✓ |
|
| LastExchangeChangedTime |
|
✓ |
✓ |
✓ |
|
| LastName |
✓ |
|
|
|
|
| LegacyExchangeDN |
✓ |
✓ |
✓ |
✓ |
|
| LinkedMasterAccount |
✓ |
|
|
|
|
| MacAttachmentFormat |
|
✓ |
|
|
|
| MailboxLocations |
✓ |
|
|
|
|
| MailboxProvisioningConstraint |
✓ |
|
|
✓ |
|
| MailboxProvisioningPreferences |
✓ |
|
|
|
|
| MailboxRegion |
✓ |
|
|
✓ |
|
| MailboxRegionLastUpdateTime |
✓ |
|
|
|
|
| MailboxRelease |
✓ |
|
|
|
|
| MailTip |
|
✓ |
✓ |
✓ |
|
| MailTipTranslations |
|
✓ |
✓ |
✓ |
|
| ManagedBy |
|
|
✓ |
✓ |
|
| ManagedByDetails |
|
|
|
✓ |
|
| Manager |
✓ |
|
|
|
|
| MaxReceiveSize |
|
✓ |
✓ |
✓ |
|
| MaxRecipientPerMessage |
|
✓ |
|
|
|
| MaxSendSize |
|
✓ |
✓ |
✓ |
|
| MemberDepartRestriction |
|
|
✓ |
|
|
| MemberJoinRestriction |
|
|
✓ |
|
|
| MessageBodyFormat |
|
✓ |
|
|
|
| MessageFormat |
|
✓ |
|
|
|
| MicrosoftOnlineServicesID |
✓ |
|
|
|
|
| MigrationToUnifiedGroupInProgress |
|
|
✓ |
✓ |
|
| MobilePhone |
✓ |
|
|
|
|
| ModeratedBy |
|
✓ |
✓ |
✓ |
|
| ModerationEnabled |
|
✓ |
✓ |
✓ |
|
| Name |
✓ |
✓ |
✓ |
✓ |
|
| NetID |
✓ |
|
|
|
|
| Notes |
✓ |
|
|
✓ |
|
| ObjectCategory |
✓ |
✓ |
✓ |
✓ |
|
| ObjectClass |
✓ |
✓ |
✓ |
✓ |
|
| ObjectState |
✓ |
✓ |
✓ |
✓ |
|
| Office |
✓ |
|
|
|
|
| OrganizationalUnit |
✓ |
✓ |
✓ |
✓ |
|
| OrganizationId |
✓ |
✓ |
✓ |
✓ |
|
| OriginatingServer |
✓ |
✓ |
✓ |
✓ |
|
| OtherFax |
✓ |
|
|
|
|
| OtherHomePhone |
✓ |
|
|
|
|
| OtherTelephone |
✓ |
|
|
|
|
| Pager |
✓ |
|
|
|
|
| PeopleUrl |
|
|
|
✓ |
|
| Phone |
✓ |
|
|
|
|
| PhoneticDisplayName |
✓ |
|
|
|
|
| PhotoUrl |
|
|
|
✓ |
|
| PoliciesExcluded |
|
✓ |
✓ |
✓ |
|
| PoliciesIncluded |
|
✓ |
✓ |
✓ |
|
| PostalCode |
✓ |
|
|
|
|
| PostOfficeBox |
✓ |
|
|
|
|
| PreviousRecipientTypeDetails |
✓ |
|
|
|
|
| RecipientType |
✓ |
✓ |
✓ |
✓ |
|
| RecipientTypeDetails |
✓ |
✓ |
✓ |
✓ |
|
| RejectMessagesFrom |
|
✓ |
✓ |
✓ |
|
| RejectMessagesFromDLMembers |
|
✓ |
✓ |
✓ |
|
| RejectMessagesFromSendersOrMembers |
|
✓ |
✓ |
✓ |
|
| RemotePowerShellEnabled |
✓ |
|
|
|
|
| ReportToManagerEnabled |
|
|
✓ |
✓ |
|
| ReportToOriginatorEnabled |
|
|
✓ |
✓ |
|
| RequireSenderAuthenticationEnabled |
|
✓ |
✓ |
✓ |
|
| ResetPasswordOnNextLogon |
✓ |
|
|
|
|
| RunspaceId |
✓ |
✓ |
✓ |
✓ |
|
| SamAccountName |
✓ |
|
✓ |
|
|
| SendModerationNotifications |
|
✓ |
✓ |
✓ |
|
| SendOofMessageToOriginatorEnabled |
|
|
✓ |
✓ |
|
| SeniorityIndex |
✓ |
|
|
|
|
| ServerName |
|
|
|
✓ |
|
| SharePointDocumentsUrl |
|
|
|
✓ |
|
| SharePointNotebookUrl |
|
|
|
✓ |
|
| SharePointSiteUrl |
|
|
|
✓ |
|
| Sid |
✓ |
|
|
|
|
| SidHistory |
✓ |
|
|
|
|
| SiloName |
✓ |
|
|
|
|
| SimpleDisplayName |
✓ |
✓ |
✓ |
|
|
| SKUAssigned |
✓ |
|
|
|
|
| StateOrProvince |
✓ |
|
|
|
|
| StreetAddress |
✓ |
|
|
|
|
| StsRefreshTokensValidFrom |
✓ |
|
|
|
|
| SubscriptionEnabled |
|
|
|
✓ |
|
| TelephoneAssistant |
✓ |
|
|
|
|
| Title |
✓ |
|
|
|
|
| UMCallingLineIds |
✓ |
|
|
|
|
| UMDialPlan |
✓ |
|
|
|
|
| UMDtmfMap |
✓ |
✓ |
✓ |
|
|
| UpgradeDetails |
✓ |
|
|
|
|
| UpgradeMessage |
✓ |
|
|
|
|
| UpgradeRequest |
✓ |
|
|
|
|
| UpgradeStage |
✓ |
|
|
|
|
| UpgradeStageTimeStamp |
✓ |
|
|
|
|
| UpgradeStatus |
✓ |
|
|
|
|
| UseMapiRichTextFormat |
|
✓ |
|
|
|
| UsePreferMessageFormat |
|
✓ |
|
|
|
| UserAccountControl |
✓ |
|
|
|
|
| UserCertificate |
|
✓ |
|
|
|
| UserPrincipalName |
✓ |
|
|
|
|
| UserSMimeCertificate |
|
✓ |
|
|
|
| VoiceMailSettings |
✓ |
|
|
|
|
| WebPage |
✓ |
|
|
|
|
| WelcomeMessageEnabled |
|
|
|
✓ |
|
| WhenChanged |
✓ |
✓ |
✓ |
✓ |
|
| WhenChangedUTC |
✓ |
✓ |
✓ |
✓ |
|
| WhenCreated |
✓ |
✓ |
✓ |
✓ |
|
| WhenCreatedUTC |
✓ |
✓ |
✓ |
✓ |
|
| WhenSoftDeleted |
✓ |
|
|
✓ |
|
| WindowsEmailAddress |
✓ |
✓ |
✓ |
|
|
| WindowsLiveID |
✓ |
|
|
|
|
| YammerEmailAddress |
|
|
|
✓ |
|
| Description |
|
|
✓ |
✓ |
|
| OperatingSystem |
|
|
|
|
✓ |
| OperatingSystemVersion |
|
|
|
|
✓ |
| ProfileType |
|
|
|
|
✓ |
| EmailAddresses |
|
✓ |
✓ |
✓ |
|
Additional Information
Password Sync
