On Demand Migration for Active Directory enables you to migrate and consolidate AD and Entra ID environments. This SaaS solution can integrate and migrate users, groups, and devices between Active Directory, Entra ID, and hybrid directory environments.
This is one of three SaaS solutions Quest offers for device migration. Please reference the user guide for the solution you have purchased:
Directory Sync is built with Microsoft Azure. Our Software-as-a-Service (SaaS) platform is designed to handle a variety of directory synchronization scenarios to meet your coexistence and collaboration needs.
Directory Sync can manage simple AD to AD, Cloud to Cloud, and more complex scenarios including combinations of local and cloud mixed environments.
What is required to get Directory Sync set up?
You will need 2 items to get started with setting up Directory Sync.
- The authorized account(s) that allow changes to your local and/or cloud directories
- At least one (1) local on-premises server to host the local agent (if applicable)
The following information provides details around the specific component requirements.
Agents
Directory Sync is a 100% SaaS platform but to commit changes to on-premises directories (if applicable) such as Active Directory, a local agent must be installed and configured.
You will need at least one Directory Sync Agent installed per forest (environment). You may have up to five agents per forest. Adding more agents can offer limited fault-tolerance and can improve synchronization throughput, especially for near real-time password synchronization.
|

|
NOTE: The Directory Sync Agent should not be installed on a non-domain joined server. If you are only connecting to Microsoft Entra ID, local agents are not required. |
Hardware
This local agent must meet the following minimum requirements:
- At least one (1) Windows Server 2016, 2019, 2022, or 2025
- Additional Windows servers may be deployed. Limit to 5.
- CPU: 4 Cores
- Memory: 4GB Free
- Disk: 40GB Free Disk Space excluding Operating System.
|
|
NOTE: The local agent must be configured on the Member Server for Modern Password Copy. Do not install any local agents on AD domain controllers in a production environment. |
Software
This local agent must meet the following minimum requirements:
- Windows Server 2016, 2019, 2022, or 2025
- .NET 4.7.2 (will automatically be installed unless already present)
- TLS 1.2 or higher
Domain and Forest Functional Levels
- All AD Functional Levels supported by Microsoft for a Microsoft Windows Server operating system listed below are supported for migration from/to Domain controllers running on that same Operating System. For example, Windows Server 2016 functional levels are supported on Windows Server 2022, Windows Server 2019, and Windows Server 2016. For full details see Microsoft’s documentation of Active Directory Domain Services Functional Levels in Windows Server on Microsoft Learn.
|
|
NOTE: Windows Server 2003 functional levels are supported only on Windows Server 2016. That is, Microsoft does not support Windows Server 2003 functional levels on Windows Server 2019 or Windows Server 2022. |
- The following Windows Server versions are supported:
- Windows Server 2016
- Windows Server 2019
- Windows Server 2022
- Windows Server 2025
Network
- Connecting to the Directory Sync web interface uses TCP port 443 (HTTPS).
- Agent connections are initiated by the agent and require port 443 access to Directory Sync SaaS application.
- Agent connections to the DCs use ports 88, 135, 137-139, 389 (UDP), 445, 1027, 3268 and 49152-65535.
- Port 636, 3269 is required for LDAPs. Please refer to Enable Lightweight Directory Access Protocol (LDAP) over Secure Sockets Layer (SSL) - Windows Server | Microsoft Learn for LDAPs requirement
- Copying SIDHistory is an operation initiated by the agent and performed by the domain controllers.
- Source/Target Domain Controller FQDNs must be resolvable by each other.
- Open TCP ports 88, 135, 137-139, 389 (UDP), 445, 1027, 3268 and 49152-65535.
Accounts
Local Active Directory Account
- The agent installer will prompt for a domain account with permission to read and write on-premises Active Directory.
- An agent intended to sync all domains in a forest, must have access rights to all domains and objects used in workflows.
Microsoft Entra ID Application Account
- When creating a new Cloud Environment, an account with the Global Administrator Role is required to grant permissions and establish a connection.
- This account also needs the Global Administrator Role enabled during the first Read workflow so that it can create and configure Microsoft Entra ID PowerShell Accounts required for Directory Sync tasks.
Microsoft Entra ID PowerShell Accounts
- An OAuth token will be used by the application to create two (2) PowerShell accounts which are used to read and update objects in the cloud.
- The accounts will have Exchange Administrator, User Administrator and Teams Administrator roles assigned in order to read and update objects in the cloud.
- The accounts being used do not require any Microsoft 365 licenses.
- The accounts must be excluded from MFA requirements.
- An OAuth token will also be used by the used by the application to create a mail-enabled security group which will contain the two PowerShell accounts.
Password Synchronization
The following conditions must be met for Password Sync:
- ADMIN$ must be accessible on the domain controller from the Directory Sync agent server.
- The Password Sync functionality requires that either a domain admin role or built-in admin role be granted to the service account.
- Third-party anti-virus or threat prevention programs may block the execution of password tasks. These programs may need to be uninstalled from both the Domain Controller and the Directory Sync Agent Server or otherwise carefully whitelisted to allow proper operation.
- The RC4 encryption (Rivest Cipher 4 or RC4-HMAC) is an element of Microsoft Kerberos authentication that Quest migration products require to sync Active Directory passwords between Source and Target environments. Disabling the use of the RC4 protocol enabled makes password syncing between environments impossible.
- Beginning on November 8, 2022 Microsoft recommended an out of band (OOB) patch be employed to set AES as the default encryption type. The enabling and disabling use of the RC4 encryption protocol has potential impact beyond the function of password syncing of Quest migration tooling and should be considered carefully.
SID History
- A trust between that source and target domain is not required to populate SID History on target objects, but is required to make use of the SID History when attempting to access source side resources. Typically, a trust is created by establishing a Forest level trust, but can also be done as a domain trust.
- The target account must have administrator permissions in the source domain. To enable this, the target account of the Directory Sync agent should be added to the source PDC's built-in administrator group.
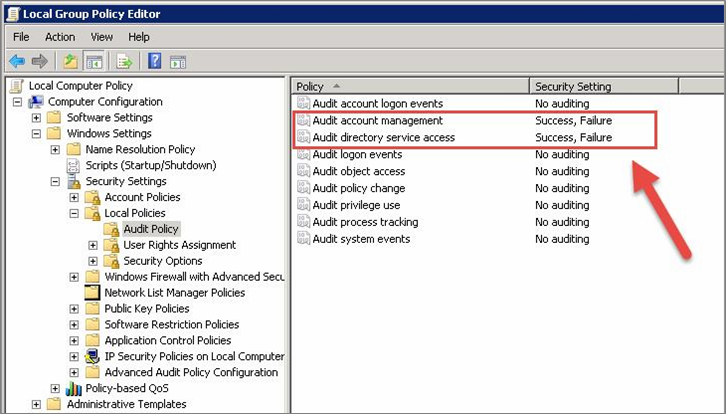
- Auditing of the source and target domain must be enabled. This can be enabled as a global policy for all domain controllers or as a local policy on the specific source and target DCs involved. To enable auditing as a local policy, go to gpedit.msc > Computer Configuration > Windows Settings > Security Settings > Local Policies > Audit Policy and enable the “Audit account management” and “Audit directory service access” settings.
- ‘Account Management’ and ‘DS Access’ Advance Audit policies of the source and target domain should be configured if Advance Auditing are configured in the environments. These settings can be enabled as a global policy for all domain controllers or as a local policy on the specific source and target DCs involved.
To enable advance audit policy for Account Management, go to gpedit.msc > Computer Configuration > Policies > Windows Settings > Security Settings > Advanced Audit Policy Configuration > System Audit Policies > Account Management enable Success and Failure audit for the below policies.
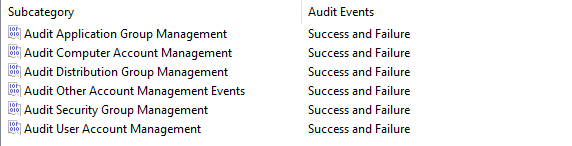
- Audit Application Group Management
- Audit Computer Account Management
- Audit Distribution Group Management
- Audit Other Account Management Events
- Audit Security Group Management
- Audit User Account Management
To enable advance audit policy for DS Access, go to gpedit.msc > Computer Configuration > Policies > Windows Settings > Security Settings > Advanced Audit Policy Configuration > System Audit Policies > DS Access and enable Success audit for the below policies.
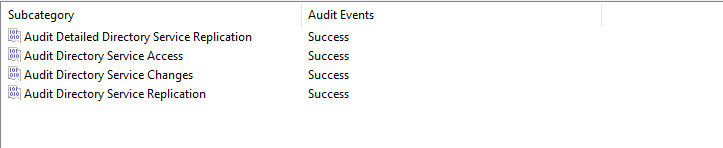
- Audit Directory Service Access
- Audit Directory Service Changes
- Audit Directory Service Replication
- Audit Detailed Directory Service Replication
- An empty Domain Local security group must be created in each source domain and named {SourceNetBIOSDomain}$$$.
- The HKEY_LOCAL_MACHINE\System\CurrentControlSet\Control\LSA\TcpipClientSupport registry key must be set to 1 on the source domain primary domain controller. You must restart the source domain primary domain controller after the registry configuration.
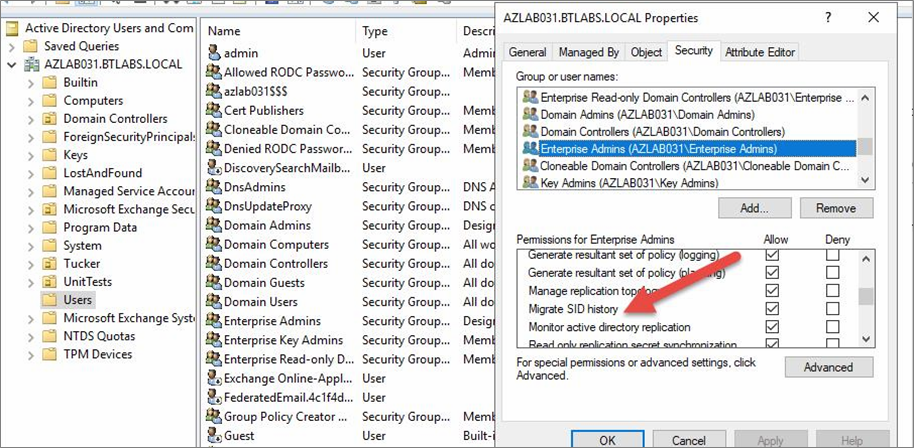
- MigratesIDHistory permissions are required on the target domain. This is typically enabled for Domain Admins and Enterprise Admins, but can be enabled for a specific group or user by following the below steps:
- Right-click on your target domain in Active Directory Users and Computers.
- Select the Security tab and add or update the desired group or user and enable the “Migrate SID History” permission.
|
|
NOTE: For further guidance from Microsoft about Using DsAddSidHistory, see the Microsoft article Using DsAddSidHistory. |
Workflow Alerts
To create a workflow alert, have a valid SMTP address ready.