Chat now with support
Chat with Support

On Demand Migration Current - Active Directory User Guide

Installing the Active Directory Agent

Each Active Directory Computer (device) that will be migrated must have an agent installed on the workstation to orchestrate local jobs that must occur to prepare and execute the workstation’s domain move.

Refer to the Requirements for to verify all devices meet the requirements for agent installation.

The agent is available as an MSI package from the Downloads section of the Configurations page. You will also need the values of the Service URL and Auth Key found on that page.

You can install the agent by running the MSI manually on the device, with a PowerShell command, or in bulk by using a GPO or other third-party delivery method.


How do you manually install the Active Directory Agent?  

  1. Download the Active Directory MSI file from the Downloads page.
  2. Copy the Active Directory MSI file to each computer.
  3. Double-click the file to open the installer.
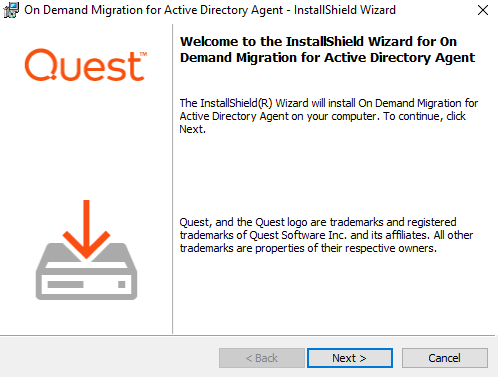
  4. On the Welcome screen, click Next.

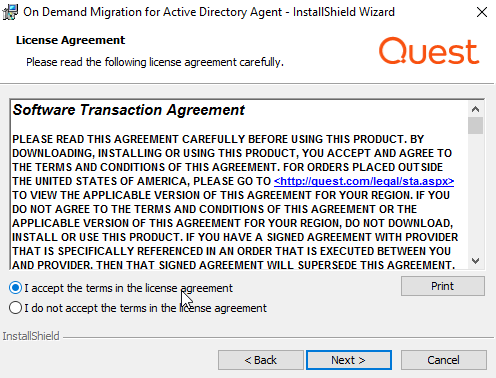
  5. On the License Agreement screen, accept the agreement and click Next.

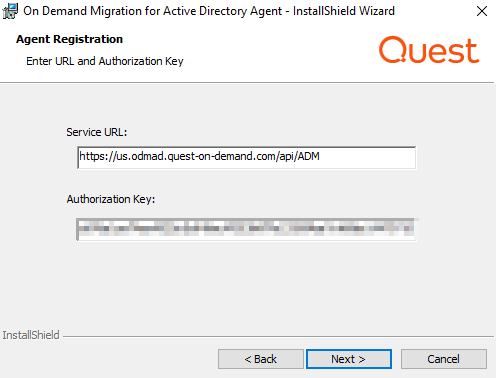
  6. On the Agent Registration screen, enter the Service URL and Authorization Key, found on the Downloads page, and then click Next.

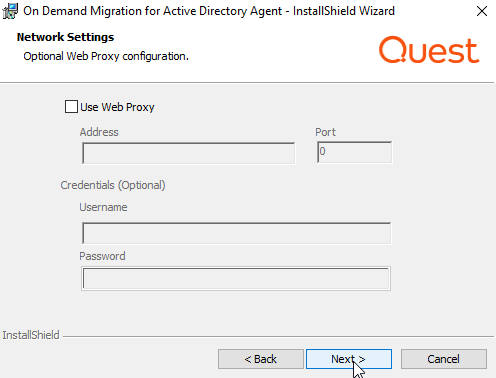
  7. On the Network Settings screen, if using a Web Proxy, check Use Web Proxy and enter the Web Proxy settings. Click Next.

  8. On the Ready to Install the Program screen, click Install.

  9. When the install completes, click Finish.

    Note: Once the agent is installed and the service is running it will connect to the server within four hours. This delay is randomized and uniformly distributed to avoid overloading the server when large numbers of agents come online at the same time.


How do you install the Active Directory Agent using a PowerShell Command?  

  1. Download the Active Directory MSI file from the Downloads page. The Service URL and Auth Key values also found on the Downloads page are required.
  2. Create and run the PowerShell command with the required SERVICEURL (Service URL) and AUTHKEY (Auth Key) values.

    Example:

    msiexec.exe /I 'C:\workspace\AD.Agent-20.3.1.1401.msi' SERVICEURL=https://us.odmad.quest-on-demand.com/api/ADM AUTHKEY=##################################################################
  3. Walk through the install wizard, filling out the needed information and click Finish when completed. The settings for using a customer web proxy for communications are optional.

As needed the installer can also be invoked in quiet mode with the /QN switch (requires running PowerShell as admin).

Additionally, it is possible to configure the agent to use a Web Proxy using the below command line arguments:

  • WEBPROXYENABLE – Is a Web Proxy used? Values: Yes=1, No=0
  • WEBPROXYURL – The Web Proxy Address
  • WEBPROXYPORT – The Web Proxy Port
  • WEBPROXYUSER – The optional Web Proxy Credentials Username
  • WEBPROXYPASS – The optional Web Proxy Credentials Password


How do you install the Active Directory Agent using a GPO (Group Policy Object)?  

  1. To install the agent using a GPO you must convert the MSI package and the parameters into an MST file. One method to do this is using Microsoft Orca. Install Orca (available in Windows SDK Components for Windows Installer Developers). Orca will be used to create the necessary MST file.

  2. Download the Active Directory Agent MSI file from the Downloads page.

  3. Right-click on the MSI file and select Edit with Orca.

  4. Once you have Orca opened, click on the Transform menu and select New Transform.

  5. Next, navigate to the Property table and add the following:

    • Add a Row with property of SERVICEURL and the Service URL value found on the Downloads page.
    • Add a Row with property of AUTHKEY and the Auth Key value found on the Downloads page.

      • Optionally, the following properties and values can also be added to configure the agent to use a Web Proxy:

        • WEBPROXYENABLE – Is a Web Proxy used? Values: Yes=1, No=0
        • WEBPROXYURL – The Web Proxy Address
        • WEBPROXYPORT – The Web Proxy Port
        • WEBPROXYUSER – The optional Web Proxy Credentials Username
        • WEBPROXYPASS – The optional Web Proxy Credentials Password
  1. Click the Transform menu and select Generate Transform to complete the MST file creation. This MST file will be used in a later step.
  2. Right-click on the Active Directory Agent MSI, point to Share with, and click on specific people.
  3. Add a security group. The "authenticated users" group already includes all computers and is a good group to use. The group you add must have the shared Read permission and NTFS permission.
  4. Click Share.
  5. Click Done.
  6. From the Start menu, point to Administrative Tools and click on Group Policy Management.
  7. Right-click on the domain or OU you will be migrating and click on Create a GPO in this domain, and link it here.
  8. In the New GPO dialog box, enter a Name for the GPO and click OK.
  9. Click on the new GPO and click OK.
  10. Right-click on the GPO and select Edit.
  11. Open Computer ConfigurationPolicies > Software Settings and right-click on Software Installation and then point to New and click on Package.
  12. In the File Name field, enter the UNC path to the MSI file and click Open.
  13. Select the Active Directory Agent MSI file and click Open.
  14. In the Deploy Software window, select the Advanced deployment method and click OK.
  15. Under the Modifications tab, add the MST file you created earlier and click OK.

Please Note: The computer must be rebooted for the applied group policy to complete the agent installation.


How do you verify the GPO?  

  1. Log on to a workstation within the scope of the GPO using administrator credentials.
  2. From a command prompt on the workstation, run gpresult -r
  3. The Computer Settings section will display the applied group policy.

Please Note:A newly applied group policy will not immediately be displayed.

The Computer Settings section displays the applied group policy, but the agent installation is not completed until the computer is rebooted.

Please Note: If using the agent Auto-Upgrade feature and deployment software that uses MSI ProductCode based detection, the Auto-upgrade feature should be disabled after initial deployment or the detection method should verify via a folder path.

Repositories

What are the Repositories?  

Repositories are storage locations (network shares) which you configure on your network used for four specific job types: Agent Logs, Custom Downloads, Offline Domain Join, and Microsoft Entra Device Join. These job types access or create files in the defined locations. If you are not using these job types you do not need to configure Repositories.


How do I manage Repositories?  

Repositories are managed from the Repositories section of the Configurations page. There you can view and copy the currently defined share path for each job type. You can update and save the configuration. Make sure that the defined network share path is routable from the devices being migrated.


What can I do with a Repository?  

Repositories are used to locate files for four job types:

  • Agent Logs – Agent logs are maintained on individual workstations. To centralize them so that review does not require logging into each machine, the Upload Logs Action can be applied to the Devices of interest. This will create a copy of the Device’s logs in the defined network share.
  • Custom Downloads – Custom Actions with a Download File Task can be used to download a specified file from the defined network share to the workstation. A common use of this job type is distributing a new VPN client to workstations after Cutover.

    A Custom Download Repository should not be used with the Offline Domain Join Action type when configuring custom actions.

  • Offline Domain Join – The Offline Domain Join Action and the associated Cache Credentials Action rely on access to ODJ files which have been generated by a client administrator prior to applying the Actions according to Microsoft instructions as described elsewhere in this guide.

    An Offline Domain Join Repository should be used with the Offline Domain Join Action type when configuring custom actions.

  • Microsoft Entra Bulk Enrollment – The Microsoft Entra ID Cutover Action relies on access to an Azure bulk enrollment package which has been created by a client administrator using the Windows Configuration Designer as described in the Active Directory Entra-Join Quick Start Guide.

Variables

What are Variables?  

Variables, also known as Global Variables, can be defined and be used across multiple scripts when defining Custom Actions. For example, a global variable to add the current date can be added to multiple scripts. Global variables will appear when selecting a starter script when creating a Custom Action if the "Global Variables" option is selected.


How is a Variable created?  

To add a Global Variable:

  1. Open the left navigation menu.
  2. Click Configuration.
  3. Click Variables.
  4. Click the Add button.
    1. Enter values in the following fields:

      • Variable Name (Required): Enter a name for the global variable. The name must contain alphanumeric characters and underscores only.
      • Variable Value (Required): The value of the global variable. Check the Encrypted box to encrypt the value in the database and hide the variable value in the interface.
  5. Click the Save button.

Migration Waves

What is a Migration Wave?  

A Migration Wave in Active Directory is a named logical grouping of Devices. This can be a useful tool for organizing, tracking, and staging your migrations.


How do I manage Migration Waves?  

There are two ways to manage Migration Waves in Active Directory. First, you can add Devices to a Wave by applying the ‘Set to Migration Wave’ Action to Devices from the Ready Devices table. The other way to manager Migration Waves is from the Migration Waves page which is accessible through ‘Waves’ in the left navigation menu. On that page you can create new Waves, Edit Wave names, Remove empty waves, and view how many Devices are in a Wave.


What can I do with a Migration Wave?  

Migrations Waves in Active Directory can be used to filter the Ready Devices table to view Device status and apply Actions.


How do I create a New Migration Wave?  

  1. Login to Active Directory.
  2. Select "Waves" in the left navigation menu.
  3. A new page will open listing your current migration waves.
  4. Click the Add icon.
  5. Name the Migration Wave, remember use a logical name representing the migration event.
  6. Click “Save.”
  7. Now that the Migration Wave is created, Devices can be added to the Wave by applying the ‘Set to Migration Wave’ Action to Devices from the Ready Devices table.


How do I remove a Migration Wave?  

  1. Login to Active Directory.
  2. Select "Waves" in the left navigation menu.
  3. A new page will open listing your current migration waves.
  4. Select one or more wave in the table.
  5. Click the Remove icon.
  6. Click "Yes" to confirm the removal.


How do I edit the name of a Migration Wave?  

  1. Login to Active Directory.
  2. Select "Waves" in the left navigation menu.
  3. A new page will open listing your current migration waves.
  4. Select a wave in the table.
  5. Click the Edit icon.
  6. Edit the name of the Migration Wave.
  7. Click “Save.”


How do I filter Devices by Migration Wave?  

  1. Login to Active Directory.
  2. Select "Devices + Servers" in the left navigation menu.
  3. On the Ready Devices tab, click the Filter icon.
  4. Select one or more wave under the Waves filter category.
Related Documents

The document was helpful.

Select Rating

I easily found the information I needed.

Select Rating