What We Migrate
All types of Public Folders (appointment, contact, journal, mail, note, task, and so on) can be migrated in case they are supported in the target tenant.
Please consider the following migration specifics:
- If the public folder with the same path already exists on the target, the source public folder will not be migrated. Check the Events tab.
- The first processed mailbox will be set as a primary for a public folder. Other mailboxes will be set as secondary public folder mailboxes.
- Send As and Send on Behalf properties will only be transferred for mail-enabled Public Folders.
- Read and unread status is not migrated.
Public Folders Migration Workspace
In this topic:
Dashboard
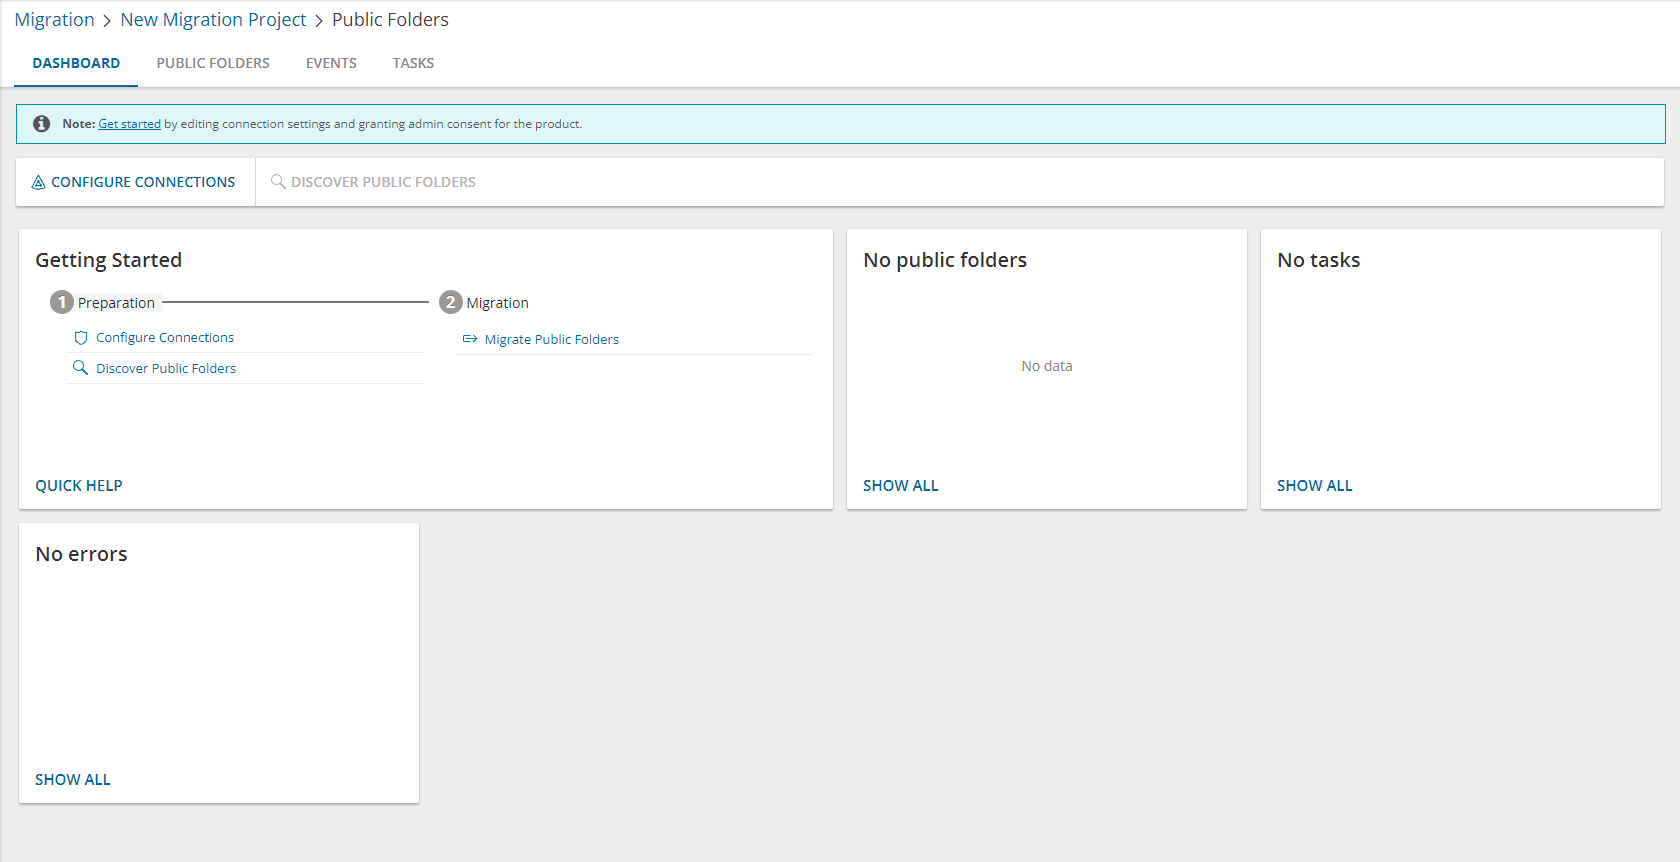
From this dashboard you can:
- Keep track of your location within project and quickly return to the main project dashboard using breadcrumbs on the top of the pane
- View list of discovered public folders with source and target paths, and last events related to the public folder
- Quickly navigate to the event lists
- Quickly navigate to the tasks list
- Create discovery tasks and public folder migration tasks
- Export feature data into comma-separated file
- Temporarily remove public folders from the migration project
- Search public folder
- Filter public folder by status, by matching state, or by mail settings
- Delete public folder
Public Folders List View
The List View displays the summary of the Public Folder information from the source and target tenants. Initially, the List View displays the list of accounts and other columns are blank. As you run the discovery, collect statistics and migration tasks, the list view will display more information about the accounts and the state of the Public Folder migrations.
To open the List View, open the Public Folder migration workspace. Then select the Public Folder tab.
The Public Folders List View is comprised of the following components:
Notification panel - presents relevant information and shortcuts to migration activities.
Filter panel - consists of predefined filters to help you search for mailboxes. See Filtering for more information about working with filters. The number next to filter values indicate the number of folders in the list that match the value.
- Type - returns a list of Public Folders based on the type.
- Status - returns a list of Public Folder accounts based on the migration state of the Public Folder. See the Migration State column description below for filter values.
- Mail Settings - returns the list of Public Folder based on their mail settings that are either Enabled or Disabled..
- Folder Size - returns a list of Public Folders based on their size from Less that 1 GB to More than 70 GB.
List View Actions Menu - contains links to Public Folder actions and the search box. Each action is explained in greater detail in subsequent topics. See Searching for more information about working with the search box.
- Discovery - action options to discover public folders in the source tenant.
- Provision - action options to provision public folders in the target tenant.
- Provision Public Folders - provisions public folders in the target tenant and resolve naming conflicts. See Provisioning Public Folders for more information.
- Map from File - starts the New Public Folder Mapping from File Task wizard to map a specific Public Folder from the source to a Public Folder that may or may not exist in the target tenant. See Mapping Public Folders for more information.
- Migrate - starts the New Public Folder Discover from File Task wizard. See Migrating Public Folders for more information.
- Collections - see Managing Public Folders with Collections for more information.
- More - additional actions as described below:
- Set Permissions - ensures that service principal permissions for Public Folders in the source tenant are refreshed and fully updated.
- Export - exports one or more selected Public Folders details to a CSV file.
- Delete - deletes one or more selected Public Folders.
- Edit Columns - displays or hides columns in the list.
List View - displays information about Public Folders in the source and target tenants. Use the Edit Columns to show or hide columns in the list. The columns are as described below:
- Type - internal folder class names (the “IPF.*” types) used by Microsoft Exchange and Outlook to define the type and behavior of a folder. The supported types are:
- IPF.Note - Standard mail folder; used for email messages, discussions, or posting notes. This is the *default* folder type for most Public Folders.
- IPF.Contact - Stores contact items (address book entries). Used for shared contact lists accessible to multiple users.
- IPF.Appointment - Calendar folder for scheduling meetings, events, and appointments. Supports shared calendars.
- IPF.Task - Task management folder for creating and assigning tasks. Shared task lists.
- IPF.Journal - Stores journal entries that automatically log activities (like emails, calls, meetings).
- IPF.StickyNote - Stores simple “sticky note” style items (like digital Post-it notes).
- Source Path - path of the public folder in the source tenant.
- Target Path - path of the public folder in the target tenant.
- Status - status of the most recent task that was run for the public folder. Valid values are New, Stopped, In Progress, Failed and Completed.
- Priority - last running task priority.
- Mail Enabled - indicates whether or not PF is mail enabled (Yes/No).
- Items to migrate - total number of PF items that can be migrated within current migration task.
- Processed - count of items migrated by last migration task.
- Processed Permissions - count of permissions migrated by last migration task.
- Size - size of the public folder in MB.
- Item Count - count of PF items in source (filled by Collect statistics task).
- Errors - count of items failed during last migration task
- Create Mailbox - partial status of the Create target mailbox operation status.
- Create Public Folder - partial status for Create target public folder operation (Provision)
- Mail Enabled Status - partial status for Set Mail Enable operation.
- Mailbox Permissions - partial status for Mailbox Permissions migration.
- Migrate Content - partial status for content migration.
- Migrate Folder Permissions - partial status for Folder Permissions migration.
- Collections - indicates the most recent collection where the corresponding account is added and the number of additional collections that also contain this object.
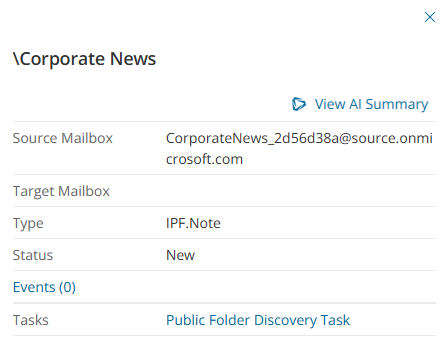
Public Folder Details - When you select a public folder from the List View, the Public Folder Detail pane opens. The information in the pane is described below. Some properties may not appear in the screenshot because they are relevant to specific situations.
-
- View AI Summary - This link is available if you opted for the AI feature in the organization you created (see Organizations and Regions), and the task is a migration task that supports the AI migration assistant and you selected the Generate AI summary option in the Reporting step of the migration wizard. Click this link after the task has completed, to view the AI-generated migration summary.
|

|
NOTE: The View AI Summary link may take a while to appear depending on the volume of tasks and objects being migrated. If this is the first time you have selected this option, the Quest Policies prompt appears. Read the Quest AI Terms of use and click Accept to proceed. This s a one-time acceptance prompt and your acceptance covers all migration tasks that support the AI migration assistant. |
- Description - name of the Public Folder in the source tenant.
- Source Mailbox - name of the mailbox assigned to the public folder in the source tenant.
- Target Mailbox - name of the mailbox assigned to the public folder in the target tenant.
- Events - count of the events that occurred during one or more tasks.
- Tasks - list of tasks invoked for the selected Public Folder.
- Collections - list of collections that contain the selected Public Folder.
Prerequisites
Verify the following prerequisites before you start migrating Public Folders:
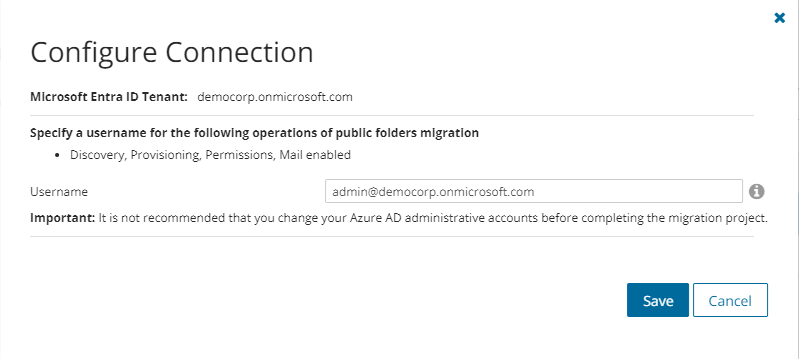
To configure connections:
- Open the Dashboard tab from the Public Folders workspace
- Click Configure Connections from the actions menu. The Configure Connections wizard for Public Folders open.
- Select each tenant that you want to configure. Then click Edit and specify the UserprincipalName of an active user account. The account does not need any permissions, and must not be deactivated or deleted. It cannot be an external or guest account. The UserPrincipalName should not have any special characters. Allowed characters are (a to z, A to Z, 0 to 9, ._-@).
Discovering Public Folders
Before proceeding with the migration, retrieve the list of public folders from the source tenant. Explicit credentials must be provided using Configure Connections. For more information, see Prerequisites.
|
|
TIP: If you want to rediscover public folders, rerun the existing discovery task. |
Discovering all Public Folders
To create a new discovery task
- Log in to Quest On Demand and choose an organization if you have set up multiple organizations.
- From the navigation pane, click Migrate > Projects to open the My Projects list.
- Create a new project or open an existing project.
- Click Public Folders from the project tiles, or click Open from the Public Folders tile to open the Public Folders Migration Workspace.
- Go to the Public Folders tab. Then click Discovery > Discover Public Folders. The New Public Folder Discovery Task wizard starts. Each step is described below:
- Schedule
- Choose from one of three options to schedule the task. The scheduler will be activated only after you complete the task wizard.
- Run now - task runs immediately.
- Run later - task must be started manually.
- Schedule - task will be started at a future date and time entered in the corresponding calendar field.
- Click Next.
- Summary
- Verify the task specifications as described below:
- Name - name of the task. You can specify a custom name. The default name is Public Folder Discovery Task.
- Source tenant - name of the tenant where the statistics will be collected.
- Scheduled start - date and time when the task will start. Now indicates that the task will start immediately.
- Click Back to revise or review a previous step or click Finish to complete the task wizard and start the task as scheduled.
When the discovery task is complete, you will see the source tenant’s public folder summary on the Dashboard.
Discovering Public Folders from a file
When you have a large set of public folders but you want to migrate a subset of those public folders, you can start the discovery process by using a CSV file. The CSV file lets you specify the public folders that you want to discover and ignore the rest. This is a two-step process:
Step 1: Prepare the CSV file
- Create a CSV file with the column title Source Path. Then enter the relative path of the folders that you want to search. Some examples are shown below:
|
|
NOTE:
- You can download a CSV template when you start the New Public Folder Discover from File Task wizard and click Download Example File from the Discovery Options step.
- CSV file names with non-ASCII characters are not supported.
|

- Save the CSV file. You may rename the file if needed.
Step 2: Start the Discovery Task
- Log in to Quest On Demand and choose an organization if you have multiple organizations.
- From the navigation pane, click Migrate > Projects to open the My Projects list.
- Create a new project or open an existing project.
- Click the Public Folders tile, or click Open from the Public Folders tile to open the Public Folders Migration Workspace.
- Go to the Public Folders tab. Then click Discovery > Discover Public Folders from File. The New Public Folder Discover from File Task wizard starts. Each step is described below:
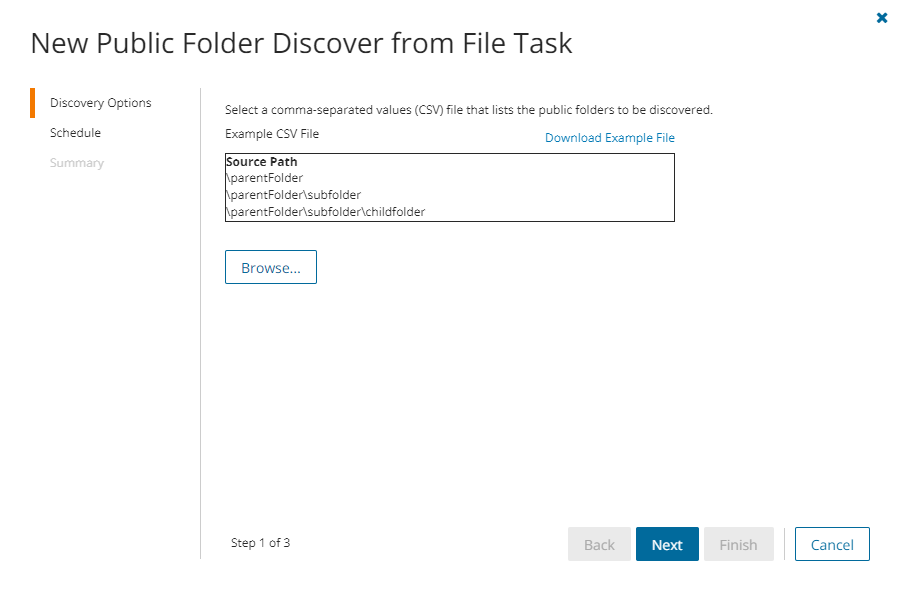
- Discovery Options
- Click Browse and select the CSV that contains the folder paths that you want to search.
- Click Next.
- Schedule
- Choose from one of three options to schedule the task. The scheduler will be activated only after you complete the task wizard.
- Run now - task runs immediately.
- Run later - task must be started manually.
- Schedule - task will be started at a future date and time entered in the corresponding calendar field.
- Click Next.
- Summary
- Verify the task specifications as described below:
- Name - name of the task. You can specify a custom name. The default name is Public Folder Discover from File Task.
- Source tenant - name of the tenant where the statistics will be collected.
- Scheduled start - date and time when the task will start. Now indicates that the task will start immediately.
- Click Back to revise or review a previous step or click Finish to complete the task wizard and start the task as scheduled.
Reviewing the Discovery Task
- Open the Tasks tab.
- Select the task that you want to review. The default name is Public Folder Discovery Task or Public Folder Discover from File Task.
- In the task details pane that opens, the information presented is as described below:
- Type - Type of the task. The type is Discover.
- Created - Date and time when the task was created.
- Modified - Date and time when the task was last updated.
- Status - State of the task.
- Last Operation - The action that was most recently performed in this task.
- Schedule - Date and time when the task started. Now indicates that the task started immediately after the task was created.
- Events (number) - Number indicates the count of events that the task encountered. The values indicate the type of the events and the event count for each type.
Reviewing the Discovery Task Events
- Open the Tasks tab.
- Select the task that you want to review.
- In the task details pane that opens, click Events (number). The Events tab opens with a filtered list of events for the selected task.
- Select an event that you want to review. In the event details pane that opens, the information presented is as described below:
- Object - Name of the team or group discovered.
- Task - Name of the task.
- Time - Date and time when the event occurred.
- Category - Type of task. the value is Application.
- Source - Name of the On Demand Migration service
