Your target tenant might already host SharePoint sites (site collections) or sub-sites created before the migration. See the table below to see the migration action that will be used depending on the existing site properties and the selected migration options.
| Yes |
No |
Merge, all supported properties will be overwritten using source settings |
| Yes |
Yes |
Create and migrate |
| No |
- |
Create and migrate |
Merging and remigration considerations
- Sub-sites based on unsupported site templates are skipped unless they are remapped.
- System settings including site columns, content types etc. from the source will overwrite settings that were changed on the target.
- New site structure including list item and docs that only exist on the target remains unchanged.
- If a new list item with the same name is added on both source and target, the source item will be migrated and added as a separate item (i.e. target will have two items with identical names).
- If a new document with the same name is added on both the source and target, the migration of the source item will be skipped, and the warning that the item already exists on the target is reported. Document libraries only allow one document per name.
- Conflict resolution setting on the List Options step of the New SharePoint Migration Task wizard controls how list items and docs (same name and ID) that were previously migrated in this project are remigrated to the target.
- Versions for remigrated List item and files will be removed and updated based on the settings selected in the Version Options step of the New SharePoint Migration Task wizard
- It is highly recommended to at least match all accounts in the project to ensure that membership and content ownership are processed correctly.
- The target tenant should already have the fully configured SharePoint with the active license plan. Note, that licenses are not automatically assigned to the target users during the migration.
- The following admin consents should be granted for SharePoint migration:
- Migration - Basic
- Migration - SharePoint - Minimal (for source)
- Migration - SharePoint - Full (for source and target)
In case necessary admin consents are not granted or expired, discovery will be deactivated and the following notification will be displayed: Grant admin consent to the Migration module on the Tenants page for both source and target tenants: Basic and SharePoint. To grant admin consents open Tenants page and grant the Required Consents and Permissions to allow the product to access the source tenant and the target tenant. You will be redirected to the Microsoft web site for granting admin consent. Once admin consent is granted, you can start discovering site collections.
In this topic:
Dashboard

The SharePoint migration dashboard presents quick links to help you prepare and migrate SharePoint content with intuitive data points and key performance metrics.
|

|
TIP: Click Refresh Project to get the latest updates for the SharePoint dashboard. |
The dashboard sections are described below:
Notification panel - displays helpful information that may include links to manage the content migration
Dashboard Menu - contains links to the following actions:
- Discover site collections - starts the New Discovery Task wizard to collect information about SharePoint sites in the source tenant. For more information see Discovering SharePoint Site Collections.
- Configure project - starts the Edit Project wizard for configuring migration defaults, SharePoint Admin Center URLs and multi-geo settings. For more information see Configuring the Project.
- Refresh project - refreshes the SharePoint migration project settings.
Getting Started - presents quick start links to the various actions for preparing and migrating SharePoint content.
SharePoint site migration status - indicates the number of SharePoint sites being migrated with a color coded status bar that indicates the migration count of the SharePoint sites.
Item Migration Progress - status count of SharePoint content that is discovered in the source tenant and migrated to the target tenant. The following metrics are displayed:
- Discovered items on source
- Items selected for migration on source
- Migrated items on target
File Count (per hour) - performance chart that indicates the files migrated per hour.
Content migration (per hour) - performance chart that indicates the SharePoint items migrated per hour.
SharePoint Contents
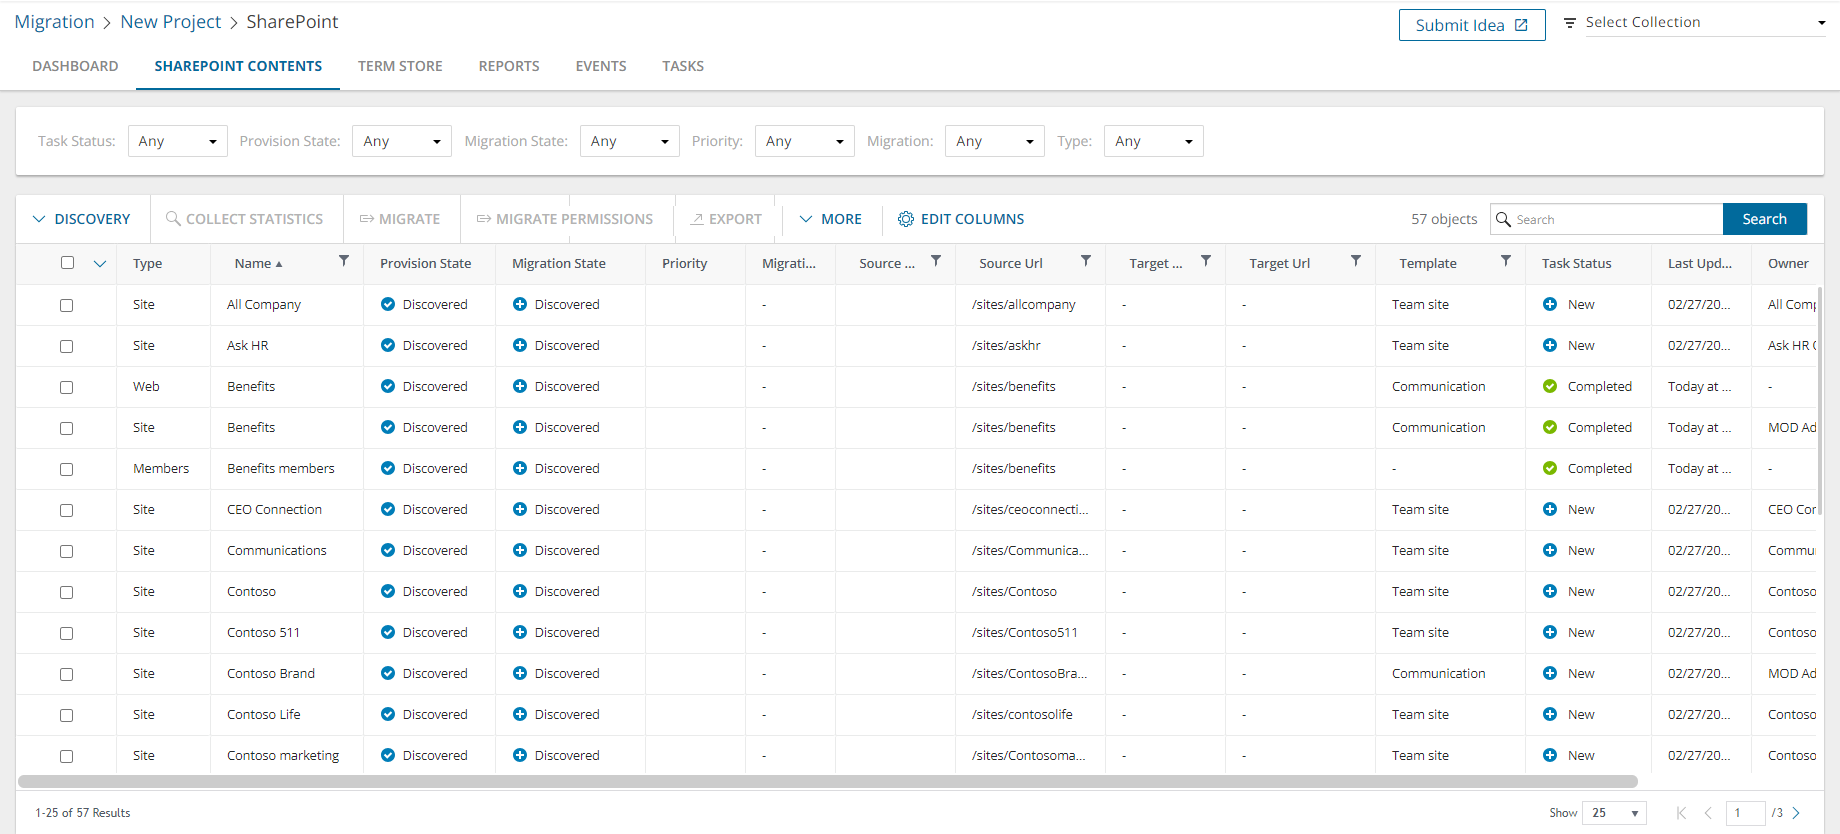
The SharePoint Contents List View is comprised of the following components:
Notification panel - presents relevant information and shortcuts to migration activities.
Filter panel - consists of predefined filters for the SharePoint List. See Filtering for more information about working with filters. The predefined filters are:
- Task Status - returns a list of SharePoint objects based on the status of a task that includes this object.
- Provision State - returns a list of SharePoint objects based on the current state of the object. Values are Discovered, Matched, Provisioned and Provisioned With Issues.
- Migration State - returns a list of SharePoint objects based on the migration state of the object and its children. The various values are described below.
- Priority - returns a list of SharePoint objects based on the precedence level of this object if it is included in a migration task. Values are Highest, High, Medium, Low, and Lowest.
- Migration - returns a list of SharePoint objects based on whether migration is supported for the site or web template type. Options are Supported and Unsupported.
- Type - returns a list of objects based on the SharePoint object type. Values are Site, Web, List, and Members.
- Site Type - returns a list of native SharePoint content based on the association of the site with a Team or M365 Group, or if it is a standalone SharePoint site. A filter option is also included for Orphaned Group Sites which are Teams or M365 groups sites that have been dissociated (from their Entra ID group). By default this filter is set to Site Type = SharePoint when the user first visits the page, and shows sites that are not associated with a Team or M365 Group.
|
|
NOTE: Filter will not be active for Projects created before June 18th 2025 as the older projects will not contain the metadata necessary for the filter to work. |
List View Actions Menu - contains links to SharePoint object migration activities and the search box. Each action is explained in greater detail in subsequent topics. See Searching for more information about working with the search box.
List View - displays information about SharePoint objects in the source and target tenants. Use the Edit Columns to show or hide columns in the list. The columns are as described below:
- Type - SharePoint object type. Values are Site, Web, List, and Members.
- Name - name of the object type.
- Provision State - current state of the object. Values are Discovered, Matched, Provisioned and Provisioned With Issues.
- Migration State - migration state of the object and its children. Values are:
- Not Migrated - migration has not started
- Discovered - SharePoint objects have been found in the source tenant.
- Matched - a SharePoint object in the source tenant has been matched with a corresponding SharePoint object in the target tenant.
- Mapped - a site in the source tenant has been mapped to another site in the target tenant. Source and target URLs are different.
- Provisioned - On Demand has created (updated) the SharePoint object (site, web, list, users and groups) on the target without warnings or errors.
- Queued - waiting for service resources to be available. For more information, see How Queuing Works.
- Migrating - migration is in progress
- Migration Failed - migration has failed.
- Migrated - migration is successful
- Migrated With Issues - this object or at least one child object had issues with migration
- Partially Migrated - at least one child object has not been migrated
- Partially Migrated With Issues - at least one child object has not been migrated and this object or at least one child object had issues with migration
- Priority - indicates the precedence level of this object if it is included in a migration task where the priority is set in the Schedule step of the migration wizard. Values are: Highest, High, Medium, Low and Lowest. The default priority is Medium. If the system is busy, the objects are queued. When the system accepts new migration work, objects are taken from the queue based on the assigned priority and age in the queue.
- Source Location - geo-location of the source object.
- Source Url - object url in the source tenant.
- Target Location - geo-location of the target object.
- Target Url - object url in the target tenant.
- Mapped to Different Url - indicates whether or not the object is mapped to a different url in the target tenant.
- Template - SharePoint template used for the source object.
- Migration - indicates whether migration is supported for the site or web template type. Values are either Supported or Unsupported.
- Site Type - possible values are M365 Groups, Teams, or SharePoint. The Team Site template is associated with M365 Groups. If Teams has been activated on a Team Site template then it is associated with Teams. All other site templates are associated with SharePoint.
- Site Language - default language of the source site.
- Hub - name of the hub group that the site belongs to if the source site is organized in a hub-spoke relationship.
- Task Status - status of the task that is working on this object. Values are New, Stopped, In Progress, Completed with Issues, Failed, and Completed.
- Last Updated - most recent date and time when the object information was updated.
- Owner - owner account name
- Source Child Items - total of all the child lists and libraries in the site or web in the source tenant.
- Target Child Items - total of all the child lists and libraries in the site or web in the target tenant.
- Collections - indicates the most recent collection where the corresponding SharePoint object is added and the number of additional collections that also contain this object.
- Source InfoPath Forms - number of Infopath forms in the source tenant.
- Source SharePoint Workflows - number of workflows in the source tenant.
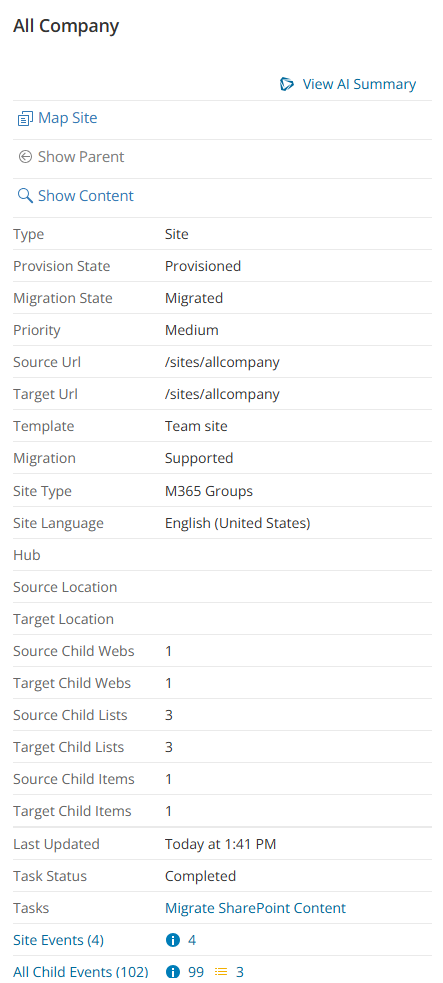
SharePoint Object Details
When you select a SharePoint object from the List View, the SharePoint Object Detail pane opens. The information in the pane is described below. Some properties may not appear in the image because they are relevant to specific situations.
-
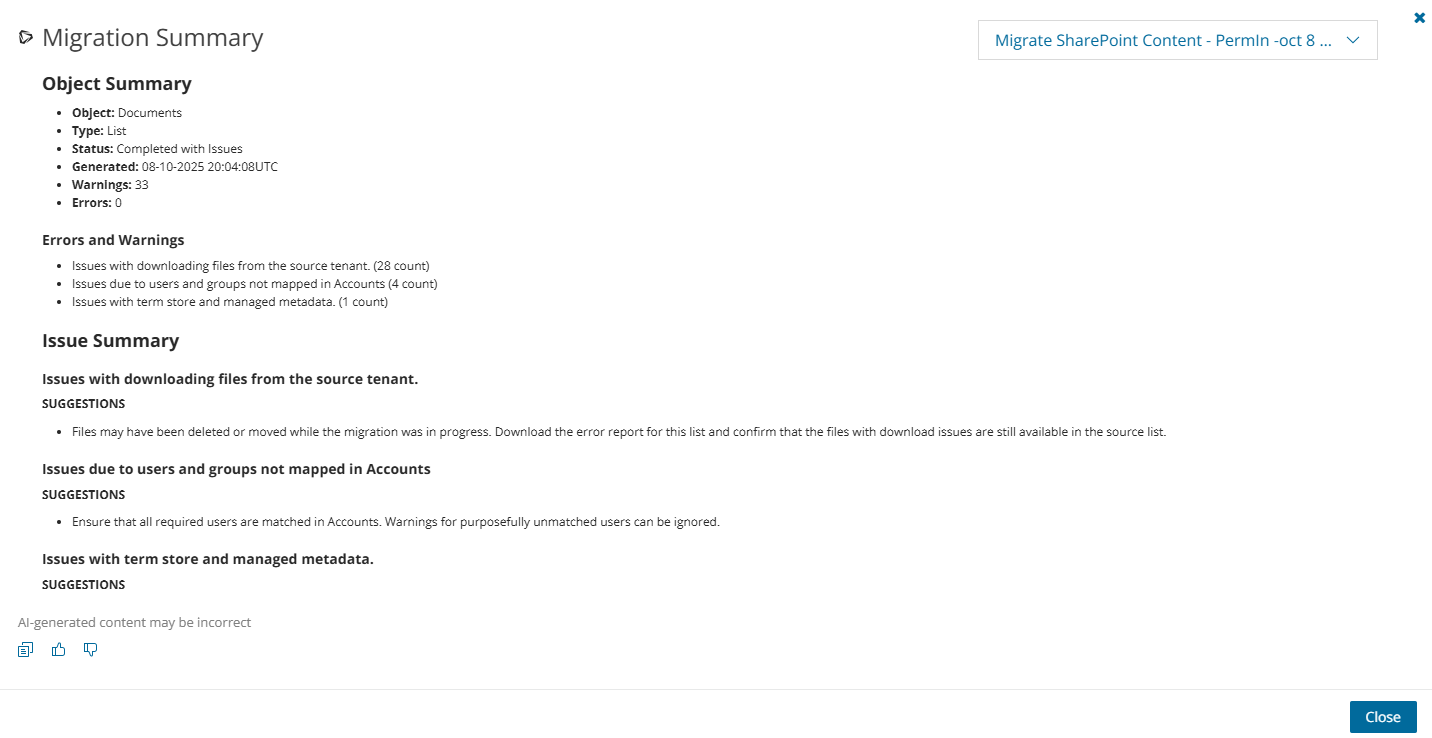
- View AI Summary - This link is available if you opted for the AI feature in the organization you created (see Organizations and Regions), and the task is a migration task that supports the AI migration assistant and you selected the Generate AI summary option in the Reporting step of the migration wizard. Click this link after the task has completed, to view the AI-generated migration summary.
|
|
NOTE: The View AI Summary link may take a while to appear depending on the volume of tasks and objects being migrated. If this is the first time you have selected this option, the Quest Policies prompt appears. Read the Quest AI Terms of use and click Accept to proceed. This s a one-time acceptance prompt and your acceptance covers all migration tasks that support the AI migration assistant. |
- Go to Team (or Go to M365 Group) - link to the Teams (or M365 Groups) list view that displays the team (or M365 Group) associated with the selected SharePoint object if such an association exists.
- Map Site, Map Web or Map List- click this link to change the name of a specific migrated site, web or list, relocate the object with a different Url or change an unsupported template during migration. For more information, see Mapping Sites, Mapping Webs or Mapping Lists.
- Show Parent - click this link to discover the parent site of the selected SharePoint content object.
- Show Content - click this link to discover and display the contents of the selected site object
- Type - SharePoint object type. Values are Site, Web, List, and Members.
- Provision State - current state of the object.
- Migration State - migration state of the object and its children.
- Priority - indicates the precedence level of this object if it is included in a migration task where the priority is set in the Schedule step of the migration wizard. Values are: Highest, High, Medium, Low and Lowest. The default priority is Medium. If the system is busy, the objects are queued. When the system accepts new migration work, objects are taken from the queue based on the assigned priority and age in the queue.
- Source Url - object url in the source tenant.
- Target Url - object url in the target tenant.
- Template - SharePoint template used for the source site or web.
- Migration - indicates whether migration is supported for the site or web template type. Values are either Supported or Unsupported.
- Site Type - possible values are M365 Groups, Teams, or SharePoint. The Team Site template is associated with M365 Groups. If Teams has been activated on a Team Site template then it is associated with Teams. All other site templates are associated with SharePoint.
- Site Language - default language of the source site.
- Hub - name of the hub group that the site belongs to if the source site is organized in a hub-spoke relationship.
- Source Location - geo-location of the source site.
- Target Location - geo-location of the target site.
- Source Child Webs - number of child webs of the selected site or web in the source tenant.
- Target Child Webs - number of child webs of the selected site or web in the target tenant.
- Source Child Lists - number of child lists of the selected site or web in the source tenant.
- Target Child Lists - number of child lists of the selected site or web in the target tenant.
- Source Child Items - total of all the child lists and libraries in the site or web in the source tenant.
- Target Child Items - total of all the child lists and libraries in the site or web in the target tenant.
- Last Updated - most recent date and time when the object information was updated.
- Task Status - status of the task that is working on this object. Values are New, Stopped, In Progress, Completed with Issues, Failed, and Completed.
- Tasks - list of tasks invoked for the selected site.
- Site Events (total count) - total count and count of successful, warning and error events that occurred during one or more tasks on the selected site.
- Events (total count) - total count and count of successful, warning and error events that occurred during one or more tasks on the selected web or list.
- All Child Events (total count) - total count and count of successful, warning and error events that occurred during one or more tasks that operated on the descendants of the selected site.
Term Store
A term store in SharePoint Online is a global site directory of common terms that are used in your organization. The point of the term store is build consistency in the way that users enter and manage data in your SharePoint environment.
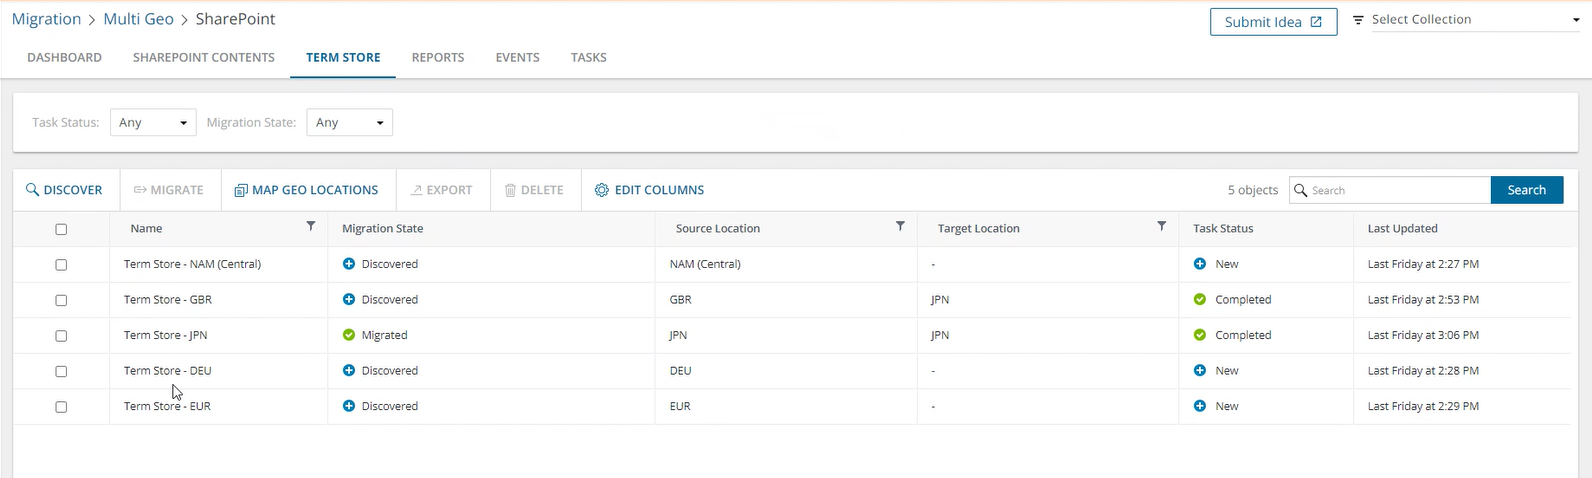
The Term Store List View is comprised of the following components:
Notification panel - presents relevant information and shortcuts to migration activities.
Filter panel - consists of predefined filters for the Term Store List. See Filtering for more information about working with filters. The predefined filters are:
- Task Status - returns a list of Term Store items based on the status of a task that operated on this object.
- Migration State - returns a list of Term Store items based on the migration state of the object and its children. The various values are described below.
List View Actions Menu - contains links to SharePoint object migration activities and the search box. Each action is explained in greater detail in subsequent topics. See Searching for more information about working with the search box.
List View - displays information about Term Stores in the source and target tenants. Use the Edit Columns to show or hide columns in the list. The columns are as described below:
- Name - name of the Term Store.
- Migration State - migration state of the object and its children. Values are:
- Not Migrated - migration has not started.
- Discovered - Term Store item has been found in the source tenant.
- Matched - a Term Store item in the source tenant has been matched with a corresponding SharePoint object in the target tenant.
- Mapped - a Term Store item in the source tenant has been mapped to another Term Store item in the target tenant. Source and target URLs are different.
- Provisioned - On Demand has created (updated) the Term Store item on the target without warnings or errors.
- Queued - waiting for service resources to be available. For more information, see How Queuing Works.
- Migrating - migration is in progress.
- Migration Failed - migration has failed.
- Migrated - migration is successful.
- Migrated With Issues - this item had issues with migration.
- Partially Migrated - at least one Term Store item t has not been migrated.
- Partially Migrated With Issues - at least one Term Store item has not been migrated and this item had issues with migration.
- Source Location - geo-location of the source Term Store item.
- Target Location - geo-location of the target Term Store item.
- Task Status - status of the task that operated on this Term Store item. Values are New, Stopped, In Progress, Failed, and Completed.
- Last Updated - most recent date and time when the Term Store item information was updated.
Reports
Migration Reports display error reports about migration tasks. For more information see Migration Reports.
