Discovering Term Store
When you start a task to discover the term store, the task discovers all the term stores across geo locations in your organization. If your organization has a common location, only one term store will be discovered for the default geo location of your organization. If you have multi-geo enabled, you will see one term store per active region.
|

|
NOTE: Discovering and migration of term stores is optional. If you don't use managed meta data from the term store in your SharePoint sites then you don't need to discover and migrate the term stores. |
To discover terms stores:
- Log in to Quest On Demand and choose an organization if you have set up multiple organizations.
- From the navigation pane, click Migrate > Projects to open the My Projects list.
- Create a new project or open an existing project.
- From the project Dashboard click Open in the SharePoint tile.
- Click the Term Store tab.
- Click Discover. The Discover Term Store wizard starts. Each step is described below:
- Notification
- Send notification email once the task is completed - select this option to send a notification email when a discovery task completes.
- Only in a case of failure - Select this option to send the email if the discovery task fails to complete successfully.
- Recipients - enter the email address of the recipients of this email. You can specify multiple recipient email addresses separated by semicolon.
- Click Next.
- Schedule
- Choose from one of three options to schedule the task. The scheduler will be activated after you complete the task wizard.
- Run now - task runs immediately.
- Run later - task must be started manually.
- Schedule - task will be started at a future date and time entered in the corresponding calendar field.
- Click Next.
- Summary
- Verify the task specifications as described below:
- Name - name of the task. The default name is Discover Term Store. You can specify a custom name.
- Source tenant - name of the tenant where the site discovery occurs.
- Scheduled start - date and time when the task will start. Now indicates that the task will start immediately.
- Click Back to revise or review a previous step or click Finish to complete the task wizard and start the task as scheduled.
- When the task completes, the Term Store list displays the term groups with Migration State = Discovered and Task Status = New. The Global Term Store tile in the Dashboard will also indicate the status of the task.
|
|
NOTE: If you want to migrate SharePoint Term Stores to a geo located target tenant, you must map the discovered source tenant Term Stores to active geo locations in the target tenant. For more information see Mapping Geo Locations. |
Mapping Geo Located Term Stores
If you want to migrate SharePoint Term Stores to a geo located target tenant, you must map the discovered source term stores to active geo locations in the target tenant using a CSV file. This is a two-step process:
Prepare the CSV file
|
|
NOTE:
- You need to map only the URLs that will change in the target Tenant.
- You can download a CSV template when you start the New Map Geo Locations Term Store Task wizard and click Download Example File from the Mapping File step.
- CSV file names with non-ASCII characters are not supported.
|
To prepare a CSV file with geo mapped SharePoint sites, use the CSV format described below:
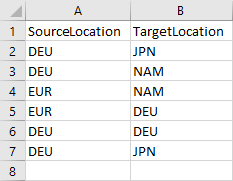
- Source Location - column header for the geo location of the source term store. The geo location could be blank if your source tenant is not geo enabled.
- Target location - column header for the geo location of the term store in the target tenant. The geo location could be blank if you choose to use the Default target geo location in the SharePoint project settings.
Start the Map Geo Locations From Term Store Task
The New Map Geo Locations Term Store Task wizard maps the geo locations of migrated SharePoint Term Stores based on the mappings in the CSV file described in the previous section.
- Log in to Quest On Demand and choose an organization if you have set up multiple organizations.
- From the navigation pane, click Migrate > Projects to open the My Projects list.
- Create a new project or open an existing project.
- From the project Dashboard click Open in the SharePoint tile.
- Click the Term Store tab. Then click More > Map Geo Locations. The New Map Geo Locations Term Store Task wizard starts. Each step is described below:
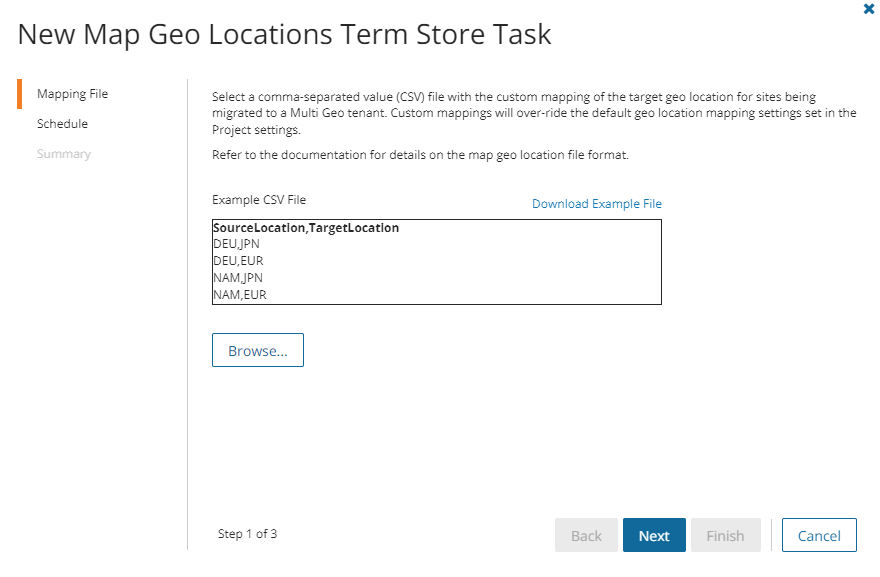
- Mapping File
- Click Browse and select the CSV file with the geo location mappings that you prepared.
- Click Open in the File Explorer window to load the file into the wizard
- Click Next.
- Schedule
- Choose from one of three options to schedule the task. The scheduler will be activated only after you complete the task wizard.
- Run now - task runs immediately.
- Run later - task must be started manually.
- Schedule - task will be started at a future date and time entered in the corresponding calendar field.
- Click Next.
- Summary
- Verify the task specifications as described below:
- Name - name of the task. The default name is Map Geo Locations From Term Store Task. You can specify a custom name.
- Source tenant - name of the tenant where the statistics will be collected.
- Target tenant - name of the target tenant in this project.
- Scheduled start - date and time when the task will start. Now indicates that the task will start immediately.
- Click Back to revise or review a previous step or click Finish to complete the task wizard and start the task as scheduled.
Discovering Sites
The On Demand Migration for SharePoint service must have a reference list of all the sites that can be migrated to the target tenant.
in this topic:
|
|
NOTE: Before you begin, ensure the you have migrated all the accounts to the target tenant. At the minimum, ensure that all SharePoint users are migrated. For more information see Account Migration. |
Discovering all sites
This is the simplest approach which uses the Discovery Task to inspect the source tenant and discover all the site collections.
To start the Discover Site Task:
- Log in to Quest On Demand and choose an organization if you have set up multiple organizations.
- From the navigation pane, click Migrate > Projects to open the My Projects list.
- Create a new project or open an existing project.
- From the SharePoint tile on the project dashboard click Open. The SharePoint Migration Workspace opens.
- Go to the SharePoint Contents tab. Then click Discovery > Discover All Sites. The New Discover All Sites Task wizard starts. Each step is described below:
- Notification
- Task Name - name of the task. You can specify a custom name. The default name is Discover All Sites.
- Send notification email once the task is completed - select this option to send a notification email when a discovery task completes.
- Only in a case of failure - Select this option to send the email if the discovery task fails to complete successfully.
- Recipients - enter the email address of the recipients of this email. You can specify multiple recipient email addresses separated by semicolon.
- Click Next.
- Schedule
- Choose from one of three options to schedule the task. The scheduler will be activated after you complete the task wizard.
- Run now - task runs immediately.
- Run later - task must be started manually.
- Schedule - task will be started at a future date and time entered in the corresponding calendar field.
- Click Next.
- Summary
- Verify the task specifications as described below:
- Name - name of the task. The default name is Discover All Sites. You can specify a custom name.
- Source tenant - name of the tenant where the site discovery occurs.
- Scheduled start - date and time when the task will start. Now indicates that the task will start immediately.
- Click Back to revise or review a previous step or click Finish to complete the task wizard and start the task as scheduled.
- When the task completes, the SharePoint Contents list is updated. The Provision state of each site is set to Discovered.
Discovering sites from a file
When you want to migrate a few sites, you can run the discovery process by using a CSV file. The file contains the site URLs and restricts the discovery of sites to the list of URLs provided in the CSV file. This is a two-step process:
Step 1: Prepare the CSV file
|
|
NOTE: CSV file names with non-ASCII characters are not supported. Using a CSV file provides the following additional benefits:
- The CSV file could contain more columns. The extra columns are ignored. If there are multiple columns with the headers URL, URI or SourceURL, all the columns will be processed.
- The URL could be either a relative URL or a URL with a fully qualified domain name. For the root site (e.g. https://starzcorp.sharepoint.com) use "/" as the relative URL.
- The specified URL can be in upper, lower or mixed case. Case is ignored during discovery.
|
You can prepare the CSV file in two ways:
- Download the CSV file from the SharePoint Admin Center
- Log in to the SharePoint Admin Center of the source tenant.
- From the navigation pane, click Active sites.
- From the Active sites page menu, click Export to download the CSV file.
- Edit the CSV file to list only the sites in the URL column that should be discovered. You can either delete the other columns to maintain a cleaner list.
- Create a new CSV file
- Enter the column header SourceURL. It is case insensitive. Enter the URLs in the subsequent rows manually.
|
|
NOTE:
- You can download a CSV template when you start the New Discover Sites From File Task wizard and click Download Example File from the Discovery Options step.
- CSV file names with non-ASCII characters are not supported.
|
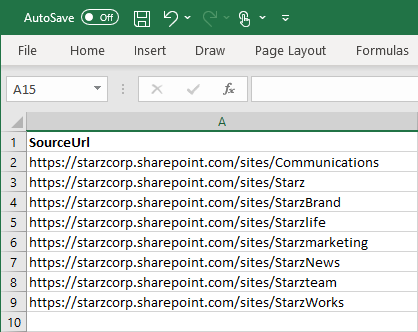
- Save the CSV file. You may rename the file if needed.
Step 2: Start the discovery task
- Log in to Quest On Demand and choose an organization if you have set up multiple organizations.
- From the navigation pane, click Migrate > Projects to open the My Projects list.
- Create a new project or open an existing project.
- Click theSharePointtile, or click Open from the SharePoint tile to open the SharePoint Migration Workspace.
- From the menu click Discovery > Discover Sites from File. The New Discover Sites From File Task wizard starts. Each step is described below:
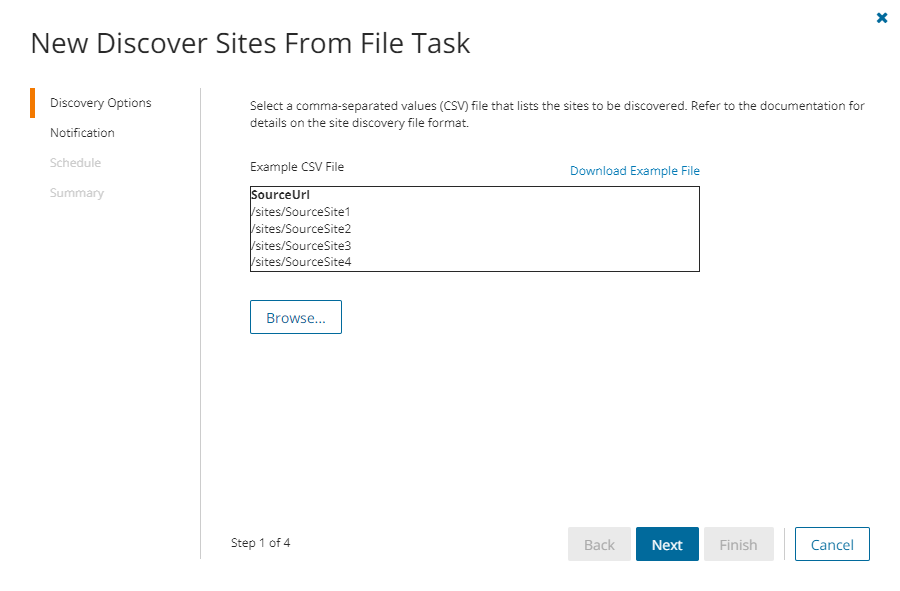
- Discovery Options
- Click Browse and locate the CSV file that contains the site collections to be discovered.
- Click Open in the File Explorer window to load the file into the wizard.
- Click Next.
- Notification
- Send notification email once the task is completed - select this option to send a notification email when a discovery task completes.
- Only in a case of failure - Select this option to send the email if the discovery task fails to complete successfully.
- Recipients - enter the email address of the recipients of this email. You can specify multiple recipient email addresses separated by semicolon.
- Click Next.
- Schedule
- Choose from one of three options to schedule the task. The scheduler will be activated after you complete the task wizard.
- Run now - task runs immediately.
- Run later - task must be started manually.
- Schedule - task will be started at a future date and time entered in the corresponding calendar field.
- Click Next.
- Summary
- Verify the task specifications as described below:
- Name - name of the task. The default name is Discover Sites from File. You can specify a custom name.
- Source tenant - name of the tenant where the statistics will be collected.
- Scheduled start - date and time when the task will start. Now indicates that the task will start immediately.
- Click Back to revise or review a previous step or click Finish to complete the task wizard and start the task as scheduled.
- When the task completes, the SharePoint Contents list is updated. The Provision state of each site is set to Discovered.
Reviewing the premigration report
- Select the Tasks tab in the SharePoint workspace.
- Select the Discover Sites from File task that you want to review.
- From the task detail pane, click Download Premigration Report.
- Download and save the ZIP file to a suitable folder, and extract the report. The report covers all the sites discovered.
|
|
NOTE: Premigration reports are also available from the Discover SharePoint Contents detail pane. This report covers all the site contents for the specific sites selected for this task. See Reports for more download options. |
Mapping Geo Located Sites
|
|
NOTE:
This feature is available if the target tenant is geo-enabled.
We recommend that you run the Map Geo Location task before you run the Mapping from File task. The Mapping from File task sets the geo locations using the default settings, and once the target location is set it can't be reset by the Map Geo Location task.
Workaround: Delete site from the SharePoint Contents list and rerun the Discover Site Collections task. |
If you want to migrate SharePoint sites to a geo located target tenant, you must map the discovered source tenant sites to active geo locations in the target tenant using a CSV file. This is a two-step process:
Step 1: Prepare the CSV file
|
|
NOTE:
- You need to map only the URLs that will change in the target Tenant.
- You can download a CSV template when you start the New Map Geo Location Task wizard and click Download Example File from the Mapping File step.
- CSV file names with non-ASCII characters are not supported.
|
To prepare a CSV file with geo mapped SharePoint sites, use the CSV format described below:
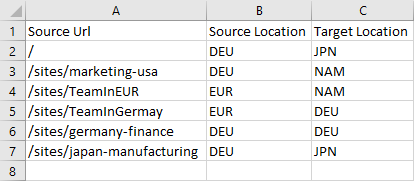
- Source Url - column header for the urls of the site in the source tenant
- Source Location - column header for the geo location of the source site. The geo location could be blank if your source tenant is not geo enabled.
- Target location - column header for the geo location of the site in the target tenant. The geo location could be blank if you choose to use the Default target geo location in the SharePoint project settings.
Step 2: Start the Map Geo Location Task
The New Map Geo Location Task wizard maps the geo locations of migrated SharePoint sites based on the mappings in the CSV file described in the previous section.
- Log in to Quest On Demand and choose an organization if you have set up multiple organizations.
- From the navigation pane, click Migrate > Projects to open the My Projects list.
- Create a new project or open an existing project.
- From the project Dashboard click Open in the SharePoint tile.
- Click the SharePoint Contents tab. Then click More > Map Geo Location from File. The New Map Geo Locations Task wizard starts. Each step is described below:
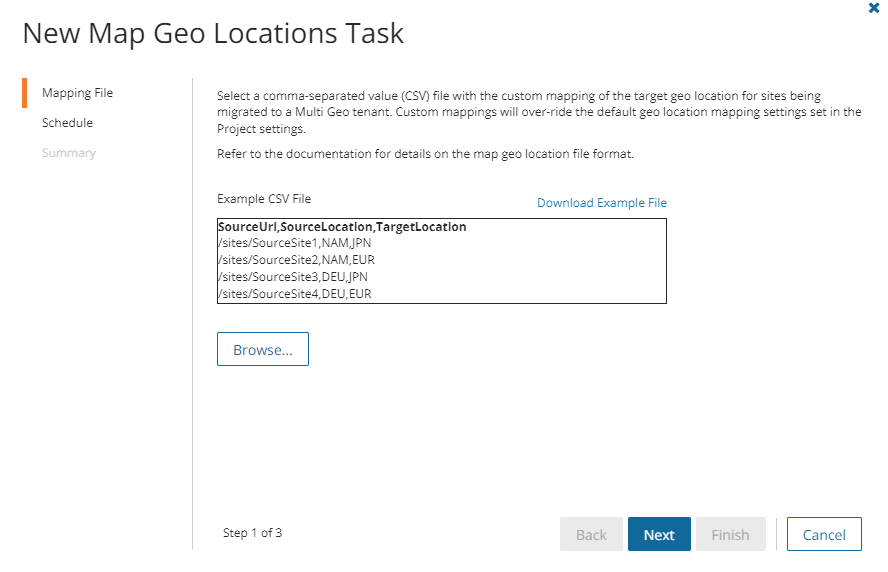
- Mapping File
- Click Browse and select the CSV file with the geo location mappings that you prepared.
- Click Open in the File Explorer window to load the file into the wizard
- Click Next.
- Schedule
- Choose from one of three options to schedule the task. The scheduler will be activated only after you complete the task wizard.
- Run now - task runs immediately.
- Run later - task must be started manually.
- Schedule - task will be started at a future date and time entered in the corresponding calendar field.
- Click Next.
- Summary
- Verify the task specifications as described below:
- Name - name of the task. The default name is Map Geo Location. You can specify a custom name.
- Source tenant - name of the tenant where the statistics will be collected.
- Target tenant - name of the target tenant in this project.
- Scheduled start - date and time when the task will start. Now indicates that the task will start immediately.
- Click Back to revise or review a previous step or click Finish to complete the task wizard and start the task as scheduled.