This topic describes the various ways you can discover Power BI content.
In this topic:
- Prerequisites
- Considerations
- Discovering all contents
- Discovering Source Workspaces
- Discovering Target Workspaces
- Resetting Workspaces
- Discovering Gateways
- Discovering Connections
- Reviewing Tasks
- Reviewing Events
Prerequisites
- The Test Power BI Connection task must be run before Discover All Contents can be processed.
- The Test Power BI Connection task must successfully connect to the source tenant to process Discover All Contents.
- The Test Power BI Connection task must successfully connect to both the source and target tenant to process migrations.
Considerations
We strongly recommend that you run only one discovery task at a time to avoid scheduling delays.
Discovering all contents
This is a unified approach which uses the Discover All Contents task to inspect the source tenant and discover all Power BI instances of Workspaces, Gateways and Connections.
|
|
NOTE: Discovering all contents is recommended as the first of all discovery tasks. This task will collect data for Workspaces, Gateways and Connections. This information will be indicated in the pre-migration report. To complete the pre-migration report, you must also run the Collect Statistics task. Workspaces, Gateways and Connections can also be discovered separately using dedicated discovery tasks that are usually recommended for the discovery of newer Power BI objects, such as a refresh from the source tenant. |

- Log in to Quest On Demand and choose an organization if you have set up multiple organizations.
- From the navigation pane, click Migrate > Projects to open the My Projects list.
- Create a new project or open an existing project.
- From the Power BI tile on the project dashboard click Open. Then select the Dashboard tab.
- Click Discover All Contents in the Dashboard menu. The New Discover All Contents Task wizard starts. Each step is described below:
- Discovery Options
- Refresh permissions - select this option to ensure that service principal permissions are up to date. Permissions can be refreshed once per hour. When service principal permissions are updated in Power BI, they may not be immediately available to API calls. This option ensures that service principal permissions are refreshed and fully updated.
- Continue From Last Discovery - select this option to continue the discovery of Power BI objects from the last discovery task if the task did not complete successfully. Selecting this option will help you save discovery time because the task can skip the objects already discovered.
- Click Next.
- Schedule
- Choose from one of three options to schedule the task. The scheduler will be activated after you complete the task wizard.
- Run now - task runs immediately.
- Run later - task must be started manually.
- Schedule - task will be started at a future date and time entered in the corresponding calendar field.
- Click Next.
- Choose from one of three options to schedule the task. The scheduler will be activated after you complete the task wizard.
- Summary
- Verify the task specifications as described below:
- Name - name of the task. The default name is Discover All Contents. You can specify a custom name.
- Refresh permissions - indicates whether or not the Refresh permissions option has been selected.
- Scheduled start - date and time when the task will start. Now indicates that the task will start immediately.
- Click Back to revise or review a previous step or click Finish to complete the task wizard and start the task as scheduled.
- Verify the task specifications as described below:
- When the task completes, the Workspaces, Gateways and Connections lists are updated.
Discovering Source Workspaces
This section describes the steps to discover Power BI Workspaces in the source tenant.
- Log in to Quest On Demand and choose an organization if you have set up multiple organizations.
- From the navigation pane, click Migrate > Projects to open the My Projects list.
- Create a new project or open an existing project.
- From the Power BI tile on the project dashboard click Open. Then select the Workspaces tab.
- Click Discover in the List View menu. The New Discover Source Workspaces Task wizard starts.
- Discovery Options
- Refresh permissions - select this option to ensure that service principal permissions are up to date. Permissions can be refreshed once per hour. When service principal permissions are updated in Power BI, they may not be immediately available to API calls. This option ensures that service principal permissions are refreshed and fully updated. When you select this option, the task also validates whether the workspaces are secured by the Microsoft Entra security group, and the access level is set to Administrator.
- Continue From Last Discovery - select this option to continue the discovery of Power BI objects from the last discovery task if the task did not complete successfully. Selecting this option will help you save discovery time because the task can skip the objects already discovered.
- Click Next.
- Schedule
- Choose from one of three options to schedule the task. The scheduler will be activated after you complete the task wizard.
- Run now - task runs immediately.
- Run later - task must be started manually.
- Schedule - task will be started at a future date and time entered in the corresponding calendar field.
- Click Next.
- Choose from one of three options to schedule the task. The scheduler will be activated after you complete the task wizard.
- Summary
- Verify the task specifications as described below:
- Name - name of the task. The default name is Discover Source Workspaces. You can specify a custom name.
- Refresh permissions - indicates whether or not the Refresh permissions option has been selected.
- Scheduled start - date and time when the task will start. Now indicates that the task will start immediately.
- Click Back to revise or review a previous step or click Finish to complete the task wizard and start the task as scheduled.
- Verify the task specifications as described below:
- When the task completes, the Workspaces list is updated.
NOTE: The discovery task discovers all supported and unsupported workspaces in the source tenant. The total number of workspaces discovered is indicated in the events list. However, only supported workspaces are listed in the Workspaces list.
Discovering Target Workspaces
This section describes the steps to discover Power BI Workspaces in the target tenant. Run this task after you run the Discover Source Workspaces to check whether discovered source workspaces are already present in the target.
- Log in to Quest On Demand and choose an organization if you have set up multiple organizations.
- From the navigation pane, click Migrate > Projects to open the My Projects list.
- Create a new project or open an existing project.
- From the Power BI tile on the project dashboard click Open. Then select the Workspaces tab.
- Click Discover in the List View menu. The New Discover Target Workspaces Task wizard starts.
- Discovery Options
- Refresh permissions - select this option to ensure that service principal permissions are up to date. Permissions can be refreshed once per hour. When service principal permissions are updated in Power BI, they may not be immediately available to API calls. This option ensures that service principal permissions are refreshed and fully updated. When you select this option, the task also validates whether the workspaces are secured by the Microsoft Entra security group, and the access level is set to Administrator.
- Continue From Last Discovery - select this option to continue the discovery of Power BI objects from the last discovery task if the task did not complete successfully. Selecting this option will help you save discovery time because the task can skip the objects already discovered.
- Click Next.
- Schedule
- Choose from one of three options to schedule the task. The scheduler will be activated after you complete the task wizard.
- Run now - task runs immediately.
- Run later - task must be started manually.
- Schedule - task will be started at a future date and time entered in the corresponding calendar field.
- Click Next.
- Choose from one of three options to schedule the task. The scheduler will be activated after you complete the task wizard.
- Summary
- Verify the task specifications as described below:
- Name - name of the task. The default name is Discover Target Workspaces. You can specify a custom name.
- Refresh permissions - indicates whether or not the Refresh permissions option has been selected.
- Scheduled start - date and time when the task will start. Now indicates that the task will start immediately.
- Click Back to revise or review a previous step or click Finish to complete the task wizard and start the task as scheduled.
- Verify the task specifications as described below:
- When the task completes, the Workspaces list is updated. If a source workspace is found in the target tenant, the Workspace State column will change to Exists in Target.
Resetting Workspaces
If you delete a workspace in the target environment to recreate, rename, or simply start over again, the Reset Workspace action can reset the source workspace to the discovered state. This action removes mappings and all other dependencies to the target workspace. The steps to reset one or more workspaces are described below:
- Log in to Quest On Demand and choose an organization if you have multiple organizations.
- From the navigation pane, click Migrate > Projects to open the My Projects list.
- Create a new project or open an existing project.
- Click Power BI from the project tiles, or click Open from the Power BI tile to open the Power BI migration workspace.
- Click the Workspaces tab and select one or more workspaces to reset.
- From the Actions menu, click More > Reset Workspace. The New Reset Workspace Task wizard starts. Each step is described below:
- Schedule
- Choose from one of three options to schedule the task. The scheduler will be activated after you complete the task wizard.
- Run now - task runs immediately.
- Run later - task must be started manually.
- Schedule - task will be started at a future date and time entered in the corresponding calendar field.
- Click Next.
- Choose from one of three options to schedule the task. The scheduler will be activated after you complete the task wizard.
- Summary
- Verify the task specifications as described below:
- Name - name of the task. The default name is Reset Workspaces. You can specify a custom name.
- Scheduled start - date and time when the task will start. Now indicates that the task will start immediately.
- Verify the task specifications as described below:
- When the task completes, the workspace is rediscovered, and the Workspace State column value of the selected workspaces in the Workspaces list changes to Discovered
Discovering Gateways
This section describes the steps to discover Power BI Gateways.
- Log in to Quest On Demand and choose an organization if you have set up multiple organizations.
- From the navigation pane, click Migrate > Projects to open the My Projects list.
- Create a new project or open an existing project.
- From the Power BI tile on the project dashboard click Open. Then select the Gateways tab.
- Click Discover in the List View menu. The New Discover Gateways Task wizard starts.
- Discovery Options
- Refresh permissions - select this option to ensure that service principal permissions are up to date. Permissions can be refreshed once per hour.When service principal permissions are updated in Power BI, they may not be immediately available to API calls. This option ensures that service principal permissions are refreshed and fully updated.
- Click Next.
- Schedule
- Choose from one of three options to schedule the task. The scheduler will be activated after you complete the task wizard.
- Run now - task runs immediately.
- Run later - task must be started manually.
- Schedule - task will be started at a future date and time entered in the corresponding calendar field.
- Click Next.
- Choose from one of three options to schedule the task. The scheduler will be activated after you complete the task wizard.
- Summary
- Verify the task specifications as described below:
- Name - name of the task. The default name is Discover Gateways. You can specify a custom name.
- Refresh permissions - indicates whether or not the Refresh permissions option has been selected.
- Scheduled start - date and time when the task will start. Now indicates that the task will start immediately.
- Click Back to revise or review a previous step or click Finish to complete the task wizard and start the task as scheduled.
- Verify the task specifications as described below:
- When the task completes, the Gateways list is updated.
Discovering Connections
This section describes the steps to discover Power BI Connections.
To start the Discover Connections Task:
- Log in to Quest On Demand and choose an organization if you have set up multiple organizations.
- From the navigation pane, click Migrate > Projects to open the My Projects list.
- Create a new project or open an existing project.
- From the Power BI tile on the project dashboard click Open. Then select the Connections tab.
- Click Discover in the List View menu. The New Discover Connections Task wizard starts.
- Discovery Options
- Refresh permissions - select this option to ensure that service principal permissions are up to date. Permissions can be refreshed once per hour.When service principal permissions are updated in Power BI, they may not be immediately available to API calls. This option ensures that service principal permissions are refreshed and fully updated.
- Click Next.
- Schedule
- Choose from one of three options to schedule the task. The scheduler will be activated after you complete the task wizard.
- Run now - task runs immediately.
- Run later - task must be started manually.
- Schedule - task will be started at a future date and time entered in the corresponding calendar field.
- Click Next.
- Choose from one of three options to schedule the task. The scheduler will be activated after you complete the task wizard.
- Summary
- Verify the task specifications as described below:
- Name - name of the task. The default name is Discover Connections. You can specify a custom name.
- Refresh permissions - indicates whether or not the Refresh permissions option has been selected.
- Scheduled start - date and time when the task will start. Now indicates that the task will start immediately.
- Click Back to revise or review a previous step or click Finish to complete the task wizard and start the task as scheduled.
- Verify the task specifications as described below:
- When the task completes, the Connections list is updated.
Reviewing Tasks
- Open the Tasks tab.
- Select the discovery task that you want to review.
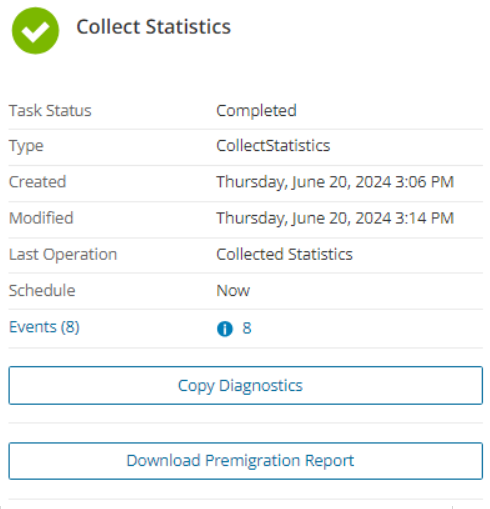
- In the task detail pane that opens, review the information presented
- From the task detail pane, click Download Premigration Report. Download and save the ZIP file to a suitable folder, and extract the report. See Reports for more download options.
Reviewing events for a Task
- Open the Tasks tab.
- Select the task that you want to review.
- In the task detail pane that opens, click Events (number). The Events tab opens with a filtered list of events for the selected task.
- Select an event that you want to review. In the task detail pane that opens, the information presented is as described below:
- Object - name of the Power BI object if applicable.
- Task - name of the task.
- Time - date and time when the event occurred.