
You can rename and map teams and M365 groups, or rename, map and merge one or more source teams (or M365 group) to a specific team (or M365 group) in the target tenant in two ways:
- Renaming and mapping teams and groups automatically
- Renaming and mapping teams and groups manually from a file
Renaming and Mapping Teams and Groups automatically
- Log in to Quest On Demand and choose an organization if you have set up multiple organizations.
- From the navigation pane, click Migrate > Projects to open the My Projects list.
- Create a new project or open an existing project.
- Click Teams from the project tiles, or click Open from the Teams tile to open the Teams dashboard.
- Click the Teams tab or the M365 Groups tab and select one or more teams or groups that you want to rename and map.
- Click More and then click Rename and Map. The New Teams & Groups Rename and Map Task wizard starts. Each step is described below:
- Mapping options
- Enter the information as described below:
- Add prefix - specify a prefix for the team or group name. Whitespaces are not supported.
- Add suffix - specify a suffix for the team or group name. Whitespaces are not supported.
- Rename mail nick name - select this option to add a prefix or suffix to the target team or group.
- Click Next.
- Enter the information as described below:
- Notification
- Send notification email once the task is completed - select this option to send a notification email when a mapping task completes.
- Only in a case of failure - select this option to send the email if the mapping task fails to complete successfully.
- Recipients - enter the email address of the recipients of this email. You can specify multiple recipient email addresses separated by semicolon.
- Click Next.
- Send notification email once the task is completed - select this option to send a notification email when a mapping task completes.
- Schedule
- Choose from one of three options to schedule the task. The scheduler will be activated only after you complete the task wizard.
- Run now - task runs immediately.
- Run later - task must be started manually.
- Schedule - task will be started at a future date and time entered in the corresponding calendar field.
- Click Next.
- Choose from one of three options to schedule the task. The scheduler will be activated only after you complete the task wizard.
- Summary
- Verify the task specifications as described below:
- Name - name of the task. You can specify a custom name. The default name is Rename and Map Task.
- Source tenant - name of the tenant in this project.
- Target tenant - name of the target tenant in this project.
- Scheduled start - date and time when the task will start. Now indicates that the task will start immediately.
- Click Back to revise or review a previous step or click Finish to complete the task wizard and start the task as scheduled.
- Verify the task specifications as described below:
The task is created. You can track its progress from the Tasks tab, view the summary on the Dashboard or monitor alerts and notifications from the Events tab.
Mapping, Renaming and Merging Manually from a File
To rename Microsoft 365 groups or merge one or more source groups to a specific group in the target tenant, a CSV file is used to indicate the mapping between source and target groups as described below.
To creating a mapping file:
- Prepare a comma-separated values (CSV) file with the source and target group names.
TIP: Export selected groups to a comma-separated values (CSV) and then edit this file. See Exporting Groups for more details.
- The header row defines the names of the source and target attribute used for mapping. Subsequent rows list the mapping values of the attributes.
The columns are as follows:
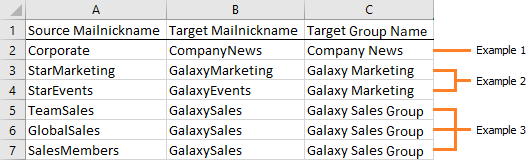
- Source Mailnickname - unique name of the source group. The following column header variations are supported: SourceMailNickname, Source MailNickname, Source MailNickName. The column header is case sensitive.
- Target Mailnickname - unique name of the target group. The following column header variations are supported: TargetMailNickname, Target MailNickname, Target MailNickName. The column header is case sensitive. You can merge multiple source groups to a single target group when you specify the same Target Mailnickname in a mapping file.
- Target Group Name - display name of the target group. The column header is case sensitive.
Example 1: Row 2: Simple change of name.
The source group display name and mailnickname are changed.
Example 2: Rows 3 and 4: Different target groups with the same display name.
The Target Mailnicknames are different but the Target Group Names are the same. The Target Mailnickname takes precedence and the groups will be mapped to distinct target groups but the display name of each target group will be the same. It is recommended that you use unique display names to avoid confusion.
Example 3: Rows 5, 6 and 7: Merge multiple source groups with the same target group.
The Target Mailnickname is the same. The source groups will be merged with the same target group with the specified display name.
- Save the CSV file.

|
|
NOTE: File names with non-ASCII characters are not supported. |
To upload a mapping file:
- Log in to Quest On Demand and choose an organization if you have multiple organizations.
- From the navigation pane, click Migrate > Projects to open the My Projects list.
- Create a new project or open an existing project.
- Click Teams from the project tiles, or click Open from the Teams tile to open the Teams dashboard.
- Click the M365 Groups tab.
- Click More > Map from File. The New Mapping from File Task wizard starts. Each step is described below:
- Mapping file
- Click Browse and select the CSV mapping file. The selected file name appears next to the Browse button.
- Click Next.
- Notification
- Send notification email once the task is completed - select this option to send a notification email when a mapping task completes.
- Only in a case of failure - select this option to send the email if the mapping task fails to complete successfully.
- Recipients - enter the email address of the recipients of this email. You can specify multiple recipient email addresses separated by semicolon.
- Click Next.
- Send notification email once the task is completed - select this option to send a notification email when a mapping task completes.
- Schedule
- Choose from one of three options to schedule the task. The scheduler will be activated only after you complete the task wizard.
- Run now - task runs immediately.
- Run later - task must be started manually.
- Schedule - task will be started at a future date and time entered in the corresponding calendar field.
- Click Next.
- Choose from one of three options to schedule the task. The scheduler will be activated only after you complete the task wizard.
- Summary
- Verify the task specifications as described below:
- Name - name of the task. You can specify a custom name.
- Source tenant - name of the tenant in this project.
- Target tenant - name of the target tenant in this project.
- Scheduled start - date and time when the task will start. Now indicates that the task will start immediately.
- Click Back to revise or review a previous step or click Finish to complete the task wizard and start the task as scheduled.
- Verify the task specifications as described below:
The task is created. You can track its progress from the Tasks tab, view the summary on the Dashboard or monitor alerts and notifications from the Events tab.
