
Restore Active Directory on Clean OS
Using the Restore Active Directory on Clean OS method you can restore the entire forest or any of its parts on the freshly installed Windows machines. This recovery method can be used, for example, when existing BMR backups contain the infected OS image. In this case, Active Directory backups can be used due to they do not contain binaries (except Sysvol files). Active Directory backups can be also checked for viruses.
Domain controllers that are running on virtual machines in Amazon Web Services (AWS) or Microsoft Azure can be restored with the Restore Active Directory on Clean OS method.
| NOTE |
The first step of the Restore Active Directory on Clean OS recovery method is to promote the selected Windows server to a domain controller. This operation cannot be performed for Windows Server 2012 R2 or higher machines with FRS replication. So, Restore Active Directory on Clean OS is supported only for Windows Server 2012 R2 or higher with DFS Replication. |
At the first stage of the Restore Active Directory on Clean OS recovery method, the DNS server role is installed on a domain controller. For this reason, it is recommended to use a backup that was made on the AD-integrated DNS server for Clean OS recovery. You can still use backups that were made on the non-AD-integrated DNS server but in this case you should not use Automatic DNS selection option on any domain controller in such a domain.
If your domain has AD-integrated DNS servers restored from backup, you need to specify the DNS settings manually. After recovery, the domain controller that was restored by the Restore Active Directory on Clean OS recovery method synchronizes DNS partitions and continues to be a DNS server.
If your domain uses external DNS, you need to specify the DNS settings manually for every domain controller in the domain. After recovery, the domain controller restored by the Restore Active Directory on Clean OS recovery method will run a non-functional DNS server so you can uninstall it.
If you are testing Forest Recovery in the lab environment and your production forest uses an external (non-AD integrated) DNS server.
-
You can prepare the lab by installing a new DNS server (e.g. on the RMAD server).
-
Create empty DNS zones on this server in accordance with your production DNS configuration.
-
Ensure that SOA and NS records created in the empty zone have the FQDN DNS name corresponding to this DNS server.
-
Create an A record pointing to this server IP address in each zone.
-
Ensure that non-secure DNS dynamic updates are enabled.
Recovery steps
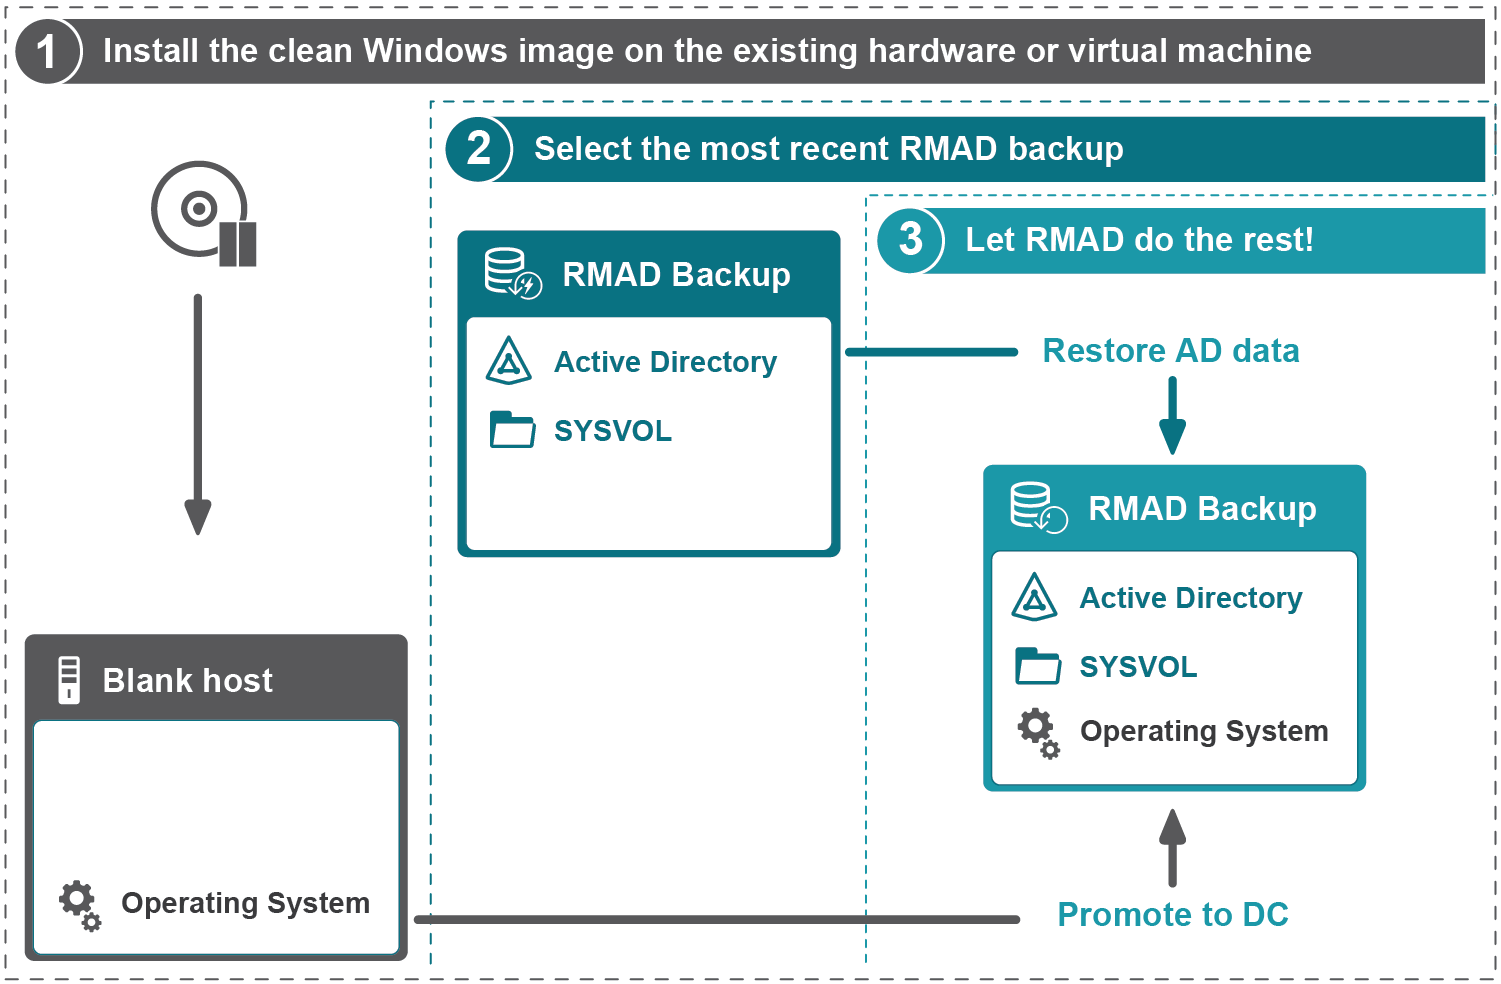
Step 1. Install the clean Windows image on the existing hardware or virtual machine
A blank host should comply with the following requirements:
-
The version of the Windows operating system must match the version deployed on the failed domain controller.
-
A blank host must have the same drive letters as the source domain controller if the Use AD paths from backup check box is selected or the drive letters must match the custom paths specified in the project.
-
A blank host should have enough free space for AD and SYSVOL data.
-
The account that is specified in Forest Recovery Console to access the target blank host should be the local Administrator on this machine.
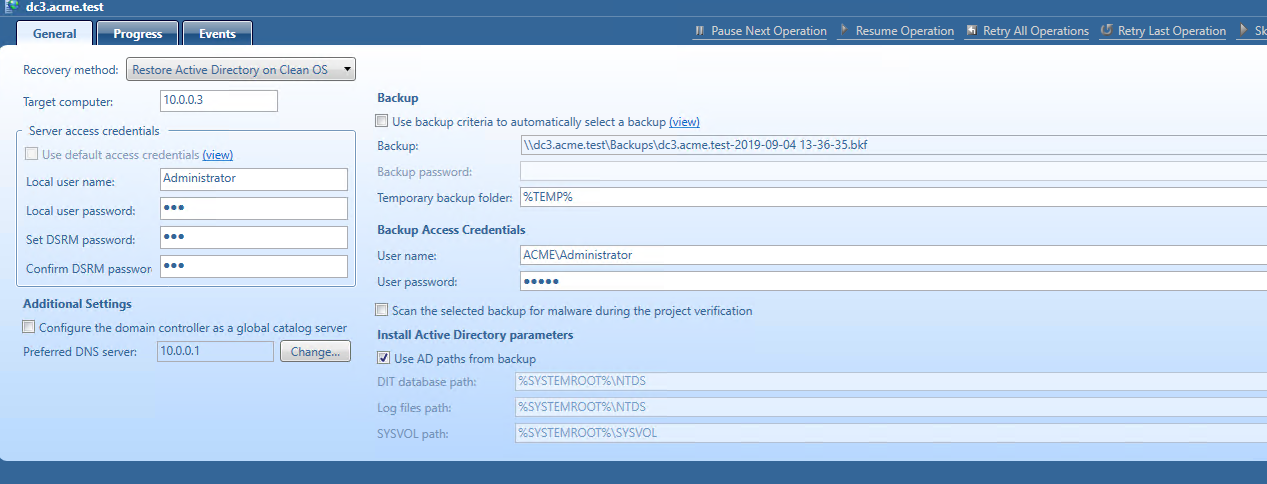
Step 2. Select any appropriate Active Directory backup
Step 3. Use the Restore Active Directory on Clean OS recovery method
Recovery Manager for Active Directory promotes the selected Windows server to a domain controller and then restores Active Directory data.
Bare metal forest recovery
Active Directory failure, which includes corrupted, completely lost, or unbootable domain controllers, is something that scares any administrator. There can be a lot of reasons for the loss of valuable data. It can be caused by any error, a virus, or a natural disaster. With our disaster recovery plan, you get an insurance policy for your business information.
This section contains recommendations for recovering an Active Directory forest if forest-wide failure renders all domain controllers (DCs) in the forest incapable of functioning normally.
Bare metal recovery requirements and limitations
| NOTE |
Domain controllers that are running on virtual machines in Amazon Web Services (AWS) or Microsoft Azure cannot be restored with the Bare Metal Active Directory Recovery method because there is no way to boot such DCs from an ISO image. |
Backup storage requirements
-
If you do not want to encrypt BMR backups, we recommend to enable Server Message Block (SMB) Encryption feature (SMB version 3.0 and higher ) on the network share to secure network connection. For more details on how to turn on SMB Encryption, see https://docs.microsoft.com/en-us/windows-server/storage/file-server/smb-security. Note that backed up domain controllers must support SMB Encryption as well.
-
The best practice is to store backups in the repository that is located in the same Active Directory site due to faster network.
-
For Windows Server 2008 R2, BMR backups that are stored on the Forest Recovery Console host are not supported.
-
The account that is used to access the BMR backups location must have Read and Write permissions to that location.
-
If the process of creating a Windows Server 2008 R2 BMR backup completes with the error like "The sector size of the physical disk on which the virtual disk resides is not supported.", make sure that the disk sector size on the target machine (NAS device or similar) is equal to 512 bytes.
For instance, NetApp ONTAP operating system uses the following command: vserver cifs options modify -file-system-sector-size 512.
Backup requirements and limitations
- Active Directory does not allow using a backup whose age exceeds the Active Directory tombstone lifetime (default is 180 days). But if there is a RMAD BMR backup that is older than 180 days and a more recent Active Directory backup, you can successfully perform the restore operation.
Target system requirements
-
The number of physical disks on the target computer must be equal or exceed the number of disks on the source machine.
-
The order of system partitions must be the same on the target disk as on the source one.
-
The physical disks on the target computer must be of the same size as the original disks or larger.
-
If a source machine with the legacy BIOS firmware has physical disks of different sizes it is critical to have the same physical disks order on the target machine. For example, if a source has two disks - disk 0 (90 GB), disk 1 (40 GB), the target should have the same 90-40 order.
-
The firmware on the target computer must be compatible with the configuration of the source disks.
-
If the physical disks on the source computer have the GPT partition style, the target computer must have UEFI firmware and must be booted in the UEFI mode.
-
If the physical disks on the source computer have the MBR partition style, then the target machine should be booted in the BIOS-compatibility mode (or just legacy BIOS mode).
-
| Source partition style | BIOS (Target firmware) | UEFI (Target firmware) |
|---|---|---|
| GPT | Incompatible | Compatible |
| MBR | Compatible | Compatible (legacy BIOS-compatibility mode) |
Bare Metal Backup encryption
-
It is recommended to encrypt your Bare Metal Recovery backup by selecting the Encrypt and protect backups with password option (by default, this option is disabled) on the Backup tab in the collection properties. For details, see Creating BMR and Active Directory backups. In this case, not only the backup data stored on the remote share is encrypted, but the data transferred over the network during the backup operation is encrypted as well.
-
If Active Directory backup encryption is enabled, RMAD BMR backup will be encrypted by BitLocker. Recovery Manager for Active Directory uses a virtual hard disk encrypted by BitLocker as a container for the backup (256-bit AES encryption).
-
An encryption key for the backup is derived from the backup password and is not tied to a TPM chip (if any). This means that the encrypted RMAD BMR can be used on another machine, without or with another TPM chip. Only a backup password is required.
-
The BitLocker Drive Encryption feature should be installed on all backed up domain controllers and on the Forest Recovery Console machine to support encrypted BMR backups. But note that the BitLocker feature does not encrypt DC drives automatically. After the feature is installed, it is required to reboot the machine.
| NOTE |
After disaster recovery, volumes on the restored machine will not be BitLocker-protected. A customer have to enable the BitLocker protection again if required. |
To enable the backup encryption, see Enabling backup encryption.
Preparing backups
To restore the Active Directory data in case of failure, you must occasionally create a BMR backup for at least one domain controller in each domain in your environment along with the Active Directory data backup.
What should you do?
-
Decide on a Backup Location For BMR backups, the best practice in an enterprise environment is to deploy a dedicated backup server performing the role of an SMB repository with high disk I/O throughput to cope with the amount of backup data. You need to specify custom access credentials for the share to access the backup data even when Active Directory is unavailable.
-
Create Backups The backup schedule is defined by customer based on the available resources and desired level of protection.
-
Bare Metal Recovery (BMR) Backup It is recommended to prepare a BMR backup for a forest recovery because it can be restored to different hardware instances. The best practice is to create BMR backups only once a week to minimize the required storage space. Now only system critical volumes are included in a BMR backup by default. If you need to include additional volumes, see Creating BMR and Active Directory backups.
-
Active Directory Backup Standard Active Directory backup includes Active Directory-specific data, e,g. Active Directory data, registry, etc. It is recommended to create Active Directory backup daily. In case of critical failures (such as DC hardware failure or malware) it will be possible to fully restore the domain with the combination of the most recent BMR backups and latest Active Directory Backups.
-
For details on how to create backups, see Creating BMR and Active Directory backups.

Converting a Windows Server Backup to a RMAD BMR backup
Recovery Manager for Active Directory has the option to convert a Windows Server Backup to a RMAD BMR backup. Note that а Windows Server Backup cannot be converted to an encrypted backup.
To convert a Windows Server Backup and then register the resulting backup, use the following command:
PS C:\> Convert-RMADBackup \\backup_srv01\wsb\WindowsImageBackup \\backup_srv01\backups\dc1.vhdx | Add-RMADBackup
For Windows Server Backups, you have to specify the full path to the WindowsImageBackup folder.
For more details about RMAD PowerShell Help, refer About Management Shell.