Chat now with support
Chat mit Support

Recovery Manager for AD Disaster Recovery Edition 10.1.1 - User Guide

Overview Getting started
Permissions required to use Recovery Manager for Active Directory Recovery Manager Console Getting and using help Configuring Windows Firewall Using Computer Collections Managing Recovery Manager for Active Directory configuration Licensing
Backing up data
Permissions required for the Backup operation Managing Backup Agent Using a least-privileged user account to back up data Using Managed Service Accounts Active Directory backups vs Windows System State backups Creating BMR and Active Directory backups Using the Backup Wizard Retrying backup creation Enabling backup encryption Backing up AD LDS (ADAM) Backing up cross-domain group membership Backing up distributed file system (DFS) data Backup scheduling Setting performance options Setting advanced backup options Using Forest Recovery Agent Unpacking backups Using e-mail notification Viewing backup creation results
Restoring data
Getting started with Active Directory recovery Managing deleted or recycled objects Restoring backed up Active Directory components Integration with Change Auditor for Active Directory Using granular online restore Restoring AD LDS (ADAM) Selectively restoring Active Directory object attributes Restoring objects in an application directory partition Restoring object quotas Restoring cross-domain group membership Performing a restore without having administrator privileges Reports about objects and operations Using complete offline restore Offline restore implications Restoring SYSVOL authoritatively Performing a granular restore of SYSVOL Recovering Group Policy Restoring data from third-party backups Using the Extract Wizard Restoring passwords and SID history
Full Replication Consolidating backup registration data Monitoring Recovery Manager for Active Directory Recovering an Active Directory forest
Forest recovery overview Deploying Recovery Manager for Active Directory Forest Edition (Disaster Recovery Edition) Permissions required to use Forest Recovery Console Forest Recovery Console Managing a recovery project Recovery methods Phased recovery Managing Forest Recovery Agent Rebooting domain controllers manually Resetting DSRM Administrator Password Purging Kerberos Tickets Managing the Global Catalog servers Managing FSMO roles Manage DNS Client Settings Configuring Windows Firewall Developing a custom forest recovery plan Backing up domain controllers Assigning a preferred DNS server during recovery Handling DNS servers during recovery Forest recovery approaches Deciding which backups to use Running custom scripts while recovering a forest Overview of steps to recover a forest Viewing forest recovery progress Viewing recovery plan Viewing a report about forest recovery or verify settings operation Handling failed domain controllers Adding a domain controller to a running recovery operation Selectively recovering domains in a forest Recovering SYSVOL Deleting domains during recovery Resuming an interrupted forest recovery Recovering read-only domain controllers (RODCs) Checking forest health Collecting diagnostic data for technical support
Restore Active Directory on Clean OS Bare metal forest recovery Using Management Shell Creating virtual test environments Using Recovery Manager for Active Directory web portal Appendices
Frequently asked questions Best practices for using Computer Collections Technical characteristics Best practices for creating backups Best practices for creating backups for forest recovery Best practices for recovering a forest Descriptions of recovery or verification steps Ports Used by Recovery Manager for Active Directory Forest Edition (Disaster Recovery Edition) Backup Wizard Online Restore Wizard Online Restore Wizard for AD LDS (ADAM) Group Policy Restore Wizard Repair Wizard Extract Wizard Events generated by Recovery Manager for Active Directory Descriptions of PowerShell commands
Add-RMADBackup Add-RMADCollectionItem Add-RMADFEComputer Add-RMADReplicationConsole Add-RMADStorageServer Backup-RMADCollection Close-RMADFEProject Compare-RMADObject Convert-RMADBackup ConvertTo-RMADRecycledObject Create-RMADStorageManagementAgentSetup Expand-RMADBackup Export-RMADBackup Export-RMADFERecoveryCertificate Export-RMADFEResult Get-RMADBackup Get-RMADBackupAgent Get-RMADBackupInfo Get-RMADBackupObject Get-RMADBackupSecurityStatus Get-RMADCollection Get-RMADCollectionItem Get-RMADDeletedObject Get-RMADFEComputer Get-RMADFEConsole Get-RMADFEDnsCache Get-RMADFEDomain Get-RMADFEEvent Get-RMADFEGlobalOptions Get-RMADFEOperation Get-RMADFEPersistenceConnection Get-RMADFEProject Get-RMADFERecoveryAgent Get-RMADFESchedule Get-RMADGlobalOptions Get-RMADLicenseInfo Get-RMADObject Get-RMADReplicationConsole Get-RMADReplicationSchedule Get-RMADReplicationSession Get-RMADReplicationSessionItem Get-RMADReportObject Get-RMADReportObjectAttributes Get-RMADReportObjectChildren Get-RMADReportSession Get-RMADSession Get-RMADSessionItem Get-RMADSessionItemEvent Get-RMADStorageServers Import-RMADBackup Import-RMADFERecoveryCertificate Install-RMADBackupAgent Install-RMADFERecoveryAgent New-RMADCollection New-RMADFEProject New-RMADFERecoveryMedia New-RMADSchedule Open-RMADFEProject Publish-RMADBackupSecurityStatus Remove-RMADBackup Remove-RMADBackupAgent Remove-RMADCollection Remove-RMADCollectionItem Remove-RMADFEComputer Remove-RMADFERecoveryAgent Remove-RMADFESchedule Remove-RMADReplicationConsole Remove-RMADReplicationSchedule Remove-RMADReplicationSession Remove-RMADStorageServer Remove-RMADUnpackedComponent Rename-RMADCollection Restore-RMADDeletedObject Restore-RMADDomainController Restore-RMADObject Resume-RMADFERecovery Save-RMADFEProject Set-RMADCollection Set-RMADFEComputer Set-RMADFEDnsCache Set-RMADFEDomain Set-RMADFEGlobalOptions Set-RMADFEPersistenceConnection Set-RMADFERecoveryMode Set-RMADFESchedule Set-RMADGlobalOptions Set-RMADReplicationConsole Set-RMADReplicationSchedule Start-RMADFERecovery Start-RMADFEVerification Start-RMADReplication Start-RMADReportViewer Stop-RMADFEWorkflow Update-RMADBackupAgent Update-RMADFEProject Update-RMADLicense

Password Settings

This dialog box enables you to specify the password and password settings for the user account you restore using the Online Restore Wizard.

The dialog box has the following elements:

  • Specify the new password. Select this option if you want to set a new password for the user account to be restored.

    • New password. Provides a space for you to type a case-sensitive password up to 127 characters.

    • Confirm new password. Provides a space for you to retype the password to confirm the spelling.

  • Leave the password unchanged. Select this option if you want to leave the user password unchanged. When you select this option, the restored user account can be disabled if its password does not meet the password policy requirements.

  • Additional options. Select this check box to specify additional settings for user password.

    • Disable user account. Select this check box to disable the user account.

    • User must change password at next logon. Select this check box to require users to change their passwords the next time they log on.

  • Apply these settings to all restored users. Select this check box to apply the specified password settings for all user accounts to be restored from the selected backup.


Operation Option

Use this page to analyze comparison reports and proceed to restore after the comparison was made.

  • View Report Click to view comparison reports. The report is viewed and managed with Quest Reports Viewer or with Microsoft SQL Server Reporting Services. The application used for generating, managing and viewing the reports was specified while installing Recovery Manager for Active Directory

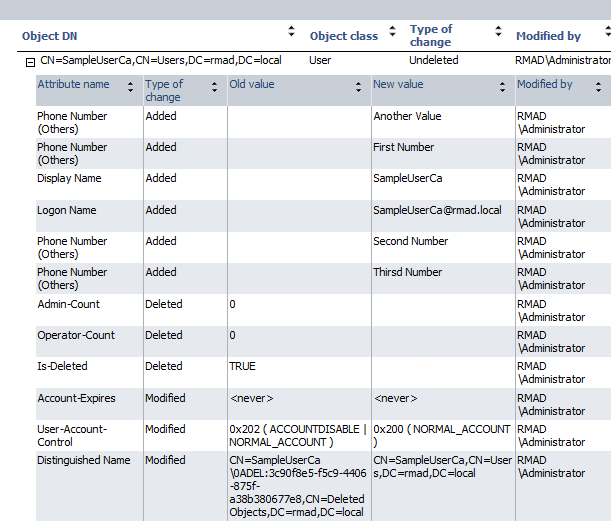
    • The Comparison report provides the following information:

      Resources/Images/CA_compare.png

      • Old value column shows data from the backup or Change Auditor database.

      • New value column shows changes that occurred in Active Directory since the last backup.

      • Modified by column provides information on who modified particular Active Directory objects (only if you use integration with Change Auditor)

    • The Restore report provides the following information:

      Resources/Images/CA_restore.png

      • Old value column shows changes that occurred in Active Directory since the last backup.

      • New value column shows data that were restored from the backup or Change Auditor database

      • Modified by column provides information on who modified particular Active Directory objects (only if you use integration with Change Auditor)

  • Proceed to restore. To proceed to a restore of the selected objects, select this check box and then click Next. To quit the wizard without performing a restore, leave this check box cleared and then click Next.


Objects to Be Restored

Use this page to view values of object attributes and select Active Directory objects to be restored.

  • Objects. Lists the objects the wizard will process. The Objects list includes only the objects for which the comparison has detected differences. The Name column displays the object’s distinguished name.

  • Properties. Displays the Properties dialog box, allowing you to view the attribute values of objects you select from the Objects list.

  • Select All.Selects all objects from the Objects list.

  • Clear All. Clears all check boxes under Objects.

To select objects to be restored
  • Select check boxes in the Objects list, and then click Next.

You can use the drop-down list to filter objects in the Objects list. You can also select and deselect all objects by clicking the Select All and Clear All buttons.

To view values of the object attributes
  • Select an object from the Objects list, and then click Properties.

The wizard displays the Properties dialog box. The Attributes box inside the Properties dialog box lists attributes of the selected object and displays the values each attribute has in the backup and in Active Directory. The elements of the Properties dialog box are defined as follows:

  • Show changed attributes only. When selected, the Attributes list displays only the attributes that have been changed since the time the backup was created.

  • Show all possible attributes. When selected, the Attributes list displays all attributes of the selected object.

  • Include attributes with empty values. When selected, the Attributes list displays the attributes that have empty values.

In the Attributes list, each entry includes the following fields:

  • Attribute. Displays the LDAP display name of an attribute.

  • Value in Backup. Displays the value the attribute has in the backup.

  • Value in Active Directory. Displays the value the attribute has in Active Directory, if the object exists in Active Directory.


Where to Restore Deleted Objects

Use this page to specify a container where to restore the objects selected on the previous page of the wizard.

  • Restore deleted objects to their original containers (default). With this option, the wizard restores the selected objects to their original container.

  • Specify a destination container for restoration of deleted objects. This option allows you specify the destination container for restoration of the deleted objects. Select that container with the Browse button. If you select the Show advanced objects option in the Browse and Select a Container dialog, the objects can be restored to the containers that reside in the Configuration and Schema directory partitions.


Verwandte Dokumente

The document was helpful.

Bewertung auswählen

I easily found the information I needed.

Bewertung auswählen