
Recovery Manager Console
Recovery Manager for Active Directory includes an MMC snap-in (also known as the Recovery Manager Console) to ensure intuitive operation and close integration with the Windows operating system.
| Note |
Machine that hosts the Recovery Manager Console must have same or higher version of Windows operating system than the processed domain controllers. Otherwise, the online compare and object search in a backup during the online restore operation may fail. |
To start the Recovery Manager Console
Complete the steps related to your version of Windows:
For Windows 7, Windows Server 2008 or 2008 R2
-
Click Start.
-
Point to All Programs | Quest | Recovery Manager for Active Directory.
-
Click Recovery Manager for Active Directory.
For later versions of Windows
On the Start screen, click the Recovery Manager for Active Directory tile.
When started for the first time, the Recovery Manager Console looks similar to the following:
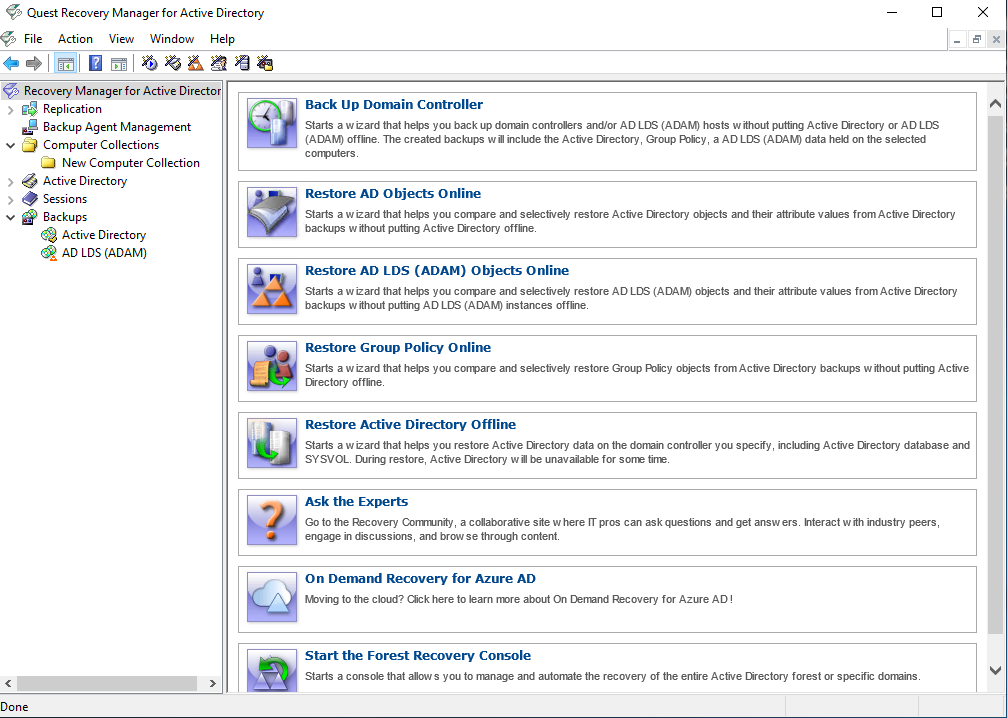
The main viewing area of the window is divided into two panes. The left pane contains the console tree, showing the items that are available in the snap-in. The right pane, known as the details pane, is used to display information about those items. The window also contains command menus and toolbars that are provided by both the MMC and the snap-in.
The information in the details pane changes accordingly when you select items in the console tree. To perform management tasks, you can click or right-click entries in the details pane and then use commands on the Action menu or shortcut menu.
You can move objects by selecting them in a source folder and then dragging the selection to a destination folder. If the drop operation is not allowed, the mouse pointer changes accordingly.
For more information about how to navigate an MMC snap-in, refer to Microsoft Management Console Help.
The console tree includes the following items:
-
Replication Using this node you can add multiple console instances to the replication console list and perform the data replication from source consoles to the local one. For more information, see Full replication and Consolidating backup registration data.
-
Backup Agent Management. Provides a central location for managing Backup Agent on computers added to Computer Collections. You can use this node to discover all preinstalled instances of Backup Agent and to manually install, uninstall, or update the agent on computers in Computer Collections (such as domain controllers and AD LDS (ADAM) hosts). For more information, see Managing Backup Agent.
-
Computer Collections. Contains a list of user-defined collections of computers. When you select a collection in the console tree, the details pane displays a list of all members of that collection. For more information, see Using Computer Collections.
-
Active Directory. Contains nodes representing the forests and AD LDS (ADAM) configuration sets to which the Recovery Manager Console is currently connected. You can browse forests and AD LDS (ADAM) configuration sets for computers and AD LDS (ADAM) instances, respectively.
-
To add a forest to the list, select Active Directory, and then, on the Action menu, click Connect to Forest.
-
To add an AD LDS (ADAM) configuration set to the list, select Active Directory, and then, on the Action menu, click Connect to AD LDS (ADAM).
-
-
Sessions. Contains a list of all backup-creation sessions performed by Recovery Manager for Active Directory. When you select a session in the console tree, the details pane reports information about that session, such as whether backups were successfully created during the session.
-
Backups. Contains a list of the Active Directory backups, AD LDS (ADAM) backups and BMR backups registered in the backup registration database of Recovery Manager for Active Directory. When you select Active Directory or AD LDS (ADAM) under the Backups node, the details pane displays a list of all registered AD backups or AD LDS (ADAM) backups respectively.
You can use the Properties dialog box provided for the Active Directory or AD LDS (ADAM) node, to filter the list of backups displayed in the details pane.
Getting and using help
Help topics and tips provided with Recovery Manager for Active Directory help you accomplish your tasks. To get assistance while you work:
-
On the Help menu, click Help Topics. This displays the Help Viewer. To find a Help topic, use the Contents and Search tabs of the Help Viewer.
-
To see a brief description of a wizard page or a dialog box, press the F1 key or click the Help button.
-
To see a brief description of a menu command or a toolbar button, point to the command or button. Descriptions of toolbar buttons appear as tool-tips.
Descriptions of menu commands appear in the status bar at the bottom of the window. If the status bar is not displayed, click Customize on the View menu, and then select the Status bar check box in the Customize View dialog box.
Configuring Windows Firewall
A firewall enabled in your environment may block traffic on ports used by Recovery Manager for Active Directory, preventing you from backing up or restoring data. Before you start using Recovery Manager for Active Directory, make sure your firewall does not block traffic on ports used by Recovery Manager for Active Directory. For more information about these ports, see the Deployment Guide supplied with this release.
This section provides instructions on how to configure built-in Windows Firewall on a computer that is running Windows Server 2008 or later (domain controller or AD LDS (ADAM) host), so that Recovery Manager for Active Directory could back up data on that computer.
The section covers the following methods:
Manual method
For each of the following agents, you must create the specified firewall rules to allow traffic on ports used by Recovery Manager for Active Directory. For descriptions of each firewall rule, see the table below.
Backup Agent:
-
If you have a preinstalled Backup Agent, create Rule 3 and specify BackupAgent64.exe in the Program path parameter.
-
If you have an automatic Backup Agent installation, create Rule 3 and specify ErdAgent.exe instead of <backup agent> in the Program path parameter.
-
If you use the specified Backup Agent port, you need to configure Rule 1 and Rule 3. In Rule 3, specify <specific TCP port> for the Backup Agent in the Local ports parameter.
-
If you use the RPC dynamic port range for the Backup Agent, configure Rule 1, Rule 2, and Rule 3. In Rule 3, specify the <RPC dynamic port range> for the Backup Agent in the Local ports parameter.
Online Restore Agent:
-
Configure Rule 4 and specify OnlineRestoreAdapter.exe in the Program path parameter.
-
If you use the specified Online Restore Agent port, configure Rule 1 and Rule 4. In Rule 4, specify <specific TCP port> for the Online Restore Agent in the Local ports parameter.
-
If the RPC dynamic port range is used for the Online Restore Agent , configure Rule 1, Rule 2, and Rule 4. In Rule 4, specify <RPC dynamic port range> for the Online Restore Agent in the Local ports parameter.
Offline Restore Agent:
-
Configure Rule 5 and specify RstAgent.exe in the Program path parameter.
-
If you use the specified Offline Restore Agent port, you need to configure Rule 1 and Rule 5. In Rule 5, specify <specific TCP port> for the Offline Restore Agent in the Local ports parameter.
-
If you use the RPC dynamic port range for the Offline Restore Agent , configure Rule 1, Rule 2, and Rule 5. In Rule 5, specify <RPC dynamic port range> for the Offline Restore Agent in the Local ports parameter.
Management Agent:
-
Configure Rule 6 and specify the ManagementAgent.exe in the Program path parameter.
-
If you use the specified Backup Agent port, configure Rule 1 and Rule 6. In Rule 6, specify <specific TCP port> for the Management Agent in the Local ports parameter.
-
If you use the RPC dynamic port range for the Management Agent, configure Rule 1, Rule 2, and Rule 6. In Rule 6, specify <RPC dynamic port range> for the Management Agent in the Local ports parameter.
Forest Recovery Agent:
-
Configure Rule 7 and specify FRRestoreService64.exe in the Program path parameter.
-
If you use the specified Backup Agent port, configure Rule 1 and Rule 7. In Rule 7, specify <specific TCP port> for the Forest Recovery Agent in the Local ports parameter.
-
If you use the RPC dynamic port range for the Forest Recovery Agent, configure Rule 1, Rule 2, and Rule 7. For Rule 7, specify <RPC dynamic port range> for the Forest Recovery Agent in the Local ports parameter.
The following list describes the settings for each firewall rule. Any setting not described in this list can be left as the default value.
-
Rule 1
- Rule Type: Custom
- Program Path: System
- Service settings: Apply to all programs and services
- Protocol: TCP
- Local ports: 445
- Remote ports: Any
- Local IP addresses: Any
- Remote IP addresses: Any
- Action: Allow the connection
- Rule profile: Domain, Private, and Public
- Allowed users: Any
- Allowed computers: Any
-
Rule 2
- Rule Type: Custom
- Program Path: %SystemRoot%\System32\Svchost.exe
- Service settings: Remote Procedure Call (RpcSs)
- Protocol: TCP
- Local ports: RPC Endpoint Mapper
- Remote ports: Any
- Local IP addresses: Any
- Remote IP addresses: Any
- Action: Allow the connection
- Rule profile: Domain, Private, and Public
- Allowed users: Any
- Allowed computers: Any
-
Rule 3
- Rule Type: Custom
- Program Path: %SystemRoot%\RecoveryManagerAD\backup agent
- Service settings: Apply to all programs and services
- Protocol: TCP
- Local ports: RPC dynamic port range/specified port for Backup Agent
- Remote ports: Any
- Local IP addresses: Any
- Remote IP addresses: Any
- Action: Allow the connection
- Rule profile: Domain, Private, and Public
- Allowed users: Any
- Allowed computers: Any
-
Rule 4
- Rule Type: Custom
- Program Path: %SystemRoot%\RecoveryManagerAD\OnlineRestoreAdapter.exe
- Service settings: Apply to all programs and services
- Protocol: TCP
- Local ports: RPC dynamic port range/specific port for Online Restore Agent
- Remote ports: Any
- Local IP addresses: Any
- Remote IP addresses: Any
- Action: Allow the connection
- Rule profile: Domain, Private, and Public
- Allowed users: Any
- Allowed computers: Any
-
Rule 5
- Rule Type: Custom
- Program Path: %SystemRoot%\RecoveryManagerAD\offline restore agent
- Service settings: Apply to all programs and services
- Protocol: TCP
- Local ports: RPC dynamic port range/specific port for Offline Restore Agent
- Remote ports: Any
- Local IP addresses: Any
- Remote IP addresses: Any
- Action: Allow the connection
- Rule profile: Domain, Private, and Public
- Allowed users: Any
- Allowed computers: Any
-
Rule 6
- Rule Type: Custom
- Program Path: %SystemRoot%\RecoveryManagerAD\ManagementAgent.exe
- Service settings: Apply to all programs and services
- Protocol: TCP
- Local ports: RPC dynamic port range/specific port for Management Agent
- Remote ports: Any
- Local IP addresses: Any
- Remote IP addresses: Any
- Action: Allow the connection
- Rule profile: Domain, Private, and Public
- Allowed users: Any
- Allowed computers: Any
-
Rule 7
- Rule Type: Custom
- Program Path: %ProgramFiles%\Quest\RecoveryManagerforActiveDirectory\forest recovery agent
- Service settings: Apply to all programs and services
- Protocol: TCP
- Local ports: RPC dynamic port range/specific port for Forest Recovery Agent
- Remote ports: Any
- Local IP addresses: Any
- Remote IP addresses: Any
- Action: Allow the connection
- Rule profile: Domain, Private, and Public
- Allowed users: Any
- Allowed computers: Any
| note |
For more information on RPC dynamic port range, refer to the following Microsoft Support Knowledge Base articles at https://support.microsoft.com: |