
Restoring from standard Active Directory backup
In case of critical failures, the Bare Metal Active Directory Recovery method lets you fully restore the domain with the combination of the most recent RMAD BMR backup and the latest Active Directory backup. For details about the backup creation, see Creating backups.
Standard Active Directory backup includes Active Directory-specific data, e,g. Active Directory data, registry, etc. It is recommended to create an Active Directory backup daily.
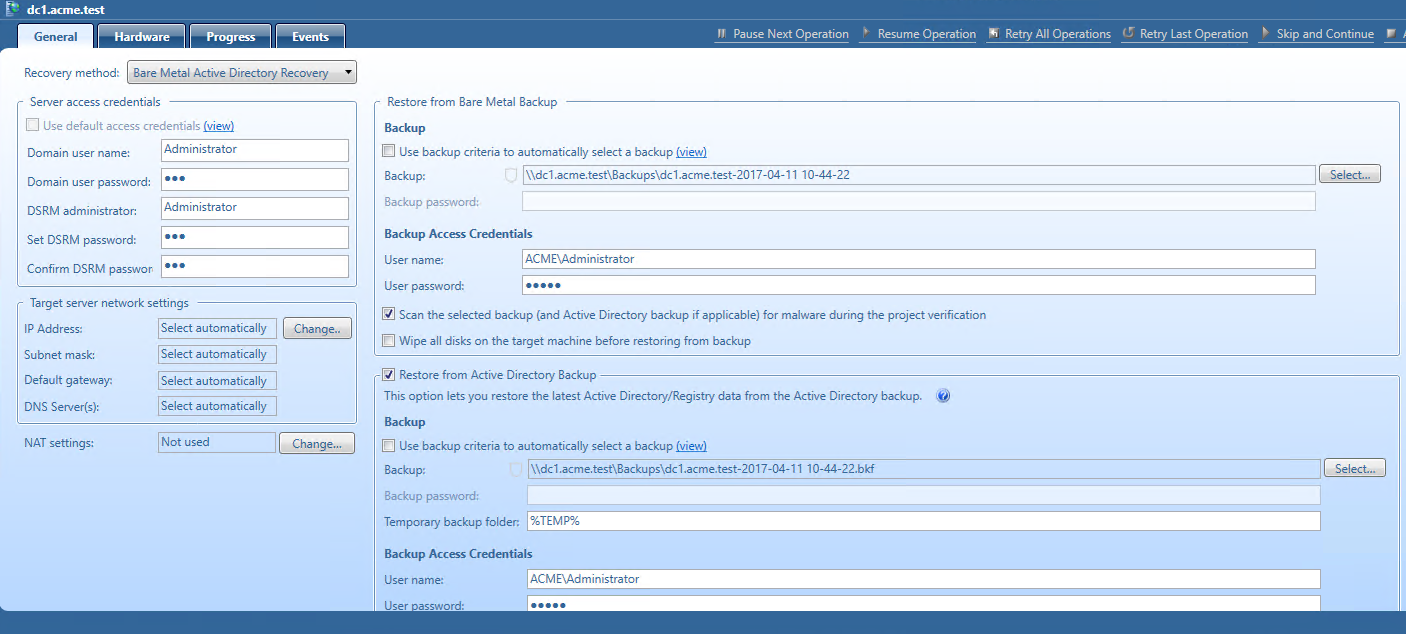
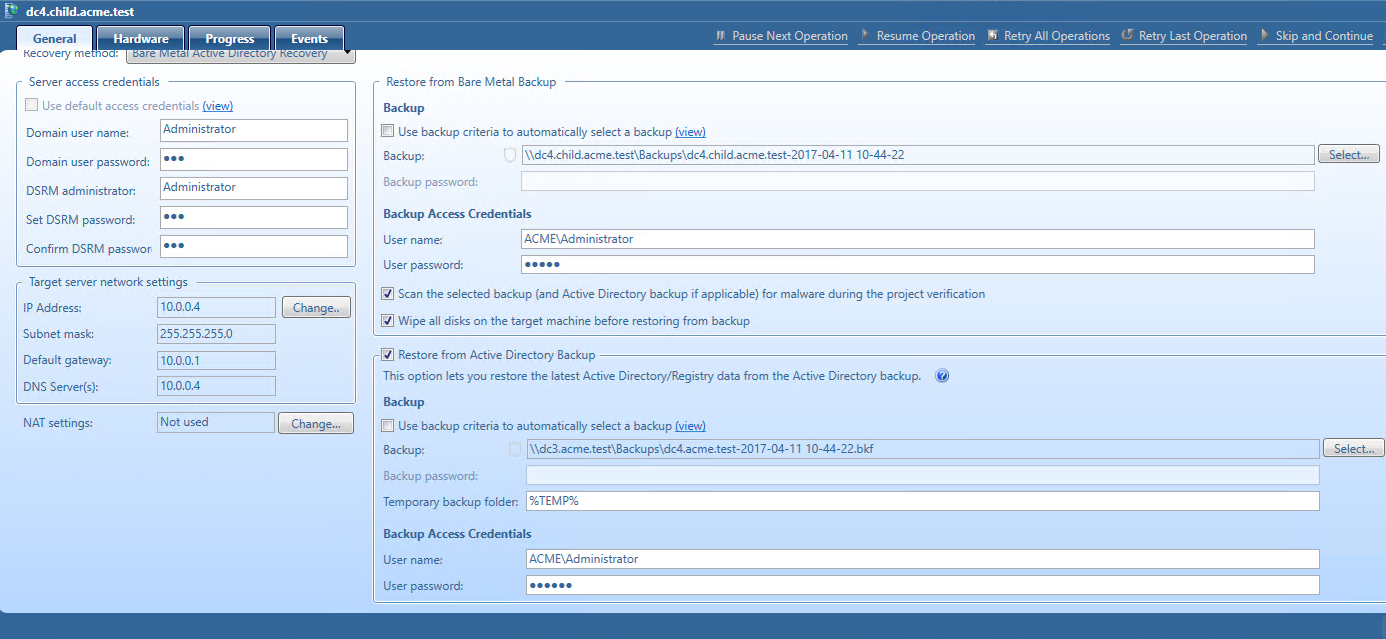
To enable restore of Active Directory data from the latest standard Active Directory backup, select the Restore from Active Directory Backup option on the General tab. For information about all available options, see General tab.
NIC teaming support
When Recovery Manager for Active Directory recovers the network settings, it connects to the first available network adapter.
In case of NIC teaming, there are two possible scenarios:
-
Recovery Manager for Active Directory restores the system to the new hardware where network adapters have different MAC addresses.
In this case, Recovery Manager for Active Directory will configure some adapter with IP settings (either original or custom), and the operating system will disable NIC teaming because it will not be able to identify teamed NICs. So, the network will work with applied settings, but without teaming.
-
The domain controller is restored to the same server.
NIC teaming is supported in case of RMAD bare metal recovery to the same machine.
Disaster recovery workflow
This following steps let you restore multiple domain controllers including the Active Directory data if a disaster occurs.
-
Deploy Recovery Manager for Active Directory.
The product should be deployed on a separate host in the environment with access to backup data and blank hosts that will be a part of the disaster forest recovery.
-
Register backups in Recovery Manager for Active Directory Console. For that, right click the Backups node and select Register Backup File option. Also, backups can be registered using Forest Recovery Console on the Selected a backup to create a new recovery project step of the New Recovery Project wizard.
-
Prepare new servers for recovered domain controllers in each domain. These servers will be used for Bare Metal Restore. The servers should be compliant with the following requirements:
-
Have compatible hardware. Dissimilar hardware (USB controllers, chipset, NIC, video, storage, etc.) is supported, assuming that the source DC system contains drivers for it.
-
The number of physical disks on the target computer must equal (or exceed) the number of disks on the source domain controller.
-
The physical disks on the target computer must be of the same size as the original disks or larger.
-
-
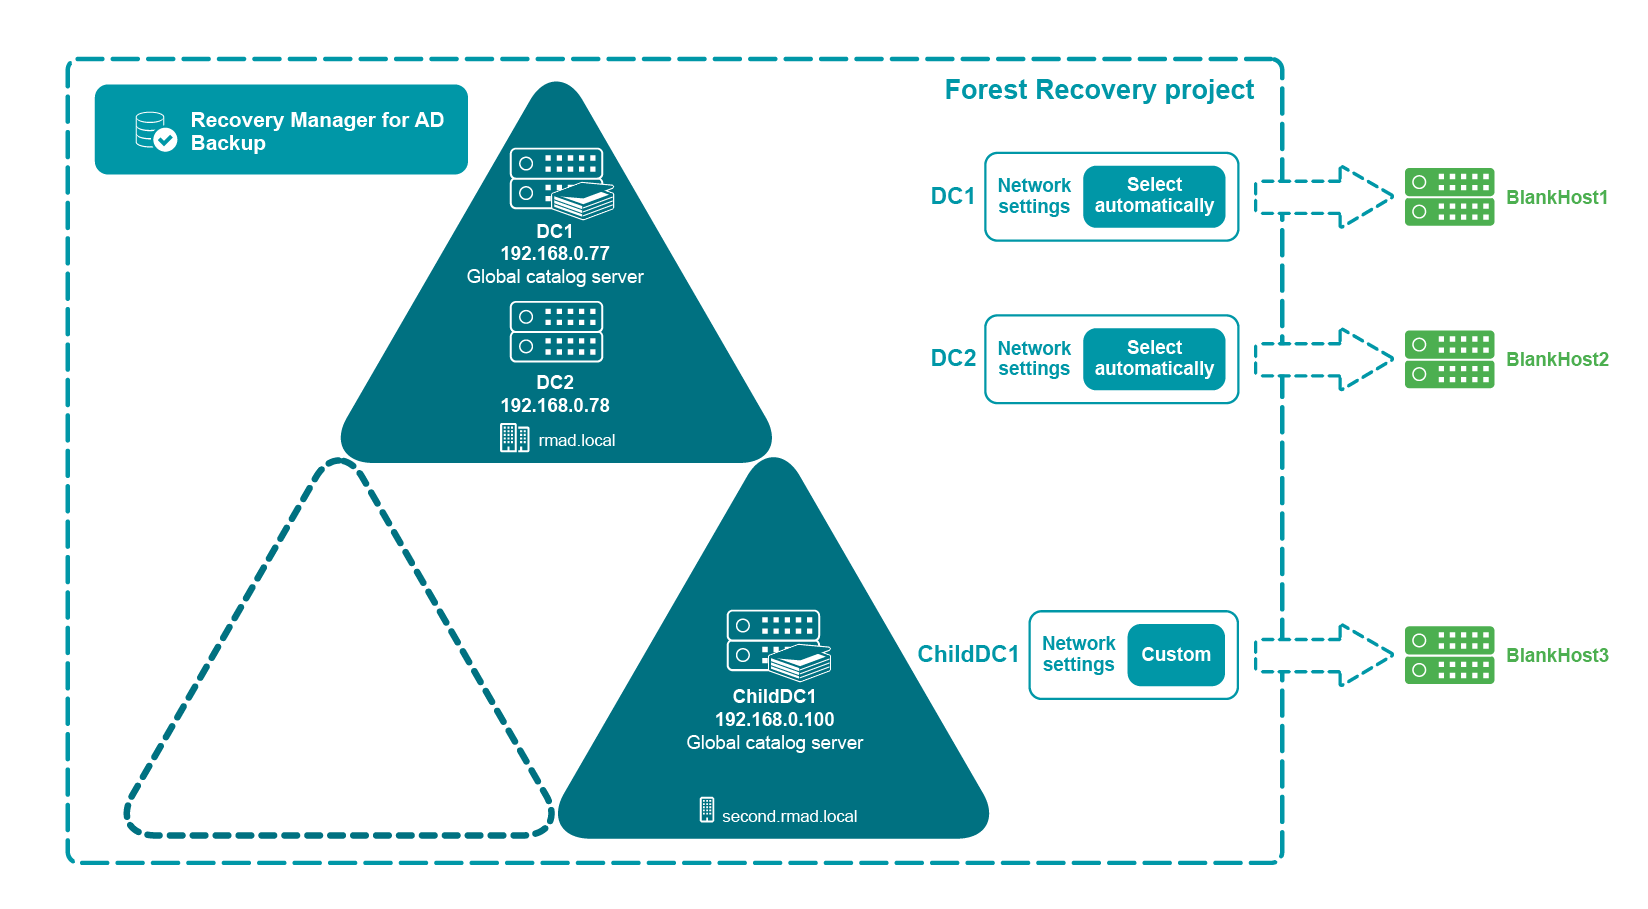
Create the forest recovery project using Forest Recovery Console. The original forest topology is retrieved from the backup file. Domain controllers’ names are preserved.
-
Specify recovery settings for each domain controller on the General tab in Forest Recovery Console. For more details, see the General tab section.
-
If Wipe all disks on the target machine before restore from the backup is selected on the General tab, Recovery Manager for Active Directory performs the DiskPart "clean all" command before recreating the disks. This command removes all partitions and cleans all disk sectors.
-
The network and DNS settings address will be retrieved automatically from the BMR backup for the Bare Metal Active Directory Recovery method.
-
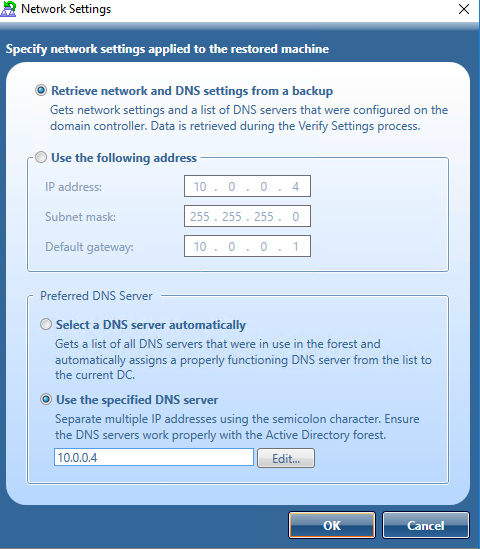
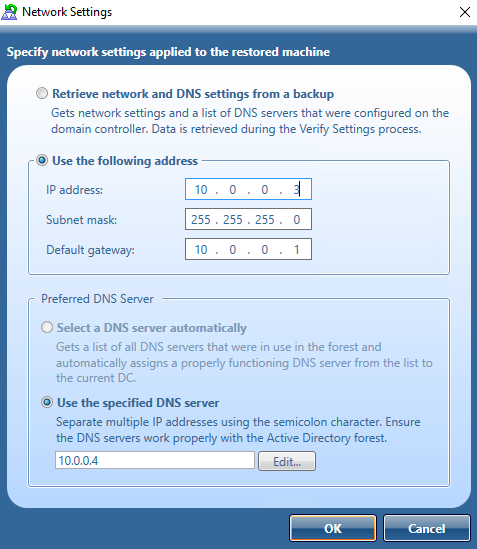
If you need to modify the network settings, click Change under the Target server network settings and select the required option. The following options are available:
-
Retrieve network and DNS settings from a backup - (used by default) This option gets network settings for the selected domain controller from the backup
-
Use the following address - This option lets you specify network settings manually.
-
Select a DNS server automatically - If this option is selected, DNS server will be selected automatically.
-
Use the specified DNS server - This option lets you specify one DNS server or a list of DNS servers separated by semicolons.
-
-
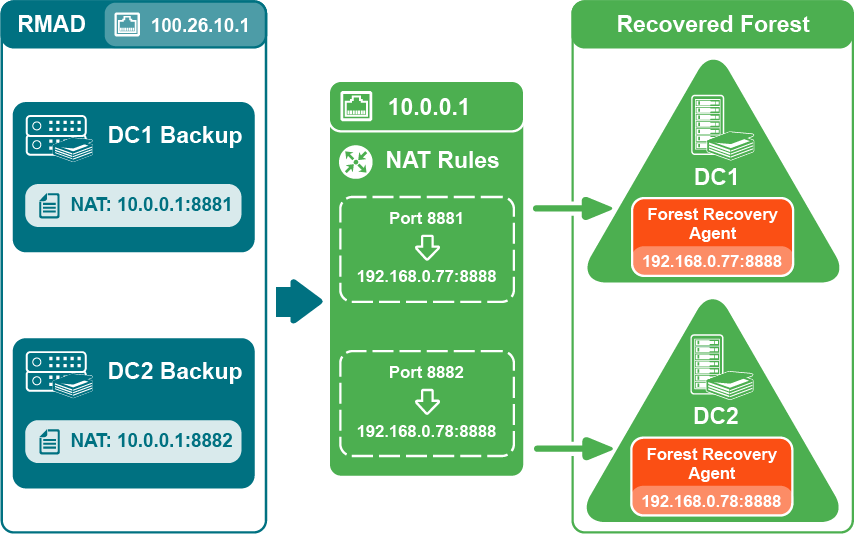
In some scenarios, recovered domain controllers may be located outside the network where Recovery Manager for Active Directory is installed. For such configurations, the NAT settings option is added to allow access to the external network using the NAT server. By default, Forest Recovery Console uses the IP address from the Forest recovery project settings (either obtained from a backup or configured manually, see steps 7,8) and the port (either from the RPC dynamic port range or the specific port configured in the recovery project) to communicate with the Forest Recovery Agent located on the restored host. The 'NAT server' setting allows you to specify a custom IP address and a port that will be used to send requests to the Forest Recovery Agent.
-
Start the Verify Settings operation from the main menu of Forest Recovery Console.
-
As a part of the verify settings operation, Recovery Manager for Active Directory creates Quest Recovery Environment image file for each domain controller. This image file will be used to boot the machine to be restored. The image is generated from BMR backup and extends the WinRE image with additional metadata required for disaster forest recovery (Forest Recovery Agent, Bare Metal Recovery Console, certificates, etc).
-
The Verify Settings process is paused on the Wait for target machine booted from Quest Recovery Environment step. This means that the recovery process cannot connect the remote host and you need boot this host with Quest Recovery Environment image. The message contains the link to the folder with Quest Recovery Environment files (by default, the files are located next to the BMR backup).
-
The recovery image should be provided to the target hosts to initiate the recovery process by any available option:
-
By the hardware management WebUI
-
By specifying the boot media in hypervisor if virtual machines are used
-
By configuring the network boot using the PXE boot server
-
The booting process can be automated by a server controller, e.g Dell Remote Access Controller (iDRAC), HP ProLiant iLO Management Engine (iLO), etc. For details, see Boot from the ISO image automatically
-
-
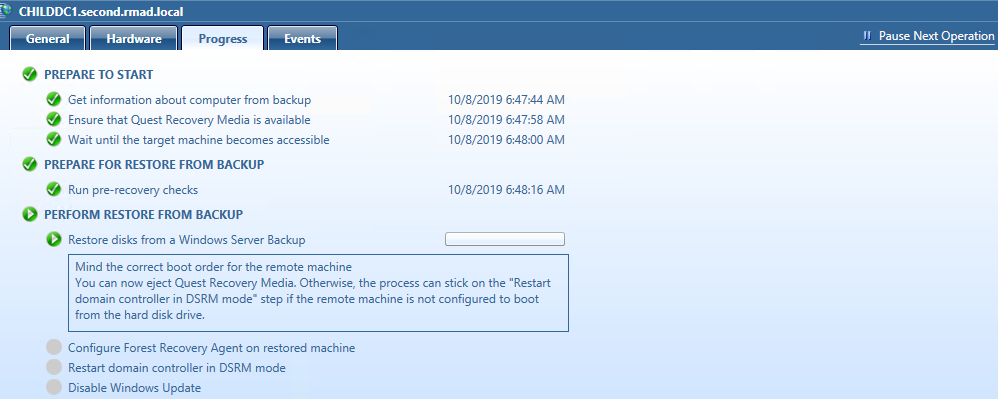
After you boot a machine, Bare Metal Recovery Console will automatically apply network settings (IP address, subnet mask) taken from the BMR backup and wait for the connection from Forest Recovery Console. Manual steps are not required.
-
Before you start the restore operation, check the boot order for the remote machine. Ensure that the target machine is trying to boot from the disk drive not from Quest Recovery Environment.
-
Start the restore operation by clicking Start Recovery from the main menu.
"Install Active Directory" recovery method can be used as a part of the Disaster Recovery workflow.
Boot from the ISO image automatically
The process of booting the physical server with Quest Recovery Environment image can be automated by a management engine. Recovery Manager for Active Directory supports the following server management systems: