
Dell Remote Access Controller (iDRAC)
The process of booting of Dell server with Quest Recovery Environment image can be automated by Dell Remote Access Controller (iDRAC).
Supported versions
Integrated Dell Remote Access Controller version 8 and 9
To boot the Dell server with Quest Recovery Environment image automatically
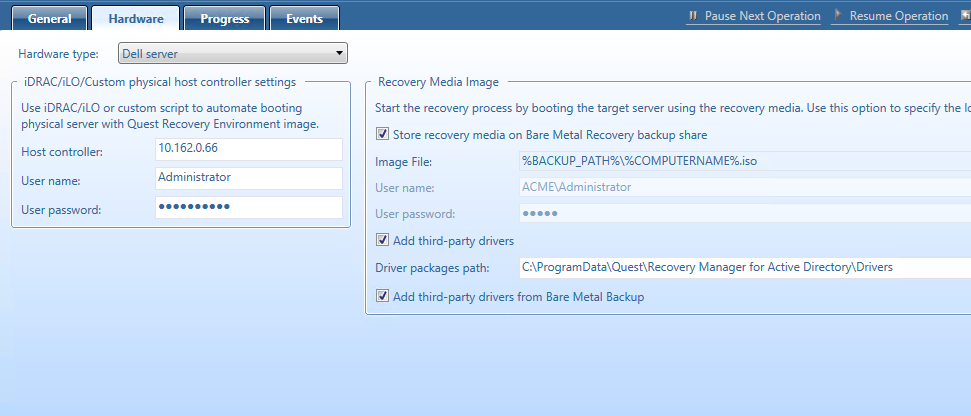
- In Forest Recovery Console, open the Hardware tab.
-
Select Dell server from the Hardware type drop-down list.
-
Specify the IP address of the iDRAC controller. It is recommended to specify the IP address of the controller instead of the server name.
Note: For Dell server, Quest Recovery Environment ISO image should be located in the share root folder.
-
Specify the user name and password of the account that will be used to access the iDRAC controller.
-
You can edit the iDRAC SSH script manually in the following location: %ProgramFiles%\Quest\Recovery Manager for Active Directory <Edition Name>\Management. This script will be executed on the remote server during the SSH session.
-
Make sure that Recovery Media Image settings are properly specified in the Recovery Media Image section of the Hardware tab.
HP ProLiant iLO Management Engine (iLO)
The process of booting the HP server with Quest Recovery Environment image can be automated by HP ProLiant iLO Management Engine (iLO).
Supported versions
HP ProLiant iLO Management Engine version 3, 4 and 5
To boot the HP server with Quest Recovery Environment image automatically
-
Install the latest version of HPEiLOCmdlets. For details, see HP Support.
-
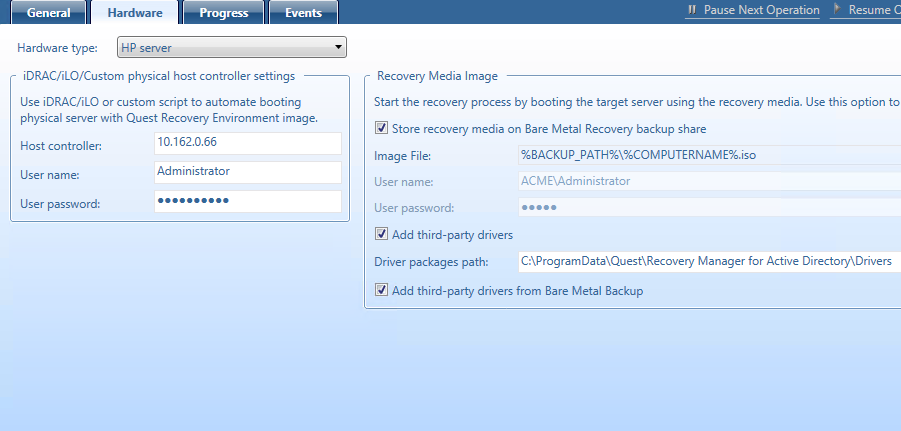
In Forest Recovery Console, open the Hardware tab.
-
Select HP server from the Hardware type drop-down list.
-
Specify the IP address of the iLO controller.
-
Specify the user name and password of the account that will be used to access the iLO controller.
-
You can edit the iLO PowerShell script manually in the following location: %ProgramFiles%\Quest\Recovery Manager for Active Directory <Edition Name>\Management.
-
Make sure that Recovery Media Image settings are properly specified in the Recovery Media Image section of the Hardware tab.
VMware ESXi
The process of booting the VMware virtual machine with the Quest Recovery Environment image can be automated by VMware ESXi.
| NOTE |
This feature allows you to work directly with ESXi hosts and VMware Center. |
Supported versions
VMware vCenter/ESX Server 6.0, 6.5 and 6.7
Prerequisites
VMware PowerCLI PowerShell module must be installed.
Minimal Rights and Permissions
| Privilege Name | Actions Granted to Users | Effective on Object | Propagate to Children |
|---|---|---|---|
| System.View | Allows a user to get information about vCenter/ESXi configuration in user interface. | vCenter | Yes |
| Datastore.FileManagement | Allows a user to carry out file operations in the datastore browser. | Datacenter, Datastore storage folder, Datastore Cluster, Datastore | Yes |
| Datastore.Browse | Allows browsing files on a datastore, including CD-ROM or Floppy media and serial or parallel port files. In addition, the browse datastore privilege allows users to add existing disks to a datastore. | Datacenter, Datastore storage folder, Datastore Cluster, Datastore | Yes |
| Datastore.AllocateSpace | Allows allocating space on a datastore for a virtual machine, snapshot, clone, or virtual disk. | Datacenter, Datastore storage folder, Datastore Cluster, Datastore | Yes |
| VirtualMachine.Inventory.Create | Allows creating a new virtual machine and allocates resources for its execution. | Datacenter, Virtual machine folder | Yes |
| VirtualMachine.Config.AddNewDisk | Allows creation of a new virtual disk to add to a virtual machine. | Datacenter, Virtual machine folder | Yes |
| VirtualMachine.Interact.SetCDMedia | Allows configuration of a virtual DVD or CD-ROM device. | Datacenter, Virtual machine folder, Cluster, Host | Yes |
| VirtualMachine.Interact.DeviceConnection | Allows changing the connected state of a virtual machine’s disconnectable virtual devices. | Datacenter, Virtual machine folder, Cluster, Host | Yes |
| VirtualMachine.Config.Settings | Allows changing any basic settings such as those in ToolsConfigInfo, FlagInfo, or DefaultPowerOpInfo | Datacenter, Virtual machine folder, Cluster, Host | Yes |
| VirtualMachine.Interact.PowerOff | Allows powering off a powered-on virtual machine. | Datacenter, Virtual machine folder, Cluster, Host | Yes |
| VirtualMachine.Interact.PowerOn | Allows powering on a powered-off virtual machine, and resuming a suspended virtual machine. | Datacenter, Virtual machine folder, Cluster, Host | Yes |
| Resource.AssignVMToPool | Assigns a virtual machine to a resource pool. | Datacenter, Cluster, Host | Yes |
| Network.Assign | Assigns a virtual machine to a network. | Datacenter, Network folder, Network | Yes |
Precautions (only for test environments)
-
Virtual test environments created with this option can only be used for testing, training, or evaluation purposes. Never restore or copy any data from your virtual test environments to the production Active Directory.
-
Ensure your virtual test environment is properly isolated from the source Active Directory forest. Otherwise, the source forest may be seriously damaged after you enable the network adapters in the newly-created virtual test environment.
To boot the VMware virtual machine with the Quest Recovery Environment image automatically
-
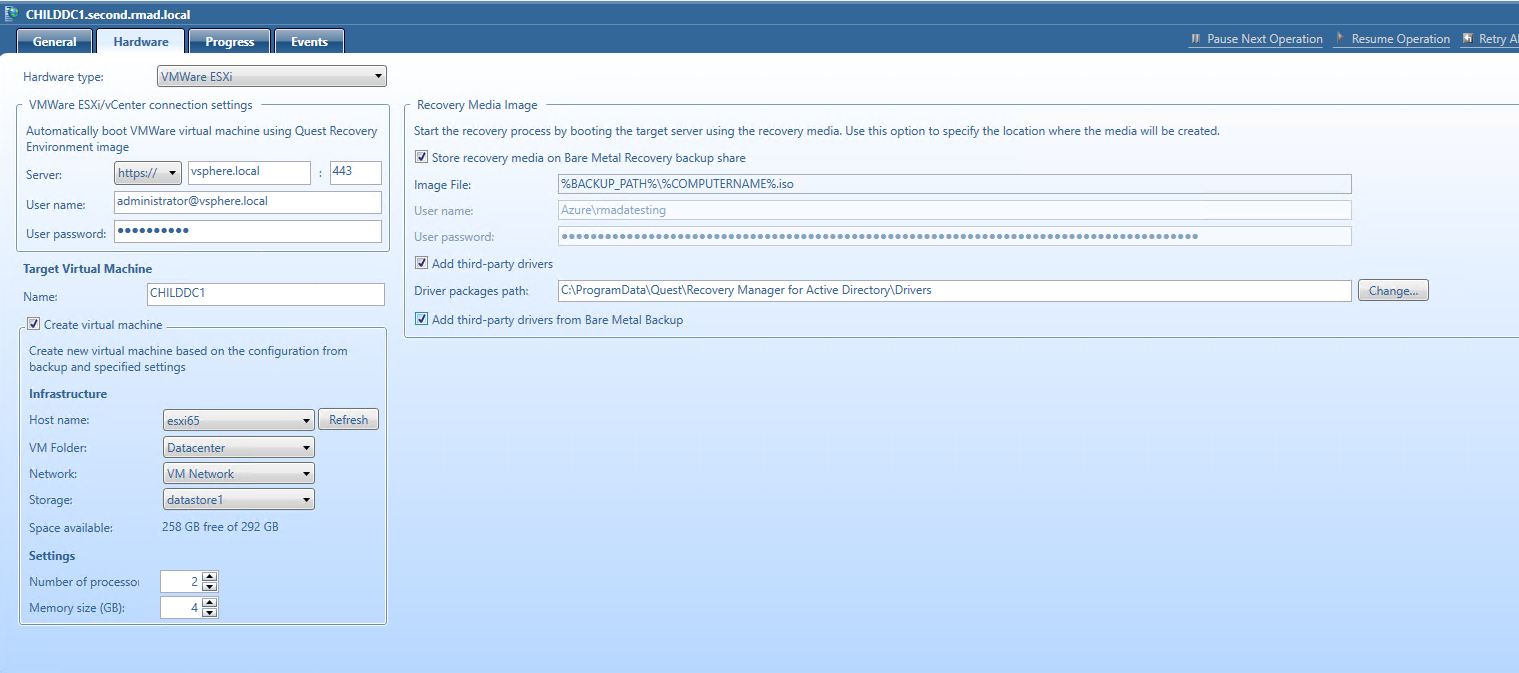
In Forest Recovery Console, open the Hardware tab.
-
Select VMware ESXi from the Hardware type drop-down list.
-
Specify the connection settings for the vSphere Web Client.
-
Specify the user name and password of the account that will be used to access vSphere Web Client.
-
Use the Name text box to type a name for the virtual machine on the target computer. The machine with this name will be used if Create virtual machine is unchecked, or will be created if the option is selected.
-
You can create a new virtual machine based on the configuration from backup and specified settings. For that, select the Create virtual machine option. The following settings can be specified:
-
Host name - Specify the ESXi host where you want to place the virtual machine. Multi-select can be used to select several DCs.
-
Refresh - Refreshes the information.
-
VM folder - Select the folder in which you want to place the target virtual machine. Nested folders are supported.
-
Network - Specify the virtual network.
-
Storage - Select the storage in which to place the virtual machine files.
-
Space available - Shows free space in the storage.
-
Number of processors - Specify the number of processors you want to have on the target virtual machine.
-
Memory size - Set the amount of random access memory you want to allocate to the target virtual machine.
-
-
Make sure that Recovery Media Image settings are properly specified in the Recovery Media Image section of the Hardware tab.
Microsoft Hyper-V
The process of booting the virtual machine with the Quest Recovery Environment image can be automated by Microsoft Hyper-V.
Supported versions
Hyper-V Server 2012 or higher
| NOTE |
Recovery Manager for Active Directory does not directly support System Center Virtual Machine Manager (SCVMM) for this feature but you can work with SCVMM-managed Hyper-V hosts. |
Precautions (only for test environments)
-
Virtual test environments created with this option can only be used for testing, training, or evaluation purposes. Never restore or copy any data from your virtual test environments to the production Active Directory.
-
Ensure your virtual test environment is properly isolated from the source Active Directory forest. Otherwise, the source forest may be seriously damaged after you enable the network adapters in the newly-created virtual test environment.
To boot the virtual machine with the Quest Recovery Environment image automatically
-
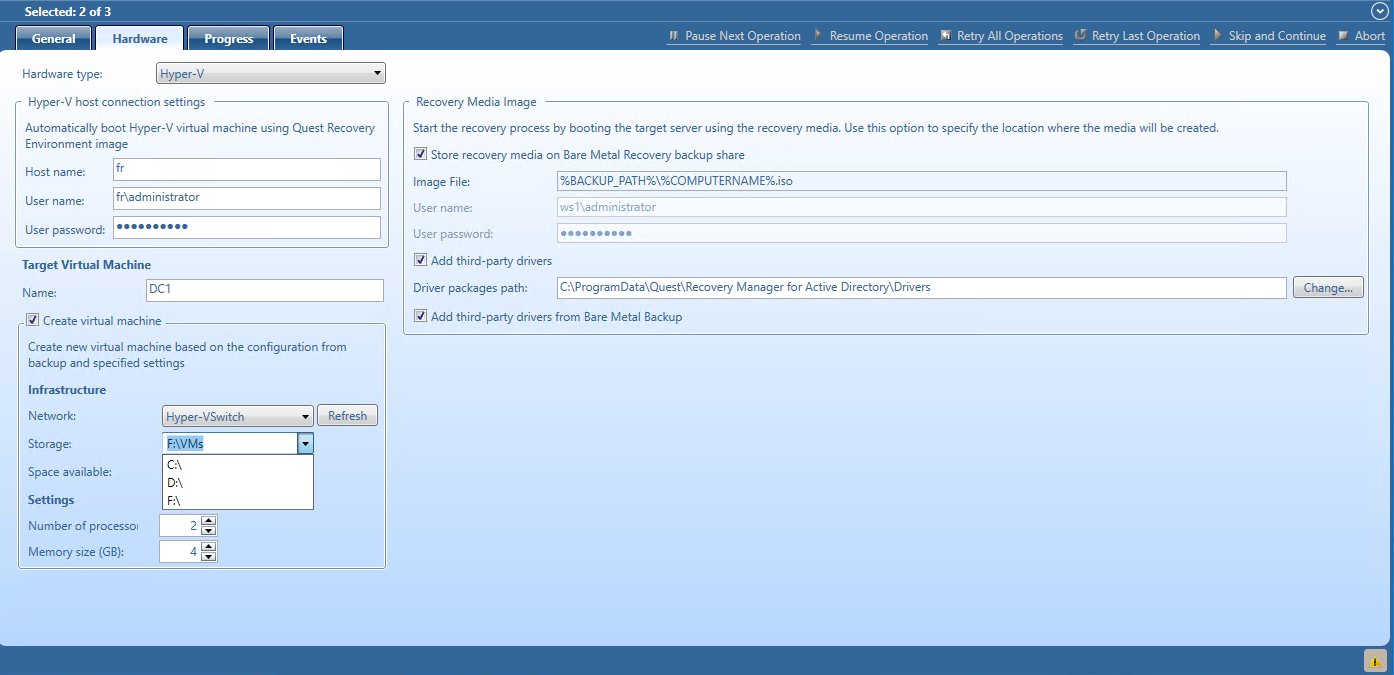
In Forest Recovery Console, open the Hardware tab.
-
Select Hyper-V from the Hardware type drop-down list.
-
Specify the connection settings for the Hyper-V host.
-
Specify the user name and password of the account that will be used to access the Hyper-V host. This account must have the following permissions:
-
Be a member of the local Administrators group on the target Hyper-V host
-
Be able to access admin$ share on the target Hyper-V host
-
Be a member of the Hyper-V Administrators group
Recovery Manager for Active Directory uses PowerShell Remoting to manage the HyperV server. The required permissions must be configured for users that are used to access the Hyper-V host, especially when the host is outside the domain where the Forest Recovery Console is running. For details, see https://docs.microsoft.com/en-us/windows-server/virtualization/hyper-v/manage/remotely-manage-hyper-v-hosts.
-
-
Use the Name text box to type a name for the virtual machine on the target computer. The machine with this name will be used if Create virtual machine is unchecked, or will be created if the option is selected.
-
You can create a new virtual machine based on the configuration from backup (generation of Hyper-V virtual machine, number of disks, disk sizes) and specified settings. For that, select the Create virtual machine option. The following settings can be specified:
-
Network - Specify the virtual network.
-
Storage - Select the storage in which to place the virtual machine files on the Hyper-V host.
-
Space available - Shows free space in the storage.
-
Number of processors - Specify the number of processors you want to have on the target virtual machine.
-
Memory size - Set the amount of random access memory you want to allocate to the target virtual machine.
-
-
Make sure that Recovery Media Image settings are properly specified in the Recovery Media Image section of the Hardware tab.