Chat now with support
Chat mit Support

Recovery Manager for AD Disaster Recovery Edition 10.1.1 - User Guide

Overview Getting started
Permissions required to use Recovery Manager for Active Directory Recovery Manager Console Getting and using help Configuring Windows Firewall Using Computer Collections Managing Recovery Manager for Active Directory configuration Licensing
Backing up data
Permissions required for the Backup operation Managing Backup Agent Using a least-privileged user account to back up data Using Managed Service Accounts Active Directory backups vs Windows System State backups Creating BMR and Active Directory backups Using the Backup Wizard Retrying backup creation Enabling backup encryption Backing up AD LDS (ADAM) Backing up cross-domain group membership Backing up distributed file system (DFS) data Backup scheduling Setting performance options Setting advanced backup options Using Forest Recovery Agent Unpacking backups Using e-mail notification Viewing backup creation results
Restoring data
Getting started with Active Directory recovery Managing deleted or recycled objects Restoring backed up Active Directory components Integration with Change Auditor for Active Directory Using granular online restore Restoring AD LDS (ADAM) Selectively restoring Active Directory object attributes Restoring objects in an application directory partition Restoring object quotas Restoring cross-domain group membership Performing a restore without having administrator privileges Reports about objects and operations Using complete offline restore Offline restore implications Restoring SYSVOL authoritatively Performing a granular restore of SYSVOL Recovering Group Policy Restoring data from third-party backups Using the Extract Wizard Restoring passwords and SID history
Full Replication Consolidating backup registration data Monitoring Recovery Manager for Active Directory Recovering an Active Directory forest
Forest recovery overview Deploying Recovery Manager for Active Directory Forest Edition (Disaster Recovery Edition) Permissions required to use Forest Recovery Console Forest Recovery Console Managing a recovery project Recovery methods Phased recovery Managing Forest Recovery Agent Rebooting domain controllers manually Resetting DSRM Administrator Password Purging Kerberos Tickets Managing the Global Catalog servers Managing FSMO roles Manage DNS Client Settings Configuring Windows Firewall Developing a custom forest recovery plan Backing up domain controllers Assigning a preferred DNS server during recovery Handling DNS servers during recovery Forest recovery approaches Deciding which backups to use Running custom scripts while recovering a forest Overview of steps to recover a forest Viewing forest recovery progress Viewing recovery plan Viewing a report about forest recovery or verify settings operation Handling failed domain controllers Adding a domain controller to a running recovery operation Selectively recovering domains in a forest Recovering SYSVOL Deleting domains during recovery Resuming an interrupted forest recovery Recovering read-only domain controllers (RODCs) Checking forest health Collecting diagnostic data for technical support
Restore Active Directory on Clean OS Bare metal forest recovery Using Management Shell Creating virtual test environments Using Recovery Manager for Active Directory web portal Appendices
Frequently asked questions Best practices for using Computer Collections Technical characteristics Best practices for creating backups Best practices for creating backups for forest recovery Best practices for recovering a forest Descriptions of recovery or verification steps Ports Used by Recovery Manager for Active Directory Forest Edition (Disaster Recovery Edition) Backup Wizard Online Restore Wizard Online Restore Wizard for AD LDS (ADAM) Group Policy Restore Wizard Repair Wizard Extract Wizard Events generated by Recovery Manager for Active Directory Descriptions of PowerShell commands
Add-RMADBackup Add-RMADCollectionItem Add-RMADFEComputer Add-RMADReplicationConsole Add-RMADStorageServer Backup-RMADCollection Close-RMADFEProject Compare-RMADObject Convert-RMADBackup ConvertTo-RMADRecycledObject Create-RMADStorageManagementAgentSetup Expand-RMADBackup Export-RMADBackup Export-RMADFERecoveryCertificate Export-RMADFEResult Get-RMADBackup Get-RMADBackupAgent Get-RMADBackupInfo Get-RMADBackupObject Get-RMADBackupSecurityStatus Get-RMADCollection Get-RMADCollectionItem Get-RMADDeletedObject Get-RMADFEComputer Get-RMADFEConsole Get-RMADFEDnsCache Get-RMADFEDomain Get-RMADFEEvent Get-RMADFEGlobalOptions Get-RMADFEOperation Get-RMADFEPersistenceConnection Get-RMADFEProject Get-RMADFERecoveryAgent Get-RMADFESchedule Get-RMADGlobalOptions Get-RMADLicenseInfo Get-RMADObject Get-RMADReplicationConsole Get-RMADReplicationSchedule Get-RMADReplicationSession Get-RMADReplicationSessionItem Get-RMADReportObject Get-RMADReportObjectAttributes Get-RMADReportObjectChildren Get-RMADReportSession Get-RMADSession Get-RMADSessionItem Get-RMADSessionItemEvent Get-RMADStorageServers Import-RMADBackup Import-RMADFERecoveryCertificate Install-RMADBackupAgent Install-RMADFERecoveryAgent New-RMADCollection New-RMADFEProject New-RMADFERecoveryMedia New-RMADSchedule Open-RMADFEProject Publish-RMADBackupSecurityStatus Remove-RMADBackup Remove-RMADBackupAgent Remove-RMADCollection Remove-RMADCollectionItem Remove-RMADFEComputer Remove-RMADFERecoveryAgent Remove-RMADFESchedule Remove-RMADReplicationConsole Remove-RMADReplicationSchedule Remove-RMADReplicationSession Remove-RMADStorageServer Remove-RMADUnpackedComponent Rename-RMADCollection Restore-RMADDeletedObject Restore-RMADDomainController Restore-RMADObject Resume-RMADFERecovery Save-RMADFEProject Set-RMADCollection Set-RMADFEComputer Set-RMADFEDnsCache Set-RMADFEDomain Set-RMADFEGlobalOptions Set-RMADFEPersistenceConnection Set-RMADFERecoveryMode Set-RMADFESchedule Set-RMADGlobalOptions Set-RMADReplicationConsole Set-RMADReplicationSchedule Start-RMADFERecovery Start-RMADFEVerification Start-RMADReplication Start-RMADReportViewer Stop-RMADFEWorkflow Update-RMADBackupAgent Update-RMADFEProject Update-RMADLicense

Methods for deploying Backup Agent

Recovery Manager for Active Directory employs a Backup Agent to back up data on remote domain controllers.

The Backup Agent must be deployed on each remote domain controller where you want to back up Active Directory data.

There are two methods to deploy the Backup Agent:

  • Have Recovery Manager for Active Directory automatically deploy the Backup Agent before starting a backup creation operation and automatically remove the Agent after the operation is complete.

  • Manually preinstall the Backup Agent on all target domain controllers where you want to back up Active Directory data.

The latter method allows you to:

  • Perform a backup operation without having domain administrator privileges. It is sufficient if Recovery Manager for Active Directory runs under a backup operator's credentials.

  • Reduce network traffic when backing up a Computer Collection.

  • Back up domain controllers in domains that have no trust relationships with the domain where Recovery Manager for Active Directory is running, solving the so-called “no trust” problem.

Note

To preinstall Backup Agent, you can either use the Backup Agent Setup Wizard or perform a silent installation. For more information, refer to the Quick Start Guide supplied with this release of Recovery Manager for Active Directory®.


Retain recent backups

If you create full backups on a daily basis as recommended earlier in this document, you should configure a backup retention policy to maintain the backups created in the last two weeks (14 last backups for each domain controller). This approach will provide you with a sufficient number of backups to recover from an Active Directory failure that remained undetected for some time. For information on how to configure a backup retention policy, refer to the User Guide supplied with this release of Recovery Manager for Active Directory.

In addition to the retained backups, you can also archive at least one domain controller backup on a weekly basis. This will allow you to retrieve Active Directory data (for instance, deleted objects) from a period past the recent backup history you retain. Make sure that these archived backups cover the entire tombstone lifetime period (180 days by default).

The best practice is to create BMR backups only once a week to minimize the required storage space.

For security reasons, keep at least one copy of each backup off-site in a properly controlled environment in order to protect it from possible attacks by malicious individuals via the network.


Where to store backups

For each Computer Collection, you can specify where to store the Collection’s backup files. You can store backups on the computer running Recovery Manager for Active Directory, the domain controller being backed up, or any available network share.

This section provides general recommendations where to store backups to be used in specific restore scenarios, such as granular online restore of directory objects, complete offline restore of Active Directory, or Active Directory forest recovery.

For more information on how to specify backup storage settings, see the User Guide supplied with this release of Recovery Manager for Active Directory.


Storing backups for granular online or complete offline restores

The following diagram shows the recommended method for storing the backups you plan to use for granular online restores of directory data or complete offline restores of Active Directory:

Resources/Images/2_DG.png

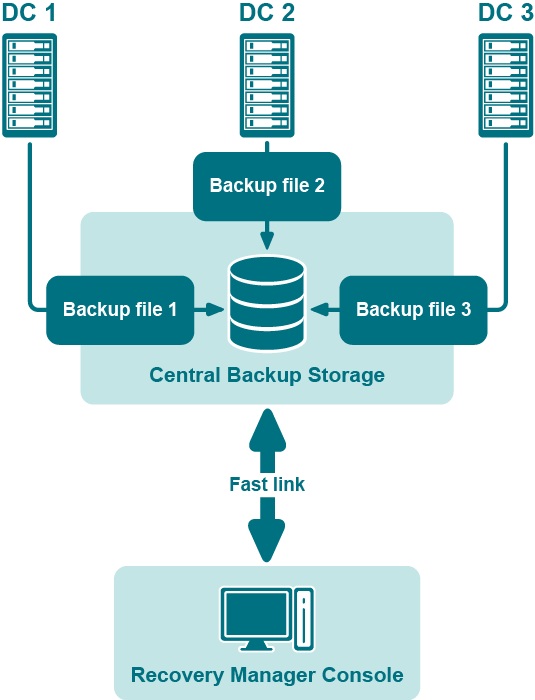
Figure: Backups for Granular Online or Complete Offline Restores

It is recommended that you store such backups in a central backup storage accessible to the Recovery Manager Console via a fast and reliable link. Such a link is required because during a restore operation backup files may be copied or unpacked from the central backup storage to the computer where you are using the Recovery Manager Console.


Verwandte Dokumente

The document was helpful.

Bewertung auswählen

I easily found the information I needed.

Bewertung auswählen