Chat now with support
Chat with Support

Unified Communications Analytics 8.6.1 - Deployment Guide

Prerequisites for your installation Installing UC Analytics Configuring UC Analytics Adding data sources for Active Directory or Azure Active Directory Adding data sources, chargeback costs, and thresholds for Exchange and Exchange Online
Permissions needed to collect Exchange on-premises or hybrid data Permissions needed to collect from native Exchange Online Creating an Exchange Configuration data source Creating an Exchange Tracking Logs data source Creating an Exchange Mailbox Contents data source Do I need both Exchange Tracking Logs and Exchange Mailbox Contents collections? Creating an Exchange IIS Logs data source Creating an Exchange Mailbox Content Summary data source Creating an Exchange Calendar data source Creating an Exchange Public Folders data source Adding Exchange Online hybrid data sources for hybrid Office 365 Adding Exchange Online data sources for native Office 365 Setting chargeback costs for Exchange Setting thresholds for Exchange metrics Omitting words when filtering by subject or body
Adding data sources, chargeback costs, and thresholds for Skype for Business/Lync Adding data sources, chargeback, and thresholds for Cisco Managing which insights can seen by users Configuring and managing subscriptions Making changes to your deployment Appendix A:Configuring Impersonation Appendix B:Configuring the Skype for Business or Lync Server Appendix C:Configuring IIS Log Files to capture ActiveSync or OWA events Appendix D:PowerShell cmdlets used by data sources Appendix E:Custom configurations and backup and recovery options Appendix F: Questions and answers about configuration

Viewing the collection job status

After the data collection start date, specified on the Data Collection page, the UC Analytics data collections begin to gather information. To view the progress of the collection jobs and to see if there are any errors during the collections, click View Data Collection Status at the top right of the Data Collections page.

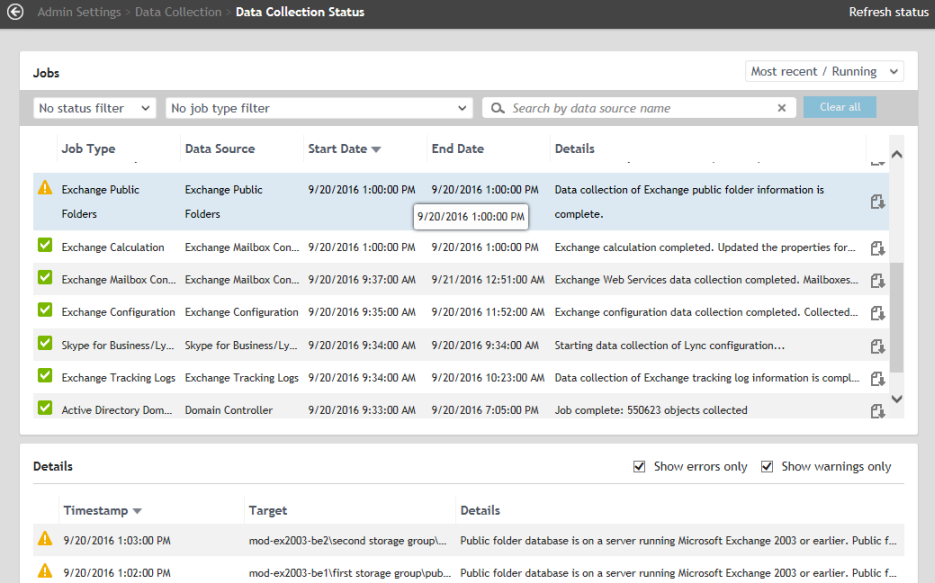
By default, UC Analytics only shows the status from the last job run for each data source (Most recent / running). If a collection job shows errors or warnings, you can view the details in the Details pane at the bottom. Use the Show errors only check box and the Show warnings only check box to select whether you want to only errors, only warnings, or both errors and warnings.

Using the filter options, you can filter for a specific data source or job status to determine if a data collection has been running correctly. You can also narrow the returned results by specifying a custom date range.

You can filter the job status results to view only jobs that succeeded, jobs that failed, jobs that are currently running, or jobs that completed with warnings. You can also filter for a specific data source (job type).

To search for a specific data source, enter part or all of the data source name in the search field.

For information about how often data collections gather data, see How often do collections update the data? .

The UC Analytics keeps 30 days of job status records by default but the job status page can only display 15,000 records. If there are more than 15,000 records in the database, you can filter the results by date range.

By default, the job status page shows the most recent result for each data source collection.

1
Click the beside Most recent only in the date range field

Today

Yesterday

Last 7 days

Last 14 days

Custom

3
If you select Custom, specify the start date and the end date for the time period:

You can download a file that contains the collection job details by clicking the icon at the end of the status row. The download option allows you to save the .log text file to a specific location. This feature is useful for troubleshooting a specific data collection job.

If you want to copy the contents of the job details, double-click on the row that contains the details you want. The Details Copy option displays and you can copy the details and paste the text into a separate document.

Forcing a data source collection to run now

After you have created and scheduled your data source collections, you may want to have a collection run immediately. For example, you might have added new targets for a data source collection and want get updated data before the next scheduled collection.

If you use the Run now option for a data source that only takes a once-a-day “snapshot” of the data, no new data is collected unless you have added a new target. For information about how often data collections gather new data, see How often do collections update the data? .

Renaming a data source

You can create more than one data collection for the same data source. By adding multiple data source collections, you can distribute the load of collecting resource-intensive data.

For example, you can collect mailbox permissions and Active Directory extended permissions through the Exchange configuration data source. Collecting the permissions data can be very time-consuming. You can add and configure multiple Exchange configuration data sources to collect different subsets of the target mailboxes to collect this information.

Once you have added more than one Exchange configuration data source, you can rename each data source to more clearly identify what data is collected from each data source.

2
Select Rename.

Identifying your internal domains

Using the Classifications page, you identify the domains which are internal to your organization. You identify your internal domains to allow insights to show internal and external email traffic, Skype for Business/Lync sessions, and other related information correctly.

2
Click Classifications and click Domain Classifications.
3
Click Add domain for the Internal Domains.

You can modify or add domains at any time. After you have made changes, the existing data in the insights is reclassified (internal and external) immediately.

Some messages may not come directly from a domain so remember to add subdomains or to specify * in the domain name.

For example, you could add both DomainA.com and *.DomainA.com to the Domain Classifications list to include DomainA.com and all of its sub-domains. If you entered *DomainA.com, you would get the domain and the subdomains but you would also get “AnotherDomainA.com” as well.

Entries in the Custom Domain Classifications list are not case-sensitive so it doesn’t matter if you enter the domain names as capital letters or lower case letters.

You can also add your own custom classifications. Since there will not be a default insight for your new classification, you can create a new insight and use the filters to select the new classification.

Related Documents

The document was helpful.

Select Rating

I easily found the information I needed.

Select Rating