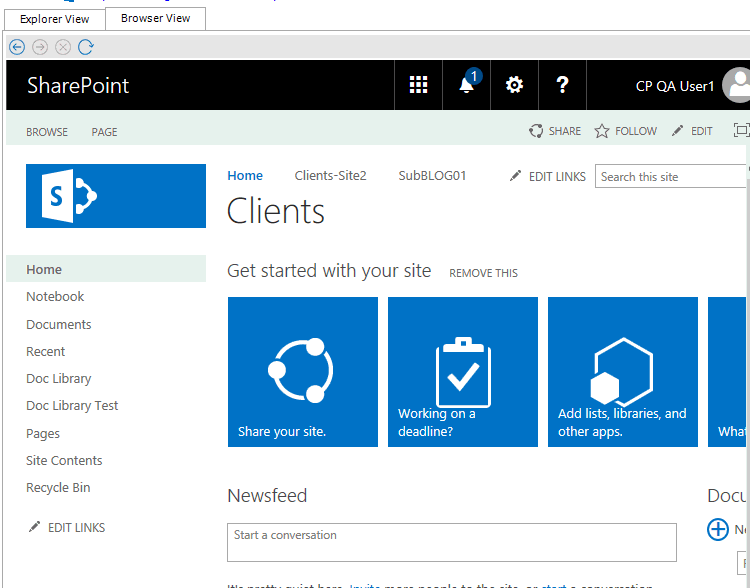
Browser View Tab
|
Navigation: Content Matrix Console End User Interface > Explorer Control View Tabs > Browser View Tab |
The Browser View displays a view of the content as it would be seen in a web browser for a selected node. It is also available if selecting a single item in the Items View. When selected, this tab will display a fully functioning web browser view of the selected content. You can use this Browser View to navigate or work with their content, the same way they would through a normal web browser window.
NOTE: If an item/document is selected in the Items View, the entire SharePoint list/document library or folder will be displayed in the Browser View tab rather than the selected item/document.
Jobs List
|
Navigation: Content Matrix Console End User Interface > Job List |
Jobs in Metalogix Content Matrix Console can be managed from the Job List. Jobs are listed for migration actions that have already been run, as well as for actions that have been saved. 
Using Multi-Select
|
Navigation: Content Matrix Console End User Interface > Using Multi-Select |
Multi-select can be used to select a number of nodes on the source side Explorer View tree, and migrate those nodes to a target SharePoint instance. Multiple SharePoint connections can be selected at one time, but only to Disconnect or Refresh those connections. If connected to a SharePoint farm or web application, only a single site collection can be selected at a time, however, multi-select can be used on any sub-sites under a single site collection.
This feature also works for migrating a single list or site into multiple target locations at the same time; for example, if you have a document library that you want to migrate into two or more target SharePoint sites. After the library is copied, any number of desired target sites can be selected, as long as they are all under the same target connection node, and when pasted the list will be migrated to all of the selected target site nodes. The basic cases for multi-select are copying: multiple to one, one to multiple, and multiple to multiple.
In addition to using check boxes to multi-select, you can use <Shift> and the <Ctrl> keys in the conventional way.
Limitations of Multi-Select
There are a few limitations when using multi-select. These limitations are:
·Only one node type can be selected at a time - This means that if a SharePoint site node is selected, then only other site nodes can be selected, and included in the action.
While the content under those nodes will be migrated (as per the selected options), only other site nodes themselves can be selected. This is the same for SharePoint lists/libraries, and folders. When connected to a SharePoint server only a single site collection can be selected at one time, but multiple sites under the site collection level can be selected.
The first node selected in the multi-select will determine what type of node can be included, and if an invalid selection is made, then the node that you tried to select will only blink. For example, if a list is selected, then only other lists, within the site collection, can be selected. If you try to select a SharePoint folder or site, then this is an invalid selection, and the folder or site will blink.
·Column Mapping - Column mapping is not available in some cases when using multi-select. If multiple lists are selected (on the source or target) then the Column Mapping feature will not be available. Some basic examples are: pasting lists (on the source) as folders (on the target), or if pasting list Items into multiple lists on the target.
·Available Context (Right-Click) Menu Options - When using multi-select the options that are available in the context (right-click) menu can change depending on where the multi selection is taking place.
When copying multiple nodes from the source side, only a few context menu options are available. These options are: Copy [Object], Check Links, Delete [Object], Refresh Nodes. Additionally, when multiple source items are selected in the Explorer View, only the Paste [Object] option is available on the target, and not the Paste Special > Paste [Specific Object] option.
If only one source item is selected and pasted to multiple locations, a few more of the Paste context menu options become available. While most of the Paste Special options become available there are still a few of these that are not. When pasting a single node to multiple locations the following options are available: Paste [Object], Paste Special, Check Links, Delete [Object], and Refresh Nodes. The options that are not available for multi-select are under the Paste Special action, and these are: Paste alerts, Paste master page gallery, Paste site navigation, and Paste users. All the remaining context menu options should be available.
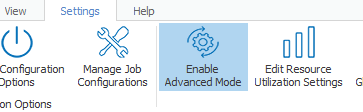
Enabling Advanced Mode
Some options in Metalogix Content Matrix are considered "advanced" and are disabled by default. Options that require Advanced Mode are identified throughout this documentation.
To enable Advanced Mode:
In Metalogix Content Matrix Console ribbon toolbar, choose Settings > Enable Advanced Mode.
NOTE: When the button is highlighted, Advanced Mode is enabled, and additional options become available for nodes/items selected in Explorer and Item View tabs. Transformation Options become available as well.