|
Navigation: Configuring Content Matrix for Distributed Migration > Configuring Agents for Distributed Migration |
Configuring an Agent for Distributed Migration consists of the following high-level tasks:
I.Install the latest version of Content Matrix then create and/or connect to the Distributed Database.
II.Copy the Agent Service installation files to the agent machine and install from a Command Prompt.
III.For the first agent, generate a unique security certificate for the Metalogix Agent Service.
NOTE: Once created on the first agent, the name of the certificate is stored in the Distributed Database and then it can be copied to other agents. (The same certificate needs to be used across all agents.)
IV.Install the Metalogix Agent Service, which
·installs the certificate to My User Account storage
·saves the certificate name to the Distributed Database
V.Start the Metalogix Agent Service.
Permission Requirements
The account used to configure agents for Distributed Migration must:
·be an Administrator
AND
·have permissions to Log on as a Service (via Administrative Tools > Local Security Policy > User Rights Assignment).
To install the latest version of Content Matrix then connect to the Distributed Database:
1.Log into the machine using an account that meets Permissions Requirements.
2.Download or copy the latest version of the Content Matrix installation kit to the machine.
3.Install the Content Matrix Console and the Metalogix Extension Web Service (MEWs). (See the Metalogix Content Matrix Advanced Installation Guide for details.)
4.Open the Console and create/connect to the Distributed Database as follows:
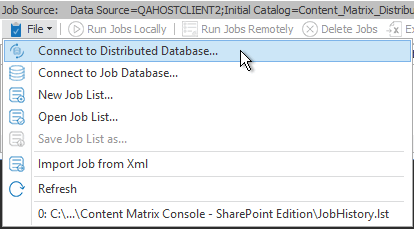
a)From the Job List, choose File > Connect to Distributed Database.
b)Select the SQL Server and SQL Database you want to connect to.
NOTE: Remember to use the same Distributed Database for all agents in the "cluster."
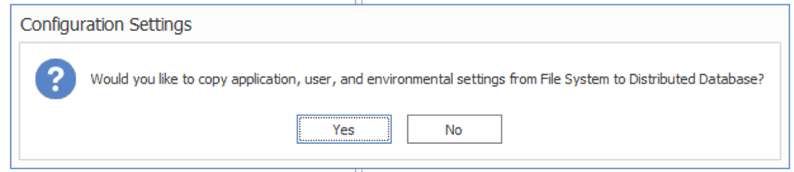
Whenever a machine connects to the Distributed Database, a pop-up will display with the option of copying User Mappings and other local machine settings to the database.
CAUTION: If you are configuring multiple agents, remember that if you click [Yes], any User Mappings and settings that already exist in the Distributed Database will be overwritten.
5.Close the Content Matrix Console.
To run the Agent Service application on the agent machine:
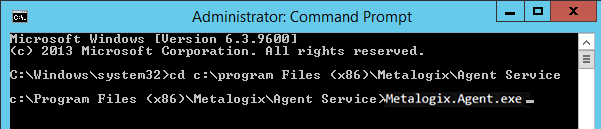
1.Copy the ContentMatrixAgentService_[version].zip file from the Content Matrix download folder and extract the files (a recommended location is C:\Program Files (x86)\Metalogix\Agent Service).
2.Either:
·navigate to the Agent Services folder and double-click Metalogix.Agent.exe
OR
·open a Command Prompt and change the directory to point to Metalogix.Agent.exe.
You will be provided with the following options:
·Generate a Security Certificate for the Metalogix Agent Service
·Install the Metalogix Agent Service
·Uninstall the Metalogix Agent Service
For each option, you will be prompted to provide the required information. If a default value is provided, you can either press <Enter> to accept the default or manually override it.
NOTE: Alternatively, you can configure agents by entering arguments manually.
To generate a self-signed certificate for agents:
NOTE: Create the certificate for the first agent only, then copy that certificate to additional agent machines. Make sure that the folder into which you are generating the certificate already exists.
Select the option Generate a Security Certificate for the Metalogix Agent Service.
You will be prompted to provide:
·the certificate name
·the certificate password
·the path to the location to which the certificate will be generated
NOTES:
·When generating a certificate, there is no need to enter the file extension as it will be ignored.
·It is necessary to use double quotation marks (" ") to enclose:
§a password that contains special characters
§a file path that contains spaces
To install the Metalogix Agent Service:
NOTE: If you have already created a self-signed certificate on the first agent, make sure it is copied to the other agent(s) before performing this procedure .
Select the option Install the Metalogix Agent Service.
You will be prompted for:
·the Administrator account (in the format domain\username).
·the Administrator account password
·the path to the location of the certificate
·the certificate password
NOTE: It is necessary to use double quotation marks (" ") to enclose:
·a password that contains special characters
·a file path that contains spaces.
To Start the Metalogix Agent Service:
1.Navigate to Administrative Tools > Services > Metalogix Agent Service.
2.Right-click and choose Start.
|
Navigation: Configuring Content Matrix for Distributed Migration > Configuring Agents for Distributed Migration > Configuring Agents by Entering Arguments Manually |
As an alternative to using the Command Prompt interface to configure the Agent Service, you can enter arguments manually from a Command Prompt.
To copy the Agent Service installation files to the agent machine:
1.Copy the ContentMatrixAgentService_[version].zip file from the Content Matrix download folder and extract the files (the recommended location is C:\Program Files (x86)\Metalogix\Agent Service).
2.Open a Command Prompt using the Run as Administrator option.
3.Change the directory to point to the location containing the Agent Service files.
To generate a self-signed certificate for agents manually:
NOTE: Create the certificate for the first agent only, then copy that certificate to additional agent machines. Make sure that the folder into which you are generating the certificate already exists.
At the command prompt, use following command to generate a certificate:
Metalogix.Agent.exe --generateCertificate <certificateName> --certificatePassword <certificatePassword> --path <certificatePath>
EXAMPLE:
Metalogix.Agent.exe --generateCertificate ContentMatrixAgentCertificate --certificatePassword certPass --path "C:\Content Matrix Certificates"
NOTES:
·When generating a certificate, there is no need to enter the file extension as it will be ignored.
·It is necessary to use double quotation marks (" ") to enclose:
§a password that contains special characters
§a file path that contains spaces (as shown in the example above).
To install the Metalogix Agent Service manually:
NOTE: If you have already created a self-signed certificate on the first agent, make sure it is copied to the other agent(s) before performing this procedure .
At the command prompt, use following command:
Metalogix.Agent.exe -i --user <domain\username> --password <password> --certificatePath <certificatePath>\<certificateName.FileExtension> --certificatePassword <certificatePassword>
EXAMPLE:
Metalogix.Agent.exe -i --user metalogix\Administrator --password userPass# --CertificatePath "C:\Content Matrix Certificates\ContentMatrixAgentCertificate.pfx" --certificatePassword certPass
NOTE: It is necessary to use double quotation marks (" ") to enclose:
·a password that contains special characters
·a file path that contains spaces (as shown in the example above).
To Start the Metalogix Agent Service:
1.Navigate to Administrative Tools > Services > Metalogix Agent Service.
2.Right-click and choose Start.
|
Navigation: Configuring Content Matrix for Distributed Migration > Managing Agents |
From any agent machine, you view, refresh and disable/enable agents.
NOTE: All agents connecting to the same Distributed Database must have the same version of Content Matrix installed.
To open the Manage Agents dialog:
From the Metalogix Content Matrix Console ribbon, choose Connection > Manage Agents.
NOTE: If the machine is not connected to a configured Distributed Database, Manage options will be disabled.
The Manage Agents dialog presents a toolbar with the following options:
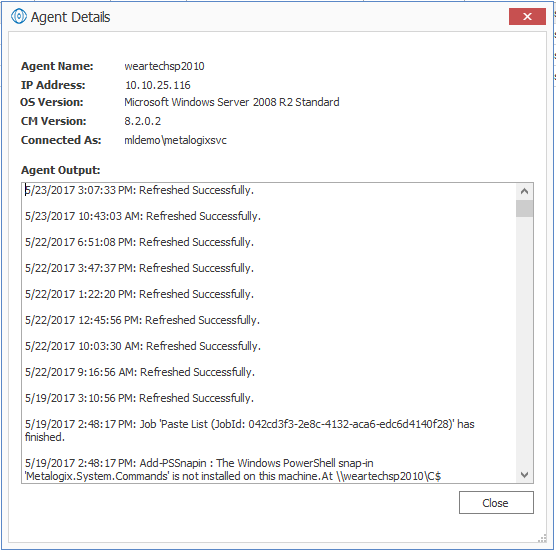
·View Agent - Displays more information about a selected agent such as log history, and other pertinent information.
·Refresh - Displays the most recent status of a selected agent.
·Enable/Disable Agent - Allows/prevents the agent from pulling migration jobs from the Distributed Database.
NOTE: If you want to uninstall the agent completely, use the procedure for Uninstalling a Distributed Migration Agent.
·Agent Support Zip - Generates a zip file containing logs that can be sent to Quest Support for troubleshooting.
|
Navigation: Configuring Content Matrix for Distributed Migration > Generating an Agent Support Zip File |
From the Manage Agents dialog, you can generate a zip file to send to Quest Support for troubleshooting purposes.
The contents of the zip file will vary, depending on which agent is selected in the grid.
|
If the agent selected in the grid is ... |
Then ... |
|---|---|
|
the local machine |
the zip file will contain two files: ·Distributed Database logs for the agent (AgentServiceDBLogs.txt) AND ·event log entries for the local agent (AgentServiceEventLogs.txt). |
|
a remote machine |
the zip file will contain the Distributed Database logs file for the agent (AgentServiceDBLogs.txt) only. If you want to provide event logs for a remote agent, you will need to log onto that machine and generate a Support zip file from there. |
To generate an Agent Support zip file:
1.Make sure the appropriate agent is selected in the grid.
2.From the Manage Agents toolbar, select Agent Support Zip and save the zip file to the desired location.
Send any zip files you generate to Quest Support.