Click the Cluster Health Check link at the top of the tab, to display the Cluster Health Check view.Figure 7. Cluster Health Check view
To search for a particular cluster, type the cluster name on the Search box at the top right corner of the view, then press Enter.Figure 8. Server Status view
Table 4. Server Status view - information To search for a particular server, type the server name on the Search Server box at the top right corner of the view, then press Enter.
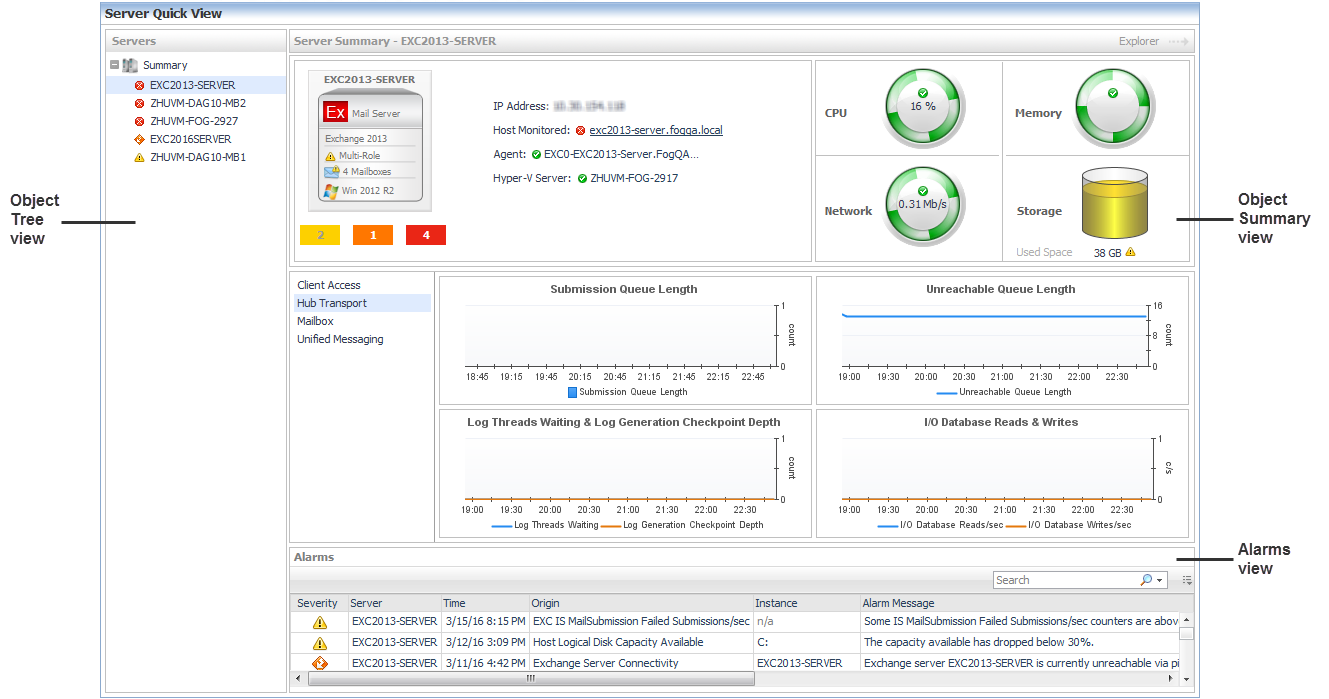
Figure 9. Exchange Environment OverviewFigure 10. Server Quick ViewIn addition, at the top right of the Object Summary view there is an Explorer link. This enables you to quickly navigate to the Exchange Explorer dashboard for more detailed metrics about the selected object or group of objects.
Table 5. Object Summary view information
• Deploy Agent Package: Deploy the Exchange agent package, create Exchange agent instances on one or more servers at a time, activate or deactivate Exchange agents, and start and stop collecting data.
• Rule Management: View and manage rules that exist in your environment. For more information, see Foglight for Exchange rules.
• Diagnostic Tests: View a list of diagnostic tests that are available, as well as run a test immediately or define a schedule for when a test is to be run. For more information, see Running diagnostic tests.
• Metrics Management: View, edit, and enable/ disable the optional metric collections that are configurable for Exchange agents. For more information, see Managing Exchange metrics.
• Script for configuring the Exchange settings: Download and run a script that automatically configures the Exchange servers.
Figure 11. Exchange Environment > Administration tab
Figure 12. Exchange Environment > Reports tab
•
•
•
1 Start the Create a Report wizard.
2
• Scheduled Report Name: Type a valid name for the report.
• Report Templates: Select the template on which you want to base your report. The Report Inputs section is populated with the template’s report parameters. Use the default parameters to quickly create a report, or optionally change the report parameters to customize the report to better meet your requirements. For more details about Exchange template reports, see Foglight for Exchange reports.
3
• Schedule: Select the report schedule from the list of available options.
• Retained Results: Type the number of results retained for the report.
• Enabled: Select the check box if you want to enable the report. Clear the check box if you want to disable the report.
• Report Format: Select the report format from the list of available options.
• Email Recipients: Type the email addresses of the recipients to be notified when the report is generated.
1 Start the Copy Existing Report wizard.
2
3
• Scheduled Report Name: Type a valid name for the new report.
• Report Templates: The report template can not be modified, only the report parameters in the Report Inputs section at the bottom of the page.
• Schedule: Select the report schedule from the list of available options.
• Retained Results: Type the number of results retained for the report.
• Enabled: Select the check box if you want to enable the report. Clear the check box if you want to disable the report.
• Report Format: Select the report format from the list of available options.
• Email Recipients: Type the email addresses of the recipients to be notified when the report is generated.
1 Start the Edit Existing Report wizard.
2
3
• Scheduled Report Name: Change the report name, as necessary.
• Report Templates: The report template and its parameters can not be modified.
• Schedule: Select the report schedule from the list of available options.
• Retained Results: Type the number of results retained for the report.
• Enabled: Select the check box if you want to enable the report. Clear the check box if you want to disable the report.
• Report Format: Select the report format from the list of available options.
• Email Recipients: Type the email addresses of the recipients to be notified when the report is generated.
Table 6. Reports view - information To delete one or several reports from the list, select the report(s) and click the Delete button at the top left corner of the view.To search for a particular report, type the report name on the Search box at the top right corner of the view, then click Enter.