Configure TLS 1.2 (Transport Layer Security)
In line with industry security recommendations the erwin CW products now support Transport Layer Security version 1.2. This security layer is a low level network encryption protocol which can optionally be used between applications and MS SQL Server. Many large organizations have been disabling TLS1.0 and TLS1.1 in favor of the newer TLS1.2, as it has certain improvements that make it less susceptable to security vulnerabilities.
In order to configure erwin EA/BP for TLS1.2 there are some steps required that go beyond a simple install. This document will guide you through these steps.
1. Run the following Microsoft Installer “sqlncli.msi” which can be obtained from here
https://www.microsoft.com/en-us/download/details.aspx?id=50402
for either x64 (64bit) or x86 (32bit) - as is approriate to your environment.
2. Set the following Entries in the registry. These can be copied into a file that is given the extension .reg and then run in windows, or downloaded with your erwin software.
Most of the entries are to disable TLS 1.0 and TLS1.1, then enable TLS1.2. The final entry is to configure erwin EA/BP to use the correct SQL Server client.
Windows Registry Editor Version 5.00
[HKEY_LOCAL_MACHINE\SYSTEM\CurrentControlSet\Control\SecurityProviders\SCHANNEL\Protocols]
[HKEY_LOCAL_MACHINE\SYSTEM\CurrentControlSet\Control\SecurityProviders\SCHANNEL\Protocols\SSL 2.0]
[HKEY_LOCAL_MACHINE\SYSTEM\CurrentControlSet\Control\SecurityProviders\SCHANNEL\Protocols\SSL 2.0\Client]
"DisabledByDefault"=dword:00000001
[HKEY_LOCAL_MACHINE\SYSTEM\CurrentControlSet\Control\SecurityProviders\SCHANNEL\Protocols\TLS 1.0]
[HKEY_LOCAL_MACHINE\SYSTEM\CurrentControlSet\Control\SecurityProviders\SCHANNEL\Protocols\TLS 1.0\Server]
"Enabled"=dword:00000000
[HKEY_LOCAL_MACHINE\SYSTEM\CurrentControlSet\Control\SecurityProviders\SCHANNEL\Protocols\TLS 1.1]
[HKEY_LOCAL_MACHINE\SYSTEM\CurrentControlSet\Control\SecurityProviders\SCHANNEL\Protocols\TLS 1.1\Client]
"DisabledByDefault"=dword:00000000
[HKEY_LOCAL_MACHINE\SYSTEM\CurrentControlSet\Control\SecurityProviders\SCHANNEL\Protocols\TLS 1.1\Server]
"DisabledByDefault"=dword:00000000
[HKEY_LOCAL_MACHINE\SYSTEM\CurrentControlSet\Control\SecurityProviders\SCHANNEL\Protocols\TLS 1.2]
[HKEY_LOCAL_MACHINE\SYSTEM\CurrentControlSet\Control\SecurityProviders\SCHANNEL\Protocols\TLS 1.2\Client]
"DisabledByDefault"=dword:00000000
"Enabled"=dword:00000001
[HKEY_LOCAL_MACHINE\SYSTEM\CurrentControlSet\Control\SecurityProviders\SCHANNEL\Protocols\TLS 1.2\Server]
"DisabledByDefault"=dword:00000000
"Enabled"=dword:00000001
[HKEY_LOCAL_MACHINE\SOFTWARE\Wow6432Node\Casewise\CorporateModeler\11\Tuning]
"UseSQLServerNativeClient"="true"
|
|
After changing the registry settings, it may be necessary to reboot your machine. |
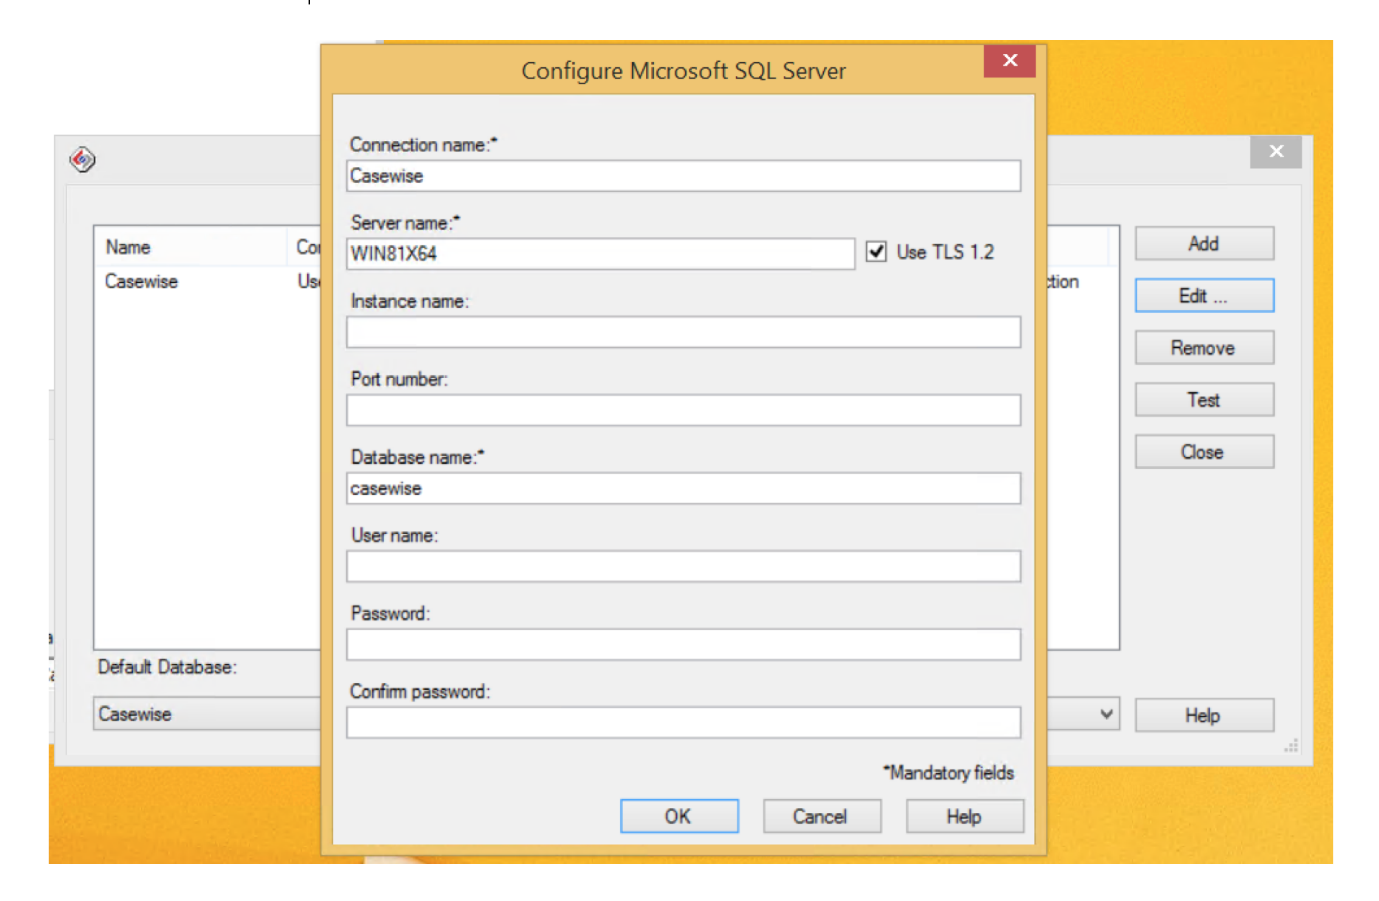
3. Once this has completed, start "erwin EA/BP Modeler" and when the logon dialog appears click the “Edit” button.
This will display all the available connections.
4. Click on the connection you want to use and "Edit" it.
5. Next to the server name there will be a check box to enable the use of TLS1.2.
Check this box and press "OK" to close the dialogs.
6. Having made these changes the erwin EA/BP applications should run as normal.
Troubleshooting:
On some operating systems this additional msi file may also be required to get the application to run successfully
Run the following Microsoft Installer “msoledbsql_18.1.0.0_x64.msi” which can be obtained from here
https://www.microsoft.com/en-us/download/details.aspx?id=56730
Evolve REST API (2018.1.0.79 and above)
The Evolve REST API was added to provide backwards compatibility support for the discontinued Web Portal SOAP API.
Where it differs slightly is in the method of calling the API. This has been modified to use the more standard RESTful http approach, using
POST, GET, PUT and DELETE protocols.
All of the calls return a json response, but can optionally return XML. The XML returned is equivalent to the older Portal API, and so should
ensure it is relatively simple to integrate, in-place of the older service.
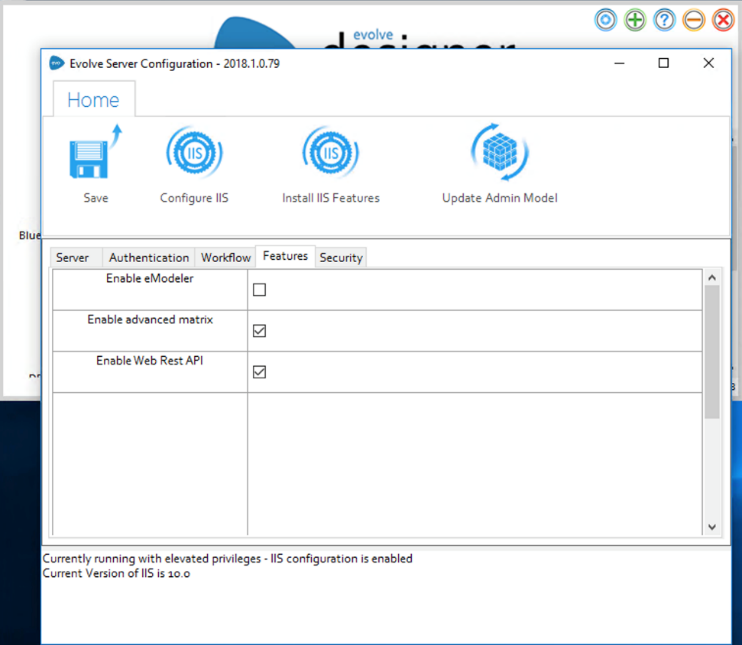
To configure the API, it is first necessary to enable it from within Evolve:
1. Having configured and ensured the Evolve server is functioning.
Start Evolve Designer with Administrator Permissions.
2. Goto your Evolve server settings
3. Check the box 'Enable Web REST API"
4. Save the configuration
5. Press "Configure IIS"
The default endpoint for the API will be:
http://<your-server>/WebRESTAPI/api/<path to endpoint>
To use the REST API, please see the documentation, located here.
|
|
When using the API, always remember to use the /auth endpoint to authenticate first, and remember to include the returned token |
Site Administration
Evolve Dynamic offers a number of built-in pages for administering your site via the web front-end.
You can create new menu items which directly link to these pages, and using Roles you can restrict access to them to prevent them being seen by normal users.
|
|
Administration pages are only available on Evolve Dynamic. |
The table below details each type of page and how to create the menu link to it:
|
Name |
Description |
Menu |
|
cw_appstore |
This is the default page picker page. |
Add Index Page Link > Standard Pages > |
|
index_cw_user_usage |
Shows users of your Site arranged by type. |
Add Index Page Link > Standard Pages > |
|
index_gov_roles |
Used for managing Roles. |
Add Index Page Link > Standard Pages > |
|
index_gov_users |
Shows all the users of your Site. |
Add Index Page Link > Standard Pages > |
|
index_governanance |
Used for managing which roles can see which pages. |
Add Index Page Link > Standard Pages > |
|
index_questionnaires |
Lists existing questionnaires and allows you to edit them. |
Add Index Page Link > Standard Pages > |
|
cw_questionnaire |
This page is the only way you can create a new questionnaire. |
Add Create Page Link > Standard Pages > |
See here for help on Creating and Editing a Menu.