Server Configuration
The instructions below explain how to configure your Evolve Server so that you can publish your sites on it.
|
|
This step must be performed after you have installed Evolve on the server machine, but before you attempt to publish any sites. |
To configure your Evolve server:
1. Run Evolve Designer.
2. On the Evolve Designer Models launcher dialog, click the Server Configuration button.
The Server Configuration dialog opens.
3. Configure the settings according to the table below:
Server
|
Setting |
Description |
|
Evolve IIS Site Name |
Specify the name of your IIS Site as it appears in the URL, such as http://<server-name>/<evolve-IIS-site-name>/ We recommend you leave the IIS Site Name. If you do change it, it must be lower case with no spaces, and you must make sure that the MVC Folder still points to Casewise/Evolve/Site - or wherever your Evolve is installed. |
|
Evolve Site Folder |
Specify the path to your Evolve Site directory. You can usually leave this as the default, unless you have installed to a different directory. |
|
Evolve Data Folder |
Specify the path to your Evolve Data directory where your local resources will be stored. You can usually leave this as the default, unless you have installed to a different directory. |
|
Server Language |
Choose the language of the top-level Evolve Site, including the Model Selector page, as well as the login screen. |
|
Server Theme |
Choose the theme of the top-level Evolve Site, including the Model Selector page, as well as the login screen. |
|
IIS Application Path |
Specify the path to your IIS application. You can usually leave this as the default. |
|
CW Database |
Select the CW repository your Evolve deployment will use. |
|
Evolve CM User Name |
Enter the Username of a CW Suite User with System Manager rights that can be used to log on to the CW repository so the Evolve Site can access the Model data. You could create a new user dedicated to Evolve use for this purpose. |
|
Evolve CM User Password |
Enter the password for the above user. Ensure you Encrypt the password after entering it. |
|
Javascript Mode |
This is an advanced setting which can only be changed in developer debug mode. |
|
IIS User Name |
Specify the name of a local user on the web server machine which has Administrator rights on the machine. This user is required for the Application Pool to run. NOTE: To prevent unwanted errors, the IIS user must be different from the remote desktop user. |
|
IIS User's Password |
Enter the password for the above user. Ensure you Encrypt the password after entering it. |
Authentication
|
Authentication Mode |
Choose how you want Users to be logged on to Evolve: Use CorporateModelerAuthentication to only allow existing CW Users to sign in Use ActiveDirectoryAuthentication to enable Active Directory authentication Use SAML2 to enable a SAML2 authentication. Follow this guide to complete the configuration of SAML2 For a basic site to start with, we recommend you use CorporateModelerAuthentication. |
|
Enable Automatic Logon |
If you choose ActiveDirectoryAuthentication, select Enable Windows Authentication to ensure Evolve users are automatically logged in to Evolve when they access the Site. |
|
Domain Short Name |
If CW Suite is set to use login via 'any valid Windows user and domain' (option 3), use this setting to enter the short name of your domain. This is referenced before '\\', when used as shortdomainname\\username. If you do not use login option 3, leave this setting blank. |
|
Use SSL Connection (Active Directory) |
Tick this box if you need to connect to Active Directory using LDAPS. Note the settings required in the AD Connection Path and AD Port, should match this request. |
|
AD Connection Path |
If you choose ActiveDirectoryAuthentication, use this setting to specify the path Evolve can use to connect to your Active Directory server. To do this: Right-click onto the server/computer and go into Properties. The domain name should be visible at the bottom. For example, if your domain is 'MyDomain.local' the connection path would be: LDAP://mydomain.local/DC=mydomain,DC=local Note: for every parameter in the domain, you need to add a “DC=” Also, for SSL Active Directory, unsure the path begins: |
|
AD Port |
If you require a specific port for your Active Directory server, enter it here. You can usually leave this as the default. Unless you are using a SSL, in which case the default port is: 636 |
|
AD Group Membership Selection Mode |
Leave as the default unless you have special Active Directory requirements. Use GetAllGroupsForUser if your Active Directory has multiple domains and nested groups. The method causes Evolve to fetch the user and then try to fetch all the groups where this user belongs to. Use GetGroupMembers (default) if your Active Directory operates on a single domain. Supports nested groups. Use GetGroupDirectoryServices if your Active Directory has multiple domains and nested groups, as in option 1 (GetAllGroupsForUser), but you want to use LDAP-oriented protocol codes. |
|
AD Connection Username |
This field is used to specify the property type on Active Directory used for the connection. This is an advanced setting that should only be used by someone who is an expert in Active Directory. |
|
Connect to Active Directory Forest |
This option is selected to browse and find users across the entire Active Directory Forest. If left unchecked, browsing is limited to the defined LDAP:// path, and will not extend to all Forest domains. |
|
Domain Exclusion List |
Connections will not be attempted for any domains in this list. |
Workflow
|
Enable Workflow |
Select the check box to enable Workflow on your Evolve server. |
|
Workflow Due Date Interval |
Set the number of days you want to allow for task completion. Evolve uses this interval to highlight tasks that are due for completion today, or alert you to ones that are overdue. |
|
Send Email Alerts |
Select the check box if you want alerts to be sent to users by Email. If you choose not to use Email, there are notifications in the Evolve Site itself. |
|
SMTP Server |
If you choose to send Email alerts for Workflow, use this setting to enter the address of your SMTP Server. |
|
SMTP Port |
If your SMTP Server requires a port setting, enter it here. |
|
Email Display Name |
Enter the name you would like to be displayed in the No-Reply email field for Workflow emails. |
|
No-Reply Email Address |
Enter the No-Reply Email address you would like to use for Workflow emails. |
4. Click Save to save your configuration.
5. Click Configure IIS.
The web server is configured and the top-level Evolve Site is created according to the settings you specified
6. If running the Server Configuration tool for the first time, click Update Admin Model.
This adds new meta data to your CW user objects to store Evolve user details.
|
|
If you make any further changes to the server configuration in this dialog, you must Save again. |
Authentication and SAML2
Configure SAML2 Authentication and SSO
SAML2 is a commonly used, standardized approach of securing logon to web based systems, where the authentication is delegated to another system or third party. The following section will describe both the pre-requisites and the Evolve configuration required to enable SAML2 as your authentication provider. It is largely assumed that you are knowledgeable about the configuration of your SAML2 authority.
|
|
For details on how SAML2 is offered when Evolve is hosted and you wish to integrate your corporate authentication with the platform, an overview document can be found here... |
The instructions below explain how to configure your Evolve Server so that you can use SAML2 as an authentication method to access your sites.
|
|
Changes to these settings will require the re-publication of the site. |
Pre-requisites for SAML2 authentication:
Firstly it is a requirement to have a SAML2 authentication provider. This is the service that will provide both authentication responses and offer users a means to logon. One common example is Microsoft Active Directory, which can be configured natively, or through SAML2.
The authentication provider will be able to supply the following:
•Either a SAML2 metadata file, or a URL that links to a SAML2 metadata file
•An EntityID – this is the URL that points to the authentication provider (this may often be found in the SAML2 metadata file)
The Evolve web site will need to be operated over a Secure HTTP protocol (HTTPS). This will mean you are also in possession of:
•An SSL certificate to ensure both end-user clients and the authentication provider can trust Evolve.
Preparing the SSL certificate:
Since Evolve needs to be able to communicate securely with the SAML2 Auth provider, it will need to use an SSL certificate. The certificate which is validating the Evolve site (SSL domain certificate) can be used, however it is necessary to change the password on the certificate to make is usable by Evolve. In order to achieve this:
1. If you have not done so already, import the domain SSL certificate into Windows
2. Export the certificate to a new *.PFX file
3. Use the following password to secure the certificate :
LQMrnsuLpVAZ9ePd
Note that it is not currently possible to choose an alternative password. However the certificate is stored securely on your server, and is not made available externally, so this should not pose a concern.
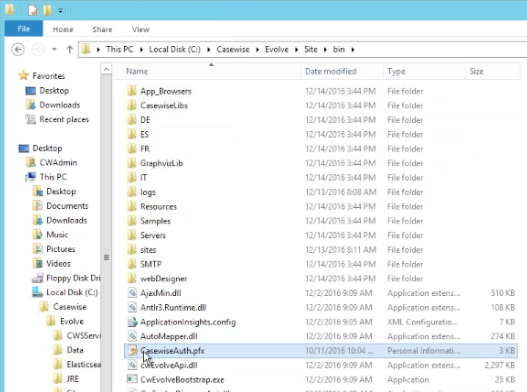
4. Save the filename: CasewiseAuth.pfx
in the folder: c:\Casewise\Evolve\Site\bin
To configure SAML2 on your Evolve server:
1. Run Evolve Designer.
2. On the Evolve Designer Models launcher dialog, click the Server Configuration button.
The Server Configuration dialog opens.
3. Configure the settings according to the table below:
Authentication
|
Authentication Mode |
Choose how you want Users to be logged on to Evolve: Use Saml2 to make Evolve expect a SAML2 authentication |
|
Enable Automatic Logon |
Leave un-checked |
|
Domain Short Name |
Leave this setting blank. |
|
Use SSL Connection (Active Directory) |
Leave un-checked. |
|
AD Connection Path |
Leave this setting blank. |
|
AD Port |
Leave this setting blank. |
|
AD Group Membership Selection Mode |
Leave this setting blank. |
|
AD Connection Username |
Leave this setting blank. |
|
Connect to Active Directory Forest |
Leave this setting blank. |
|
Domain Exclusion List |
Leave this setting blank. |
|
SAML2 Entity ID |
This is often found in the metadata.xml file, and consists of the URL that Evolve needs to check authentication. |
|
SAML2 Meta Url |
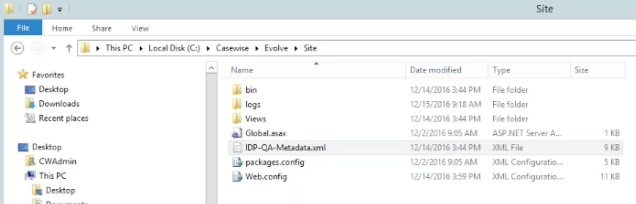
This could be a public URL, a private URL or a local file path. The meta data consists of an XML file that contains the settings for the SAML2 configuration. where the metadata file should be stored in the Site folder |
|
Evolve's Url |
Enter the URL to the Evolve home page - e.g. |
4. Click Save to save your configuration.
|
|
If you make any further changes to the server configuration in this dialog, you must Save again. |
At this point it will no longer be possible to logon to Evolve, as the final steps are to configure the permissions based on Claims configured on the Authentication Server, and their mapping to groups on the Evolve server.
To configure Groups and Roles on your Evolve server:
Groups and Roles for SAML2 are configured in exactly the same way as they are for Active Directory. Take a look at this to see how they work. You will find this detail in the "AD Mapping" details of the "Site Level Settings" - "Deployment Node Settings".
Further instructions for specific Identity Providers:
See here for help on Integrating with Okta Identity Provider