Update an Existing Site
These instructions explain how to update an existing Site and configure the settings so it can be published in the latest version. These steps should be followed for each existing Site you want to publish in the new version of Evolve.
These instructions assume you have already upgraded the Evolve application on your server, and used the Server Configuration tool to configure it.
As long as the model containing your Site is in your repository, when you launch Evolve Designer the Model and its Site should be listed so you can open the Site in the designer application.
|
|
There is a new warning message displayed when publishing a Site if your model has more than one template diagram for a Rule and Category combination. We strongly recommend that if you see this message you revisit your model to eliminate duplicate diagram templates for the same Rule and Category, otherwise you could have issues displaying diagrams in your Site. |
Step 1 - Check existing custom data and files
Custom Site content
Check that any custom Site content you may have is in the correct location in the Evolve/Site directory.
This is in your Site\bin\webDesigner\custom\<customization-name> directory.
See URLs, file paths and directory structures.
Custom logos
If you use custom logos in your Evolve Site or Sites, the configuration required to use them has changed. Please read these instructions on how to use custom logos on your Site to ensure they continue to work after upgrading.
Custom Workflow Emails
If you have customized the default Email templates for Workflow, ensure they are copied to the Site\bin\SMTP\Email Templates directory.
Step 2 - Update the Site's Meta Model
To update the meta model:
1. In Evolve Designer open your Site
2. Click the Update Meta Model button
The Model is updated with the latest required meta data.
3. Save your Site, the close and re-open Evolve Designer when prompted.
Step 3 - Update Diagram Designer layouts
1. Ensure Evolve Object Types are displayed in Object Explorer by using the Show/Hide Object Typesbutton in Evolve Designer
2. In Object Explorer, view the CW Diagram Designer objects in your model
3. Edit the properties of each object and set the Freeze Level to ‘Unfrozen’
4. In Diagram Designer, open each layout and click the Run tab.
Step 4 - Update the Site settings
To update the Site settings:
1. Open the Site in Evolve Designer
2. Select the top-level Site node
3. Check the following settings and edit where necessary:
|
Setting |
Description |
|
Server Language |
Choose the language of the Site if you want to override the global Evolve setting. |
|
Server Theme |
Choose the theme of the Site if you want to override the global Evolve setting. |
Note: These are the basic settings required to publish your Site. For the full configuration reference, see: Configuration Reference.
4. Select the Deployments > [server name] > Model node (showing the Scriptname of the Model your Site is in)
5. Complete the following fields:
|
Setting |
Description |
|
Site URL Name |
Specify the name of this Model Site as it appears in the URL, such as http://<server-name>/<evolve-IIS-site-name>/[sites|statics]/<site-url-name>/ |
|
Site Display Name |
Enter the name of your site. This is only displayed on the top-level Evolve Sites page. |
|
Deploy Custom Site |
If you publish using custom content, select the custom site reference here. |
|
AD Group for Social Users |
Only used if the Evolve Authentication Method is set to Active Directory. Specify the name of the Active Directory group you want to use for Evolve Social users. |
|
AD Group for Contributor Users |
Only used if the Evolve Authentication Method is set to Active Directory. Specify the name of the Active Directory group you want to use for Evolve Contributor users. |
|
AD Default Social Role Name |
Only used if the Evolve Authentication Method is set to Active Directory. Specify the default Role you want newly-created Evolve Social users to be given. |
|
AD Default Contributor Role Name |
Only used if the Evolve Authentication Method is set to Active Directory. Specify the default Role you want newly-created Evolve Contributor users to be given. |
|
Display Model in Evolve |
Applies to Dynamic Sites only. Use this option to specify if this Model Site is available or disabled in Evolve. |
Note: These are the basic settings required to publish your Site. For the full configuration reference, see: Configuration Reference.
6. Save the Site.
The settings are updated.
Step 6 - Publish your Site
Now the Site and IIS are configured, you must publish your site so that all the required files are generated and placed in the correct location on the web server.
To publish your Site:
In Evolve Designer, click Dynamic Site or Static Site in the Publish area on the Home menu.
Accessing a Dynamic Site
Dynamic Sites are published at the following URL:
http://<server-name>/<evolve-IIS-site-name>/sites/<site-url-name>/
Accessing a Static Site
Static Sites are published at the following URL:
http://<server-name>/<evolve-IIS-site-name>/statics/<site-url-name>/
Map Imported Associations to Existing Source and Target Objects
When importing data into an existing model using the XML file import format, the user can now [2020.1.1] choose to map associations by the source and target object for an existing user-defined association, as opposed to by the Unique Identifier.
NB: Traditional associations such as Reason for involvement, Data Model Usage, and Entity Synonym are not affected.
This means that when a user imports an association from another model, if an association of the same type exists between the same source and target objects (having the same source and target, Unique Identifiers) in the target model, the importer will consider it to be the same association, even if the Association's Unique Identifier is different. Without this option, duplicates are created if for example, the same association between the same two objects is created separately in two models, and then the data is merged. This is because they were created separately, so will have different Unique Identifiers and when one is imported into the other, they will be treated as separate Associations and thus be duplicated.
This option, when it has identified an Association that matches by Source, Target and Association Type, irrespective of Association Identifier, will then proceed to update the Target Association, rather than duplicate it.
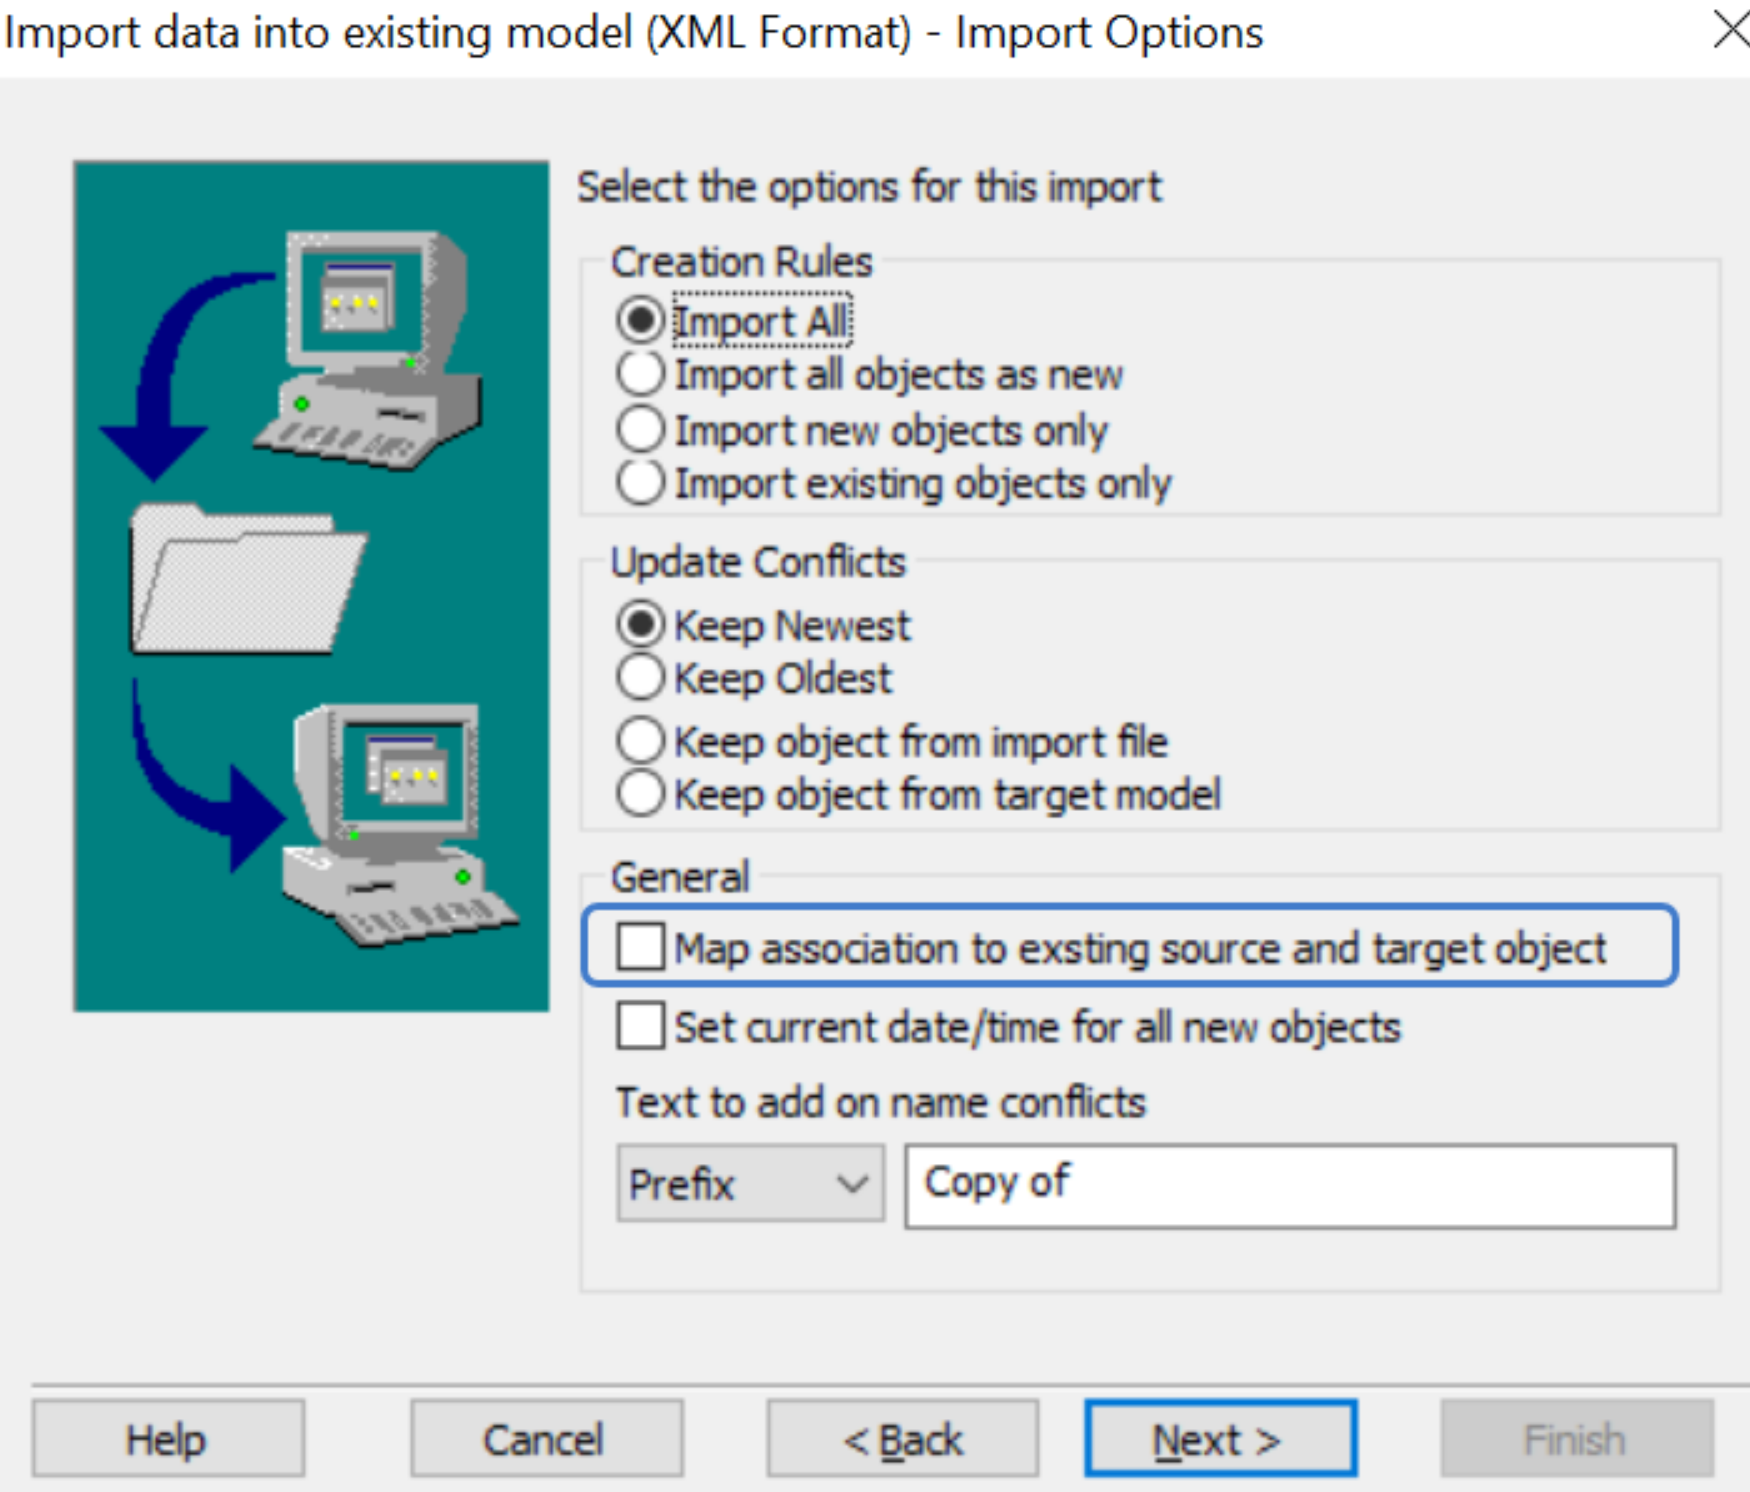
For the user to be able to do this, there is a new check box in the import options called "Map associations to existing source and target object" (it only applies to the import wizard for XML), as shown on the image below.
Note: Choosing this option does not change the original XML in any way.
For example, a user creates a new model, say "Master." Within that model, the user creates their own Association Type between Application and Process. They create one instance of Process and one instance of the Application and then Associate the two items using the this new Association Type.
The model is exported to another model, say "Working", and some work is done on it. In this "Working" model, they remove the user-defined Association between the original Process and Application. Do some further work, including making changes to the actual Process and Application, and then decide they need the Association between the original Process and Application back, so recreate it. As it has been recreated, it will now have a different unique identifier. This working model now needs importing into the "Master" model. If the "Working" model is imported using any standard options, the user will now have two Associations between the original Process and Application.
Ticking the check box will stop this and map any changes made to the Association in the "Working" model to the Association in the "Master" model.
Communicator for Word Filtering
Communicator for Word is an application that allows users to export the data from the Evolve Suite to a Word document. As part of this process, the data is initially exported in XML format using the application CMXMLApp
Depending on the model's size, this export can potentially produce a huge XML file, which may take a long time to load or may even exceed memory limits.
To reduce the XML files' size, the user can select the specific objects and the properties to export. In addition, the ability to filter objects based on a property value is also available. These filter options are saved with the filter configuration [2020.1.1 onwards].
How to apply filter
Start the application CMXMLApp from the erwin bin folder, usually "C:\Program Files (x86)\erwin\CM10\bin".
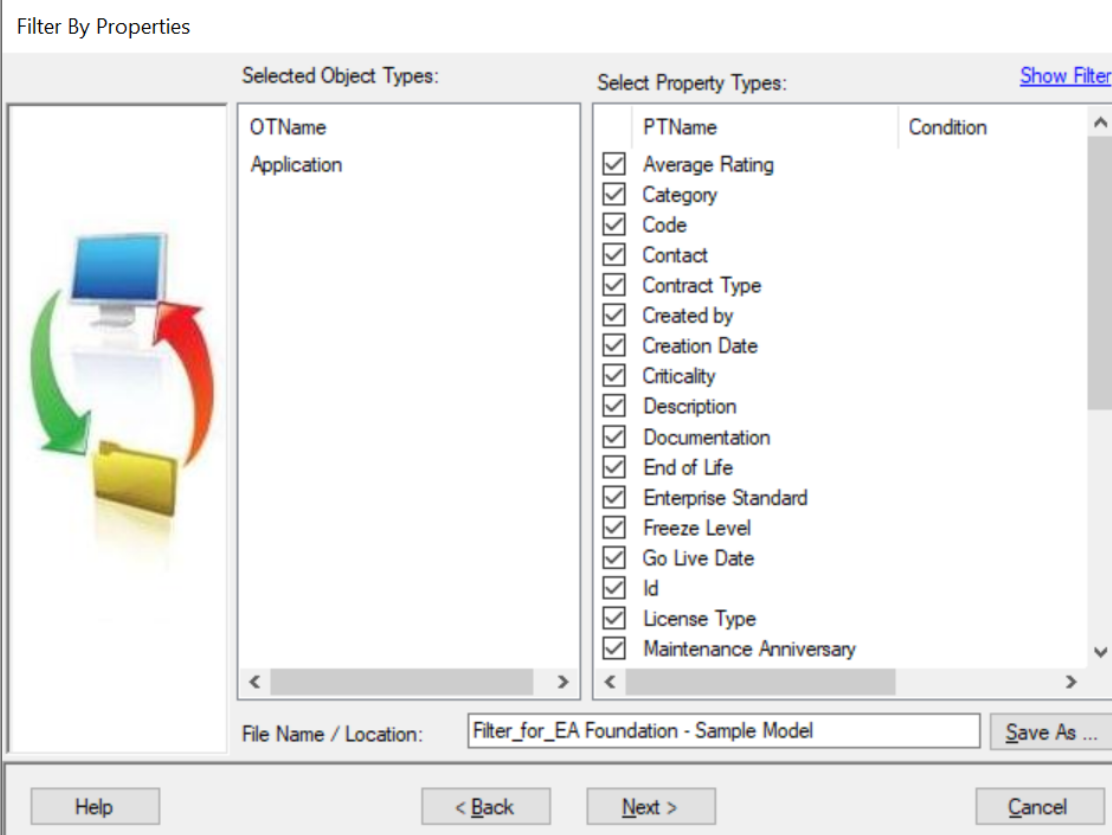
Run through the wizard until you get to the "Filter by Properties" page.
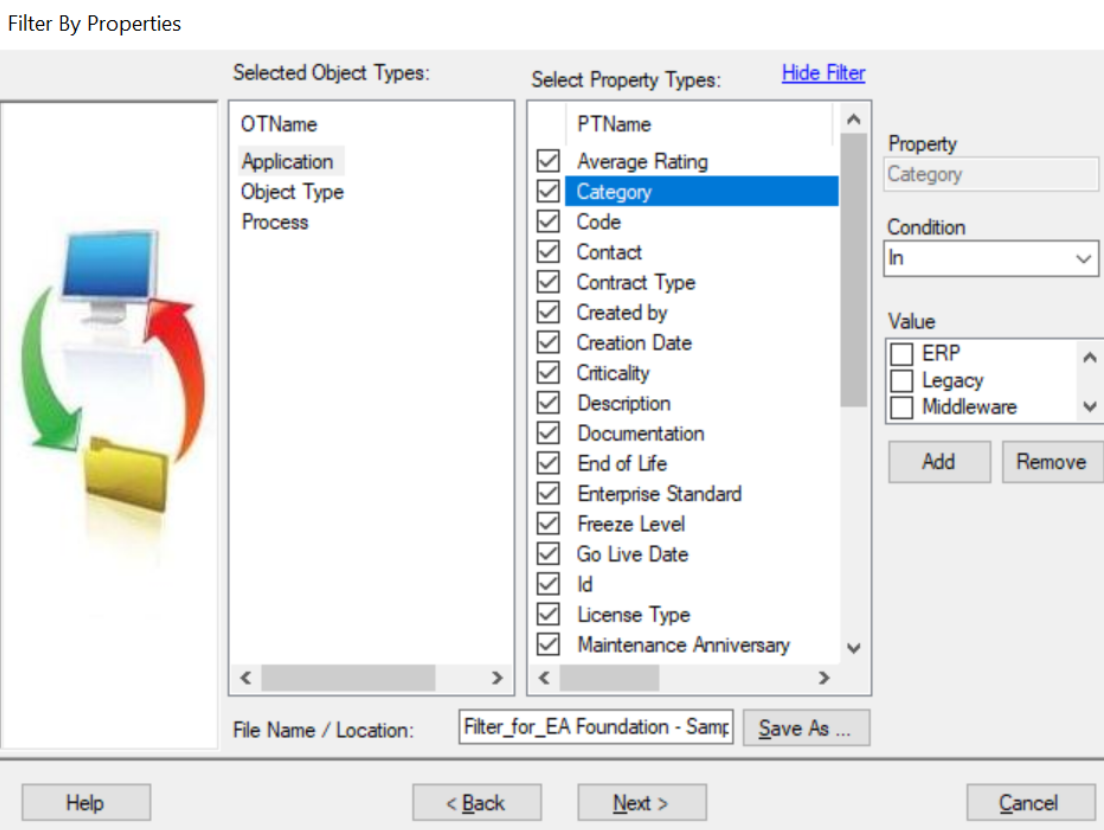
Click on "Show Filter" in the top right, then the filter options will appear on the right side as shown in the picture below.
The type of filter shown and the data entered will depend on the property. In the example above, it is a category property with know values and the user can choose one or more. The application will then only output results where the category matches this selection. If the user chooses to save this file by clicking the "Save As" button, opening the file again will show the user's original selection.