This page lists and explains all the configuration settings available for Evolve Sites.
Server-Level Settings

Server
|
Setting |
Description |
|
Evolve IIS Site Name |
Specify the name of your IIS Site as it appears in the URL, such as http://<server-name>/<evolve-IIS-site-name>/ We recommend you leave the IIS Site Name. If you do change it, it must be lower case with no spaces, and you must make sure that the MVC Folder still points to Casewise/Evolve/Site - or wherever your Evolve is installed. |
|
Evolve Site Folder |
Specify the path to your Evolve Site directory. You can usually leave this as the default, unless you have installed to a different directory. |
|
Evolve Data Folder |
Specify the path to your Evolve Data directory where your local resources will be stored. You can usually leave this as the default, unless you have installed to a different directory. |
|
Server Language |
Choose the language of the top-level Evolve Site, including the Model Selector page, as well as the login screen. |
|
Server Theme |
Choose the theme of the top-level Evolve Site, including the Model Selector page, as well as the login screen. |
|
IIS Application Path |
Specify the path to your IIS application. You can usually leave this as the default. |
|
CW Database |
Select the CW repository your Evolve deployment will use. |
|
Evolve CM User Name |
Enter the Username of a CW Suite User with System Manager rights that can be used to log on to the CW repository so the Evolve Site can access the Model data. You could create a new user dedicated toEvolve use for this purpose. |
|
Evolve CM User Password |
Enter the password for the above user. Ensure you Encrypt the password after entering it. |
|
Javascript Mode |
This is an advanced setting which can only be changed in developer debug mode. |
|
IIS User Name |
Specify the name of a local user on the web server machine which has Administrator rights on the machine. This user is required for the Application Pool to run. |
|
IIS User's Password |
Enter the password for the above user. Ensure you Encrypt the password after entering it. |
Authentication
|
Authentication Mode |
Choose how you want Users to be logged on to Evolve: Use CorporateModelerAuthentication to only allow existing CW Users to sign in Use ActiveDirectoryAuthentication to enable Active Directory authentication For a basic site to start with, we recommend you use CorporateModelerAuthentication. |
|
Enable Automatic Logon |
If you choose ActiveDirectoryAuthentication, select Enable Windows Authentication to ensure Evolve users are automatically logged in to Evolve when they access the Site. |
|
Domain Short Name |
If CW Suite is set to use login via 'any valid Windows user and domain' (option 3), use this setting to enter the short name of your domain. This is referenced before '\\', when used as shortdomainname\\username. If you do not use login option 3, leave this setting blank. |
|
Use SSL Connection (Active Directory) |
Tick this box if you need to connect to Active Directory using LDAP SSL. |
|
AD Connection Path |
If you choose ActiveDirectoryAuthentication, use this setting to specify the path Evolve can use to connect to your Active Directory server. To do this: Right-click onto the server/computer and go into Properties. The domain name should be visible at the bottom. For example, if your domain is 'MyDomain.local' the connection path would be: LDAP://mydomain.local/DC=mydomain,DC=local Note: for every parameter in the domain, you need to add a “DC=”. |
|
AD Port |
If you require a specific port for your Active Directory server, enter it here. You can usually leave this as the default. |
|
AD Group Membership Selection Mode |
Leave as the default unless you have special Active Directory requirements. Use GetAllGroupsForUser if your Active Directory has multiple domains and nested groups. The method causes Evolve to fetch the user and then try to fetch all the groups where this user belongs to. Use GetGroupMembers (default) if your Active Directory operates on a single domain. Supports nested groups. Use GetGroupDirectoryServices if your Active Directory has multiple domains and nested groups, as in option 1 (GetAllGroupsForUser), but you want to use LDAP-oriented protocol codes. |
|
AD Connection Username |
This field is used to specify the property type on Active Directory used for the connection. This is an advanced setting that should only be used by someone who is an expert in Active Directory. |
|
Connect to Active Directory Forest |
This option is selected to browse and find users across the entire Active Directory Forest. If left unchecked, browsing is limited to the defined LDAP:// path, and will not extend to all Forest domains. |
Workflow
|
Enable Workflow |
Select the check box to enable Workflow on your Evolve server. |
|
Workflow Due Date Interval |
Set the number of days you want to allow for task completion. Evolve uses this interval to highlight tasks that are due for completion today, or alert you to ones that are overdue. |
|
Send Email Alerts |
Select the check box if you want alerts to be sent to users by Email. If you choose not to use Email, there are notifications in the Evolve Site itself. |
|
SMTP Server |
If you choose to send Email alerts for Workflow, use this setting to enter the address of your SMTP Server. |
|
SMTP Port |
If your SMTP Server requires a port setting, enter it here. |
|
Email Display Name |
Enter the name you would like to be displayed in the No-Reply email field for Workflow emails. |
|
No-Reply Email Address |
Enter the No-Reply Email address you would like to use for Workflow emails. |
Site-Level Settings
Site node settings
|
Setting |
Description |
|
Node Name |
Non-editable. This is the name of the Site node. |
|
Link Extension MIME Type |
Advanced only. This is site page extension. You should leave this set to 'html' unless you have a very specific reason not to. |
|
Site Language |
Choose the language of the Site if you want to override the global Evolve setting. |
|
Number Separator |
Select 'None' (default), 'Comma' or 'Space' to specify which number separator is used when displaying numbers on your Evolve Site. For example: None - 1000 or 1000000 Comma - 1,000 or 1,000,000 Space - 1 000 or 1 000 000 |
|
JSON Extension |
Advanced only. This is JSON file extension. You should leave this set to 'json' unless you have a very specific reason not to. |
|
Less Theme |
Choose the theme of the Site if you want to override the global Evolve setting. |
|
Enable Cloud APIs |
Advanced only. Use this setting to enable the Cloud APIs. |
|
Export Diagram Images |
Static Sites only. Use this option if you are publishing your Site in Static mode and you are showing Diagrams created in CW Modeler using the CW Modeler Diagram behavior. You can leave this option unselected if you are not displaying diagrams or are only using the Vector (HTML5 ) behavior to prevent images of diagrams being generated when you publish your Site - a process which can take some time. |
|
Display Date/Time In Local Time Zone |
When Set, ensures all dates and times are displayed locally for the end user. Otherwise, uses the server date and time. |
|
Restrict User Profile Access |
When Set, prevents users from reading other user's profiles. |
|
Remember Diagram Zoom Level |
When Set, allows the end-user's browser to remember the zoom position for diagrams they have viewed. This makes navigating back and forth between diagrams, much easier. This can be disabled, if the site design is such that it is prefered to default to showing the full diagram, each time a page is visited. |
|
Enable Smart Breadcrumbs |
When Set, the smart breadcrumb trail is shown for end-users, for this site. Otherwise the display is, as it was pre-version 2018 (no breadcrumb trail). |
|
Node UUID |
Non-editable. This is the unique identifier for the Site node. |
Deployment node settings
|
Setting |
Description |
|
Model Filename |
Do not change this field. This setting represents the Scriptname of your Model. |
|
Site URL Name |
Specify the name of this Site as it appears in the URL, such as: http://<server-name>/<evolve-IIS-site-name>/[sites|statics]/<site-url-name>/ Ensure the name is lower case, and has no spaces or special characters. To change the Site URL Name for an existing Site, see: Change the URL name of your Site. |
|
Site Display Name |
Enter the name of your Site. This is only displayed on the top-level Evolve Sites page. |
|
Deploy Custom Site |
This option is used if you have a custom site configuration. |
|
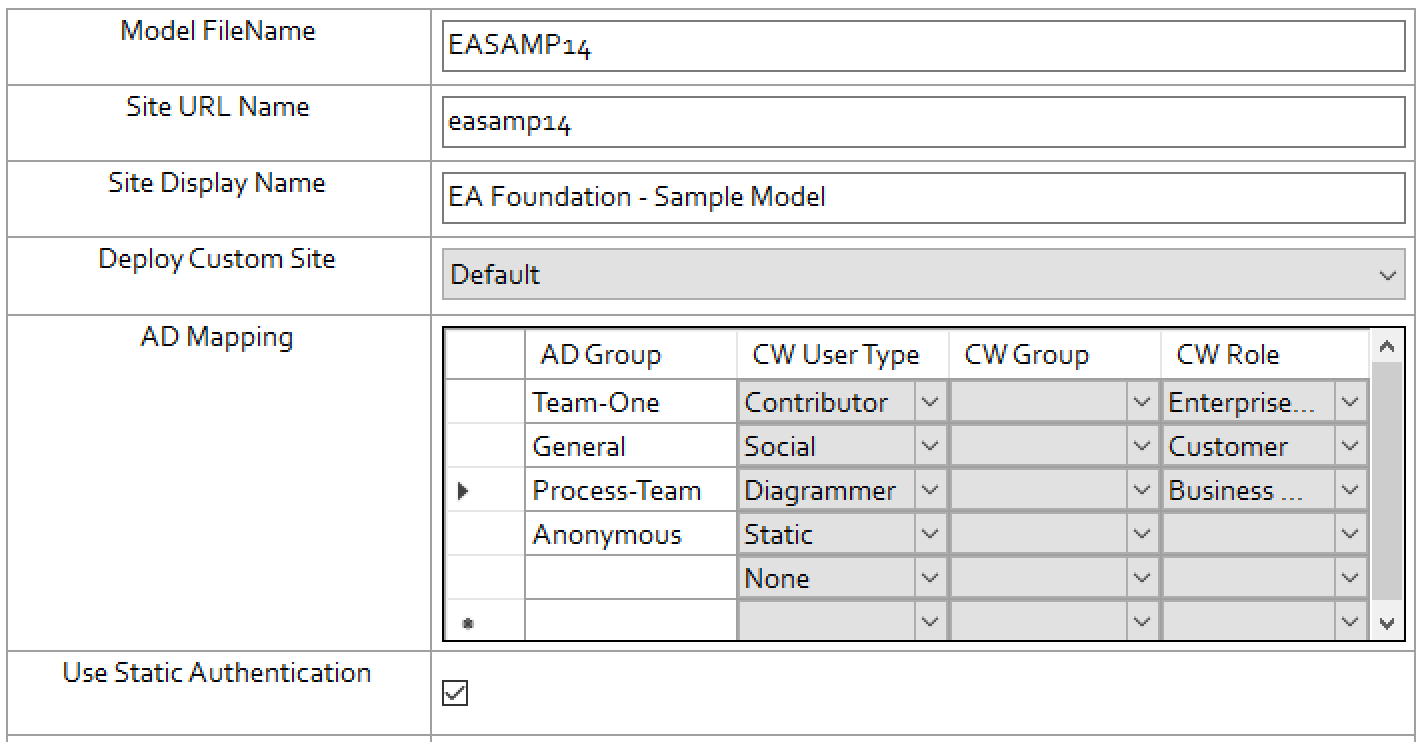
AD Mapping |
Usage: Only used in Dynamic sites if the Evolve Authentication Method is set to Active Directory or SAML2. The AD Mapping is used to map first time users to Evolve. This allows your organization to select a Group, Role and License combination for users to be given, the first time they connect to Evolve. When they connect the product will check the group/s they are in, and create a user in the administration model with the permissions defined. All subsequent access rights changes can be managed from the product. If a user is no longer in the necessary Active Directory group, or is without a required SAML2 claim, then they will be prevented access to Evolve. The Active Directory/SAML2 mapping grid
By default you will be provided 3 entries which correspond to the 3 license types your users can be offered. Any entry without an AD Group name, is effectively not mapped. For each row you wish to map, specify the name of the Active Directory group or the SAML2 Claim you want to use for that type of Evolve licensed users. Members of multiple AD Groups will have their rights aggregated, such that they have the super set of permissions acquired by the groups. The license they are provided will be the highest level - e.g. Diagrammer trumps Contributor, which trumps Social user. Rows can be added to the bottom of the grid, to enable the addition of further groups or claims. |
|
AD Group Specify the name of the Active Directory group or the SAML2 claim you want to use for this row. This is the group the user will need to be a member of, or the claim the user will need to have, in order to receive these rights. A special built-in group called "Anonymous" can be used, to describe anyone who logs in, without access to the other defined groups. Since version 2018, this "Anonymous" group can have CW Group, CW User Type and CW Role defined, such that they can have a default access. This may be desired if, for example, all employees have read access, under a basic Role, but are not associated to any of the EA/BP groups. Then, for example, a select few have Contributor access through a specific Group. | |
|
CW User Type Specify the type of user license that will be provided for this group of users. The highest level of license will be awarded if the user is in multiple groups. | |
|
CW Group Specify the access rights group you wish the users of this group to belong to. This can control the sites/models the user has access too, and also the object types/categories available to them. CW Groups are managed in "Access Rights Manager" or "Model Explorer" | |
|
CW Role Specify the default Role that will be provided for this group of users. For details on the use of roles in Evolve see here. | |
|
Use Static Authentication |
When checked this option will use the AD Mappings (or the CW_User Type) to enable access to the static generated site. Users without at least 'Static' permissions, will be denied access to the site. |
|
Display Model in Evolve |
Use this option to specify if this Model Site is available or disabled in Evolve. |
Validate Repository
Verify and Fix Issues with the Repository
When upgrading from older versions of CWSuite / Evolve, or if the product appears to be behaving inconsistently it is advised to check that the Repository is in a consistent state. This is done through the following steps:
1. Check you are privileged to perform this task:
You MUST be an Administrator of the CW repository and also have db_owner, or administrator permissions on the SQL/Oracle database.
2. Open a Windows Command Prompt by:
Pressing At the taskbar, select Start. | Run.
Type: CMD. or on some versions of Windows. COMMAND.
Click 'OK'.
3. Navigate to the CWSuite installation directory, usually:
C:\Program Files (x86)\Casewise\CM10\bin
Use the commands:
Type: C:
Type: cd "program files (x86)\casewise\cm10\bin"
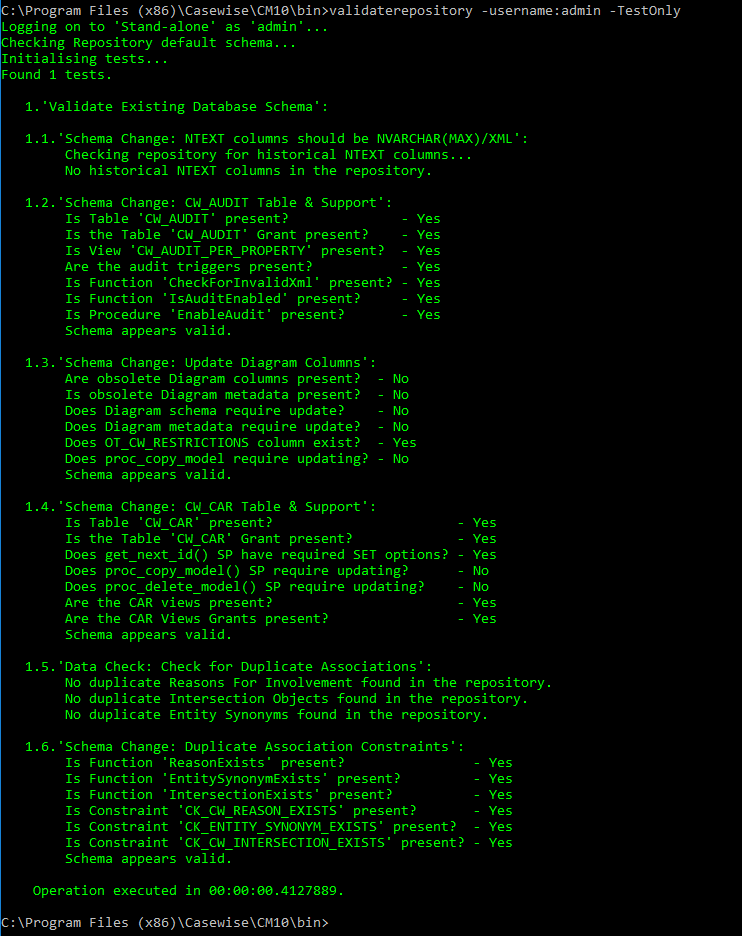
4. Run the Validate tool to check for errors:
Type: validaterepository -username:<your-admin-username> -password:<your-password> -TestOnly
5. You should be presented with something similar to the following response:
6. Other ValidateRepository commands can now be run from this point
Enabling Audit Options
In order to prepare CWSuite to have auditing options available, it is necessary to switch auditing on in the repository. This is performed through the ValidateRepository tool, as it requires minor changes to the database schema.
1. First ensure that the CW repository has its schema up to date, and has no issues, by following the above steps "Verify and Fix Issues with the Repository".
2. Now enable Auditing:
Type: validaterepository -username:<your-admin-username> -password:<your-password> -enableaudit:true
e.g. validaterepository -username:admin password:test -enableaudit:true
3. You should be presented with the following response:
Enabling Global Search
1. In CWSuite, ensure that the model’s auditing option is enabled. See image, on the right to find the location of this setting.
|
|
If you do not see the option to 'Enable Object Revision History' in the Model Properties dialog. Ensure you have turned auditing on in the Repository. See details here. |
2. Before deploying a Dynamic Site from Evolve Designer, ensure Enable Global Search is selected by navigating to Site -> Deployments -> [DeploymentMachine] -> Site Name and checking the Enable Global Search checkbox.
3. Also check the location of the temporary search index delta files. This folder will buffer changes from the database, to the search service. It is entirely temporary and should the content be erased, it will automatically be recreated.
This directory should be server-local (a suitable location is selected by default, however if you need more disc space, this can be placed anywhere else on the server).
If this server is Primary, the search content will appear at this location first, before being copied to a "Shared Location", for use by the slave servers.
If this server is a Slave (not Primary), then this location will not be used, as the data is sourced from the "Shared Location". Slave servers must have the "Shared Location" set to the same folder as the Primary Server's "Shared Folder"
|
|
New settings in Evolve 2018.1.0 and above. These control the temporary file location for search index change. |
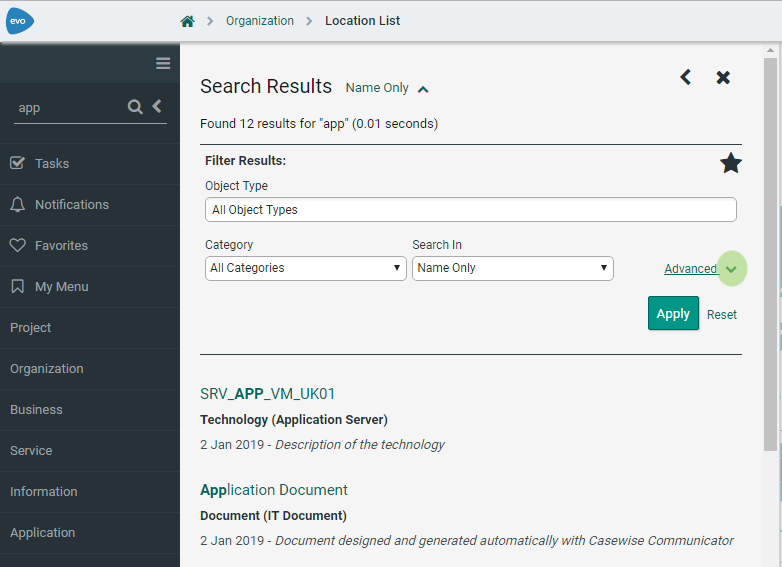
Searching for Objects
Finding objects is as simple as entering text into the search field and clicking the search icon or pressing enter.
Filtering Search Results
Filtering by Object Type
Search results can be filtered to only show objects that are a specific object type.
Filtering by Category
Search results can be filtered to only show objects that fall under a specific category.
Restricting Search
By default Global Searches are performed on object Names and Descriptions. If this is yielding too many unwanted results you can specify to search based on object names or descriptions separately.
Related Topics
Global Search - Advanced Filters [2018.0.2+]
Before you start
•Ensure Global Search is enabled.
Accessing the Advanced Filters
Access the search window by typing your search text in the left hand pane and clicking the search icon or pressing enter.
This will give an initial result set using the current filter settings. Clicking the down twisty 'v' will show the standard filters.
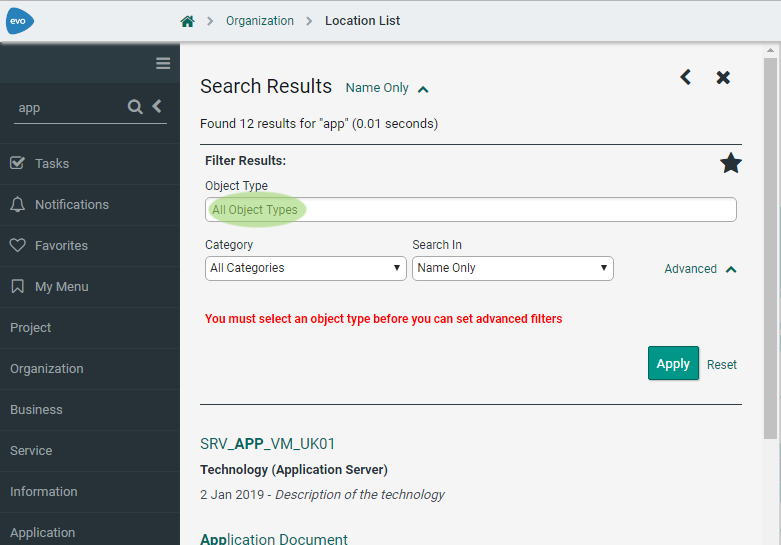
Just above the apply button there is an Advanced twisty 'v', this will give access to the advanced filters section.
In order to add an advanced filter you must first select one or more object types.
|
Fig. Advanced button |
Fig. Object Type Selection |
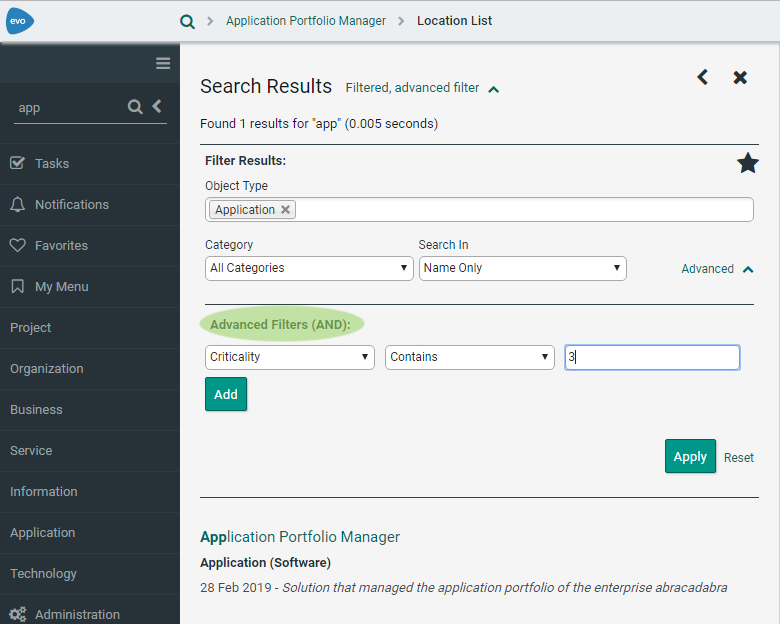
Using the Advanced Filters
•Click the "Add" button to add a filter.
•Drop down a property (note: if multiple object types are selected, only the intersected set of properties will be available).
•Choose your condition from the second drop-down (e.g. Contains).
•Type the text you wish to use with the condition.
•Press 'Apply' to apply a filter and 'Reset' to remove the filters.
Note that all filters are "AND"ed together, with the standard filter content.
Fig. Advanced Filters
Related Topics