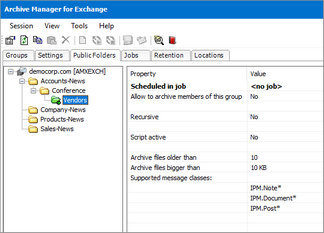
First you must check if the public folder has had the archiving option activated (see the section How to activate the archiving option for a public folder). Folders activated for archiving are displayed in green. You can now schedule archiving by assigning a job (see the sections "Scheduler tab and How to create a job).
On this tab you can define jobs for automated archiving. Archiving with jobs is done in the background with predefined settings.
|
|
IMPORTANT: On the Jobs tab, at the bottom of the right pane, you have to specify the backup time, in other words, the period during which jobs are not supposed to run in order to activate database backup. It is not possible to archive until it is set. Just enter the time in the Backup start time and Backup stop time fields and then click Update. |
You may for instance schedule your database backup overnight.
|
|
NOTE: Do not schedule your jobs during the backup interval, as they are paused until the backup period is over and no mails would be archived during that period. After that the job is resumed. |
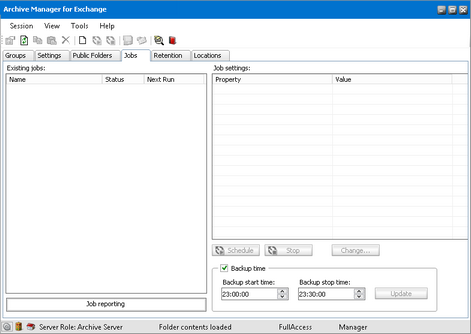
At first there may not be jobs defined, as seen below. You must create them.
As mentioned previously, automated archiving is done via jobs which must be specified up front.
|
|
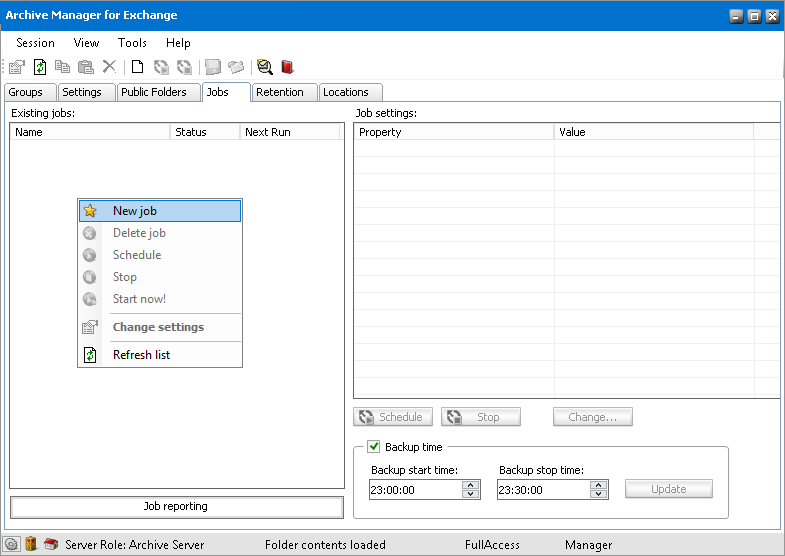
NOTE: Before creating new job, click the Refresh icon to update the Jobs tab. |
To define a new job:
1.In Manager view click on the Jobs tab.
2.Right-click in the left pane and in the context menu select New job. You can also click on the Create new job icon on the toolbar to define a job.
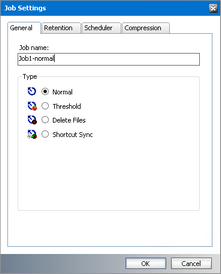
3.In the Job Settings window that is displayed and select the type of job. Each job type is explained in the following topics.
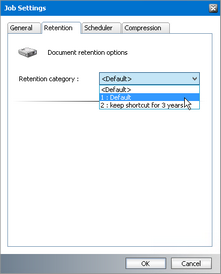
4.Click the Retention tab. On this tab you must specify the retention category which defines the retention time for the items archived via this job. By the means of these categories you can adjust shortcut behavior and set various retention times for archived items. You can choose from available categories or you can create your own categories on the Retention tab of Manager view.
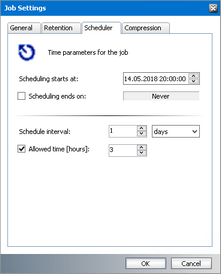
5.Click the Scheduler tab. On this tab you must specify the time when scheduling begins: in the Scheduling starts at field enter the date (by clicking on the upward or downward arrows, or by overwriting it) and time (directly by overwriting the time).
In the Schedule interval box you may specify a period following which the job restarts itself. Just click on the upward and downward arrows. The period may be set in minutes or days.
must you select the Allowed time [hours] box, then you may enter your archiving period simply by clicking on the upward or downward arrows.
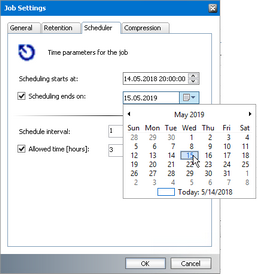
If you select the Scheduling ends on checkbox you may specify a time when the scheduling ends. The period is set to Never by default, i.e. when the checkbox is not selected. Click on the downward arrow to open the calendar where you can select the appropriate month (by clicking on the left and right arrows) and time (by selecting the appropriate day).
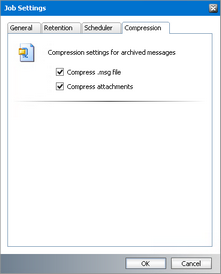
6.Click the Compression tab. On this tab you may specify which of the files will be compressed, simply by selecting the appropriate checkboxes: Compress .msg file, and Compress attachments.
Compression-related settings having been defined under Tools/Options/Archive settings relate to manual archiving only; they are not automatically used by jobs. Therefore, compression-related settings must be specified individually for each job.
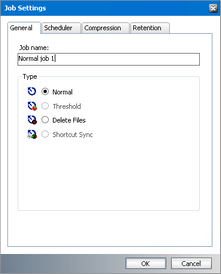
A Normal job is used for archiving emails of a specific group. You can create multiple normal jobs and assign each job to one or more groups.
To define a Normal job:
1.In Manager view, click on the Jobs tab.
2.Click with your right mouse button inside the left pane. A context menu appears. In the context menu select New job.
3.In the Job Settings window that appears, select Normal on the General tab. Enter a name in the Job name text box.
4.Then specify your scheduling criteria on the Scheduler tab.
5.Configure settings in the Retention and Compression tabs.
6.Finish by clicking OK.
|
|
NOTE: To archive emails of a specific group, the job has to be assigned to that group (see the following section How to archive emails of a group via a job). |
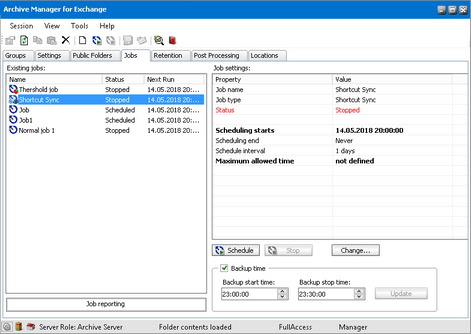
Jobs that you create will be displayed in the left pane on the Jobs tab (in Manager view). Under the Status field you may check their current status.
·Scheduled (displayed green) means that the job is scheduled and currently archiving emails or in a stand-by mode until it restarts again;
·Stopped (displayed red) means that the job, although might be scheduled, is currently not active.
In the right pane you will see the respective jobs settings displayed.
Change the status to Scheduled simply by clicking on the Schedule button or by right-clicking the respective job and selecting Schedule in the context menu. You may stop an already scheduled job by clicking on the Stop button or by right-clicking the respective job and selecting Stop in the context menu.
At the bottom of the right pane you must specify the backup time, in other words the period during which jobs are not supposed to run, in order to activate database backup. If it is not set, no archiving is possible. Just enter the time in the Backup start time and Backup stop time fields and then press Update. You may for instance schedule your database backup over night. Pay attention to this backup period, as no jobs must be running at that time.
|
|
NOTE: Jobs which are running at the moment are highlighted in green in the Existing jobs pane of the Jobs tab. |