When you have decided to archive the content of a public folder, you must specify the criteria according to which emails of that folder will be archived. You may do that through the properties of the folder in question.
There are two ways of setting the criteria for archiving a public folder:
·You may either right-click the folder and select Properties in the context menu to open the Properties window; or
·You may select the folder and then click on the Properties icon on the toolbar following which the Properties window for that specific folder opens.
To set your criteria in the Properties window:
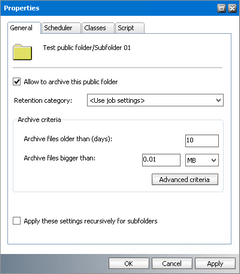
1.In the Properties window, click on the General tab.
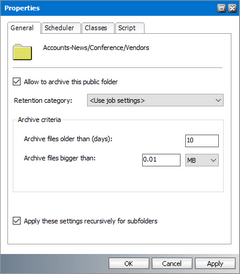
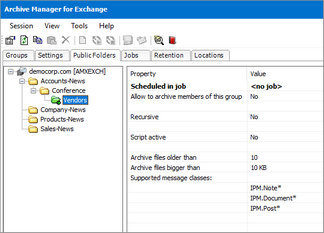
On this tab you may activate the archiving option for public folders. Only with this option activated the public folder can be archived via jobs. You can also specify the period after which messages will be archived and a limit-value for the files.
Select the Allow to archive members of this group checkbox, to activate archiving.
In the Retention category down-drop box you can select a retention category which will be used for archiving the public folder. It allows you to archive the public folder with specific retention category. This retention category can be DIFFERENT from the one assigned to a job that will be in charge of the public folder. (The relevant job is specified on the scheduler tab.) must you select the Use job settings option, the retention category of the job will be used.
In the Archive files older than (days) text box you may enter a number, specifying after how many days you want messages to be archived.
In the Archive files bigger than text box you may enter a number, specifying the minimum size of the messages to be archived; please do not forget to select the proper item from the dropdown list to specify size either in B, KB, or MB.
If you want the subfolders to be archived as well, select the Apply these settings recursively checkbox.
EXAMPLE: On the figure below we want to archive all messages older than 10 days and exceeding 100KB (also applied to subfolders). Further, the retention category of the job will be used and all settings will be applied recursively to subgroups.
When you click Apply, the respective public folders are now activated for archiving. In the next step you must specify a job that would be used for automated archiving. You will do that on the Scheduler tab.
|
|
NOTE: Public folders that are setup for archiving but don't have an associated job are are indicated with a green icon with an exclamation mark |
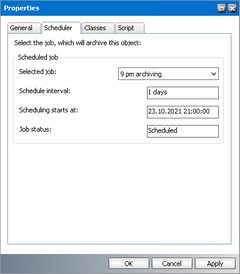
2.Switch to the Scheduler tab.
Automated archiving is done via jobs that must be specified beforehand on the Archive Manager for Exchange/Jobs tab. So if no jobs have been defined yet, do so first (See "How to create a job). Once jobs have been defined on the Jobs tab, you may select the relevant one.
To do so, open the Selected job dropdown list and select a job, for instance 9 pm archiving. As soon as you select a job, the Schedule interval (in days), Scheduling starts at, as well as Job status text boxes are automatically filled in with that jobs settings.
EXAMPLE: On the following figure we have selected a job called 9 pm archiving. Messages will be archived daily at 21:00 as of October 23, 2021. The status of that job is Scheduled, which means that the job has not been put on hold and will run at the specified time.
Click Apply.
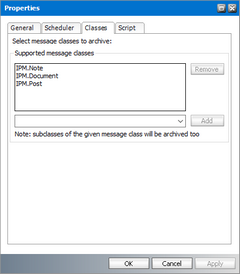
3.In the Properties window click on the Classes tab.
Here you can specify the types of email items contained in the respective public folder to be archived/excluded from archiving by default. Message classes archived by default are listed in the Message classes list box. They include IPM.Note (email), IPM.Post (Note in Outlook), IPM.Document (OLE-documents). You may of course remove any of them from that box and thus exclude them from archiving by default. Similarly, you may add additional classes and have them archived by default.
Click on the down arrow next to the Add button to open the dropdown menu. Select the item and then click Add.
The respective item will be added to the list in the Message classes list-box. To confirm, click Apply.
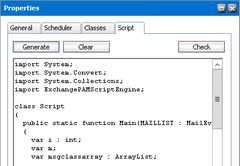
4.In the Properties window click on the Script tab. You may want to modify the script for a public folder, simply to define further conditions.
To display the first script, click Generate. It will be subsequently displayed in the text box below. Now you may modify it to your needs. When you are done, click Apply and then OK to confirm.
|
|
NOTE: Public folders that are setup for archiving are indicated with a green icon. If sub-folders are included, the icon will also display an arrow to indicate recursive selection. |
To activate the archiving option for a public folder:
1.In Manager view click on the Public folders tab.
2.In the left pane select the public folder, right-click it and then, in the context menu, click Properties to open its Properties window.
3.In the Properties window on the General tab do not forget to select the Allow to archive checkbox.
4.Click Apply and then OK to confirm. The archiving option is now activated for the folder. Now you are ready to assign a job that would do the archiving.
Steps to deactivate the archiving option for a public folder:
1.In Manager view click on the Public folders tab.
2.In the left pane select the public folder, right-click it and then, in the context menu, click Properties to open its Properties window.
3.In the Properties window on the General tab do not forget to deselect the Allow to archive checkbox.
4.Click Apply and then OK to confirm. It is no longer possible to archive this public folder via job.
In Manager view, click on the Public folders tab.
To copy a public folders settings, choose one of the following options:
Method I
1.To copy the settings of a public folder, select a folder in the left pane and then click on the Copy settings icon on the toolbar.
2.Then select the target public folder to copy those settings onto and click the Paste settings icon on the toolbar. Those settings will be copied onto the target folder.
Method II
1.To copy the settings of a public folder, select a public folder in the left pane, right-click it and then, in the context menu, click Copy settings.
2.Then select the target public folder to copy those settings onto. Right-click it and, in the context menu, select Paste settings. Those settings will be copied onto the target folder.