Evolve Workflow Configuration
Workflow configuration is now a part of Administration, alongside Pool/Swimlane Configuration and it enables you to create and customize workflows.
|
|
Workflow configuration is available to Subscribed users only. For access, contact Sales & Support. |
|
|
You must have Administrator rights to create or configure workflows. |
To create a workflow:
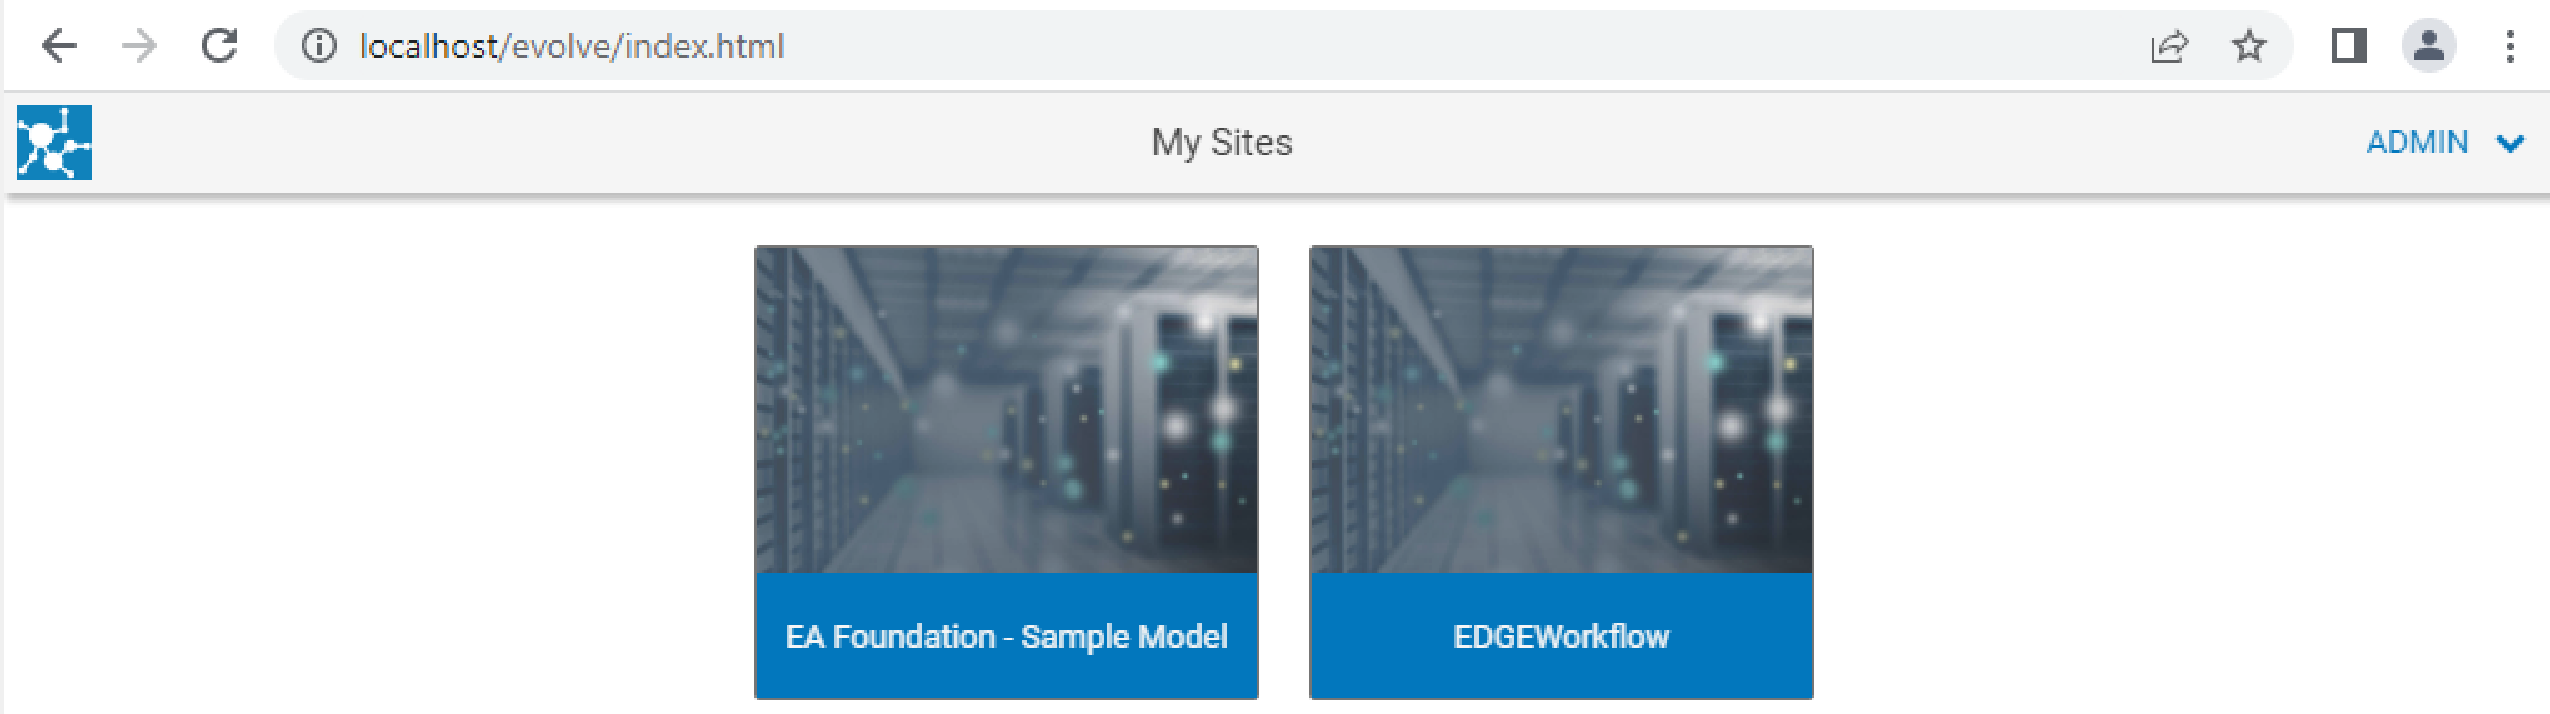
1.Open the browser and login to erwin Evolve Web.
2.Click a model. For example, EDGEWorkflow.
3.Click Administration.
1.Click Configure Workflow.
1.Click the Object Type drop-down list box and select the required object type.
|
|
CwRole is used by Workflow Engine, which can be triggered directly from the erwin Evolve home page. |
Add scenario
When you click add_scenario, a scenario is created and a request is sent for approvals.
|
|
Users with Administrator rights can create multiple Scenarios. |
To add Scenarios:
1.Click the add_scenario icon.
2.In the Name box, specify the name of the Scenario.
3.In the Order box, specify the order of the Scenario.
|
|
Use up or down arrow to change the order of the Scenario. |
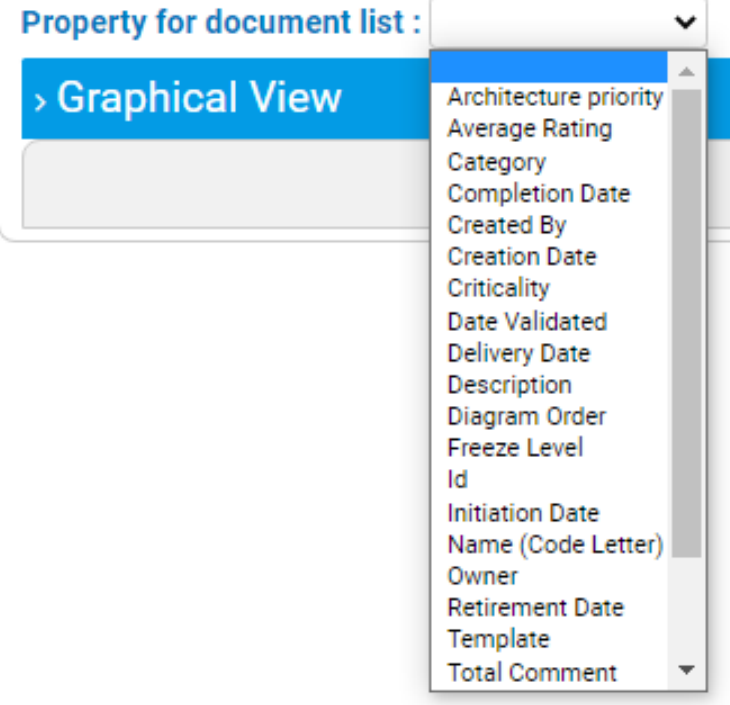
4.Click the Property for document list drop-down list box and select the required option.
Graphical View
You can view the workflow process in a graphical format in the Graphical View section.
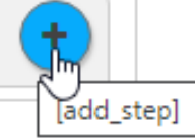
To add step via the Graphical View:
1.Click the add_step icon.
2.In the Name box, specify the name of the step.
3.In the Order box, specify the order of the step.
|
|
Use up or down arrow to change the order of the step. |
|
|
To restrict the reviewer from unintentionally modifying the document, you can configure the document to be read-only before sending it for review. Select the Document Section in ReadOnly check box. |
Input Configuration
You can create custom approval form with fields, such as Name, Email and Description.
To add form_input:
1.Click the add_form_input icon.
2.Complete each of the following settings:
|
Section |
Property |
Description |
Additional Information |
|
Input Configuration |
label |
Specifies the label of input |
|
|
Order |
Specifies the order of input |
| |
|
Type |
Specifies the type of input |
property: Indicates an input type objectType: Indicates a custom form’s object type association: Indicates a relationship between two objects message: Indicates a generic message of input request-name: Indicates the name of workflow creator | |
|
Scriptname |
Specifies the script name of the property |
Available when Type is set to property. Click the Scriptname drop-down list box and select the required option. | |
|
Object Type |
Specifies the input object type |
Available when Type is set to objectType. Click the Object Type drop-down list box and select the required option. | |
|
Scriptname to use in other property value |
Specifies the scriptname of the object Type or request name |
Available when Type is set to objectType or request-name | |
|
Association Type |
Specifies the association type of input |
Available when Type is set to association. Click the Association Type drop-down list box and select the required option. | |
|
Informative Message |
Specifies an informative message about input |
Available when Type is set to message | |
|
Read Only |
Specifies whether the input is read-only |
Available when type is set to property, objectType, association or request-name | |
|
Mandatory |
Specifies whether the input is mandatory |
Available when Type is set to property, objectType, association or request-name | |
|
Hidden |
Specifies whether the input is hidden |
Available when type is set to property, objectType, association or request-name | |
|
Value |
Specifies a value of the input type |
Available when type is set to property, objectType, association or request-name | |
|
Filter |
Specifies the Filter option to filter input value |
1.Click Add New 2.Click the Property drop-down list box and select the required option 3.Click the Operator drop-down list box and select the required option 4.Use Value or drop-down list to specify the property value | |
|
Step Mapping Configuration |
Label |
Specifies the label of the step mapping |
|
|
Order |
Specifies the order of the step mapping |
| |
|
Step Name |
Specifies the name of the step |
| |
|
Read Only |
Specifies whether the step is read only |
| |
|
Hidden |
Specifies whether the step is hidden for all users |
| |
|
Mandatory |
Specifies whether the step is mandatory |
| |
|
CW User |
Specifies the casewise user of mapping |
| |
|
Mapped to the creator of the workflow |
Specifies whether the creator of the workflow is mapped |
| |
|
Cw Role |
Specifies the role of casewise user |
Available only when Mapped to the creator of the workflow is not selected and while configuring Review 1 and Review 2 | |
|
Filter |
Specifies the Filter option to filter the value for custom form types |
1.Click Add Filter 2.Click Property drop-down list and select the required option 3.Click Operator drop-down list and select the required option 4.Use Value or drop-down list to specify the property value | |
|
Add Buttons and Next Steps |
Label |
Specifies the name of buttons and steps |
|
|
Order |
Specifies the order of buttons and steps |
| |
|
Step Name |
Specifies the name of the step |
| |
|
Enable Notification |
Specifies the notification of new task |
| |
|
Create the Final Object |
Specifies whether the created object is final |
To create the final object, user must be contributor or diagrammer. | |
|
Ignore Mandatory Fields |
Specifies whether the mandatory fields can be ignored |
| |
|
Filter |
Specifies the Filter option to filter the value for custom form types |
1.Click Add Filter 2.Click Property drop-down list and select the required option 3.Click Operator drop-down list and select the required option 4.Use Value or drop-down list to specify the property value | |
|
Notification Title & Notification message |
Specifies the title and message of notification |
Available only when you select the Enable Notification check box or the Create the Final Object check box |
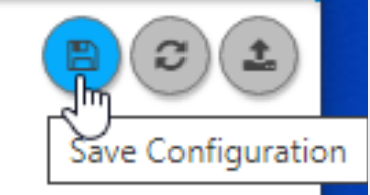
To save the workflow configuration, click the Save Configuration icon.
|
|
The Save icon saves JSON configuration into erwin Evolve Web Platform. |
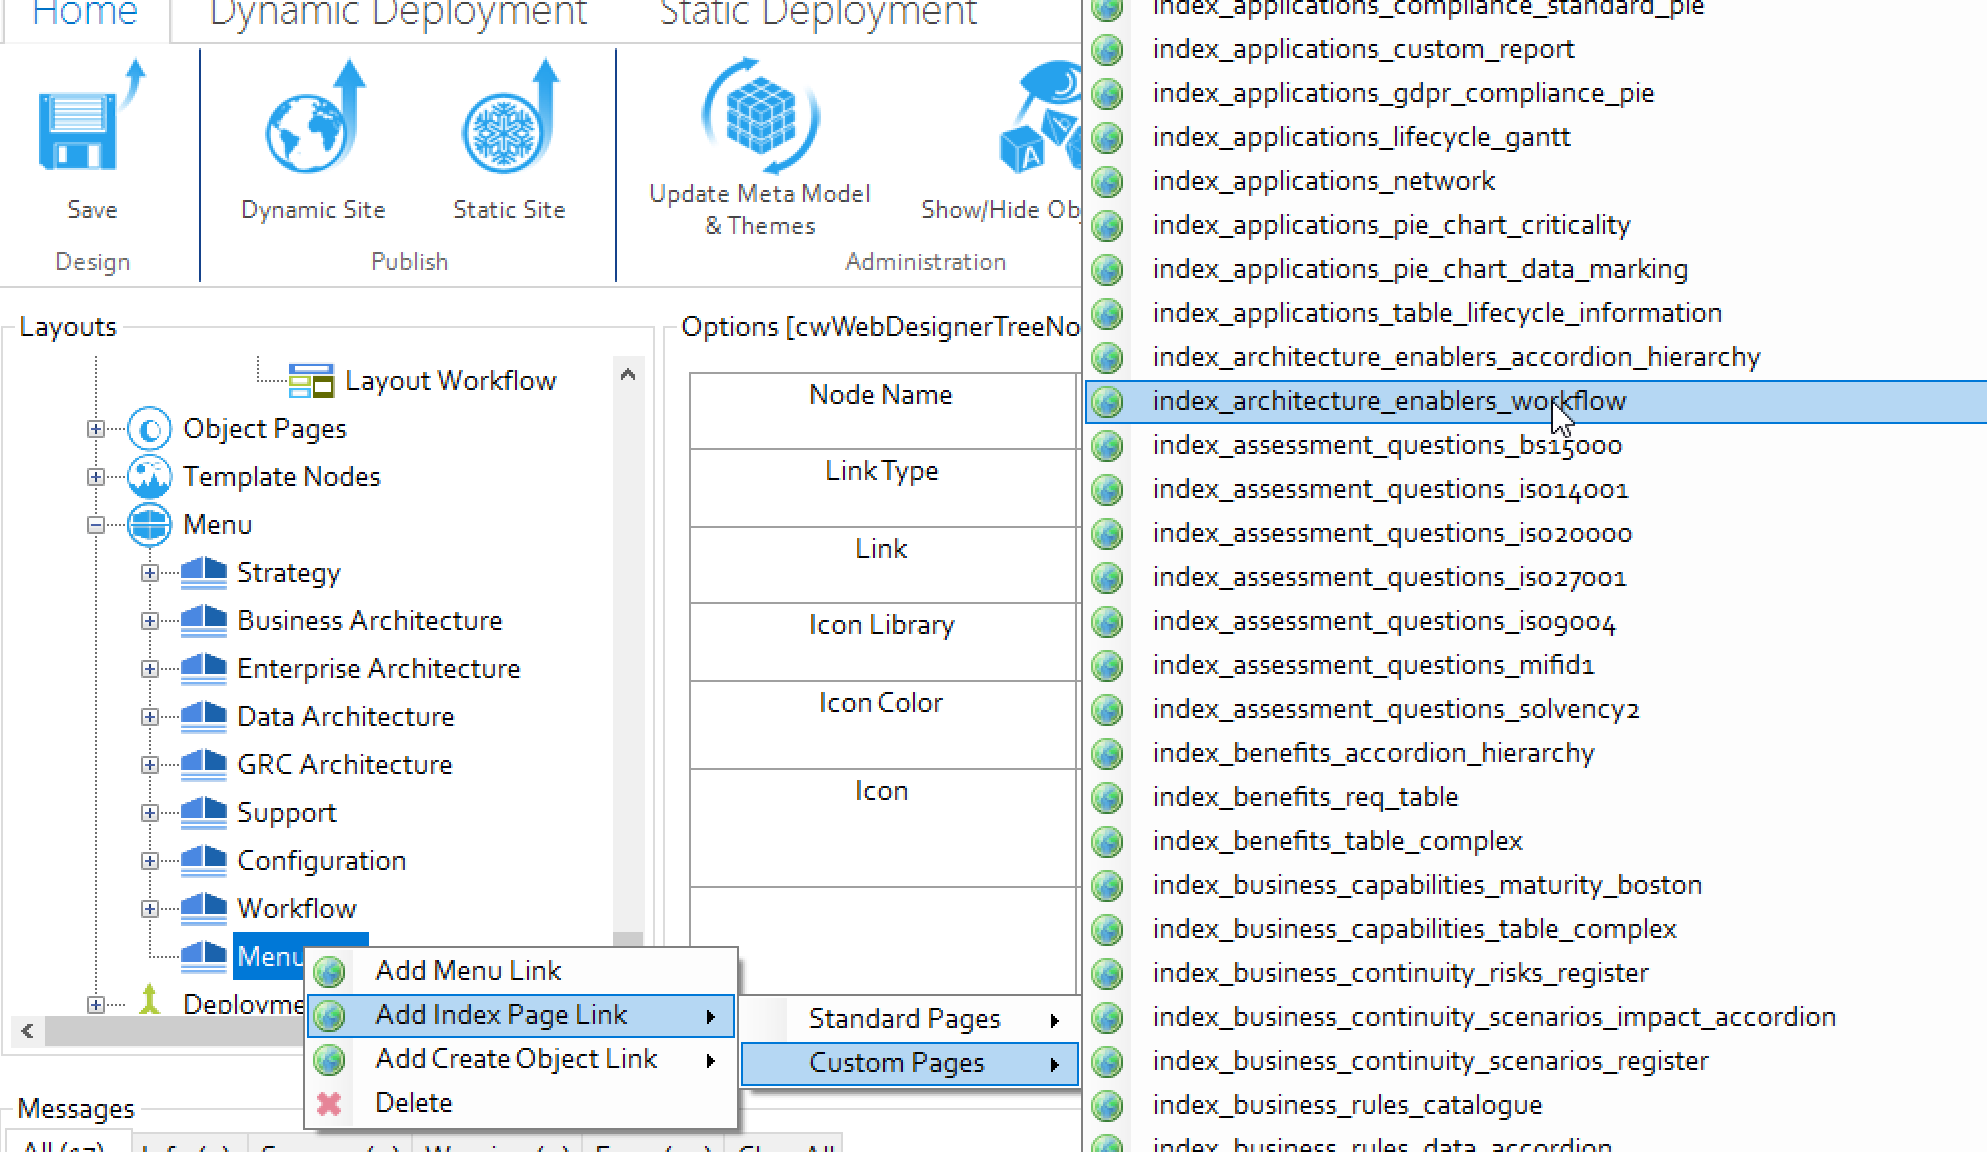
To add an index page in Evolve Web Platform for the workflow:
1.Start Evolve Designer.
2.Click a model. For example, EDGEWorkflow.
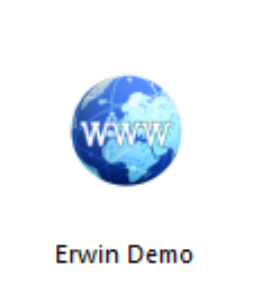
3.Click Erwin Demo.
An Evolve Designer window opens.
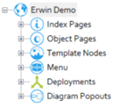
4.Expand Erwin Demo.
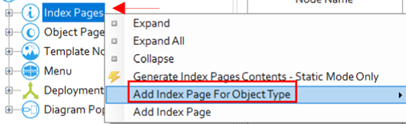
5.Right-click the Index pages node and click Add Index Page For Object Type.
6.Select the required object type for which you want to configure workflow. For example, Architecture Enabler.
An index page (index_architecture_enablers) will be added at the end of index pages.
7.Click index_ architecture_enablers.
8.In the Page Name box, change the page name if you want. For example, index_ architecture_enablers _workflow.
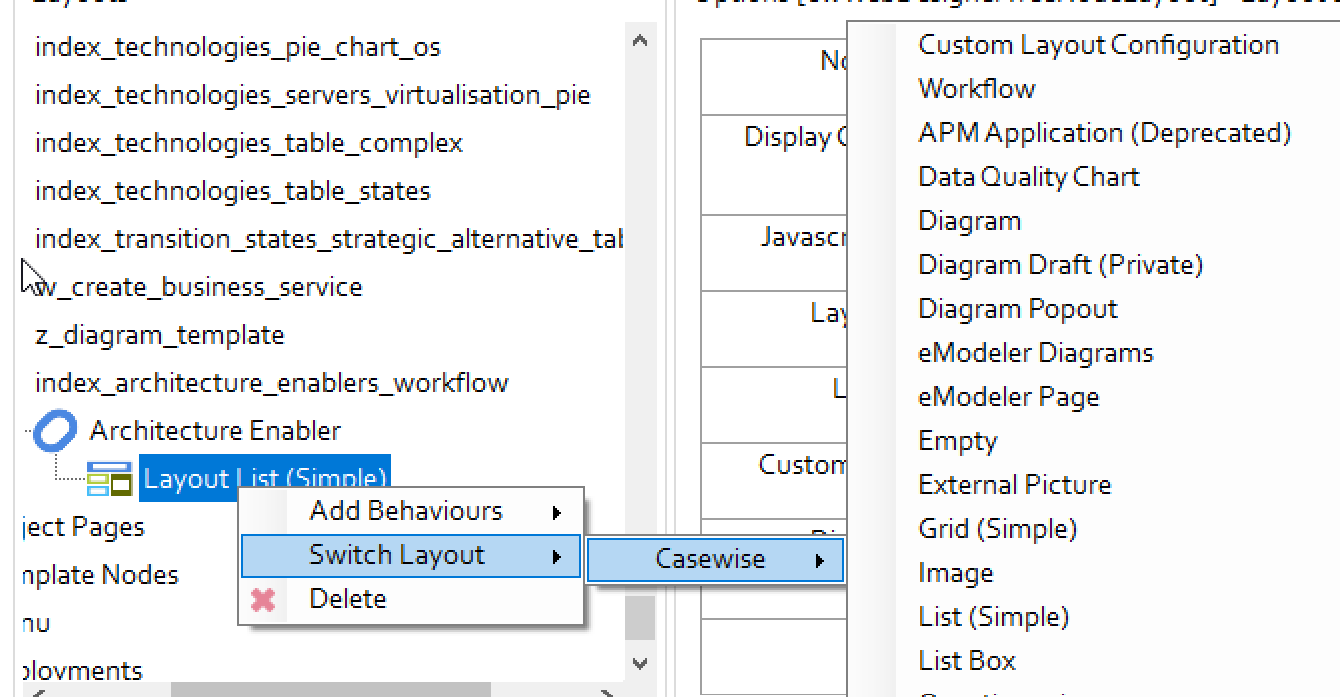
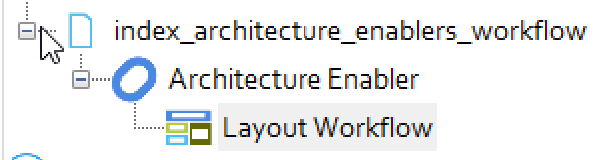
9.Expand index_architecture_enablers _workflow > Architecture Enabler.
10.Right-click Layout List (Simple) and then, select Switch Layout > Casewise > Workflow.
The Layout List (Simple) nodes changes to Layout Workflow.
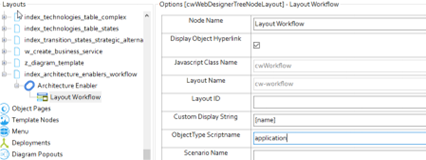
11.Click the Layout Workflow node.
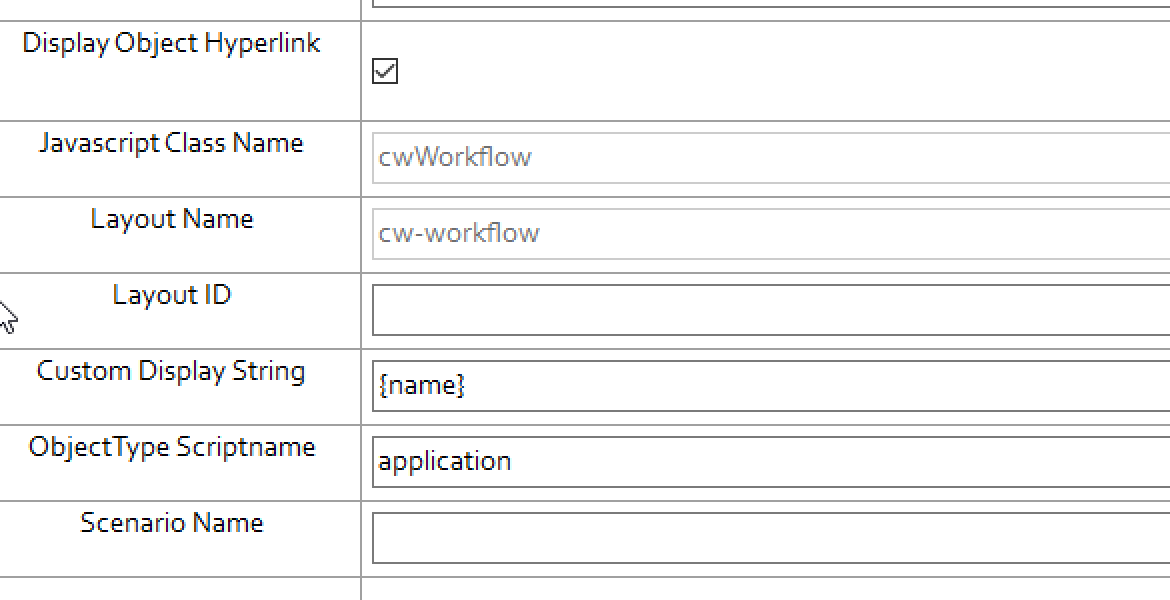
12.In the ObjectType Scriptname box, specify the script name of the object type. For example, application.
|
|
Ensure that ObjectType Scriptname is in lowercase. |
13.In the Scenario Name box, specify the name of the application that you use while configuring workflow in your erwin Evolve site.
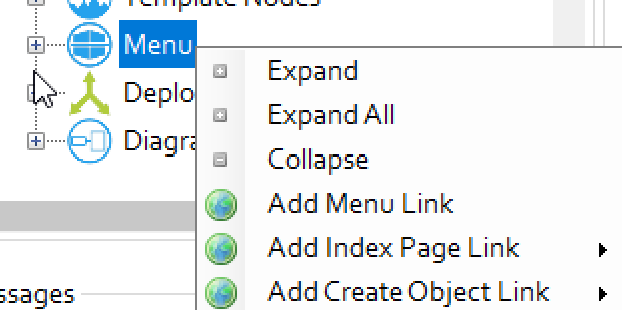
14.Right-click on the Menu node and click Add Menu Link.
15.Expand Menu node.
16.Right-click Menu Link and select Add Index Page Link > Custom Pages.
17.Select the index page that you created. For example, index_architecture_enablers_workflow.
18.Click Save.
19.Click Dynamic Site.
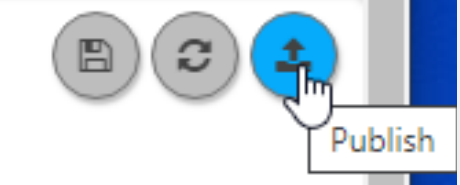
To publish the workflow to the server, click the Publish icon.
|
|
The publish icon publishes the workflow to the server. |
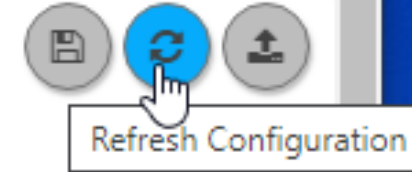
To refresh the workflow configuration, click the Refresh Configuration icon.
|
|
The Refresh icon discards the workflow's saved changes and reloads it from the server. |
The Page Review Workflow is part of the Share functionality in Evolve.
If Workflow is enabled, a user can choose to share the page with a Role. All members of the Role are then assigned Tasks prompting them to review the page - or object - and they must confirm they have reviewed it before the Task is considered complete.
In addition, the user who shared the page is also assigned a Task - with the Task marked as 'Requested' - and this allows them to view which users have reviewed the page.
Only once all members of the Role have confirmed they have reviewed the page is the Task marked as 'Completed'.
What do you want to do?
Confirm you have reviewed an Object Page
See who has reviewed a page you shared
Tasks are an integral part of Evolve Workflow and are assigned to users in the following two instances:
•When users are set as an Approver of Page or Object Instance as part of the Review and Approval workflow, they will receive Tasks when users edit data that they must approve.
|
|
Users cannot delete or modify the attachment unless the status of the request is Resubmit. |
•When a user in Evolve Shares a page with a Role, all members of the Role are assigned Tasks to prompt them to review the page.
Depending on how Workflow is configured, when Tasks are assigned, users may receive an Email notification as well.
What do you want to do?
Create an approval request/task:
To create an approval request/task:
1.Open the browser and login to Evolve.
2.Click a model. For example, EDGEWorkflow.
3.Click Workflow.
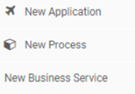
4.Click New Application.
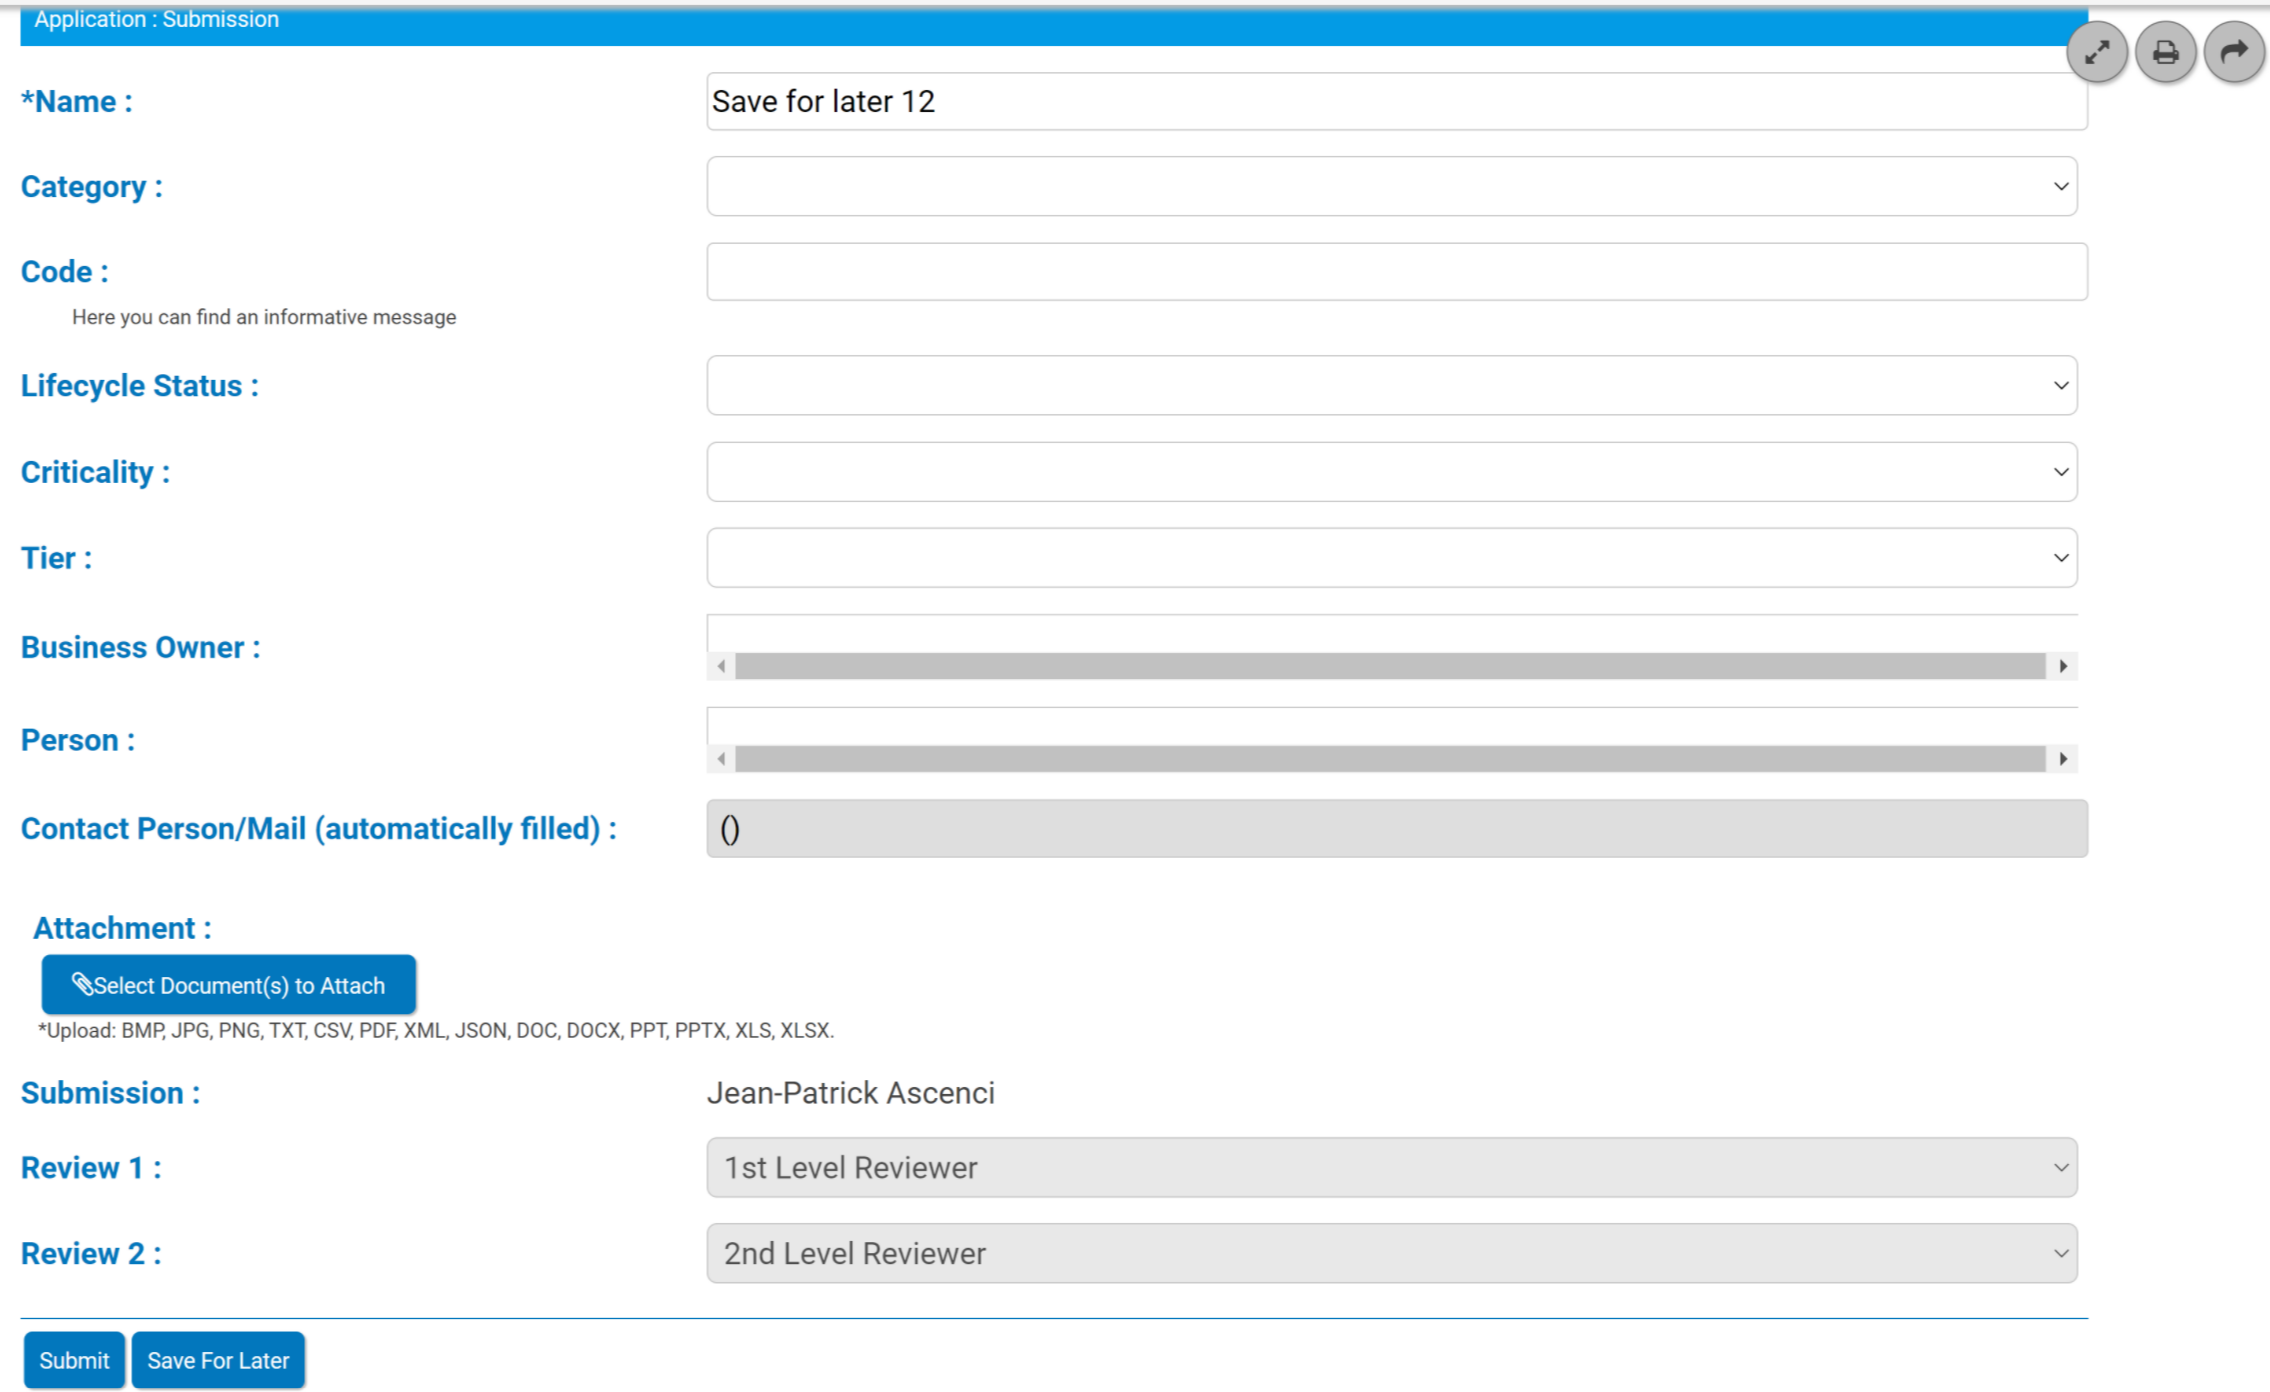
An application form appears.
5.Enter details in the required fields. Fields marked with asterisk are mandatory.
|
Property |
Description |
Additional Information |
|
Name |
Specifies the name of the new application |
|
|
Category |
Specifies the business category of input |
You can customize categories using workflow configuration according to your business usage. |
|
Code |
Specifies an informative message about the application |
|
|
Lifecycle Status |
Specifies the status of the lifecycle |
|
|
Criticality |
Specifies the importance of the application |
You can customize the criticality options using workflow configuration. |
|
Tier |
Specifies the rank of the application |
You can customize the tier options using workflow configuration. |
|
Business Owner |
Specifies the name of the business owner |
|
|
Person |
Specifies the person who created the application |
For example, Malcom Brooks |
|
Contact Person/Mail |
Specifies the name or email address of the person to be contacted |
For example, Malcom Brooks (person_email@company.com) |
|
Attachment |
Specifies the uploaded attachment of the application |
Click the For more information, refer to Attachments Notification Message |
|
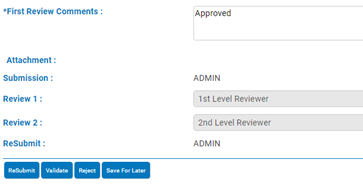
Review 1 |
Specifies the first level reviewer, which is set in workflow configuration |
|
|
Review 2 |
Specifies the second level reviewer, which is set in workflow configuration |
|
Attachments Notification Message
Depending on the scenario, the following messages appear when you upload an attachment to the approval form:
|
File Type |
Notification Message |
|
Duplicate File |
This file is already attached. Please select another file if needed. |
|
Empty file |
The attached file is empty. Please select another file. |
|
Size is over 20 MB |
This file has exceeded the size limit. Please Select another file or try reducing the size less than 20 MB. |
|
Unsupported |
This File type is unsupported. Please select the supported file types. |
File types supported for attachments:
The file types supported for attachments are as follows:
- BMP
- JPG
- PNG
- TXT
- CSV
- PDF
- XML
- JSON
- DOC
- DOCX
- PPT
- PPTX
- XLS
- XLSX
6.Click Submit to submit the form or click Save For Later to save the form.
|
|
Save For Later enables you to save the information for later, and is stored under draft. |
Once the form is submitted, you will be notified that the form has been submitted and sent to the reviewer for approval.
To view the approval request/task:
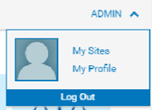
1.Under ADMIN, click My Profile.
The My Profile screen appears.
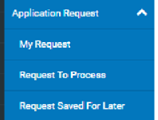
2.Under Application Request, click My Request.
The My Request screen appears
|
|
The My Request screen displays the status and history of all your requests. |
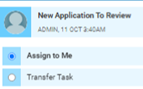
To review tasks raised by the requestor:
1.Login erwin Evolve Web with reviewer.
2.Click Tasks.
3.Select the application form that you want to review.
4.Click Assign to Me.
5.Click Take Action.
An application form opens.
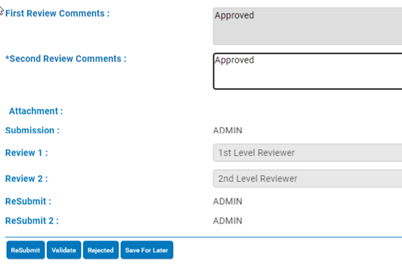
6.If you are reviewer 1, enter the review comments in the First Review Comments box and click Validate.
7.If you are reviewer 2, enter the review comments in the Second Review Comments box and click Validate.
Once you click Validate, you will be notified that “Your Action was successfully submitted. Requested User will be Notified”.
To send the application form back to the user:
1.If you are reviewer 1, enter the review comments in the First Review Comments box and click ReSubmit.
2.If you are reviewer 2, enter the review comments in the Second Review Comments box and click ReSubmit.
You will be notified that “Your Action was successfully submitted. Requested User will be Notified”.
To reject tasks raised by requestors:
1.If you are reviewer 1, enter the review comments in the First Review Comments box and click Rejected.
2.If you are reviewer 2, enter the review comments in the Second Review Comments box and click Rejected.
You will be notified that “Your Action was successfully submitted. Requested User will be Notified”.
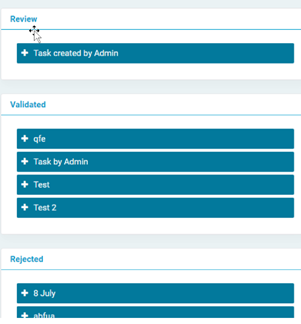
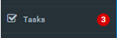
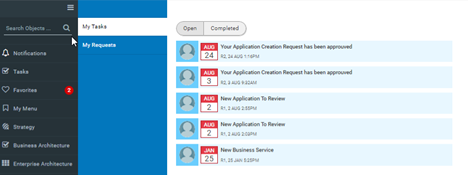
View your pending Tasks
To view your pending Tasks:
1.In your Evolve Site, click the Tasks menu.
The sub-menu lists up to five Tasks that are unread.
2.Click on a Task to go directly to it, or click See all tasks to view all your Tasks.
By default the To Do page is shown so the pending Tasks are displayed.
3.Select a Task to view its details.
Review and approve/reject data change requests by another user
If you are in an Approver Role for a Page or Object Instance, or you are a User assigned as an Object Instance Approver, you are assigned Tasks to review the changes and then accept or reject changes made by other users.
|
|
Reviewers can only download and view the attachment, which is attached by the user. They cannot delete the attachment file. |
To review and approve or reject data change requests:
1.View your Task by using the Tasks menu or by following a link in a notification email.
2.The page shows you all the changes the user made, including the previous value as well as the new value.
3.Go through each change and choose whether to Accept or Reject it.
Alternatively you can use the Accept All or Reject All buttons.
4.Once you have Approved or Rejected all the changes, click the Submit review button.
The changes are submitted and your Task is marked as 'completed'. The user who made the changes is sent a notification of the results of your review.
Before you submit, you can enter comments in the comments text box. These will be visible to the user so they can understand why you rejected or approved their change request.
Confirm you have reviewed a shared page
If a user has shared a page with a Role, all members of the Role must confirm they have reviewed the page.
To confirm you have reviewed a shared page:
1.Navigate to the Task by using the Tasks menu in your Evolve Site, or by following a link in a notification email
2.Click the Take Action button to navigate to the page to be reviewed
3.Once you have reviewed the page, click the Confirm you have reviewed this page button.
The Task is complete.
View pending Tasks you initiated
If you initiated a Task, either by a data change request, or by sharing a page for review, you can view the details of the Task while it is still incomplete.
To view pending Tasks you initiated:
1.Use the Tasks menu to See all tasks.
2.Click the My Requests sub-menu.
All Tasks you initiated are displayed.
3.On the Task you want to check:
oClick Show Assignees on page sharing Tasks to see who has reviewed the page.
oClick Show Approvers on data change request Tasks to see the list of Approvers.
Cancel a pending Task you initiated
If you initiated a Task, you can cancel it at any time before the Task is completed.
To cancel a Task you initiated:
1.Use the Tasks menu to See all tasks.
2.Click the My Requests sub-menu.
All Tasks you initiated are displayed.
3.Click the Trashcan icon next to the Task you want to cancel.
The Task is deleted and is removed from all Assignees' and Approvers' Task lists.
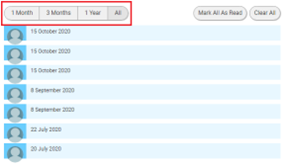
View completed Tasks
To view your completed Tasks:
1.In your Evolve Site, click the Tasks menu
2.On the sub-menu, click See all tasks to view all your Tasks
3.Select My Tasks or My Requests in the sub-menu to see Tasks that have been assigned to you, or ones that you initiated by sharing a page with a Role.
By default the My Tasks page is active so the pending Tasks are displayed
4.Click the Completed filter to view just completed Tasks.
Additionally filter the list by time (from now) using the 1 Month, 3 Months and 1 Year filters.
View Notifications
If you are involved in a Task, you receive notifications in your Evolve Site when the task related activity is performed.
These notifications can be accessed using the Notifications link in the main Site menu.
If new notifications exist, they are highlighted in the menu.
To view your notifications:
1.Click the Notifications menu.
Click Older and Newer to move through the pages of notifications.
Click 1 Month, 3 Months, 1 Year or All buttons to specify the age of notifications displayed.
Delete a Notification
To delete a notification:
1.Click the Notifications menu.
2.Use the pagination and date filtering controls to locate the notification you want to delete.
3.Click the trashcan icon at the top-right of the notification.
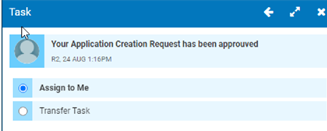
Transfer a Task
When a task is assigned to you as 'My Tasks', you can either assign it to yourself, or transfer it to another user.
To transfer a task:
By default the 'My Tasks' page is active and displays the pending Tasks.
The Action/Delegate options will display.
A list of users to whom the task could be potentially delegated to is displayed.
1.In your Evolve site, click on the Task menu.
2.From the sub-menu, click See All Tasks to view all tasks.
3.Select My Tasks, to view the tasks assigned to you.
4.Select and open the task you wish to transfer.
5.Select the Transfer Task option.
6.Select the user that you wish to transfer the task to, and you will be presented with the option to add a brief message explaining the reason for the transfer.
7.Click on Submit button.
You will be notified that “The task was delegated to the selected user”.
All references to the task are removed from the original user's profile and they are no longer associated with it.
The task is added to the transferred user's 'My Tasks' list.
The task's history is now updated to display the task transfer.
|
|
Once the transfer request has been submitted, it cannot be undone. |
|
|
The Task Delegation function is enabled by default. To switch off this feature, open Evolve Designerand deselect the Enable Task Delegation option on the Model node. With the function disabled, commit the changes to your Site. See: Publish your Site |
Request an Object be validated
If your Site is configured to support Object Validation requests, you can make a request on any page showing a supported Object Type.
To request an object be validated:
1.On a supported Object Page, click the Create Task button
2.In the Validators section, select all the people you want to validate the object
Use the Filter box to type people's names to find them in the list
3.In the Message field, optionally enter a message explaining why you want the object validated, or note any information that may be of use to the validators.
4.Click Submit.
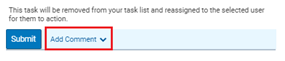
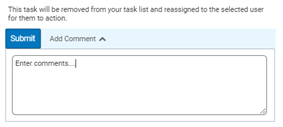
Comment on a Task requiring action
If you have a pending task to action, you can add a comment to your response.
To add a comment to a response:
A Comment field will display.
1.Navigate to the relevant Task using the Tasks menu in your Evolve Site, or by following a link in the Task email.
2.Click on Add Comment (located next to the Submit button).
3.Enter your comments, or any information you feel may be of use to the Requester, into the field.
4.Click Submit. Your comments will be attached to your response.
Comments sent from the Assigner will be stored in the Task's history and are only visible to the original Requester and associated Assignees.
Change Calendar Due Date
If you have created a task that requires actioning, Server Configuration automatically sets its Due Date Interval to three days. This date can be changed to a more meaningful one using the Date Picker.
To customize a task's due date:
1.When creating a Task Request, click on the Change Due Date button (located next to the Submit button).
2.A date field will display.
3.Click on the field or calendar icon and the Date Picker will display enabling you to select a custom date from the calendar.
4.Review your change, then click on Submit.
View Object Validation Status
If an Object has a pending validation request, it is possible to view the status of this request on its Object Page.
To view the status of an Object's validation requests:
1.In your Evolve site, open up the desired Object Page.
The status message will display at the top of the Page sub-menu.
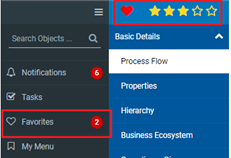
Keep up to date with any workflow-related activity by following objects in your Site.
You can Follow any object that is governed by any of the available workflows. Following means you will receive notifications for any workflow activity related to the object.
If there is new workflow activity for any object you have followed, the Favorites link in the Site menu highlights them, as well as the item itself on your home page.
To follow to an object:
1.Navigate to an Object Page displaying the object you want to follow.
2.Favorite the object by clicking the Favorite button (the heart icon).
Favoriting the object adds it to your home page and Favorites menu.
3.On your home page, locate the object.
4.Click the Follow icon in the bottom right of item.
The icon changes color from gray to orange showing that it is now being followed.