Working with Radar Layout
A Radar layout is used to create a chart that displays three or more* Object properties on different axes which start from the same central point.
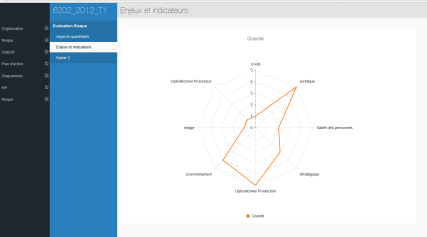
A simple Radar chart uses one line to display the different properties of a single object (a Property Group).
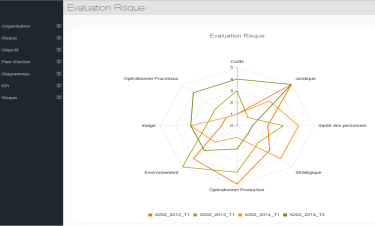
The Radar layout can also overlay multiple lines into a single chart to display the various properties of an Object List. Each line is used to represent a different Object.
With the Radar layout, you can use one chart to visually consolidate multiple values of a single object, or multiple values of many objects, against one another.
|
|
*We recommend that 3-10 properties or values are used per Object for clarity purposes. |
Why and how should you use one?
Use the Radar layout when you want to visually compare the different properties of a single object, or of many objects, against each other.
You can use radar layout list in an index page or a single page. To do this, add an index page (or add a “New Association” for single pages).
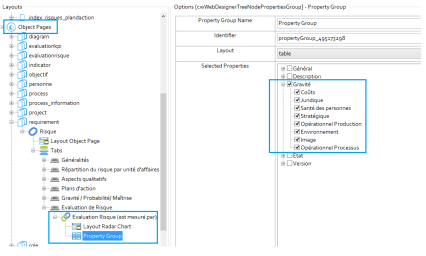
Next, add a properties group and under “Selected Properties”, tick the properties that you wish to display in the radar layout. Please note that only integer properties (i.e numbers) can be represented in radar layout.
Where and when can you use one?
Use the table below to see where you can use the Radar Layout:
|
Page Type |
Parent node |
Tabs |
Number on page |
Editable |
|
Index Page |
Object Type node |
Yes - optional |
Any |
No |
|
Object Page |
Association Type node |
Yes - mandatory |
Any |
No |
What do you want to do?
Use a Radar Layout
To create a Radar layout for the properties of a single object:
This is either the Object Type Node on an Index Page or an Association Type Node on an Object Page.
|
|
Selection is only applicable for integer Properties as Radar Layout requires that only integer values are used to create charts. Decimal numbers are permitted, however. |
|
|
|
1.In Evolve Designer, locate the Parent Node that you want your Radar Layout to be applied to.
2.From the Layout drop-down menu, select Radar.
3.In the Selected Properties area of the Parent Node, select all the properties that you want to display in the Radar.
4.Save and Publish your Site.
5.Navigate to the appropriate Object or Index Page on your Site, and the Radar chart will be displayed.
To create a Radar layout for the properties of many objects:
This is either the Object Type Node on an Index Page or an Association Type Node on an Object Page.
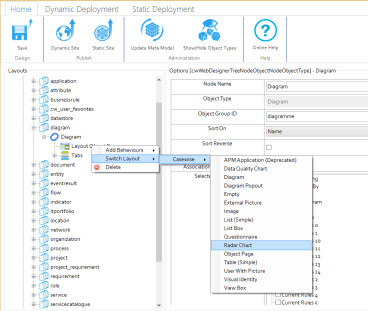
Choose Switch Layout > CW > Radar.
1.In Evolve Designer, locate the Parent Node that you want your Radar Layout to be applied to.
2.Right-click beneath the Parent Node Layout to change the Layout to Radar:
3.In the Selected Properties area of the Parent Node, select all the properties that you want to display in the Radar.
4.Save and Publish your Site.
5.Navigate to the appropriate Object or Index Page on your Site, and the Radar chart will be displayed.
|
|
|
|
|
|
|
|
When inserting a Property Group, we recommend you only display a small number of properties in any particular group - your page will look much better if you restrict the number of properties in each one. |
Working with the Visual Identity Layout
The Visual Identity layout is used to show a list of objects with Visual Indicators to represent some of their properties, rather like you can with Shape Regions in CW Modeler.
The layout displays each object as a rectangle, and then at the bottom of each shape you can show icons to represent the values of one or more properties of your object.
It means you can build a dashboard-like page for a set of objects, highlighting important data about each one, for example, showing a red circle if an object has a Business Risk of '3 - High' or a green circle if it has a Business Risk of '1 - Low', and so on.
|
|
As for all Visual Indicators, the Visual Identity layout only supports lookup (drop-down) and check box (true or false) properties of your objects. |
|
|
In order to use the Visual Identity layout you must have configured a Custom Site to support the use of Visual Indicators. |
Why and how should you use one?
Use the Visual Identity layout when you want to create a dashboard-like view of a set of objects or associated objects, highlighting some of the important data about the objects displayed.
For example you could use the layout to provide an overview of the state of a set of Server objects, using the indicators to show high-level data about each server.
Where and when can you use one?
Use the table below to see where you can use the Visual Identity layout:
|
Page Type |
Parent node |
Tabs |
Number on page |
Editable |
|
Index Page |
Object Type node |
Yes - optional |
One, or one per Tab |
No |
|
Object Page |
Association Type node |
Yes - mandatory |
One per Tab |
No |
Use the Visual Identity layout
|
|
These instructions assume you have already configured your Custom Site to support the use of Visual Indicators for the Object Types and Property Types you want to reference. |
To use the Visual Identity layout:
1.In Evolve Designer, locate the parent node you want your Visual Identity layout to be applied to
This is either the Object Type node on an Index Page or an Association Type node on an Object Page
2.In the Selected Properties area of the parent node, select all the properties you want to use as visual indicators
3.Switch the Layout of the node to Visual Identity
Right-click the layout beneath the parent node and choose Switch Layout > CW > Visual Identity
4.Select the Layout Visual Identity node
5.In the Properties List field, enter the Scriptname of the Property Type you want to be used as an indicator
You can reference multiple Property Types by entering the Scriptnames of each, separated using comas
6.Save and Publish your Site.
Working with Visual Indicators
Visual Indicators are small icons or images that are displayed to represent the values of properties of your objects, rather like you can with Shape Regions in CW Modeler.
It means you could use a series of colored discs to represent Categories of an object, or tick and cross icons to show whether a value is true or false.
They can be used with the Visual Identity layout, and with Custom Display Strings.
In order to use Visual Indicators though, you must deploy your site as a Custom Site, as the images you want to use as your indicators must be stored on the Evolve server and deployed with your Site when you publish it.
|
|
Visual Indicators can only work with lookup (drop-down) and boolean (true or false) properties of your objects. |
Configure your Custom Site to support the use of Visual Indicators
To use Visual Indicators on your Site, you must place image files in the correct location in a Custom Site folder, and make sure they have the correct file names.
Folders
For each Object Type you want to use a Visual Indicator with, create a directory with the name as the Scriptname of the Object Type in your Custom Site 'images' folder.
For example
<your-custom-site-folder>/images/image_mappings/application
<your-custom-site-folder>/images/image_mappings/process
Inside each Object Type folder, you must create additional folders for each Property Type you want to use as an indicator, again named according to the Scriptname of the Property Type
For example
<your-custom-site-folder>/images/image_mappings/application/validated
<your-custom-site-folder>/images/image_mappings/application/type
Files
In each Property Type folder, you should place image files for each of the possible values that can be set.
Files should be named as follows:
Use 'true' or 'false' for boolean Property Types
Use the Abbreviation for lookup (drop-down) Property Types.
|
|
If you want to show an indicator for the 'Undefined' value for a lookup, create an image named 'undefined'. |
Evolve supports PNG, JPEG and GIF for the images, but as images look best when they use a transparent background, we recommend using PNG files.
In the Site the images are re-sized to be displayed at 16x16 pixels, so we recommend creating square images that will not be skewed when re-sized. For optimization reasons, we recommend creating images that are already 16x16 pixels.
Working with External Pictures
An External Picture layout is used to show a picture for each object in a list, and works by using a property on your objects to reference images on the Evolve server.
It is similar to the Image layout, except it is much better suited to displaying smaller images.
For example, you could have a number of 'Product' objects, each one with a 'logo' property. If you upload an image for each product to your Evolve server, you can enter the image name in the 'logo' property for each product, and using the External Picture layout, display that logo on an Index Page or Object Page (if listing Associated Objects).
|
|
In order to use the External Picture layout, you must have a Property Type on your object which can be used to store the image file reference. This must be a Single-Line Textproperty. Note the scriptname of this Property Type. The External Picture layout also requires you publish your Site as a Custom Site, and image files must be uploaded to your Evolve server. |
Why and how should you use one?
Use the External Picture layout when you want to display an image for each object in a list.
Where and when can you use one?
Use the table below to see where you can use an External Picture:
|
Page Type |
Parent node |
Tabs |
Number on page |
Editable |
|
Index Page |
Object Type node |
Yes - optional |
Any |
No |
|
Object Page |
Association Type node |
Yes - mandatory |
Any |
No |
What do you want to do?
Use an External Picture layout
To use the External Picture layout:
1.Ensure you have a Single-Line Text Property Type on your Object Type where you can enter the image name. If you do not have one, use CW Suite to create a new one.
For example, create a new Property Type titled 'logo'.
|
|
If you create the Property Type while Evolve Designer is open, you will have to close Evolve Designer and re-open it in order for it to recognize the new meta data. |
2.Upload all the image files you want to use to the 'images' folder, or a sub-folder within it, in your custom Site folder
All standard web image formats are supported.
3.For each of the objects you want to use an image with, enter the image file name in the new property field.
What you enter here must be the full path to the image file, with the root being the 'images' folder in your custom Site folder. Therefore, if you uploaded your images directly into the 'images' folder, you can simply enter the image file name. However, if you created a sub-folder there, you should enter: <sub-folder-name>/<image-file-name>, such as 'logos/myimage.png'.
4.In Evolve Designer, locate the parent node you want your External Picture page to sit beneath
This is either the Object Type node on an Index Page or an Association Type node on an Object Page
5.In the Selected Properties setting for the parent node, ensure you select the new Property Type which stores the image reference
6.Right-click the layout beneath the parent node and choose Switch Layout > CW > External Picture
7.In the Layout ID setting for the External Picture layout node, enter the scriptname of the Property Type which stores the image reference.
8.Save and Publish your Site.
|
|
Please remember that now you are using a custom Site you must select that custom Site in the Deployment node settings for your Site. |