
Alternate Framework
There may be some occasions when the software itself or a Support Engineer will request you install an alternate framework. This request may be related to a certain authentication provider you are utilizing, Box connectivity or possibly even for the encryption of your data.
If requested to do so, please follow the steps below:
1.Exit and stop all running instances of the application on your host computer.
2.Download the alternate framework. Please be sure to choose the appropriate version specific to your installation. If you are unsure, go to Help > About and after the version number it will display either 32-bit or 64-bit.
3.Once downloaded, extract the zip to a location of your choice on the host computer. Please do not simply "open" the zip file, be sure to Extract all of the contents to this location.
4.Navigate to the location where the application was installed on your host computer, locate and then delete the folder named "jre". If you do not see this folder, please enable Hidden Files and Folders in Windows.
5.Copy the new "jre" folder that was extracted in Step 3 to the same location where the "jre" folder was deleted in Step 4.
·You do not want to "overwrite" the original folder with the new one, you need to delete the original first.
6.You may now start the application again.
If you experience any issues during the replacement process or after the application is restarted, please contact Support for assistance.
Claims Based Authentication
If your source tenant requires multi-factor authentication you can use the Claims options when connecting to a tenant.
1.On the connect to pop up, select the Claims button.
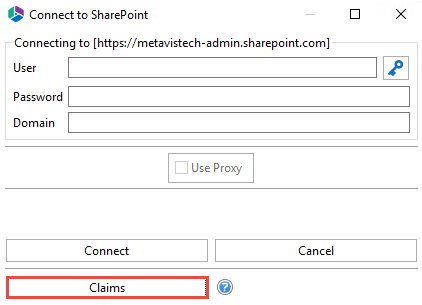
2.Enter your credentials, whether they be Microsoft or Box and connect.
If using OAuth Framework authentication with claims, please see the following section for more information.
CSV Column Reference Guide
The application allows users to import content into SharePoint and copy content between different SharePoint lists using CSV spreadsheets. These spreadsheets are auto generated with the necessary metadata required for the operation and may be modified using Excel or any text editing application. The following table describes the columns used within these spreadsheets.
Columns for Uploading Content using CSV
1.Source File - Identifies the physical path to the file that will be uploaded.
2.Target SharePoint Site - Identifies the target site for the file listed in the source file column. The field is left blank by default but may be specified to upload content into different sites and lists using the same CSV file.
|
|
NOTE: In order to take advantage of this feature the CSV file must be uploaded on a site not a list level. |

3.Target SharePoint List - Identifies the target list for the import
4.SharePoint File Name - Identifies the SharePoint item name that will be used for the import ( "/" is used to identify folders)
5.Content Type - Identifies the SharePoint content type that will be used for the import.
|
|
NOTE: This content type should already exist within the target SharePoint list and must be spelled exactly the same way to avoid errors. |
6.Custom Fields - Any custom fields would be listed following the content type.
|
|
NOTE: These fields must already exist within the target SharePoint list (and content Type). The values entered here must also pass any SharePoint validation or restrictions for the corresponding field. If the field is multi-value enabled and you wish to apply two or more, please separate each value with a pipe character and a trialing space. For example, if I wanted to apply the terms Apple and Orange to a managed metadata column here is how it would look in the CSV file: Apple| Orange . That is "Apple" pipe character space "Orange". |
7.Created At - Identifies the content creation date which is extracted from the file system. If left blank the value will be set to the current date and time.
8.CSV ID Col - This is a reserved field utilized for incremental copy functionality. Do not enter anything into this field.
9.Modified At - Identifies the last content modification date which is extracted from the file system. If left blank the value will be set to the current date and time.
10.Created By - Identifies the user who created the content. If left blank the value will be set to the user currently logged into SharePoint.
11.Modified By - Identifies the user who last modified the content. If left blank the value will be set to the user currently logged into SharePoint.
12.Mark Version - For versioned libraries, identifies the version level for the item being imported ("Major" or "Minor"). If a quasi-versioning system was used in the file system, this field along with the SharePoint File Name can be used to recreate the versions in SharePoint. In order to implement this functionality, use the same file name in the SharePoint File Name field and then specify the appropriate version level in this field. If left blank, the default version level will be used during import.
13.Version Comment - Specifies the comment that will be used when importing items