
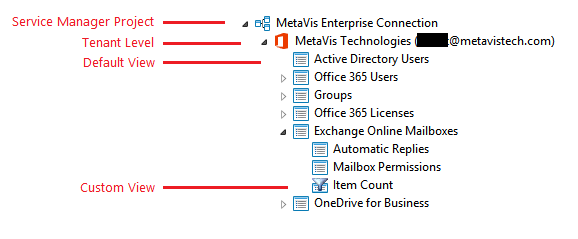
Default and Custom Views
After the connection has been made to Office 365, an Administrator project 
These views offer a number of options including creating new custom views, filtering, export/import and actions. The following sections will describe these options in detail.
Tenant Level
The first level within an Administrator project is the tenant itself shown with this icon 
Default Views
The next level is the Default Views and those are shown with this icon 
To open a default view do the following:
1.Double click on the View name in the Navigator pane, or right click on the name and select Open.
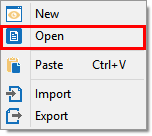
2.The view will load in the larger section to the right of the Navigator pane.

|
|
NOTE: Depending on the location of the user and attributes needed to generate this view, you may be asked to provide additional credentials needed to authenticate. |

3.From the view results, you can select one or more users and perform a number of actions using either the buttons in the application's ribbon
the toolbar
or the right click context menu which differs depending on the Default View that you have selected.
These actions include Quick Actions, Custom Actions, Exporting, Refreshing, and Editing.


|
|
NOTE: Because these default views are preconfigured to load all attributes, this operation may take a significant time to complete. Please plan accordingly if you are working with a tenant that contains thousands of users or consider creating a custom view that may load in less time. For example, instead of loading the default view "Exchange Online Mailboxes" perhaps consider creating a Custom View where you can display only the mailboxes where the Active Directory attribute "Department" contains "Sales" is generated. |
Custom Views
Custom views are user created views that reside below a parent Default View and are signified with this icon 
To create a new custom view do the following:
1.Right click the parent default view and choose the New option. This will open the Create View window.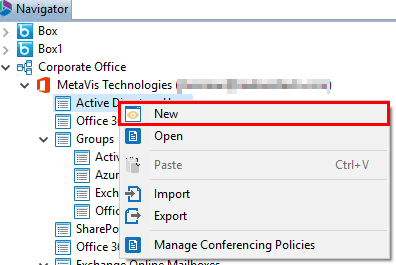
2.Enter a name for the custom view. the Section Name will automatically be populated based on the node for which you selected to create the new view. 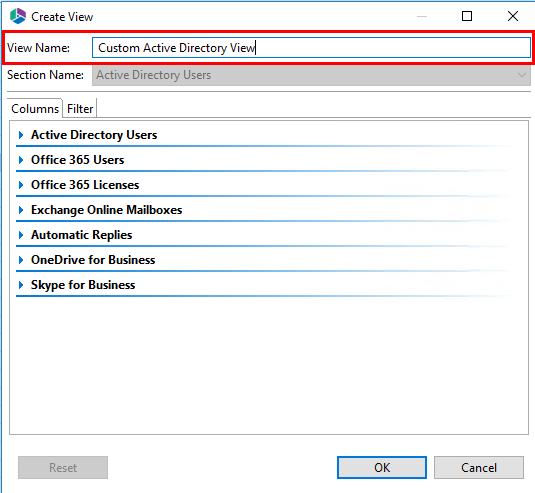
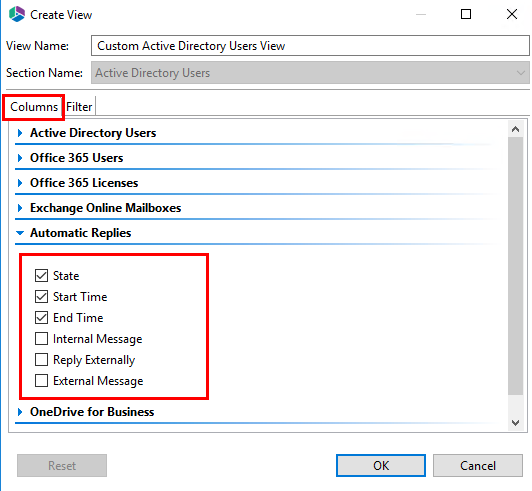
3. Starting with the Columns tab, expand the Office 365 service you wish to include and click the checkbox next to each relevant attribute.
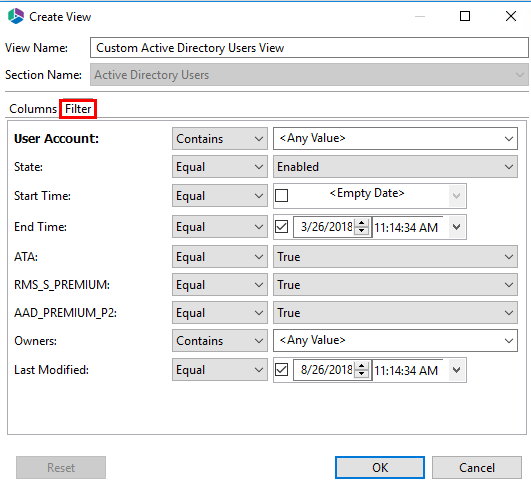
4.Switch over to the Filters tab if you wish to apply any filters to the results.
Filters are configured with conditions (Equal, Not Equal, Contains, Does not Contain), drop down selections and text entry fields. If you wish to rearrange the order of the columns, simply click and drag/drop the column to the new position you wish it to appear in. If you wish to remove a column, simply switch back to the Columns tab and deselect this attribute.
5.Once you have configured the view to your liking click Ok. You will be asked if you would like to open the created view - you an select yes or no. Selecting Yes will display the custom view immediately, selecting no will simply add the custom view to the Navigator section of the page where it can be accessed later.
Menu Options
Depending on the selected level, you will have a number of options available in the right click menu. Below are the icons and descriptions for each option within each section.
Tenant Level
( 
( 
( 
( 
( 
Default Views
( 
( 
( 
(
(
(
Custom Views
( 
( 
( 
(
(
|
|
NOTE: There is no way to undo the deletion of a custom view. |
Edit Quick and Custom Actions
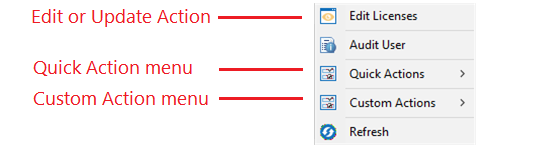
From any Default or Custom View, you may select one or more entries from the View's contents to perform an action against by using the right click menu. The right click menu will provide you with a basic Edit or Update option most appropriate for the currently open view, a Quick Action which performs a single operation regardless of the view, or a Custom Action which is a pre-configured series of actions to be performed in order. The descriptions and their use are detailed in the following sections.
Refresh
Due to the amount of time it may take to open certain views, the entries are not automatically refreshed after any Action has been run. To update the entries displayed in any View you may either:
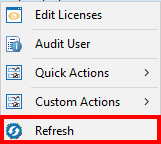
·Select an entry, right click and choose Refresh. This will refresh the entire View.
·Click the Refresh toggle button in the application's toolbar to enable automatic refreshes. When toggled is on ( 


Basic Edit or Update Actions
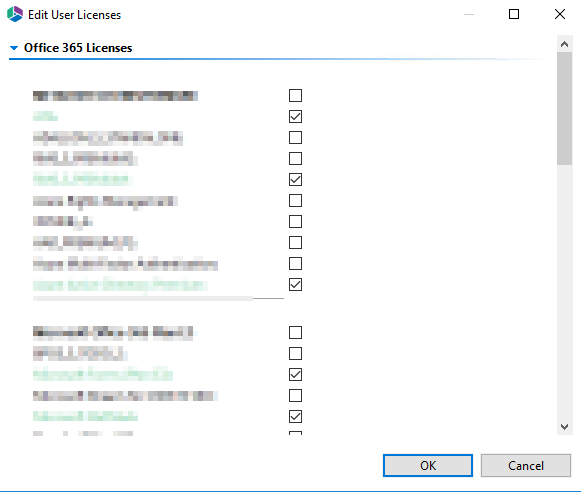
When a Default View is open, you may select one or more entries, right click and have access to a view specific Edit or Update action. For example, if you open the default "Office 365 Licenses" view, select one or more users and right click, the basic edit operation here will be to "Edit Licenses". This action will allow you to edit the licenses associated to the selected users only. A similar operation performed in another Default View will present a different Edit action.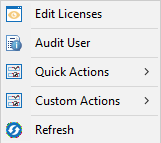
In a Custom View, this basic edit action becomes a generic "Edit User" and provides access to all available services and attributes that can be updated.
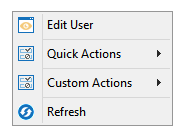
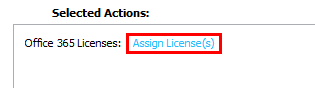
Quick Actions
Select any Default or Custom View. When the view is open, you may select one or more entries, right click and have access to a menu of Quick Actions. Quick Actions, unlike the basic Edit or Update, are not specific to the current view and are configured to perform a single operation against the selected entries. Using the previous example, if you opened the Default View "Office 365 Licenses", select a few entries, right click and hover over Quick Actions, this will open a list of quick action options - such as the Enable/Disable Account option, which allows you to disable the entries you selected. The advantage to these Quick Actions is that you can perform an action without having to load the view that specifically contains these attributes.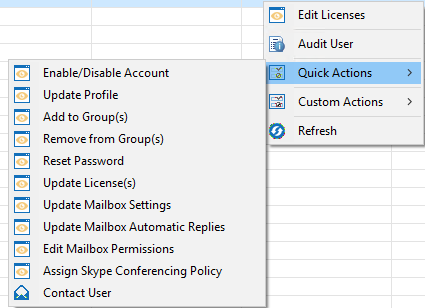
Custom Actions
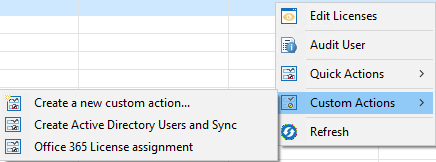
Unlike the Basic and Quick Actions, Custom Actions are a series of actions that are user created, upon execution of a custom action each action is performed in the sequence defined, from top to bottom. Custom Actions can be run from any Default or Custom View and are not specific to the one currently open.
In order to run a Custom Action, you must first create one. To create a new custom action do the following:
1.Select the Tenant Level node within your Service Manager project and either double click on the Tenant Level node, right click the tenant level node and select Manage Custom Actions, or choose the "Open" option in the Custom Actions section of the top ribbon. This will open the Manage Custom Actions viewer.
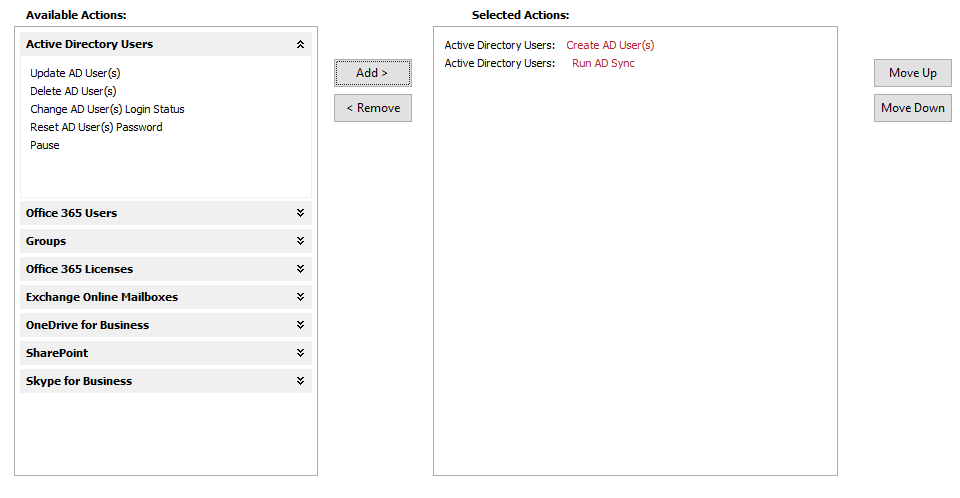
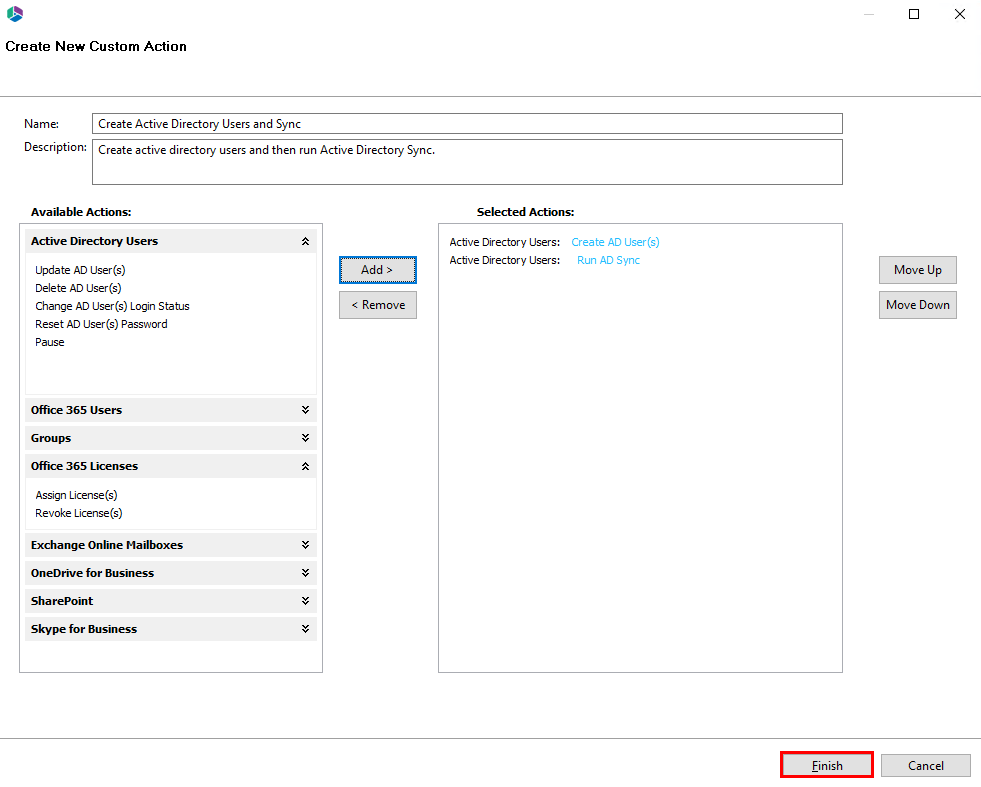
2.From within the Custom Action view, either right click and select the menu "Create Custom Action" option, or choose the "Create" button in the Custom Action section of the top ribbon. This will open the Create New Custom Action window.

3.Enter a name and an appropriate description for the new custom action.

4.Select one or more actions from the left side Available Actions menu and either double click on it or click the Add button in the middle. This Available Action will now be moved to the Selected Actions menu on the right side.
§At any time you can choose a Selected Action and either double click or click Remove to move it back to the Available Action menu.
§You may also choose a Selected Action and Move Up or Move Down to adjust the order of operations.
5.Certain actions will include a placeholder which must be configured to your specifications. For example, the Office 365 Licenses action "Assign License(s)" has a placeholder where you must define which licenses to be assigned during the execution of this Custom Action. You access the configuration by double clicking on the placeholder next to the selected action. This opens a configuration menu for that specific action.
6.Complete the configuration for any placeholders that belong to the Selected Actions.
7.Once your custom action has been built to your requirements, click Finish to save the configuration and return to the Custom Action list.
Once one or more Custom Actions have been created, you can run them in one of a few ways:
You can run a Custom Action from the right click menu after entries have been selected from any View.
Or you can run a Custom Action from the "Manage Custom Actions" view. The benefit of this approach is that you can specify which users to run the action against either by loading a static CSV file or dynamically by selecting an existing View. In order to use this method do the following:
1.Open the "Manage Custom Actions" view by clicking the "Open" button in the Custom Actions section of the top ribbon or by selecting "Manage Custom Actions" from the tenant node's right click menu.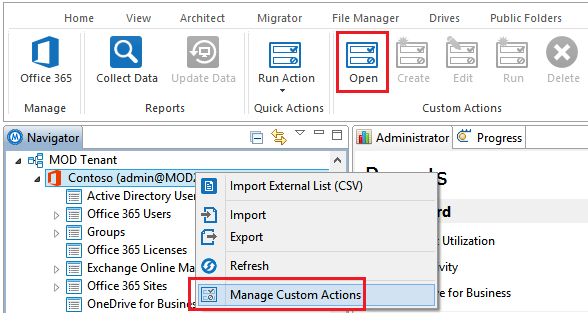
2.From the Manage Custom Actions view, select the Custom Action that you would like to run and either click the "Run" button in the Custom Actions section of the top ribbon, or right click on the custom actions and select "Run Custom Action" from the right click menu.

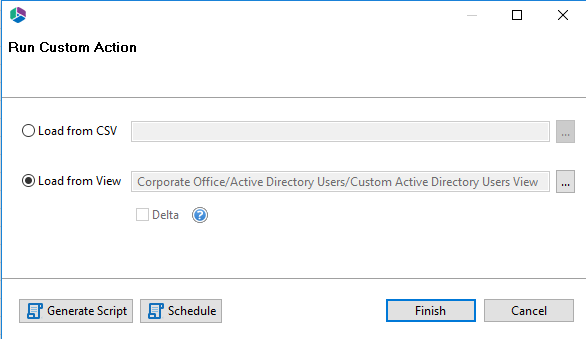
3.The Run Custom Action dialog box will now appear. Select from the option to Load from CSV or Load from View.
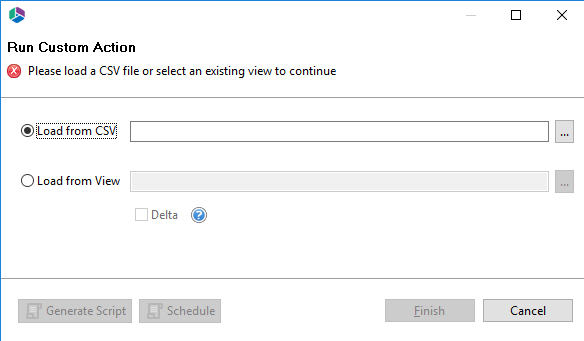
·Load from CSV: This option provides you with the ability to load a specific list of users for which to run the custom action against. The CSV file should be formatted as a single column which contains the Office 365 User(s) accounts to be processed. For example, user01@contoso.com. Load from CSV example file.
·Load from View: This option allows you to select an existing view (default or custom) for which to run the custom action against. The users which are displayed in the view are the only users for which this custom action will be. Please note that this can be a dynamic list of users. For example, if you create a simple custom view where "Sign-in Status equals Blocked" the list of users in this view on Monday may not be the same list of users on Friday, so the custom action may be run against a different set of users every time.
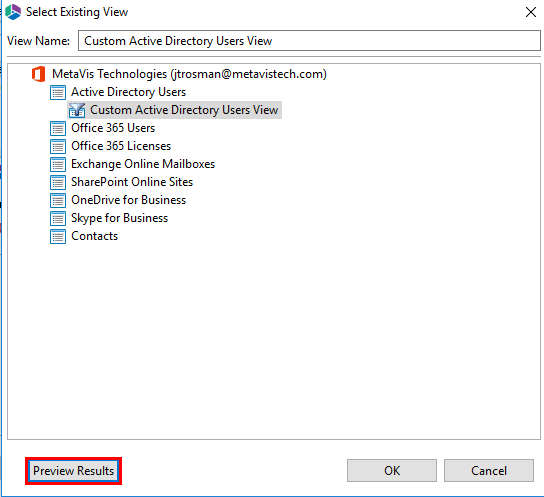
oYou may preview which users will be processed by the use of your custom view by simply selecting the view from the Load from View option and then clicking the Preview Results button.
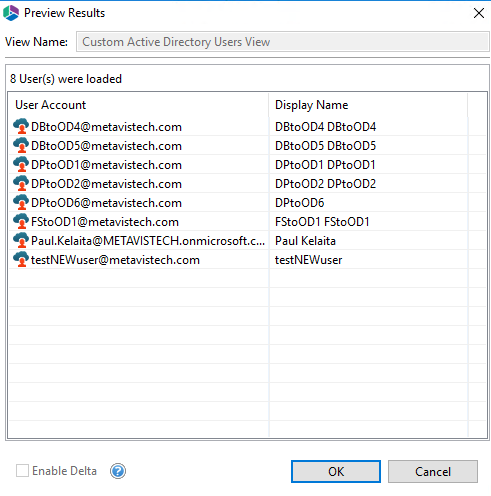
This will open the preview results window, providing an overview of the users that were loaded.
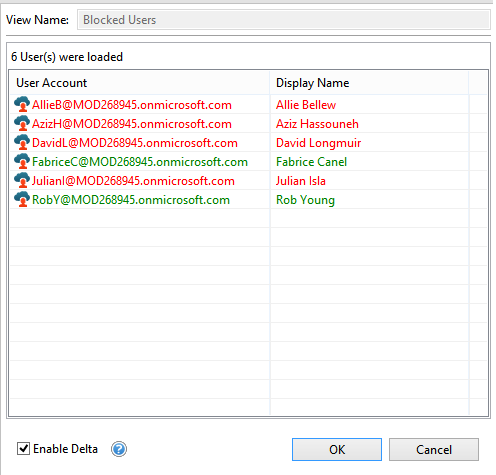
·Delta: The Delta option is only available when the Load from View option is selected and this action has already been run at least one time in the past against this specifically named view. When enabled, this execution of the Custom Action will not process any objects in the current view results that were previously processed in an earlier run. Using the previous example of a view which returns a list of users whose Sign-in Status is Blocked, if this view returns a total list of 4 users on Monday when the action is first run, then the next run on Friday this view may return the same 4 from Monday, plus an additional 2 users that have since been Blocked. With Delta, the custom action will know that the original 4 users were already processed and therefore it will only process the additional 2 users that were added since the last time the action was run.
oYou may preview which users will be processed by the use of your custom view by simply selecting the view from the Load from View option and then clicking the Preview Results button. If this custom action has already been processed against this view at least once in the past, then you may also preview the Delta results by clicking the Enable Delta option. With Delta enabled, the Office 365 User accounts listed in red are the ones that would not have been processed during the next delta operation, while those listed in green would have been processed.
4.After you have either loaded the list of users from a CSV file or from an existing view, you may click the Finish button to begin immediately or the Generate Script or Schedule buttons to process them later.
5.Once the Custom Action has finished running, you can select the View Logs option from the pop-up window notifying you of the completion of the process, or you can select to view Logs later by selecting "logs" from the View section of the top banner.

Import Certificate
When working with an on-premises LDAP server, certain operations like AD password resets are required to take place over a secure connection (SSL). Due to this requirement, our actions will need access to your LDAP certificate. If LDAPS is not already configured in your environment, please talk with your Active Directory Administrator or consider reading the following Wiki article for guidance: http://social.technet.microsoft.com/wiki/contents/articles/2980.ldap-over-ssl-ldaps-certificate.aspx.
Note: Without LDAPS, you will be able to perform all AD operations with the exception of creating users or updating user passwords.
Administrator will support the detection and import of LDAP certificates. When you attempt to perform the first operation that requires a valid certificate, you will receive a message in the log indicating that a certificate is required and has been located. At this point, restart the software and attempt this operation again.
Import External List (CSV)
Import External List will allow you to pre-create a CSV file containing a list of users and associated attributes. Once imported, you can then perform either a Quick or Custom Action against a selected set of these users.
To use this option:
1.Right click on the Tenant level Office 365 node in the Navigator. Choose the "Import External List (CSV)" option.
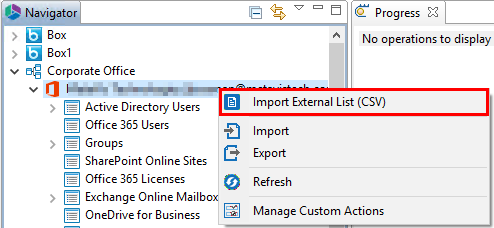
2.Locate and then select your CSV file and click OK to open it within a new Service Manager view.
3.You may now select the users from this view and perform quick or custom actions against them.

Below you will find example templates that can be used to Create new Active Directory Users or Create new Office 365 Cloud Users. If you would like to create your own CSV file, you can do so simply by selecting one or more users from your Active Directory Users or Office 365 Users View and choosing the Export to CSV option.
Download the new Active Directory User example template: Active Directory User Template
Download the new Office 365 Cloud User example template: Office 365 Cloud User Template