Connecting to Google Admin Console
This section describes the process required to connect to Google's Admin Console for running migrations of Google Drives.
1.Open the Google Cloud Developer Console and log in with your Google Admin Account. https://console.developers.google.com
2.At the top-left, click 
3.Click [New Project].
4.Enter a Project name, Organization, and Location then click [Create].
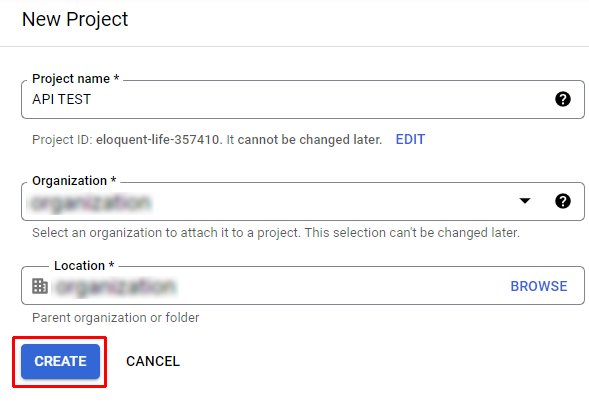
Once the Project has been created you will receive a notification.
5.Select the project from the dropdown.

6.At the top-left, click
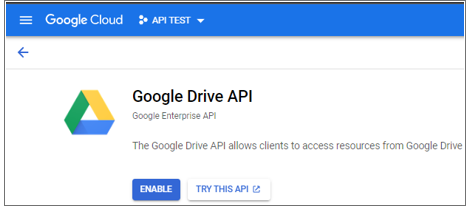
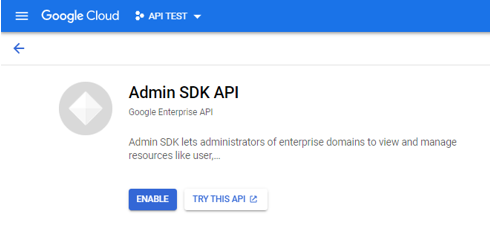
7.Enable the Google Drive API and the Admin SDK API as follows:
a)In the search field, enter the name of the API, then press Enter.
b)In the list of search results, click the API , then click Enable.
8.At the top-left, click
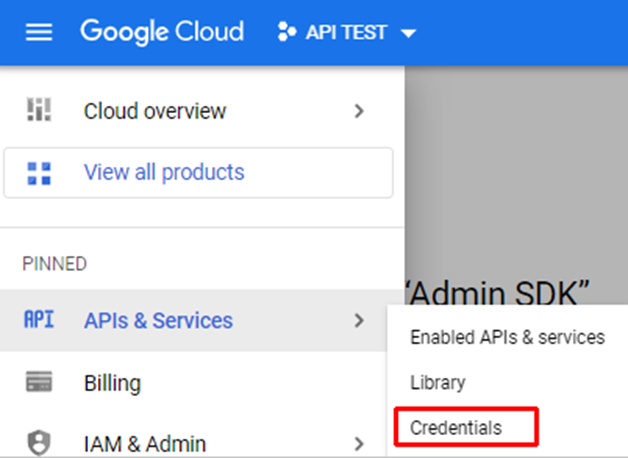
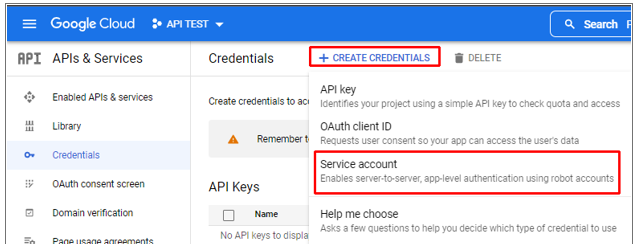
9.On the Credentials page, click Create Credentials then select Service account.
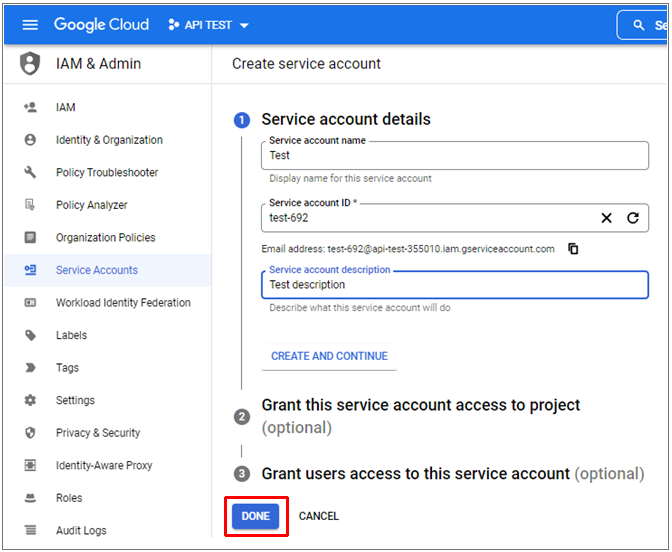
10.In the Service account details section:
§Enter a Service account name, Service account ID, and Service account description.
§Click [Done].
The Credentials overview page displays.
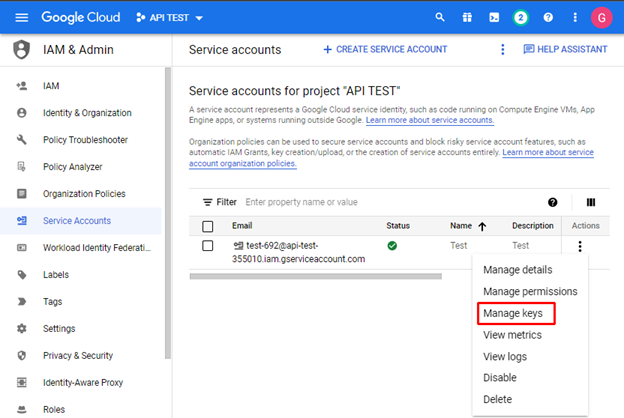
11.Click Manage Service Accounts.

12.For the service account you just created, click the Actions ellipsis and select Manage keys.
13.From the Add Key dropdown, select Create new key.
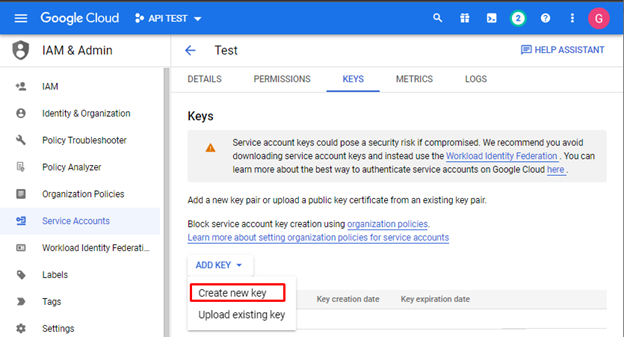
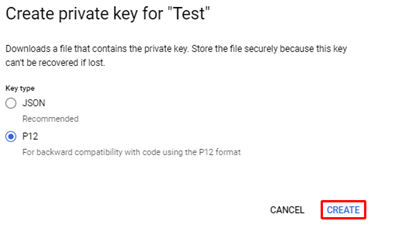
14.For Key type, select P12 then click [Create] to redisplay Service accounts page.
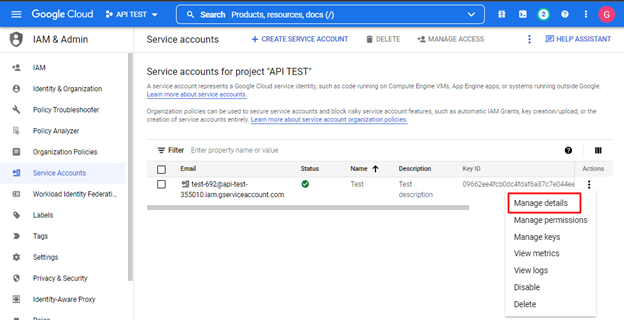
15.For the service account you created, click the Actions ellipsis and select Manage Details to display the Service account details page.
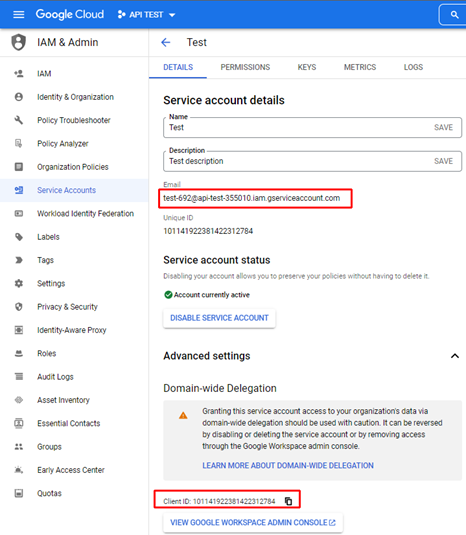
16.Copy into a text file the Service account Email and, from the Advanced Settings section, the Client ID.
17.Click View Google Workspace Admin Console or open a new tab in your browser and go to https://admin.google.com. Log in with your admin account if necessary.
18.At the top-left, click
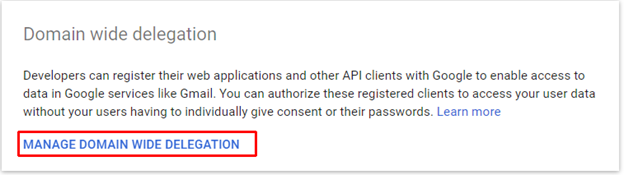
19.In the Domain wide delegation pane, select Manage Domain Wide Delegation to display the Domain Wide Delegation page.
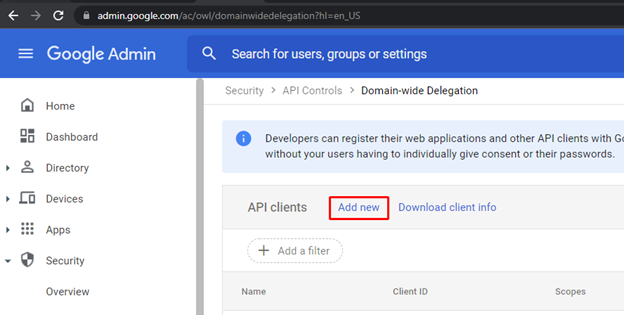
20. Select Add new.
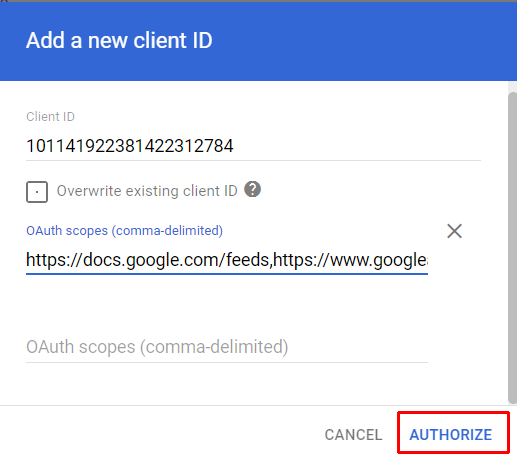
21.Paste in the Client ID that you copied to the text file.
22.In the OAuth scopes section, add the following string exactly as it appears below (or download it in .txt file format here) then click [Authorize].
https://docs.google.com/feeds,https://www.googleapis.com/auth/admin.directory.group.member.readonly,https://www.googleapis.com/auth/admin.directory.group.readonly,https://www.googleapis.com/auth/admin.directory.user.readonly,https://www.googleapis.com/auth/drive,https://www.googleapis.com/auth/drive.file,https://www.googleapis.com/auth/userinfo.email,https://www.googleapis.com/auth/userinfo.profile
23.In the Metalogix Essentials application, go to Drives tab and click Copy Google Drive in the ribbon. Select "Copy Google Drive to OneDrive" from the drop down list.

24.Enter the Google Drive parameters:
a)Admin User Enter the username of the account that was just used to create the service account.
b)P12 Key File Click the Load button and select the .p12 key file you downloaded earlier.
c)Service Account Paste in the service account Email that you saved to the text file.
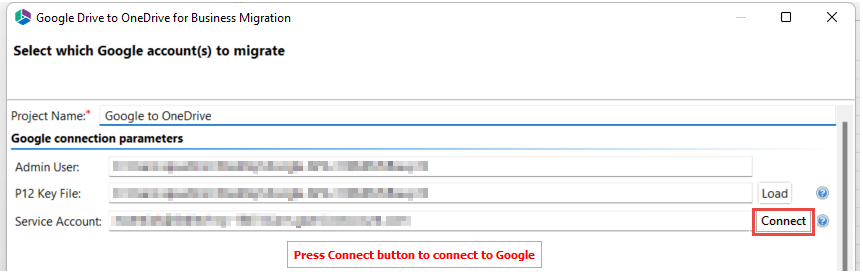
25.Click [Connect].
In a few seconds, you should receive the message Successfully connected to Google Drive.
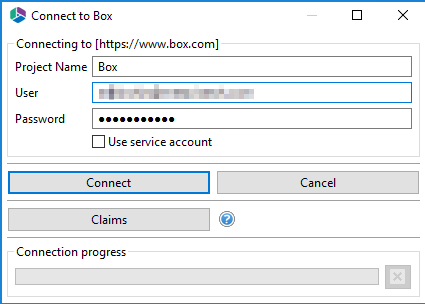
Connecting to Box
If you wish to connect to a Box account, then follow these steps:
1.Start by selecting the Box option in the Connect To section under the Drives tab.

2.The connecting to Box window will pop up. enter a Project name, and your Box Username and Password. Click on Connect or Claims (depending on the authorization settings for your Box service).
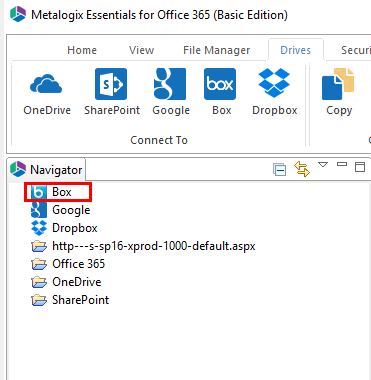
3.Box will now appear in the Navigator tab, located on the left hand side.
Export to CSV
Essentials provides users with the ability to Export a list of Box users to a CSV file. This report can then be used for User Mapping or Source-To-Target CSV file creation for Mass Migrations from the Drives Tab.
The following steps will run through the process of Exporting Box users to a CSV file.
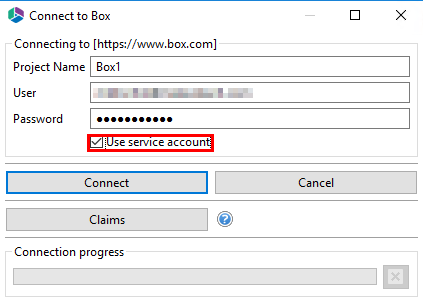
1.In the Essentials console, click on the Drives tab, and select Box. This will open the Connect to Box window.
2.On the Connect to Box window, enter a project name, a Box Admin account and its corresponding Password. Check on the "User Service Account" option. Click on Connect or Claims (depending on the authorization settings for your Box service).
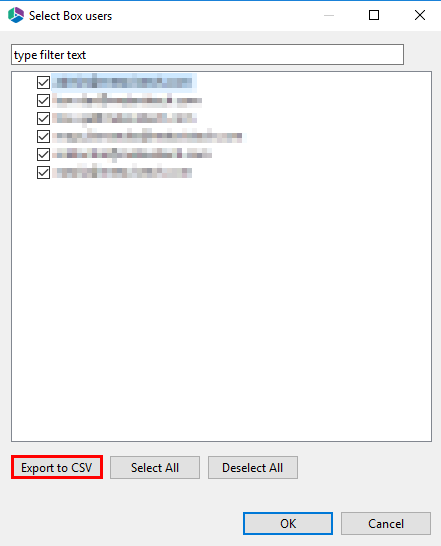
3.Once you're connected to box the Select Box Users window will pop up. Select the users you wish to export to a CSV report and then click the Export to CSV button.
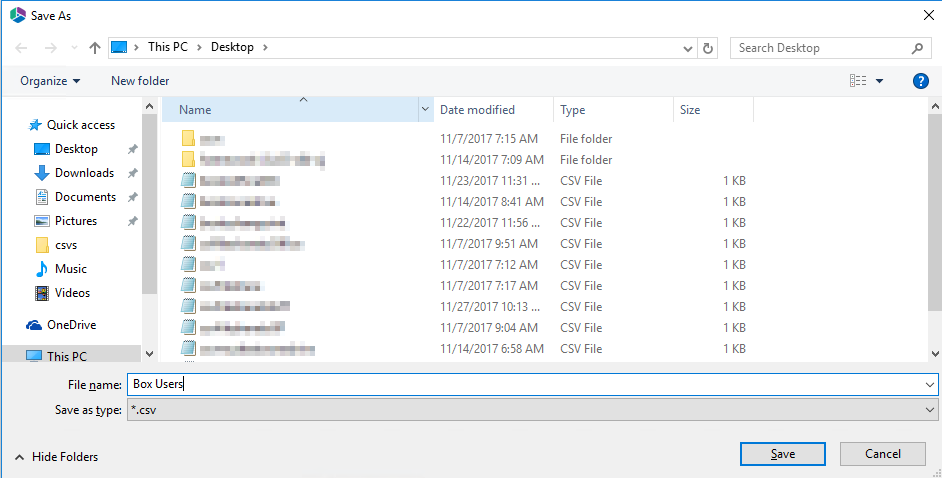
4.Provide your CSV file with a name and click Save.
Connecting to Dropbox
If you wish to connect to a Dropbox account, then follow these steps:
1.Start by selecting the Dropbox option in the Connect To section under the Drives tab.

2.Give your project a name.

3.Enter the username of your Dropbox Administrator.
4.Make sure Dropbox Business - Connection Requirements are met.
5.Use the information in the following table to determine the appropriate action to take.
|
If ... |
Then ... |
|---|---|
|
you have long-term Access Token obtained prior to Metalogix Essentials version 2.10 |
a)Provide the token in the Access Token field. b)Click Connect. |
|
you do not have a long-term Access Token obtained prior to Metalogix Essentials version 2.10 |
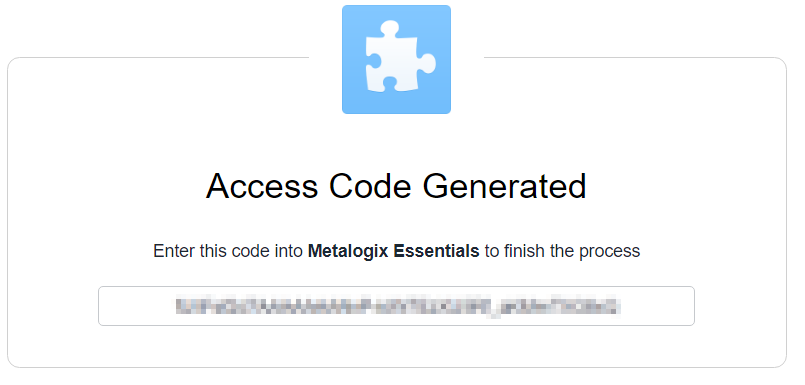
a)Provide the App Key and App Secret obtained from the app Settings page. b)For Access Code, click the Get Code button to connect to the Dropbox OAuth authorization page. c)Click Allow to provide the app with the applicable access permissions and generate an Access Code. d)Copy the generated Access Code and paste it into the Access Code field. e)Click Connect. The Access Token field will be populated automatically and will be refreshed as needed during the course of a migration to prevent the token from expiring. |
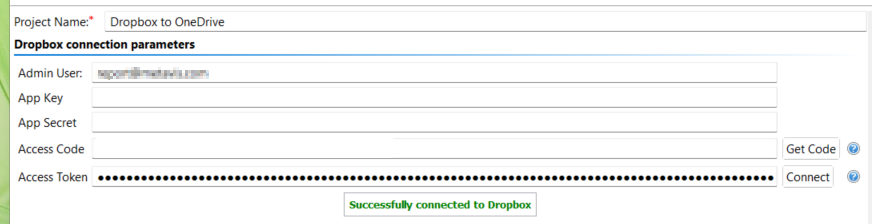
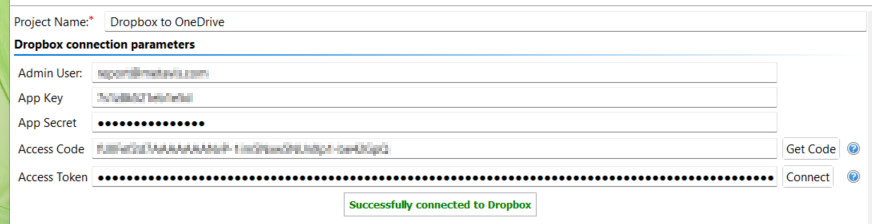
If you receive any message other than Successfully connected to Dropbox, double check your supplied information and try again. If you are still experiencing issues, please contact Support for further assistance.
|
|
NOTE: If you attempt to connect or open a Dropbox drive through the software and it does not respond, please contact support for a updated version of the required framework. |

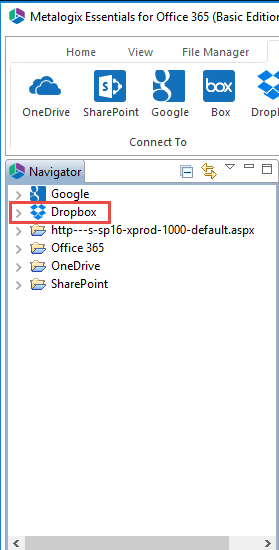
Dropbox will now appear in the Navigator tab located on the left hand side.