Chat now with support
Chat mit Support

Recovery Manager for AD Disaster Recovery Edition 10.1.1 - User Guide

Overview Getting started
Permissions required to use Recovery Manager for Active Directory Recovery Manager Console Getting and using help Configuring Windows Firewall Using Computer Collections Managing Recovery Manager for Active Directory configuration Licensing
Backing up data
Permissions required for the Backup operation Managing Backup Agent Using a least-privileged user account to back up data Using Managed Service Accounts Active Directory backups vs Windows System State backups Creating BMR and Active Directory backups Using the Backup Wizard Retrying backup creation Enabling backup encryption Backing up AD LDS (ADAM) Backing up cross-domain group membership Backing up distributed file system (DFS) data Backup scheduling Setting performance options Setting advanced backup options Using Forest Recovery Agent Unpacking backups Using e-mail notification Viewing backup creation results
Restoring data
Getting started with Active Directory recovery Managing deleted or recycled objects Restoring backed up Active Directory components Integration with Change Auditor for Active Directory Using granular online restore Restoring AD LDS (ADAM) Selectively restoring Active Directory object attributes Restoring objects in an application directory partition Restoring object quotas Restoring cross-domain group membership Performing a restore without having administrator privileges Reports about objects and operations Using complete offline restore Offline restore implications Restoring SYSVOL authoritatively Performing a granular restore of SYSVOL Recovering Group Policy Restoring data from third-party backups Using the Extract Wizard Restoring passwords and SID history
Full Replication Consolidating backup registration data Monitoring Recovery Manager for Active Directory Recovering an Active Directory forest
Forest recovery overview Deploying Recovery Manager for Active Directory Forest Edition (Disaster Recovery Edition) Permissions required to use Forest Recovery Console Forest Recovery Console Managing a recovery project Recovery methods Phased recovery Managing Forest Recovery Agent Rebooting domain controllers manually Resetting DSRM Administrator Password Purging Kerberos Tickets Managing the Global Catalog servers Managing FSMO roles Manage DNS Client Settings Configuring Windows Firewall Developing a custom forest recovery plan Backing up domain controllers Assigning a preferred DNS server during recovery Handling DNS servers during recovery Forest recovery approaches Deciding which backups to use Running custom scripts while recovering a forest Overview of steps to recover a forest Viewing forest recovery progress Viewing recovery plan Viewing a report about forest recovery or verify settings operation Handling failed domain controllers Adding a domain controller to a running recovery operation Selectively recovering domains in a forest Recovering SYSVOL Deleting domains during recovery Resuming an interrupted forest recovery Recovering read-only domain controllers (RODCs) Checking forest health Collecting diagnostic data for technical support
Restore Active Directory on Clean OS Bare metal forest recovery Using Management Shell Creating virtual test environments Using Recovery Manager for Active Directory web portal Appendices
Frequently asked questions Best practices for using Computer Collections Technical characteristics Best practices for creating backups Best practices for creating backups for forest recovery Best practices for recovering a forest Descriptions of recovery or verification steps Ports Used by Recovery Manager for Active Directory Forest Edition (Disaster Recovery Edition) Backup Wizard Online Restore Wizard Online Restore Wizard for AD LDS (ADAM) Group Policy Restore Wizard Repair Wizard Extract Wizard Events generated by Recovery Manager for Active Directory Descriptions of PowerShell commands
Add-RMADBackup Add-RMADCollectionItem Add-RMADFEComputer Add-RMADReplicationConsole Add-RMADStorageServer Backup-RMADCollection Close-RMADFEProject Compare-RMADObject Convert-RMADBackup ConvertTo-RMADRecycledObject Create-RMADStorageManagementAgentSetup Expand-RMADBackup Export-RMADBackup Export-RMADFERecoveryCertificate Export-RMADFEResult Get-RMADBackup Get-RMADBackupAgent Get-RMADBackupInfo Get-RMADBackupObject Get-RMADBackupSecurityStatus Get-RMADCollection Get-RMADCollectionItem Get-RMADDeletedObject Get-RMADFEComputer Get-RMADFEConsole Get-RMADFEDnsCache Get-RMADFEDomain Get-RMADFEEvent Get-RMADFEGlobalOptions Get-RMADFEOperation Get-RMADFEPersistenceConnection Get-RMADFEProject Get-RMADFERecoveryAgent Get-RMADFESchedule Get-RMADGlobalOptions Get-RMADLicenseInfo Get-RMADObject Get-RMADReplicationConsole Get-RMADReplicationSchedule Get-RMADReplicationSession Get-RMADReplicationSessionItem Get-RMADReportObject Get-RMADReportObjectAttributes Get-RMADReportObjectChildren Get-RMADReportSession Get-RMADSession Get-RMADSessionItem Get-RMADSessionItemEvent Get-RMADStorageServers Import-RMADBackup Import-RMADFERecoveryCertificate Install-RMADBackupAgent Install-RMADFERecoveryAgent New-RMADCollection New-RMADFEProject New-RMADFERecoveryMedia New-RMADSchedule Open-RMADFEProject Publish-RMADBackupSecurityStatus Remove-RMADBackup Remove-RMADBackupAgent Remove-RMADCollection Remove-RMADCollectionItem Remove-RMADFEComputer Remove-RMADFERecoveryAgent Remove-RMADFESchedule Remove-RMADReplicationConsole Remove-RMADReplicationSchedule Remove-RMADReplicationSession Remove-RMADStorageServer Remove-RMADUnpackedComponent Rename-RMADCollection Restore-RMADDeletedObject Restore-RMADDomainController Restore-RMADObject Resume-RMADFERecovery Save-RMADFEProject Set-RMADCollection Set-RMADFEComputer Set-RMADFEDnsCache Set-RMADFEDomain Set-RMADFEGlobalOptions Set-RMADFEPersistenceConnection Set-RMADFERecoveryMode Set-RMADFESchedule Set-RMADGlobalOptions Set-RMADReplicationConsole Set-RMADReplicationSchedule Start-RMADFERecovery Start-RMADFEVerification Start-RMADReplication Start-RMADReportViewer Stop-RMADFEWorkflow Update-RMADBackupAgent Update-RMADFEProject Update-RMADLicense

Step 1: Create a virtual lab project

To create a virtual lab project
  • Start the Active Directory Virtual Lab console.

    After the console opens, a wizard starts automatically to guide you through the virtual lab project creation.

    Alternatively, if you have the Active Directory Virtual Lab console already open, from the main menu, select File | New Project, and then follow the steps in the wizard.

When creating a virtual lab project, you are prompted to specify the following:

  • Third-party virtualization software with which to create virtual machines from the source computers.

    The virtualization software must be preinstalled in your environment and be accessible to the Active Directory Virtual Lab. For the privileges required to use the virtualization software, see Permissions.

  • Source Active Directory forest from which to create your virtual test environment.

  • Default hardware settings for creating virtual machines from source computers in the virtual lab project.

If necessary, you can modify these default settings for each virtual machine to be created.

  • A Virtual Lab Project (*.vlproj) file to save your project. You can reuse the settings stored in the .vlproj file to create more virtual test environments in the future.


Step 2: Add source computers to virtual lab project

Once you have created a virtual lab project, you need to populate it with the source computers from which to create virtual machines in your virtual test environment. The source computers can be physical or virtual domain controllers or standalone servers. The source computers added to your virtual lab project are displayed in the List of source computers area.

To add domain controllers to your project
  1. In the Active Directory Virtual Lab console, click the Select DC button.

    In the dialog box that opens, wait until the Active Directory Virtual Lab retrieves information about all domain controllers in the source Active Directory forest.

  2. Select the check boxes next to the domain controllers for which you want to create virtual machines.

    If you do not want specific domains in your virtual test environment, leave the check boxes cleared for all domain controllers in those domains. As a result, the Active Directory Virtual lab excludes these domains from the virtual test environment by cleaning up their metadata.

  3. When you are finished, click OK.

NOTE

We recommend that you select one target domain controller in each domain that hosts AD integrated DNS zone as a primary DNS server and set its target IP address as a DNS server for all other target virtual machines in this domain. The corresponding source domain controller should be the DNS server as well. When all target virtual machines have been created, they have a network interface card (NIC) configured according to the ADVL project settings. During the Enable Network operation, the Primary DNS servers are restarted and IP addresses are updated for all other virtual machines in this domain. After the updated DNS data will be replicated to domain controllers in other domains, other DNS servers in these domains should work as well.

To add a standalone server to your project
  1. In the Active Directory Virtual Lab console, click the Add computer button.

  2. In the dialog box that opens, use the following elements:

    • Computer name. Type the fully qualified domain name (FQDN), NetBIOS name, or IP address of the source standalone server you want to add.

    • User name. Type the user name of the account with which you want to access the source standalone server.

    • Password. Type the password that matches the user name you have specified in the User name text box.

    For information on the permissions the account you specify must have on the source computer, see Permissions.

  3. Click OK to add the standalone server to the virtual lab project.

To remove a source computer from your project
  • In the List of Source Computers area, right-click the computer you want to remove from your project, and then click Remove on the shortcut menu.


Step 3: Modify virtual machine creation settings

By default, the virtual machine creation settings for each source computer in your virtual lab project are populated with the default values you have configured when creating the project (see Virtual lab project default settings).

If necessary, you can modify the virtual machine creation settings for each source computer in the project.

To modify the virtual machine creation settings
  1. In the List of Source Computers, click to select the source computer.

  2. Use the following tabs to modify the virtual machine creation settings as necessary:

    • General tab

    • Hardware tab

    • Active Directory tab

For more information about the options you can use on these tabs, see Virtual machine creation settings and events.

To configure a setting for multiple source computers at once, select those computes in the List of Source Computers (hold down CTRL and click the computers in the list), and then configure the setting you want on the above-listed tabs.


Step 4: Verify virtual machine creation settings

In this step, you verify the virtual machine creation settings specified for each source computer to ensure they are correct. If any issues are found, you are prompted to fix them. You cannot proceed with the virtual test environment creation until you resolve all errors encountered during the verification. Also, you must resolve or ignore the encountered warnings, if any.

To verify the settings in your project
  • In the Active Directory Virtual Lab console, click the Verify Settings button and wait for the verification to complete.

Once the verification completes, you can view its results in a dialog box that opens automatically. If any issues are found during the verification, this dialog box looks similar to the following:

Resources/Images/pic_StepByStep.png

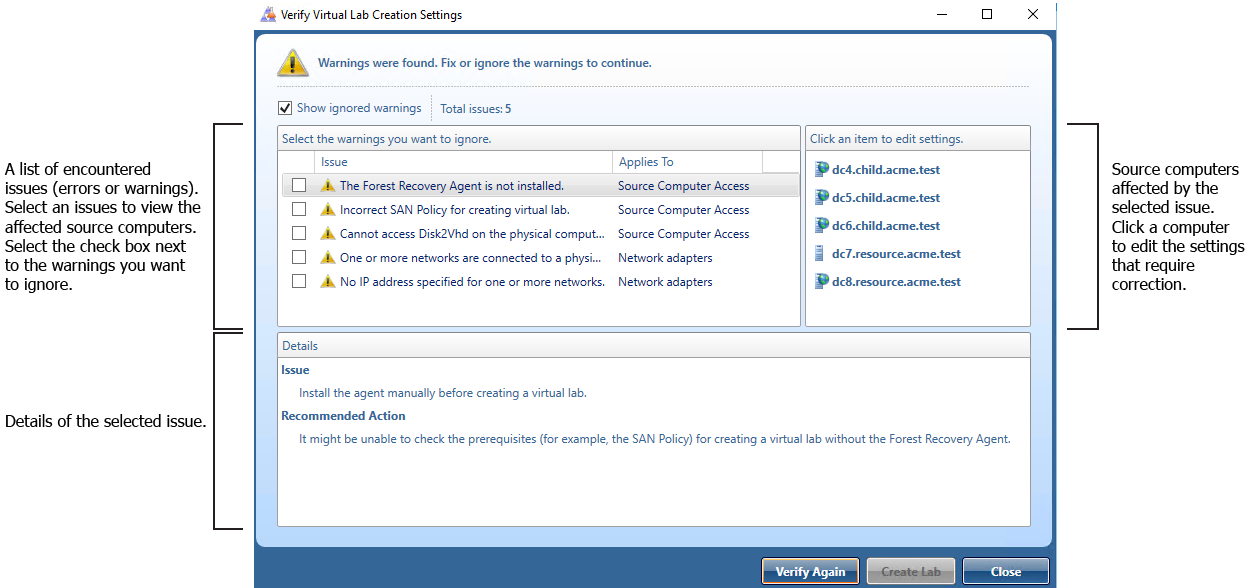
After resolving or ignoring the issues found, click the Verify Again button in this dialog box to re-run the verification operation on the virtual lab project. If the issues have been resolved successfully, the Create Lab button becomes available and you can proceed with the virtual lab creation.


Verwandte Dokumente

The document was helpful.

Bewertung auswählen

I easily found the information I needed.

Bewertung auswählen