
Recovering recycled objects
With Recovery Manager for Active Directory you can only recover recycled objects by restoring them from a backup created with Recovery Manager for Active Directory. Therefore, make sure that you have at least one backup that includes the recycled objects you want to recover.
| NOTE |
Recycled objects can be restored only using the agent-based restore method. This means that the backup that is used to restore recycled objects is created from the target domain controller. For more details, see Agent-based method. |
To recover recycled objects
-
On the Recovery Manager for Active Directory computer, start the Recovery Manager Console, then expand the appropriate console tree node nodes to select the Deleted Objects container in the domain where you want to view a list of recycled objects.
-
From the main menu, select Action | View as Flat List.
-
Filter the objects by the recycled state:
-
In the right pane, select the recycled objects you want to recover. To select multiple objects, hold down CTRL, and click the objects you want to select.
-
From the main menu, select Action | Recover Deleted Objects.
-
Follow the steps in the wizard to restore the selected recycled objects from a backup created with Recovery Manager for Active Directory.
Restoring backed up Active Directory components
Recovery Manager for Active Directory enables the backup and restoration of the following Active Directory components on domain controllers:
-
DIT Database
-
SYSVOL
-
Registry, including all registry hives and the file NTUSER.DAT
To restore backed up Active Directory components
-
Start the Repair Wizard and follow the instructions in the wizard.
-
On the Computer and Backup Selection page, double-click the computer whose backup you want to use, and then double-click the backup you want to use. Click Next.
-
Follow the wizard to walk through the restore process.
With the Repair Wizard, you can restore data from Active Directory backups created by applications that store backups in Microsoft Tape Format (MTF), such as Windows Backup or Veritas Backup Exec. To use a backup, on the Computer and Backup Selection page, click Register, and then click Register Backup File. The wizard catalogs the backup and adds a new entry to the list of backups.
Snapshot backups are not supported by the Repair Wizard. However, you can restore Active Directory data from such backups using the Online Restore Wizard and Group Policy Restore Wizard. The Extract Wizard also supports snapshot backups.
Integration with Change Auditor for Active Directory
Recovery Manager for Active Directory can be integrated with Quest Change Auditor for Active Directory to find out which user modified specific Active Directory objects. Change Auditor is designed to collect information on all critical changes occurred in Active Directory and track user and administrator activity. For more information about Change Auditor for Active Directory, visit https://www.quest.com/change-auditor/.
The Recovery Manager for Active Directory comparison reports on Active Directory objects can provide information on who (which user account) modified the objects being reported. This information is taken from the Change Auditor database.
From version 10.0.1, Recovery Manager for Active Directory restores the deleted object(s) and continuously restores the last change (if any) that was made to the object attributes after creating the backup, using the data from the Сhange Auditor database.
In order to integrate, Recovery Manager for Active Directory and Change Auditor must be installed in the same Active Directory forest. For a list of the Change Auditor for Active Directory versions with which Recovery Manager for Active Directory can be integrated to provide information about the users that modified specific AD objects, see the Release Notes for this version of Recovery Manager for Active Directory.
Required permissions
Read-only access for the Change Auditor database is required.
To enable Change Auditor integration
-
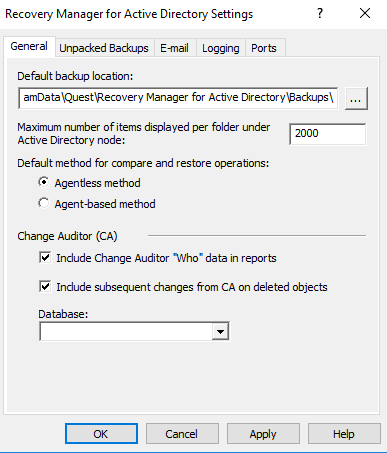
In the Recovery Manager Console, right-click the Recovery Manager for Active Directory console tree root and select Settings.
-
On the General tab the following options are available:
-
Include Change Auditor "Who" data in reports. When this checkbox is selected, the comparison report includes information on users who modified certain Active Directory objects. To use this option, you must have Change Auditor for Active Directory installed in the home Active Directory forest of Recovery Manager for Active Directory.
-
Include subsequent changes from CA on deleted objects. When this option is selected, Recovery Manager for Active Directory restores deleted object(s) and continuously restores the last change (if any) that was made to the object attributes after creating the backup.
-
Database. Allows you to specify the name of Change Auditor database.
To specify the CA database server, instance, port, and name, use the following format: <Server Name>\<Instance Name>,<Port>\<Database Name>. Example: testserver.domain.com\testinstance,1432\ChangeAuditorDB
-
| NOTE |
You can disable or enable Change Auditor integration later in the Online Restore Wizard for particular recovery sessions. |
Details and limitations related to the continuous recovery ("Include subsequent changes from CA on deleted objects" option):
-
The Continuous recovery feature lets you reapply all the object changes that were made between the backup creation and the object deletion.
-
Without the Change Auditor integration, the deleted object will be restored to the state in the backup.
-
With the Change Auditor integration, the deleted object will be restored with both Change 1 and Change 2.
-
Recovery Manager for Active Directory cannot restore only Change 1 or Change 2.
-

- The Continuous recovery feature can be used only for deleted objects. It does not make sense to restore the object from backup and then apply Change 1 and Change 2, because it just gives the object's current state. Note that restore of Change 1 or Change 2 only is not supported by Recovery Manager for Active Directory - but supported by Change Auditor. For details, see the Change Auditor for Active Directory documentation.

-
Support for restore of non-string attributes, single string, and multiple string attributes.
-
Support for the member/memberOf linked attributes. Other linked attributes cannot be restored. For instance, there is a backup that contains User 1. Then, the customer creates a new group and adds User 1 in this group. Then, User 1 is deleted. If the customer wants to combine data from backup and changes that were made between creating the backup and user deletion (data from the Change Auditor database) - User 1 will be restored as a member of this group.
To generate a report that shows who modified specific AD objects
-
To start Online Restore Wizard, open Recovery Manager Console. Then right-click the Recovery Manager for Active Directory console tree root and select Online Restore Wizard.
-
Step through the wizard until you are on the Wizard Operation Mode page, then do one of the following:
-
If you want to compare AD objects in a backup against those in live Active Directory or restore AD objects and view the restore operation report, select Compare, restore, and report changes in Active Directory.
-
If you want to compare Active Directory objects in two backups, select Compare two backups and report the differences.
-
-
Step through the wizard until you are on the Action Selection page. Select Compare, analyze, and, optionally, restore.
-
Step through the wizard until you reach the Reporting Options page. Select Generate report, then specify what kind of information you want in the report.
-
Select the Include Change Auditor "Who" data in reports check box, and then specify the Change Auditor database you want to use. Also, you can select the Include subsequent changes from CA on deleted objects option.
-
Step through the wizard until you reach the Operation Option page. Click View Report.
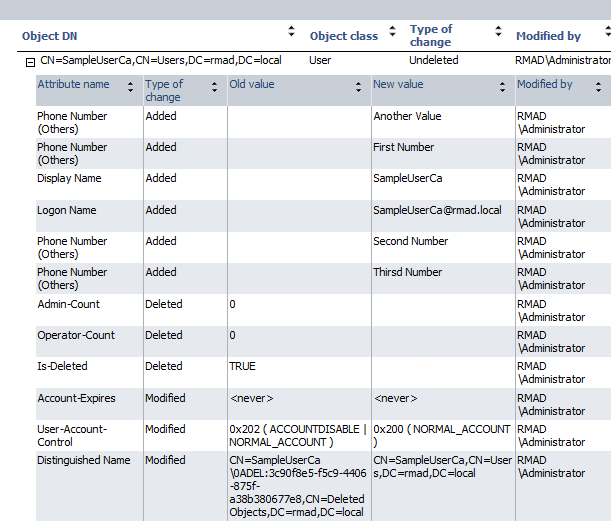
The Comparison report provides the following information:
-
Old value column shows data from the backup or Change Auditor database.
-
New value column shows changes that occurred in Active Directory since the last backup.
-
Modified by column provides information on who modified particular Active Directory objects (only if you use integration with Change Auditor)

The Restore report provides the following information:
-
Old value column shows changes that occurred in Active Directory since the last backup.
-
New value column shows data that were restored from the backup or Change Auditor database
-
Modified by column provides information on who modified particular Active Directory objects (only if you use integration with Change Auditor)
Using granular online restore
The granular online restore method allows you to retrieve individual directory objects from a backup, and then restore them to a domain controller. The operation can be performed on any domain controller that can be accessed remotely. In addition, granular online restore does not require you to restart the target domain controller, nor does it affect any directory objects that are not selected for recovery.
In addition to selectively restoring individual Active Directory objects, the granular online restore method allows you to selectively restore individual attributes of objects in Active Directory, such as the User Password, Group Membership, or User Certificate attributes of a User object. The ability to restore selected attributes ensures that valuable changes, made to Active Directory objects since the time the backup was created, are not overridden. This provides the flexibility to efficiently resolve potential problems that may result from the improper modification of individual attributes of Active Directory objects.
The granular online restore should be used in situations where important object data has been inadvertently deleted or changed in Active Directory, and the changes have been propagated to other domain controllers. To recover from such an event, you can carry out a granular online restore to Active Directory using a backup that was created before the objects in question were deleted or modified.
After Recovery Manager for Active Directory completes a granular online restore on the target domain controller, the restored objects are replicated to the other domain controllers via the normal replication process. Given that the objects recovered by a granular online restore have a higher version number, recently deleted or modified object data is ignored during replication.
Granular online restore allows you to roll back changes made to Active Directory, and return individual directory objects and attributes to the state they were in when the backup was created. It is important to note that a granular online restore only affects the objects and attributes selected for recovery. All other objects remain unchanged in Active Directory. Furthermore, if the value of an attribute in Active Directory is identical to the value it has in the backup, the granular online restore does not attempt to change the attribute.
A granular online restore is especially useful when you need to recover some directory objects in a short period. For example, suppose a user account is accidentally deleted from Active Directory but exists in a backup. To recover that user account, you can perform a granular online restore, selecting the user account from the backup. The selected user account is restored to Active Directory with the same properties and permissions that it had when the backup was created. No other user accounts are affected.
To perform granular online restore, start the Online Restore Wizard and follow the instructions in the wizard.
| Note |
Recovery Manager for Active Directory can also recover individual AD LDS (ADAM) objects. To restore AD LDS (ADAM) objects, use the Online Restore Wizard for AD LDS (ADAM). |
Granular online restore is always authoritative: it restores Active Directory object data to the state the data had when the backup was created, and any updates that were made after that point are lost. After Recovery Manager for Active Directory completes a granular online restore on the target domain controller, the restored objects are replicated to the other domain controllers via the normal replication process. Given that the objects recovered by a granular online restore have a higher version number, recently deleted or modified object data is ignored during replication.
Recovery Manager for Active Directory supports granular online restore from BMR backups.