Discovering Site Contents
Discovering the site structure and content provides a better understand of the scope of the migration. The SharePoint contents list displays the following SharePoint object types: Site (site collection), Web (root site), Lists, Webs (sub sites, child sites). The display will include the number of lists and the number of items in each list.
In this topic:
Starting a Discover SharePoint Contents Task
- Log in to Quest On Demand and choose an organization if you have set up multiple organizations.
- From the navigation pane, click Migrate > Projects to open the My Projects list.
- Create a new project or open an existing project.
- Click the SharePoint tile, or click Open from the SharePoint tile to open the SharePoint migration workspace.
- Click the SharePoint Contents tab to open the SharePoint Contents list view.
- Choose one or more sites by selecting the respective check box for the site. You can select the check box in the column header to select all sites.
- Click Discovery > Discover SharePoint Contents from the Actions ribbon. The New Discover SharePoint Contents Task wizard starts. Each step is described below:
- Options
- Task Name - name of the task. You can specify a custom name. The default name is Discover SharePoint Contents.
- Collect forms and workflow statistics - select this option to count the number of Infopath forms and workflows associated with the selected sites.
- Click Next.
- Notification
- Send notification email once the task is completed - select this option to send a notification email when a discovery task completes.
- Only in a case of failure - Select this option to send the email if the discovery task fails to complete successfully.
- Recipients - enter the email address of the recipients of this email. You can specify multiple recipient email addresses separated by semicolon.
- Click Next.
- Schedule
- Choose from one of three options to schedule the task. The scheduler will be activated after you complete the task wizard.
- Run now - task runs immediately.
- Run later - task must be started manually.
- Schedule - task will be started at a future date and time entered in the corresponding calendar field.
- Priority - select a priority from the dropdown for the objects scheduled for migration with this task . Values are: Highest, High, Medium, Low and Lowest. The default priority is Medium. If the system is busy, the objects are queued (Migration state = Queued). When the system accepts new migration work, objects are taken from the queue based on the assigned priority and age in the queue.
- Click Next.
- Summary
- Verify the task specifications as described below:
- Name - name of the task. You can specify a custom name. The default name is Discover SharePoint Contents.
- Source tenant - name of the tenant where the statistics will be collected.
- Scheduled start - date and time when the task will start. Now indicates that the task will start immediately.
- Click Back to revise or review a previous step or click Finish to complete the task wizard and start the task as scheduled.
Viewing the SharePoint contents
- Log in to Quest On Demand and choose an organization if you have set up multiple organizations.
- From the navigation pane, click Migrate > Projects to open the My Projects list.
- Create a new project or open an existing project.
- Click the SharePoint tile, or click Open from the SharePoint tile to open the SharePoint migration workspace.
- Click the SharePoint Contents tab to open the SharePoint Contents list page.
- To view the contents for a specific site:
- Clear any filters in the Filter panel
- Set the Type filter to Site from the dropdown list. The list of sites and site collections are displayed.
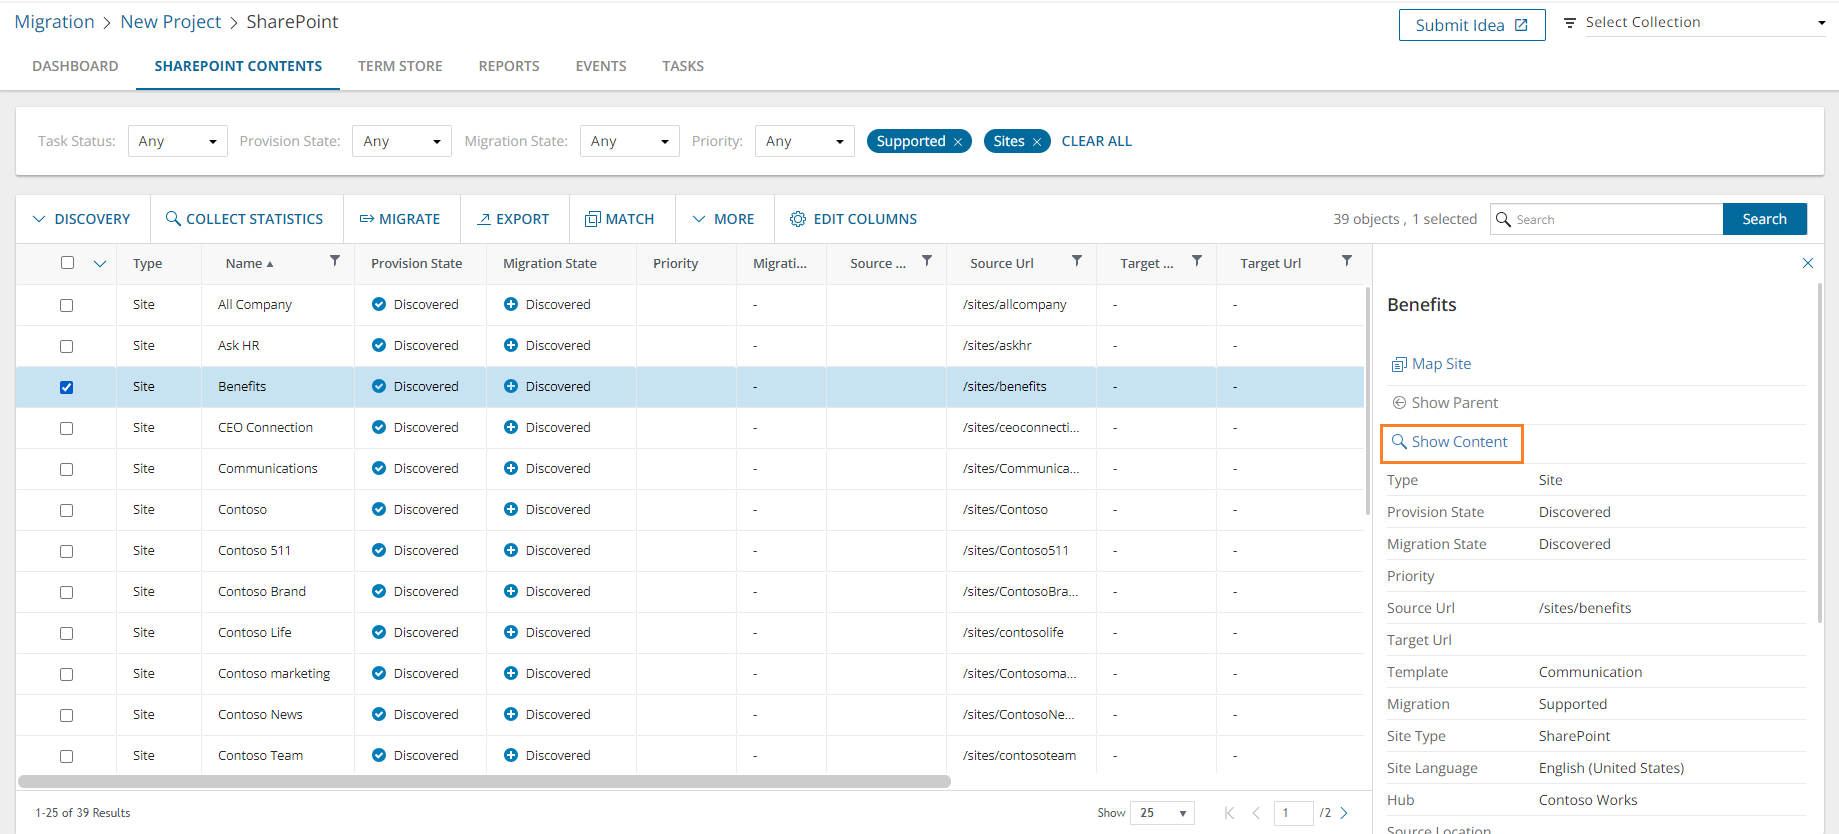
- Select a site by clicking the corresponding check box. The site detail panel opens.
- Click Show Content. The site contents are displayed in the list.
- To view the contents for a specific content type:
- Clear any filters in the Filter panel
- Set the Type filter to a content type from the dropdown list. The list of content types are displayed.
Reviewing the premigration report
- Select the Tasks tab in the SharePoint workspace.
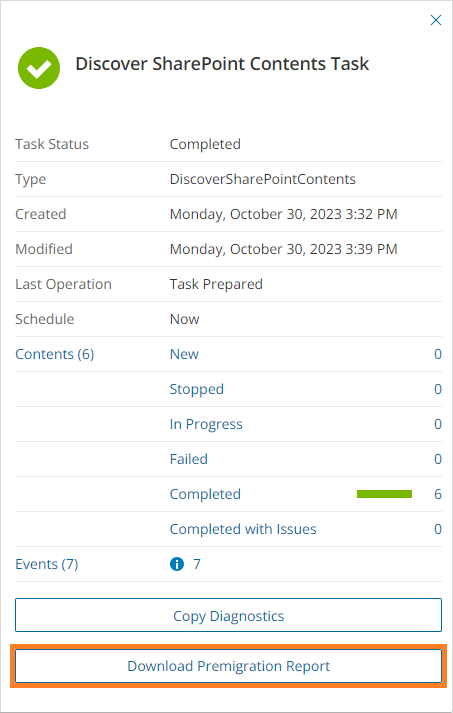
- Select the Discover SharePoint Contents Task that you want to review.
- From the task detail pane, click Download Premigration Report.
- Download and save the ZIP file to a suitable folder, and extract the report.
|

|
NOTE: This premigration report covers all the site contents for the specific sites selected for this task. Premigration reports for all sites (excluding site contents) are also available from the following tasks:
- Discover All Sites
- Discover Sites from File
|
Comparing Site Contents
The Compare SharePoint Content task compares items in the list between source and target tenants.
- For tasks that include site and web all the child list and libraries will be compared.
- Comparison is only supported for list and libraries previously migrated by the ODMSP service.
- Comparison is done based on the item's UniqueID which is maintained when the ODMSP service migrates an item to the target. List item, files and folders are compared.
In this topic:
Starting a Compare SharePoint Contents Task
- Log in to Quest On Demand and choose an organization if you have set up multiple organizations.
- From the navigation pane, click Migrate > Projects to open the My Projects list.
- Create a new project or open an existing project.
- Click the SharePoint tile, or click Open from the SharePoint tile to open the SharePoint migration workspace.
- Click the SharePoint Contents tab to open the SharePoint Contents list view.
- Choose one or more sites, webs or lists that have been previously migrated, by selecting the respective check boxes.
- Click More > Compare from the Actions ribbon. The New SharePoint Compare Task wizard starts. Each step is described below:
- Notification
- Task Name - name of the task. You can specify a custom name. The default name is Compare SharePoint Content.
- Send notification email once the task is completed - select this option to send a notification email when a discovery task completes.
- Only in a case of failure - Select this option to send the email if the discovery task fails to complete successfully.
- Recipients - enter the email address of the recipients of this email. You can specify multiple recipient email addresses separated by semicolon.
- Click Next.
- Schedule
- Choose from one of three options to schedule the task. The scheduler will be activated after you complete the task wizard.
- Run now - task runs immediately.
- Run later - task must be started manually.
- Schedule - task will be started at a future date and time entered in the corresponding calendar field.
- Priority - select a priority from the dropdown for the objects scheduled for migration with this task . Values are: Highest, High, Medium, Low and Lowest. The default priority is Medium. If the system is busy, the objects are queued (Migration state = Queued). When the system accepts new migration work, objects are taken from the queue based on the assigned priority and age in the queue.
- Click Next.
- Summary
- Verify the task specifications as described below:
- Name - name of the task. You can specify a custom name. The default name is Compare SharePoint Content.
- Source tenant - name of the tenant where the statistics will be collected.
- SharePoint objects selected - number of SharePoint object that are selected for comparison.
- Priority - the priority of this task.
- Click Back to revise or review a previous step or click Finish to complete the task wizard and start the task as scheduled.
Reviewing the comparison report
One report is generated for each list in the site, web or lists selected. All items are included in the CSV report for lists that contain up to 100,000 items. For lists above 100,000, all matched items are not included in the CSV report, but only differences are reported.
- Select the Tasks tab in the SharePoint workspace.
- Select the Compare SharePoint Content task (or whatever custom name you have assigned).
- From the task detail pane, click Reports. The Reports list opens with a predefined filter on the task that you selected.

- From the Reports list, select a list and click Download from the Download Log column to save the CSV file to your default download folder.
- The Comparison Status column has the following values:
- Matched - items with the same ID are on source and target with same modified date.
- Only on source - item is only on source.
- Only on target - item is only on target.
- Newer on source - version of item with the same ID is newer on the source than the target.
- Newer on target - version of item with the same ID is newer on the target than the source.
- Different name - Items with the same ID but different names are on the source and target i.e. file was renamed.
- You can check the Modified date to determine which is newer.
- Different location - Item with same ID but in a different location or path are on the source and target i.e. file was moved within the list.
- Modified date remains the same as the move operation in SharePoint does not change the modified date.
- If a file was renamed and moved it is indicated as Different Location.
Mapping Webs
Webs or sub-sites that have not been migrated can be renamed, mapped to a different parent, or promoted to a site in the target tenant. When these objects are migrated, they will be renamed, relocated to the new parent or promoted to a site. The web is retained in the source tenant but set as Relocated (ie., not migratable)
The conditions for mapping a web to another web are as follows:
- Web has not been previously migrated.
- Web is not a root web.
If a web is promoted to a site, then:
- Site must have a new name.
- A new site and member objects are cloned form the web's parent site.
- Web is cloned as the root web of the new site.
- Children of the web are re-parented under the cloned web.
- Migrate the new site to complete the migration of the promoted web
Example: Consider the promotion of a web (\sites\HR\Benefits) to a site (\sites\HR-Benefits). When the task completes, the SharePoint Contents list will display the following:
| Site |
HR |
\sites\HR |
|
| Web |
HR |
\sites\HR |
|
| Site |
HR-Benefits |
\sites\HR |
\sites\HR-Benefit |
| Web |
HR-Benefits |
\sites\HR |
\sites\HR-Benefit |
Limitations
- Links from the source web may not be updated on target. For example, links to the old parent.
- For webs with unique SP Groups the groups may be duplicated.
To map a web
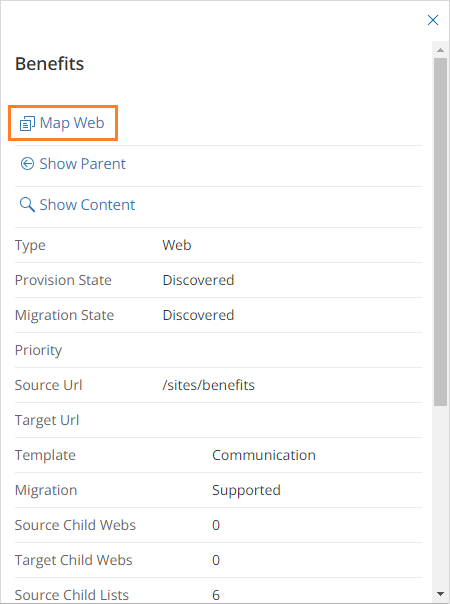
- Open the SharePoint contents tab and locate the list. You can use the list filter Type = Web to narrow down your search.
- Select a web that has not been migrated. You can select only one web at a time. Then click Map Web from the list detail pane.
- The New Web Mapping Task wizard starts. Specify the information in the steps described below:
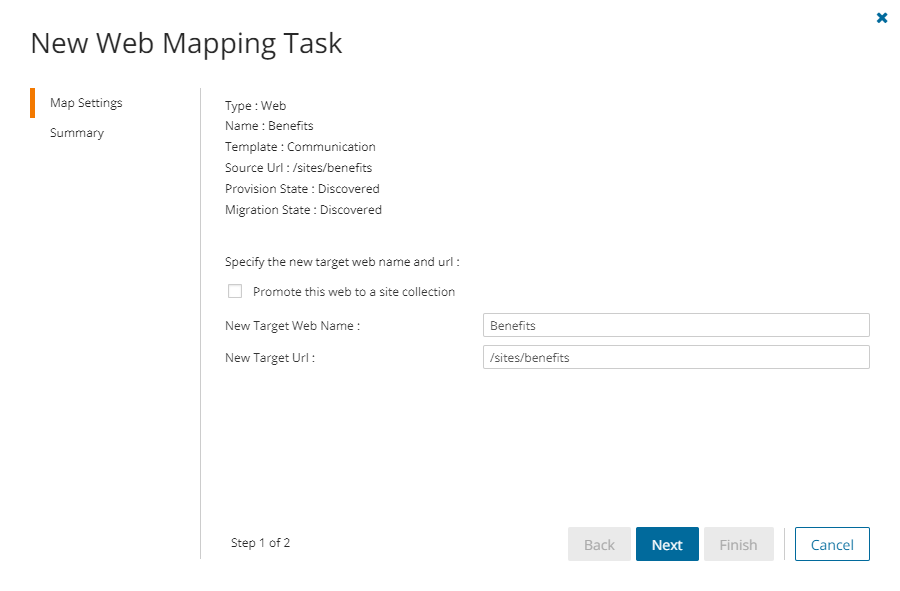
- Map Settings
- Promote this web to a site collection - select this option to promote the web to a site. Webs with unsupported templates cannot have the template remapped and be promoted to site, so this setting will is displayed if the selected web has a supported template.
- Specify the new name and relative url
- New Target Web Name - specify the new name of the target web if necessary, or retain the original name if you want to relocate the web.
- New Target Url - Enter the new relative url of the web if you plan to relocate the web. This option is not available if the web is promoted to a site.
- Specify a supported target web template. This option is available if the selected site has an unsupported template.
|
|
NOTE:
To find webs with unsupported web templates, clear the filters in the search ribbon. Then set the following filters: Migration = Unsupported and Type = Web
When you use a supported template, the original web features may not be provisioned. However, supported lists and list items can now be migrated to the target tenant. |
- New Target Web Template - choose Teams site (no Microsoft 365 group) from the dropdown.
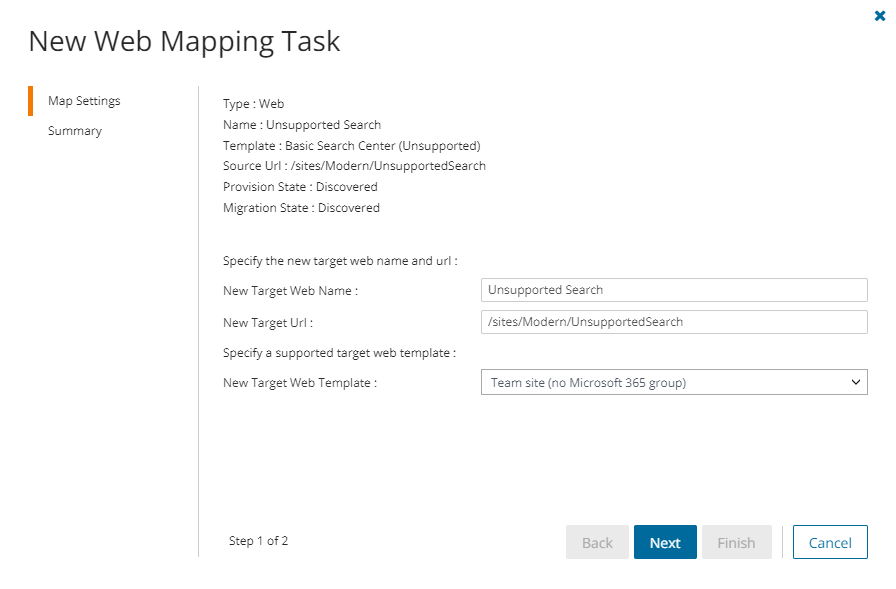
- Click Next.
- Summary
- Verify the task specifications as described below:
- Name - name of the task. The default name is Map Single SharePoint Object Task. You can specify a custom name.
- New Target Web Name - new name of the target web
- New Target Url - relative url of the site or web in the target tenant.
- Click Back to revise or review a previous step or click Finish to complete the task wizard and start the task as scheduled.
- You can track the progress in the Tasks tab, monitor alerts and notifications in the Events tab and view the summary on the Dashboard.
- When the task completes, the SharePoint Contents list is updated. Compare the Source Urlcolumn with the Target Url column for the selected web. The Provision state of the selected web is set to Mapped.
Mapping Lists
Lists or libraries that have not been migrated can be mapped to a different web on the target tenant or mapped to an existing list. When these objects are migrated, they can be relocated to the new SharePoint web or merged with a target list. This web can be in the same site or a different site.
- The web in the target tenant must exist before the mapping otherwise mapping will fail.
- Previously migrated lists cannot be mapped to a different web.
- The source and target lists must have the same template type.
- The list mapping will be used by a migration task that includes the list.
- If lists are merged during migration, then
- List objects merged
- Content types
- List columns
- List Items (with permissions)
- List objects not merged
- List settings including Title and Description
- List Permissions
- Views
- Alerts
To map a list to a different site or web
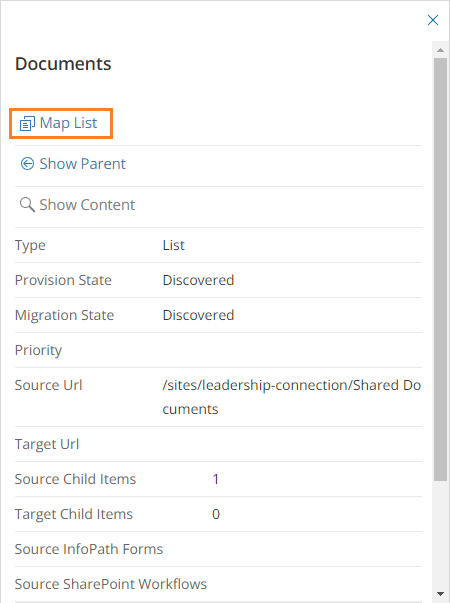
- Open the SharePoint Contents tab and locate the list. You can use the list filter Type = List to narrow down your search.
- Select a list that has not been migrated. You can select only one list at a time. Then click Map List from the list detail pane.
- The New List Mapping Task wizard starts. Specify the information in the steps described below:
- Map Settings
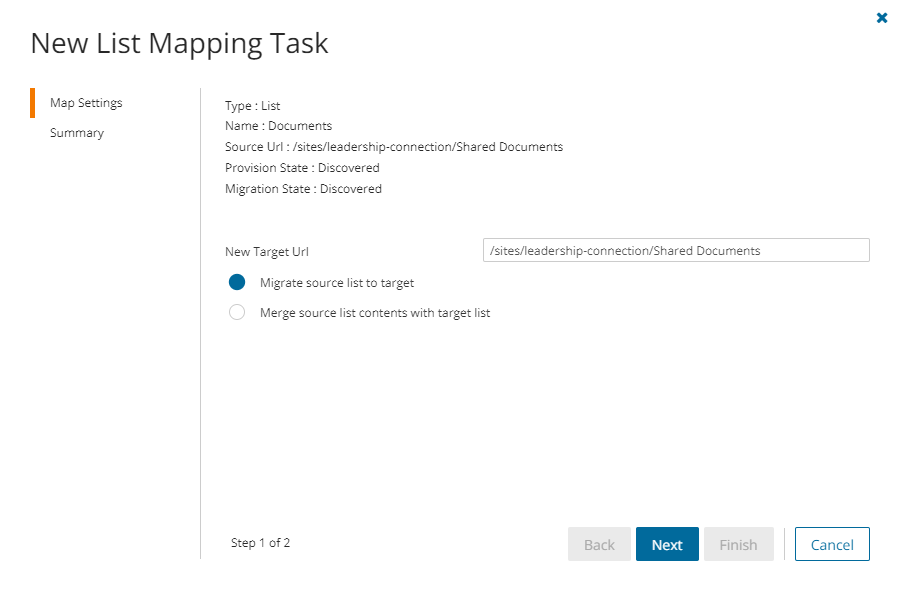
- Specify the new name and relative url
- New Target Url - Enter the new name of the list or retain the original name. You can specify a different url in the target tenant to relocate the site if necessary.
- Choose a the mapping option
- Migrate source list to target - select this option to migrate the contents of the source list to the specified target list
- Merge source list contents with target list - select this option to merge the contents of the source list with the specified target list.
- Click Next.
- Summary
- Verify the task specifications as described below:
- Name - name of the task. The default name is Map Single SharePoint Object Task. You can specify a custom name.
- New Target Url - the relative url of the site or web in the target tenant.
- Map option - option to match sub-sites and other descendant structures.
- Click Back to revise or review a previous step or click Finish to complete the task wizard and start the task as scheduled.
- You can track the progress in the Tasks tab, monitor alerts and notifications in the Events tab and view the summary on the Dashboard.
- When the task completes, the SharePoint Contents list is updated. Compare the Source Urlcolumn with the Target Url column for the selected list. The Provision state of the selected list is set to Mapped.
