立即与支持人员聊天
与支持团队交流

On Demand Migration Current - User Guide

About On Demand Migration Working with On Demand Migration Account Migration Mailbox Migration OneDrive Migration Microsoft Teams Migration Microsoft 365 Groups Migration SharePoint Migration Public Folders Migration Power BI Migration Troubleshooting Finalizing the Migration Appendix A: Using PowerShell Appendix B: How Queuing Works

Migrating Workspaces

In this topic:

Prerequisites

Any Connections that are required by Reports must be migrated before scheduling a Workspace migration.

The Default Target Admin User configured in your Power BI project, is added to migrated Workspaces to ensure that access to migrated Workspaces is retained if a matching administrator account is not available for a migrated Workspace. We recommend that you retain this for safety.

Considerations

Your target tenant might already host Power BI Workspaces created before the migration. In cases where a Workspace name already exists in the destination, the migration will merge report, semantic model and Workspaces permissions data from the source tenant.

After Workspace migration, report users will remain the same as the users in semantic model.

We recommend that you run only one migration task at a time to avoid scheduling delays.

Starting a Migrate Workspace Objects Task

  1. Log in to Quest On Demand and choose an organization if you have set up multiple organizations.
  2. From the navigation pane, click Migrate > Projects to open the My Projects list.
  3. Create a new project or open an existing project.
  4. From the Power BI tile on the project dashboard click Open. Then select the Workspaces tab.
  5. Select one or more Workspace that you want to migrate.
  6. Click Migrate in the List View menu. The New Migrate Workspace Objects Task wizard starts.
  7. Start
    1. Task Name - You can specify a custom name. The default name is Migrate Workspace Objects.
    2. Use the settings from an existing migration template for this task - select this option if you have already saved a previous migration templates. if this is the first time you are migrating mailboxes, keep this option unchecked.
      • Select template - select a template that you previously created, from the dropdown list.
    3. Go to Summary step - select this option to preserve the settings and go directly to the last step of the wizard. If you do not select this option, but you have selected a template, you can step through the wizard and edit the settings in the template.
    4. Click Next.
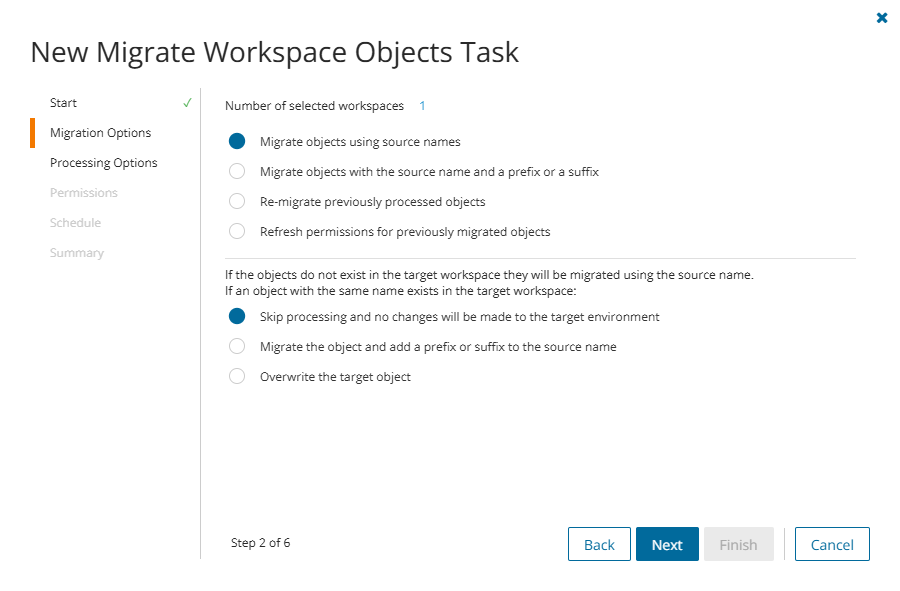
  8. Migration Options

    1. Migrate objects using source names - If the objects do not exist in the target workspace they will be migrated using the source name. If a source object with the same name exists in the target workspace, choose from the following collision handling options:
      • Skip processing and no changes will be made to the target environment
      • Migrate the object and add a prefix or suffix to the source name

        Enter a prefix or suffix as described below:

        • Add prefix - specify a prefix for the workspace object name. Whitespaces are not supported.
        • Add suffix - specify a suffix for the workspace object name. Whitespaces are not supported.

      • Overwrite the target object
    2. Migrate objects with the source name and a prefix or a suffix - Select this option to always create new objects in the target workspace using the specified prefix or suffix for the object names. This task will skip any objects with the new name if they already exist in the target workspace..

      Enter a prefix or suffix as described below:

      • Add prefix - specify a prefix for the workspace object name. Whitespaces are not supported.
      • Add suffix - specify a suffix for the workspace object name. Whitespaces are not supported.

    3. Re-migrate previously processed objects - select this option to remigrate workspace objects that were previously migrated and replace the target workspace object with the source object.
    4. Refresh permissions for previously migrated objects - select this option will not migrate new objects. It will only update permissions for previously migrated objects based on the Permissions selections.
    5. Click Next.
  9. Processing Options
    1. Skip rebind - Select this option to prevent Power BI from retaining the data source connection for reports during migration. After migration, data in the reports cannot be refreshed in the target tenant because the original data source connection information has not been migrated. If you clear this option, data source connection will be migrated but some unsupported data sources connection types, like SQL with OAuth 2.0 authentication will be skipped. See What we migrate for supported data types.
      • Skip connection rebind for unsupported connections only - select this option to check the connection type for a semantic model. If the connection type is supported then the data source connection for reports is retained, otherwise the data source connection rebind is skipped during migration.
      • Always skip connection rebind - select this option to migrate all reports and semantic models without processing the connection to the original source data.
    2. Include reports created with a live connection to the Power BI Service - select this option to migrate reports that were created with a live connection to a previously published semantic model.

      NOTE: At least one report must be directly bound to a semantic model without a live connection.

    3. Maintain semantic model names during export - select this option to retain the source semantic model name when this is extracted though the Power BI export process, and not the default report name for the semantic model.
  10. Permissions
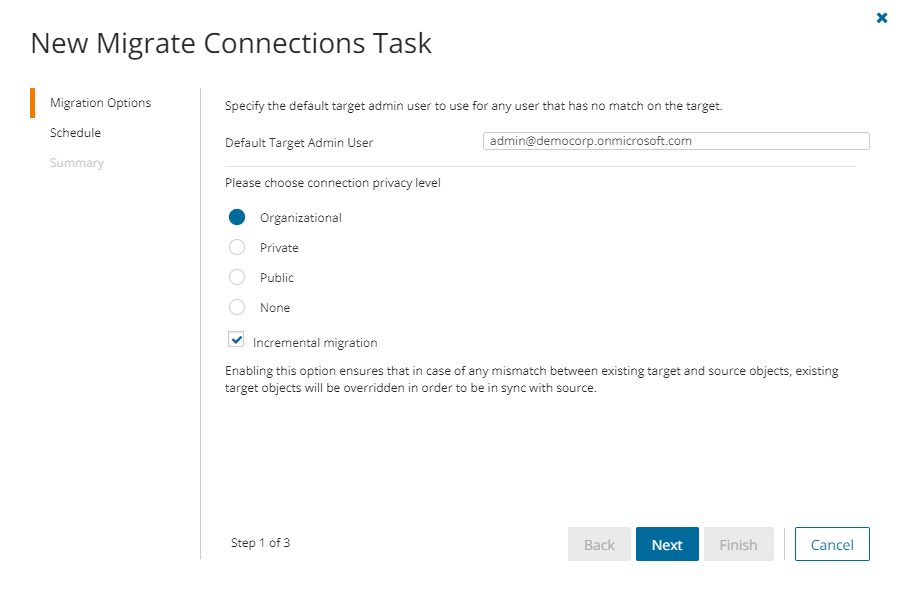
    1. Default Target Admin User - Specify the default target admin user to use as the workspace owner when any workspace user has no match in the target tenant.
    2. Set workspace content permissions - select this option to resolve source and target permissions if there is a mismatch between existing content permissions. If this option is not selected, and the Default Target Admin User is not specified, the settings from the existing default target admin user will be used.
      • Add from source - this option migrates accounts from the source to the target that are not already in the target. Existing target accounts, groups, and roles remain unchanged. If the source accounts are mapped to target accounts that already have workspace permissions, then those target accounts will not be updated.
      • Update from source - this option migrates only mapped accounts with workspace permissions to the target. The target accounts, groups, and roles are updated to match the source permissions. Any existing permissions on the target that do not exist in the source are ignored. Permissions of other accounts in the target workspace that are not mapped to a source account are not updated.
      • Synchronize with source - this option updates target accounts, groups and roles to the source permissions. Existing account permissions that are not in the source are removed. After synchronization, target permissions of mapped accounts are the same as the source.
  11. Schedule
    1. Choose from one of three options to schedule the task. The scheduler will be activated after you complete the task wizard.
      • Run now - task runs immediately.
      • Run later - task must be started manually.
      • Schedule - task will be started at a future date and time entered in the corresponding calendar field.
      • Priority - select a priority from the dropdown for the objects scheduled for migration with this task . Values are: Highest, High, Medium, Low and Lowest. The default priority is Medium. If the system is busy, the objects are queued (Migration state = Queued). When the system accepts new migration work, objects are taken from the queue based on the assigned priority and age in the queue.
    2. Click Next.
  12. Summary
    1. Save task settings as a migration template - select this option to save the settings in this wizard as a reusable migration template.
      1. Migration Template Name - specify a name for the template. If you have changed the settings of a preselected template, specify the same template name to apply the changes to the template when you complete the wizard. All saved templates are displayed in the Templates tab.
    2. Verify the task specifications as described below:
      1. Name - name of the task. The default name is Migrate Workspace Objects. You can specify a custom name.
      2. Default Target Admin User - name of the admin user specified for this task.
      3. Incremental migration - indicates whether or not this option has been selected.
      4. Scheduled start - date and time when the task will start. Now indicates that the task will start immediately.
    3. Click Back to revise or review a previous step or click Finish to complete the task wizard and start the task as scheduled.
  13. When the task completes, the Workspace State column in the Workspaces list is updated.

Reviewing the Migrate Workspaces Task

  1. Open the Tasks tab.
  2. Select the Workspace migration task that you want to review.
  3. In the task details pane that opens, the information presented is as described below:
    1. Task Status - current status of the task.
    2. Type - Type of the task. The type is MigrateWorkspaces.
    3. Created - Date and time when the task was created.
    4. Modified - Date and time when the task was last updated.
    5. Last Operation - The action that was most recently performed in this task.
    6. Schedule - Date and time when the task started. Now indicates that the task started immediately after the task was created.
    7. Priority - the priority of this task.
    8. Events (number) - Number indicates the count of events that the task encountered. The values indicate the type of the events and the event count for each type.
    9. Workspaces (number) - The number of Workspaces that were selected for migration and the number of Workspaces passing through the various states from Migrating to Migrated.

Reviewing the Migrate Workspaces Task Events

  1. Open the Tasks tab.
  2. Select the Workspace migration task for which you want to review the events.
  3. In the task details pane that opens, click Events (number). The Events tab opens with a filtered list of events for the selected task.
  4. Select an event that you want to review. In the event details pane that opens, the information presented is as described below:
    1. Object - name of the Power BI object if applicable.
    2. Task - name of the task.
    3. Time - date and time when the event occurred.
    4. Summary - a descriptive statement about the event if an exception occurs.


Troubleshooting

Before you contact Quest support is recommended to prepare organization ID, project ID and task ID

To find Task ID and Project ID

In Events grid right click task link in Task Name column and select Copy link address. Copied link contains the Task ID and the Project ID.

To find organization ID

If you are trying to find an existing On Demand organization ID that another users have created, make sure that they have added your email address under Access Control > Administrators.

  1. In case you are Administrator of the organization, click your account in top right corner to open the account related menu.
  2. Click the organization name. You can see Organization ID in Manage Organization dialog.

Special Cases

Table 1: Special Cases

Feature Event Root cause Workaround
Microsoft Teams Migration Cannot find the group '{Group ID}' on the source. Try to check whether the group exists using PowerShell cmdlet 'Get-UnifiedGroup' as described in the documentation Group associated with the team not found

Use the following PowerShell script and the group ID provided by the error message to get the group name:

Install-Module PowerShellGet -Force Install-Module -Name ExchangeOnlineManagement
$UserCredential = Get-Credential
Connect-ExchangeOnline -Credential $UserCredential
Get-UnifiedGroup -Identity "b1552bc6-f932-4ac9-a4f2-24a5d2da2eed" | Format-List DisplayName,Id

If this is a source group, fix your source data before proceed for migration.

If this is a target group, check if this group exists in target. If this group exists, please contact our support. If this group doesn't exist, remove this group associated team from target, and rerun provision and migration.

Finalizing the Migration

Congratulations! The migration is complete.

If you have created a temporary Migration Service account for the migration as described in the Consents and Permissions topic, it is time to remove it because this account has elevated permissions and could pose security risks.

Removing the temporary account from Teams

The temporary Migration Service service account that was added to all source and target teams respectively as members or owners, can be removed. To remove the temporary Migration Service service account from the teams and groups use the task wizard described below:

  1. Log in to Quest On Demand and choose an organization if you have multiple organizations.
  2. From the navigation pane, click Migrate > Projects to open the My Projects list.
  3. Create a new project or open an existing project.
  4. Click the Teams tile, or click Open from the Teams tile to open the Teams dashboard.
  5. Select the Teams tab and select List View if not already selected.
  6. Select the teams from where you want to remove the Migration Service service account.

    TIP: Use filters, search or collections to quickly navigate through the list of teams.

  7. Click More > Remove Migration Service Account. The Remove Migration Service Account wizard starts.
  8. Description
    1. This task must run last after all migration done. After running, ODM can no longer access the Team for updates.
  9. Notification
    1. Send notification email once the task is completed - select this option to send a notification email when a discovery task completes.
      • Only in a case of failure - select this option to send the email if the discovery task fails to complete successfully.
    2. Recipients - enter the email address of the recipients of this email. You can specify multiple recipient email addresses separated by semicolon.
    3. Click Next.
  10. Schedule
    1. Choose from one of three options to schedule the task. The scheduler will be activated only after you complete the task wizard.
      • Run now - task runs immediately.
      • Run later - task must be started manually.
      • Schedule - task will be started at a future date and time entered in the corresponding calendar field.
    2. Click Next.
  11. Summary
    1. Verify the task specifications as described below:
      1. Name - name of the task. You can specify a custom name. The default name is Remove Migration Service Account.
      2. Source tenant - name of the source tenant in this project
      3. Target tenant - name of the target tenant in this project.
      4. Scheduled start - date and time when the task will start. Now indicates that the task will start immediately.
    2. Click Back to revise or review a previous step or click Finish to complete the task wizard and start the task as scheduled.

Appendix A: Using PowerShell

You can use the On Demand Migration PowerShell API to interact with objects in your On Demand Migration environment. The PowerShell cmdlets allow you to perform tasks, such as account discovery, mail migration, OneDrive migration, task and event management in a PowerShell scripting environment.

The ODM API is available for install or download from the PowerShell Gallery.

NOTE: Usage of the PowerShell Gallery requires the PowerShellGet module to be installed on your computer. The module is normally installed with operating system, but may need an upgrade to the latest version. For more information, see How to Install PowerShellGet.

In this topic:


On Demand User Role Requirements

User must have the Migration Administrator role to access and run any of the On Demand Migration PowerShell commands. On Demand ships with this role. See the On Demand Global Settings Current User Guide for more information about setting up roles.

Deploying the ODM PowerShell API Module

The ODM PowerShell API module must be installed or download from the PowerShell Gallery.

Searching in PowerShell gallery
Find-Module OdmApi -Repository PSGallery
Installing the module from the PowerShell gallery
Install-Module OdmApi -Repository PSGallery
Downloading the module from the PowerShell gallery (without installing it)
Save-Module OdmApi -Repository PSGallery -Path "C:\temp"

Connecting to the ODM service

Before you can use the ODM PowerShell cmdlets to interact with your ODM environment, you must connect and authenticate your access to your ODM host. The credentials you use must be granted a role with sufficient privileges to work with the On Demand Migration services.

Connecting to the ODM service - Interactive mode

The Microsoft Account Authentication Workflow requires user interaction for the initial authentication with Microsoft. When Microsoft Account authentication is used all authentication is handled via Microsoft and the user’s Microsoft Entra ID. This type of authentication supports MFA and is fully controlled by the user’s Microsoft Entra ID Conditional Access Policies. Any password and lockout policies are also managed directly by the customer through their Microsoft Entra ID.

  1. Run the following command to connect to your ODM Service. The default region is US.
    Connect-OdmService

    To connect to a specific region like Europe, run the command Connect-OdmService -Region EU. The region value can be set in the OdmApi.psm1 file by editing this line: [string]$Region = 'us'. For example to set default region to Europe replace the line to [string]$Region = 'EU'.

  2. This command will redirect the user to the Microsoft Authentication workflow to authentication against the user’s Azure Active Directory. In the authentication dialog, enter the credentials of the On Demand account (not the tenant account)

    If MFA is enforced, users will see an additional window

Connecting to the ODM service - Unattended (or Headless) mode

The Microsoft Account Authentication Workflow requires user interaction for the initial authentication with Microsoft. This type of authentication doe not supports MFA. It is used primary for work or school accounts. The Tenant ID is required.

Connect-OdmService  -Username "admin@democorp.com" -Password "P@ssword!" -TenantId "81f2b32e-c198-44fd-99d4-109665c16f34"


Example: Selecting the organization and migration project

Get the organization id
  1. Log in to Quest On Demand.
  2. From the Choose an organization page, note the organization id.

- or, if you have already selected an organization -

  1. Click the logged in user name from the top right corner of the page.
  2. Click the Organization Name from the drop-down to open the Edit Organization page. Then make a note of the organization id.
Connect to the organization

In your PowerShell session console, enter the command:

Select-OdmOrganization -OrganizationId '6a079d6e-e98a-475b-acba-8b08e9caa430'
Select a migration project

Once connected to the Organisation, we need to connect to the Project, the project GUID is required, this is obtained from the ODM GUI or running the command Get-ODMProject which will list all past and present projects associated with the ODM organization, an example of this command is below:

Get-OdmProject | fl
Name                          : New Migration Project
Description                   : Migrate Sales division assets
SourceTenantDefaultDomainName : sourcecorp.onmicrosoft.com
TargetTenantDefaultDomainName : targetcorp.onmicrosoft.com
Id                            : Elf813YBfQYAK6Q42Kun
Connect to your project

Identify the project Id and connect to the project using the following command.

Select-OdmProjectWorkload 'projectworkloadId'


Getting Help

OdmApi module supports online help via Get-Help command. Any command syntax and examples of usage can be displayed by the Get-Help command.

Examples:

Get-Help Connect-OdmService

Get-Help Connect-OdmService -Examples

Get-Help Connect-OdmService -Full


相关文档

The document was helpful.

选择评级

I easily found the information I needed.

选择评级